- BOAT OF THE YEAR
- Newsletters
- Sailboat Reviews
- Boating Safety
- Sailing Totem
- Charter Resources
- Destinations
- Galley Recipes
- Living Aboard
- Sails and Rigging
- Maintenance
- Best Marine Electronics & Technology

Upgrading a Sailboat Head
- By Ben Zartman
- Updated: January 19, 2021
It has been our pattern ever since we began cruising on Ganymede , a home-finished Cape George 31 cutter, to take the already simple systems we began with and simplify them further. And so, the motorcycle battery first used to start the outboard got chucked in favor of pulling the cord; the fuel now lives in a 5-gallon Mexican fabric-softener jug with a hole cut in it for a hose (it actually leaks and smells less than the OEM tank); the hand pump for lamp oil is in a junk heap in a Colombian boatyard. The list goes on: Suffice it to say that nearly everything is simpler and has fewer moving parts than when we began. Only one boat system, in fact, has become more complicated, and that was by necessity.
For the first several years of our cruise, when we were exploring Central and South America , in some of the places we explored, our sanitation strategy—the tried-and-true rubber bucket—was positively space-age. And in locales with more-modern conveniences, the strict injunction to use designated pump-out stations was made ironic by the complete absence of such facilities. I look forward to the day when every harbor has a pump-out facility, and coastal cities no longer dump sewage straight into the water. But these are the times we live in, and that was the situation in the spots where we cruised.
Returning to the United States, however, presented a new challenge. Here there are designated pump-out facilities, and the dutiful sailor will want to avail himself of them, for the good of everyone. And so, seeing we were going to cruise in home waters for some time, I installed a holding tank and a porcelain toilet. There being nowhere else to put it, the holding tank went in the tiny head cubicle, in the place where we used to hang foul-weather gear and stash the laundry basket. The biggest advantage of having it there is that there’s a very short run of hose from the head to the tank—the plumbing doesn’t pass under people’s bunks or through any bulkheads and is 100 percent accessible. Another advantage is that the 20-gallon tank takes up so much room that on really rough nights, there’s no chance of falling off the toilet because you’re wedged in pretty tight. It might not be comfortable, but who goes to sea for that anyway?
I have always wanted a Wilcox-Crittenden “Skipper” head, the one with a cast-bronze body and oh-so-elegant pump handle. Sadly, they’re no longer made, and if they were, there simply wouldn’t have been room on our boat. My No. 2 choice was the Lavac, largely because it seems the simplest, most trouble-free marine head out there. Also, being able to mount the pump separately from the toilet was necessary due to the space restrictions I’ve already mentioned. I mounted the pump on the bulkhead above, which was perfect for the children, who could stand on the closed lid of the head and pull on the handle to their hearts’ content.
Now, however much space a 20-gallon holding tank uses up, it’s not really all that big when five people are contributing, and we had to find a pump-out station pretty frequently. Also, since the system was closed—there were as yet no through-hulls at all in Ganymede —the only way we could self-empty the holding tank was to adapt a spare hand pump to the deck fitting, drop a hose over the side, and pump overboard that way. Definitely not for the faint of heart, and too acrobatic to do out at sea in any kind of weather. Clearly more plumbing was needed.
I had avoided putting any through-hulls at all in Ganymede when I built her, for the simple reason that I dislike and distrust them. However well-made and well-installed, there’s no denying that they make for a weak link below the waterline, and hose connections with clamps are a common point of failure and raise the potential for sinking. But there was no denying that some sort of outlet would be needed if we wanted to cruise offshore or in foreign lands again, and a water inlet would be nice as well: So far we had been pouring water into the bowl in order to flush.
Still, I couldn’t bring myself to use regular bronze through-hulls and seacocks. I mean, a sailor has to sleep at night! Instead, I ordered some lengths of thick-walled fiberglass pipe from McMaster-Carr. Then with the boat on the hard, I cut a hole for the larger-diameter pipe on one side of the bilge sump, and a smaller hole on the other side. Now the inlet and outlet sides would be separated by the entire full keel of the boat; there was no chance of sucking back in something that had just been pumped out.
Since fiberglass tube isn’t flexible, I took some careful measurements with T-bevels to ensure that the pipe joints would go where I wanted them, then cut the pipes and glued the joints back together with thickened epoxy glue. I was careful to make the outlet pipe have the straightest run, without unnecessary twists and turns. The inlet pipe crossed over from the opposite side of the bilge before turning up to parallel the other one.
It took some careful dry-fitting and fine-tuning before I was comfortable with the setup, but once it all looked good, I put the large pipe in place and held it there with some fiberglass pipe straps I’d made using the pipe itself as a mold. And just for good measure, I squeezed some glue onto the straps so they’d never come off the pipe. Then, making sure the pipe and the hole in Ganymede were thickly coated in thickened epoxy as well, I tabbed the pipe firmly to the inside of the hull with some scraps of biaxial carbon fiber.
It didn’t take long, and before the first phase was cured, I fit and tabbed the inlet pipe in a similar fashion. Because it spans a large distance inside the bilge sump, I glued a support strut halfway along, just in case someone were to drop something really heavy down there, though that would require some serious acrobatics.
On the outside, all I had to do once the glue dried was sand the protruding pipes flush with the hull and make sure I got antifouling up inside as far as the brush could reach.
Ganymede ’s bilge sump, though easily accessible for cleaning and inspection, has never been pretty. It just wasn’t on my list of things to beautify during the construction. But now that there had been so much grinding in there anyway, it seemed a shame not to tidy it up a little. And so I sanded—with 80-grit by hand wherever a machine couldn’t reach—then primed and applied gray Bilgekote. It still isn’t pretty, I’ll admit, but it’s all a uniform color, and it’s got less dirt-trapping hollows. It’ll have to do.
At the upper end of the pipes I had installed Marelon ball valves—something I might not have been comfortable with if they were beneath the waterline. But as it is, they’re a couple of feet above it, which means I can take them off, with the boat in the water if necessary, to service or change them. I could probably have done without them entirely, but I wanted an easy means of sealing the pipes in case the siphon breaks failed. You never can be too careful with plumbing.
As with everything on a small boat, it took some careful arranging to get all the hoses, valves, siphon breaks and other fittings to fit peaceably together. Since Ganymede hadn’t been designed with all that plumbing in mind, there was nowhere to hide it out of sight—it’s all just out in the open, looking more as though it grew there, vine-like, than was placed on purpose. The advantage of that, though, is that the Y-valve can be operated and the filter changed without grubbing about in a dark cupboard, and all maintenance is easily done without the usual contortions.
Well, there it is: The one boat system on Ganymede that has become more complex rather than simpler. And while I grudge the expense and the space that it all takes up, I must admit that a porcelain toilet is far more classy and convenient than the old rubber bucket. So no, I don’t regret it—I just hope the rest of the world catches up and installs pump-out stations soon.
Boatbuilder and writer Ben Zartman is a frequent contributor to CW
- More: head , print dec 2020 , systems
- More How To
How to Protect Your Spars from Corrosion
Sailing totem refit series: the forward head makeover, fatty goodlander: dealing with chafe while cruising, how to rig everything in your favor, one mile offshore with christian williams, winds of change.
- Digital Edition
- Customer Service
- Privacy Policy
- Email Newsletters
- Cruising World
- Sailing World
- Salt Water Sportsman
- Sport Fishing
- Wakeboarding
Selecting A New Marine Toilet / Head (Complete How-To Guide)
We can all agree that space, power and water are all major factors in our boats. Which is why selecting a new marine toilet is a crucial decision. No one wants to flush their hard-earned money down the drain. For many boaters it’s daunting trying to figure out which is the right one to choose. To help you I wrote this how-to guide for selecting a new marine toilet.

This article covers toilets types, common installations, maintenance and marine sanitation laws. By the end, you will learn everything you need to know to pick the right marine head for your vessel.
Want to skip to a particular section? Feel free to click the navigable table of contents to do so. Alright, let’s get started.
Outdoors Informed is reader supported. We independently research and rate every product. When you buy through a link on our site, we may earn an affiliate commission. However, our opinions and evaluations are our own. Outdoors Informed does not accept free products from manufacturers. Learn more.
Related: Top Electric Marine Toilets In 2024
- Darren Coleman
- Last Updated: 01/19/2024
What Is A Marine Toilet?
A marine toilet or “ head “, is a special type of toilet that allows for sanitary conditions out at sea. Its operation is the opposite of a traditional toilet you find on land. A traditional toilet is a terrible idea for a boat. This is because the water would spill from the toilet bowl as the boat rocks. To fix potential spillage a marine toilets’ bowl stays dry until its in use. In it is in use a pump pushes water into the bowl to facilitate sanitation.
Current marine toilets come in a variety of types, sizes and shapes. Plus there are many variations of water sources, controls, and flush controls available.
Marine Laws For Selecting A New Marine Toilet
Next, it’s important to understand the basics of marine sanitation laws. Marine sanitation laws differ slightly for boats operating in Canadian or US waters.
In both US/Canada, vessels with permanent installed toilets must use a Marine Sanitation Device (MSD) onboard. The MSD has to either store waste until it’s transferred ashore. Or reduce coliform counts to a low level to discharge into waters without posing a health hazard.
3 Types Of Marine Sanitation Devices or MSDs:
- Type I MSDs discharge chemical treated effluent. With a fecal coliform bacterial count not greater than 1000 per 100 milliliters of water. No visible floating solids.
- Type II MSDs discharge chemical treated effluent. Having a fecal coliform bacterial count of less than 200 per 100 milliliters. As well as, suspended solids not greater than 150 milligrams per liter.
- Type III MSDs are devices designed to store sewage until it’s pumped out at a pump-out facility. Or discharged outside the boundary of three miles from shore. Known as “holding tanks”.
To help you decide on the best MSD for your vessel it’s vital to consider where you will discharge sewage.
Marine Sanitation Laws For Discharging Sewage:
Below are the marine laws you must follow to properly dispose of raw sewage on your vessel:
- Boating over three miles from a coastline . In this area it’s legal to discharge raw (untreated) waste overboard. You can do this either by emptying direct from the toilet or from a holding tank. I prefer a dual system design that allows dockside pump-outs and discharging offshore.
- Operating inside the three–mile limit to a coastline. Here it’s illegal to dump raw sewage unless it’s treated by an onboard treatment device. Such as a Raritan Electro Scan (Type I or II MSD). This uses electricity to create chlorine from saltwater which disinfects the raw sewage.

* Note: USCG approved Type I Marine Sanitation Devices (MSDs) are not legal in Canada. An example of a popular Type I MSD is the Raritan. Yet, type II MSDs are legal in Canada, except in designated sewage areas as defined in the Regulations .
- No Discharge Zones (NDZ) are all non-navigable inland freshwater lakes and Great Lakes. Overboard discharge in NDZs like in a reservoir are illegal and subject to fines. Whereas any navigable interstate waterways (except special NDZ zones) allow for treated discharge.

If you use a Y-valve (common in saltwater) in your sanitation system, be aware that some waters have special rules. These areas will require a special locking mechanism for the Y-valve. This mechanism will lock the valve and flow toward the holding tank.
More and more coastal areas are becoming NDZs. Like in Michigan, New Mexico, Rhode Island and Vermont where all waters are now, no discharge zones. Making the case for dual sanitation systems to ensure versatility throughout the US.
Five Types Of Marine Heads
For most vessels there are four distinct types of marine heads. Each with a different method of flushing away the waste. These are the common types of boat heads:
- Porta-Potty (Portable Boat Toilet)*
Manual Pump Head
Electric head, vacuflush head.
- Composting Marine Toilet
* In some jurisdictions, for power boats a Porta-Potty doesn’t qualify as a marine head.
Porta-Potty
A Porta-Potty, sometimes called a cassette toilet is the most basic head installation to deal with onboard sewage. This type is common for smaller vessels that don’t have the space for a full sanitation system. It has both a refillable water supply and holding tank incorporated into the actual head. There is no permanent plumbing system in a portable toilet system, the head does all the work with a caveat.

To operate it, you do your business, then actuate a hand/foot-operated pump. This both pumps water into the bowl and opens a trap door system that lets waste fall into the lower holding tank.
Advantages for this type are the space it saves, it’s near impossible to clog and the low initial cost. Plus if you add a chemical deodorizer to the holding tank, it’s virtually odorless.
The caveat for a portable toilet is when the holding tank is full. It’s not an enjoyable experience to have to remove the tank on shore and dump the holding tank.
The manual pump head abandons portability as it uses a permanent plumbing system. This type of head uses a pump, hoses, valves and a larger holding tank to store waste. I’ll further explain waste storage options later in the article. Using an installed holding tank means you need to empty waste at a marina’s pump-out facility. This is more civilized than hand emptying a Porta-Potty tank.

A manual pump head like a Jabsco, consists of the bowl, a hand-pumped raw-water intake, and a discharge hose. The output hose flows to the holding tank , then flows to either a pump-out hose or self-discharge hose. Depending on your waste storage system, there might be a macerator too. This chops up waste to smaller bits to reduce clogs in the waste hoses.
To use it, once you make a deposit, you move the pump up and down by hand around a half dozen times. On the up stroke of the hand pump, the system draws water into the bowl. Next, on the down stroke the system pushes the waste out through the discharge hose.
The big advantages of this head is that it’s repairable, easy to maintain and quiet to use. Another great function of this type of head is the ability to switch to either wet or dry flushes. A dry flush is when you set the switch to not allow fresh water to enter while pumping. Dry flushing is for fluid only waste, to help reduce the volume of liquid filling the waste holding tank. Which is a genuine concern for boats with a small holding tank on board.
Shopping Considerations For A Manual Marine Head
- Direction Of Pump Handle Throw. A horizontal throw (back and forth) tends to be less tiring than a vertical throw (up and down). Expect horizontal throw pump handles to cost more than vertical throw versions.
- Seat Height & Sturdiness . Ensure the height of the seat is at a comfortable height for yourself. Next pay attention to the material durability of the seat and its hardware. Using the head in rough waters puts stress on the seat hinges. So look for beefy hardware that won’t snap and dump you off the seat before you finish.
- Larger Joker Valve. This rubber valve is what the waste passes through during each hand throw of the pump lever. A bigger valve size means a lower chance of clogging. Bear in mind, a faulty joker valve can permit water leakage into the sink in rough water. Keep a close eye on the component.
- Ability To Rebuild Toilet. Marine toilets tend to need rebuilding every couple of years depending on amount of use. Look for brands that offer quality rebuild kits and instructions.
- Toilet Weight. If you are upgrading from a Porta-Potty it’s important to know that a manual head will add about 22 pounds (9.98 kg) of weight.
An electric head is an improvement of a manual head because it replaces the need to hand pump the flush. You either replace the manual head with and electric model or upgrade the existing head. To do so you need to add an electric pump, flush switch and a 12 volt circuit to the compatible system.

This design uses an electric pump to create suction to pull in water and push waste out from the bowl. Inside the pump contains a macerating function that grinds up waste and paper. Which reduces clogging of the output hose to the holding tank or overboard, if you are offshore.
Power consumption of an electric head is low due to the quick speed of the flush, as most finish in under 30 seconds. Yet, the toilet will use a brief load burst of between 20 and 30 amps. Thus, you should consider adding a separate circuit breaker for an electric head.
To operate this type, a user only has to engage a button for the duration of the flush. For guests that aren’t used to marine sanitation this type of boat toilet is great.
Keep in mind that this design is quite noisy during a flush. Due to the sounds from the electric macerator and pump. So night flushes may annoy guests sleeping next to the bathroom. Another consideration when shopping for this type of head is access to the moving parts. This head does need maintenance, if the moving parts aren’t accessible expect headaches. The biggest issue though, is if the boat losses power the toilet pump motor losses flush function.
What is a Vacuflush head? As it’s name suggests, a Vacuflush uses an electric vacuum pump to keep a constant vacuum on the waste line. It uses a freshwater input to cut odor and calcification build-up in hoses. Calcification can happen due to lake and seawater organisms that die in the hoses. This head also uses very little water for operation compared to the 0.75 gallon (2.84 liters) the manual or electric heads use. Plus it uses much less power consumption at 3-7 amps whereas electric uses about 10-15 amps.

How Does A Vacuflush System Work?
1. Vacuum is constant in the system at all times. Before sitting down, you need to add water in the bowl. Most need you to raise the foot pedal or lever to do this.
2. Sit down and do your business. You flush by pressing down on the pedal/lever. This will release the vacuum pressure stored by the system. This change in pressure inside the vacuum tank activates the vacuum pump. Resulting in the bowl clearing in an instant moving waste through the vacuum pump . Pushing it at high speed through the output pipes to the holding tank.
3. Once you release the flush pedal/lever, you recreate a vacuum tight seal. The vacuum pump continues to run (its noisy) until recharging the vacuum level in the system. Recharging takes about one minute, depending on how long you held the flush.
A Vacuflush marine head is typical for larger power yachts for many years. They work well but are very expensive to retro fit and repair compared to the other types.
Composting Head
The composting head is a bit of a newcomer to the marine-toilet market. Two important install considerations for this type are the footprint and bulkhead clearances. If you have the room though with this type there are no hoses or holding tank need either.

Another benefit over other systems is it doesn’t need seacocks or through-hulls. The waste system works by separating the solid and liquid waste. Inside it channels liquid waste into a single tank and solids into a composting tank. In a typical design there are two small holes in the front of the bowl for liquids. Then a large center hole for solids. Both tanks sit under the head to save space in the hull, which is the other big bonus of this style of boat toilet.
Composting Toilet Operation
To use this type of head it’s best to do your liquid or solid business sitting down. Expelling liquids sitting down is to ensure you hit the small liquid only holes. For solids activate the handle on the side to open the flapper to the compost bin. After you finish, close the flapper to seal the compost bin. Next turn the big crank handle a few times to mix the compost medium and the solids. An integral vent fan keeps the compost dry and helps to quicken the process.
Although boaters do feel a composting head is a bit of a learning curve, when set up and maintained its odor free. Plus you’ll never have to worry about clogged hoses, finding or paying for pump out stations again. There are almost no moving parts, almost nothing that could break, and next to no maintenance. You just need to clean it. The downside is you will have to come close to your waste during disposal but that’s not a bad trade off.
Where Does Toilet Waste Go On A Boat?
Dealing with toilet waste on a boat is much different from on land. As mentioned in the MSD section of this article, where waste goes depends on where the boat travels. Small vessels travelling close to shore tend to use the Porta-Potty or a composting head. Whereas a typical waste storage system for an offshore boat is a toilet plumbed to a holding tank. A holding tank system can range from simple and direct, up to complicated but versatile in use.
Below are explanations of how boats deal with and store toilet waste on a boat using holding tanks.
Porta-Potty & Composting Waste Systems

As mentioned in the type of marine toilets section, this is the solution for small boats. Owners of “weekender” boats need a way to hold small amounts of waste but don’t have space for a permanent head. Thus, many opt for the Porta-Potty waste option because it can hold around six gallons. In a cassette toilet the waste gets stored in two mini tanks under the head.
Boaters like that its easy to use and doesn’t clog. What stinks about this setup though is how close you come to your waste. As you have to take is on shore to dump it when it’s full.
Direct Discharge Waste System

A direct discharge waste system is only for vessels that travel far offshore. In this marine system after waste exits the head unit it flows through a hose and out into the water. If you plan to travel in waters under 3-miles (4.83 km) offshore this isn’t the system for you. Not only is dumping raw sewage in our waters gross, inside the 3-mile limit is illegal too.
Dumping out waste inshore near beaches is harmful to many people. Including swimmers, divers and people who enjoy eating local fish/shellfish.
Another consideration is if you’re boating in foreign countries (e.g. the Caribbean). Many of these parts of the world don’t have waste pump out facilities. So, it’s best to discharge your waste overboard while underway in deep waters.
Seacocks and Thru–hulls
In most head systems, you need both a freshwater intake and black water output. To let the passage of fluids you need to drill holes through the hull with special fittings to stop sinking. A thru-hull is the fitting that accepts hoses and fittings to allow fluids in and out of the hull. A seacock is an attachment to the thru-hull to provide shut-off protection to the hose attached to it.
Most boats use a 3/4″ intake seacock and thru-hull for seawater flushing. For overboard discharge they use a 1 1/2 to 2″ seacock and thru-hull. Bronze seacock fittings are the most traditional due to their strength and durability. For metal hulls boats use Marelon fittings for their non-conductive, non-corroding nature.
Hose For Marine Plumbing Systems
Hose it is typical material used to transport fluids in hull plumbing systems. Keep in mind, sanitation hoses of any material will stink overtime if sewage sits inside them. While corrugated hoses and plumbing traps are cheap they will restrict waste flow. Whereas smooth walled hose or pipe promotes easy flow of fluids. If you have the space, try using a rigid hose/pipe material like PVC for long horizontal/sloped runs. This material traps odors and is great for flow.
Holding Tank Waste System Without Direct Discharge

Adding a holding tank allows boaters to travel under 3-miles from shore and use their marine head. The holding tank stores the waste inside the hull until you get to the marina or pump-out facility.
It uses the same freshwater seacock to the head unit but pushes waste to the tank. From the tank a macerating valve and pump-out hose finish the system. The best material for a holding tank is polyethylene (PE). This is because it’s lightweight, clean, non-permeable and won’t stink. Don’t use metal, most novices forget about the potency of urine as a corrosive liquid.
Waste Macerating Valve
A macerating valve in a marine waste system is like a garbage disposal for solid waste. The macerating valve turns on when you need to pump-out and empty the holding tank. If it doesn’t operate as expected, pumping out is difficult. Ensure to test this part of your system before hitting the water to ensure its working.
Holding Tank Waste System With Direct Discharge Option

This waste storage set up is the most versatile if you have the space in your boats’ hull. A common installation for this system is to place a “y-valve” between the toilet and the holding tank. Another is to install it after the holding tank. Using this system provides you with two discharge options. Either to direct waste overboard when you are beyond the three–mile limit. Or, if you are inshore, use the holding tank and pump out at the marina.
Marine Waste Y-Valve
A y-valve, also called a waste diverter valve, controls the flow of onboard waste. It diverts waste after the marine head into an onboard holding tank or overboard where it’s legal to do so. There are two installation options:
Upstream of holding tank:
Waste gets direct discharged in sea or sent to the holding tank. Any waste sent to the holding tank gets removed via a single pump-out hose.
Accidental discharge if valve is faulty. Some locales authorities don’t approve putting a y-valve upstream of a holding tank.
Downstream of holding tank

The waste get pushed through a single hose to holding tank. Next it moves into the y-valve which dumps into a hose to the water or an upward hose for pump-out. This makes local authorities happy and prevents accidental discharges.
- Downsides Are Clogs:
The caveat with this setup is if the hose between the head and tank clogs. Clogs make doing maintenance a horrific experience.
User Tips For Marine Toilets
- Prevent holding tank odors by ensuring the holding tank vent hose is clear. Or if you have the room increase the hose size of this vent to promote odorless aerobic bacteria in the tank. If you can’t increase the vent size on can’t vent at all, try a tank treatment to reduce odors.
- Add vented loops into hoses of you waste system. Boats often sink due to dangerous backflow siphoning in marine heads. To prevent siphoning, install a vent loop above the waterline against the bulkhead.
- Only use biodegradable toilet paper !
- Use it in moderation: If it is yellow, let it mellow, if it is brown, flush it down.
- Follow marine laws: The fines for overboard discharge of untreated sewage are rising. Get acquainted with the local pump-out facilities and personnel. One part bleach to 10 parts water should kill any bacteria in any cleanup.
- Before you haul out the boat for storage. Flush, clean, and pump dry your holding tank. Out of the water, drain any water inside the toilet to prevent freeze-up damage during winter storage.
Finishing Up: Selecting A New Marine Toilet
Now you have the information to select a new marine toilet. Installing a new marine head is within the skill-set of a do-it-yourselfer. Although, if you’re a novice or upgrading from a manual head to a vacuum type. It’s in your best interests to consult with an experienced marine plumber.
Thank you for trusting us at Outdoors Informed to aid in your research. We like to help so you spend less time indoors and more time doing your business out on the water.

Latest Articles
6 best ballast bags for your boat: surfs up, ballast bags guide: enhance boat weight for wake surfing.
- New Sailboats
- Sailboats 21-30ft
- Sailboats 31-35ft
- Sailboats 36-40ft
- Sailboats Over 40ft
- Sailboats Under 21feet
- used_sailboats
- Apps and Computer Programs
- Communications
- Fishfinders
- Handheld Electronics
- Plotters MFDS Rradar
- Wind, Speed & Depth Instruments
- Anchoring Mooring
- Running Rigging
- Sails Canvas
- Standing Rigging
- Diesel Engines
- Off Grid Energy
- Cleaning Waxing
- DIY Projects
- Repair, Tools & Materials
- Spare Parts
- Tools & Gadgets
- Cabin Comfort
- Ventilation
- Footwear Apparel
- Foul Weather Gear
- Mailport & PS Advisor
- Inside Practical Sailor Blog
- Activate My Web Access
- Reset Password
- Customer Service

- Free Newsletter
Tartan 30: An Affordable Classic

Ericson 34-2 Finds Sweet Spot

How to Sell Your Boat

Cal 2-46: A Venerable Lapworth Design Brought Up to Date

Preparing A Boat to Sail Solo

Solar Panels: Go Rigid If You have the Space…

Leaping Into Lithium

The Importance of Sea State in Weather Planning

When Should We Retire Dyneema Stays and Running Rigging?

Rethinking MOB Prevention

Top-notch Wind Indicators

The Everlasting Multihull Trampoline

Taking Care of Your 12-Volt Lead-Acid Battery Bank

Hassle-free Pumpouts

What Your Boat and the Baltimore Super Container Ship May Have…

Check Your Shorepower System for Hidden Dangers

Waste Not is the Rule. But How Do We Get There?

How to Handle the Head

The Day Sailor’s First-Aid Kit

Choosing and Securing Seat Cushions

Cockpit Drains on Race Boats

Re-sealing the Seams on Waterproof Fabrics

Safer Sailing: Add Leg Loops to Your Harness

Waxing and Polishing Your Boat

Reducing Engine Room Noise

Tricks and Tips to Forming Do-it-yourself Rigging Terminals

Marine Toilet Maintenance Tips

Learning to Live with Plastic Boat Bits
- Systems & Propulsion
Dissecting the Desiccating Head
Ps embarks on an excretionary voyage into the world of alternative, ‘composting’ toilet systems..

Our first cruising boat had a conventional portable toilet. We didn’t like it, but we made peace with it, cruising for up to two weeks at a time. Using the best treatment helped (see PS September 2018, “Controlling Porta-potty Odor).
Our next boat, a PDQ 32 cruising cat, had a holding tank system. We replaced the hoses with low permeation types (see PS April 2012, “Marine Sanitation Hose Test,”), and used the best treatments (see PS February 2012, “Solutions for a Stinky Holding Tank”). As long as we maintained the head properly, it was just like home. We were fortunate to have accessible pump-out stations in our marina and cruising ground.
Then, we downsized to an F-24 trimaran. Like our first boat, it came with a conventional portable toilet, and we didn’t like that. My back was 25 years older, so carrying it through the cabin and up to the dock was annoying, maybe even dangerous. Smaller toilets (a weight I can actually lift) fill up in two days, making them impractical for us. Weight isn’t the only issue with a portable toilet. You have to take it home, dump it, clean it, top off the flush tank, and bring it back to the boat. For the past three years we’ve used WAG bags deployed in the empty portable head. Because we were day sailing, they were only for emergencies, and we could always charge the portable with water and chemical and use that if we felt the need.
Composting toilets are growing very popular, and we’ve tested a few (see PS November 2002, “Composting Marine Heads”). They reduce odor by separating the urine from the solids and then begin a composting process. We concluded that they worked well, but on sailboats they technically function as dry toilets not composting toilets. A true composting toilet, as defined by NSF/ANSI standard 41, Non-Liquid Saturated Treatment Systems, provides actual composting and will reduce coliform bacteria to <200 MPN/100ml. This takes months of holding capacity, venting, controlled temperature, moisture, aeration, and mixing, and a lot more space and power than any boat can afford.
DRY TOILET TYPES
Dry toilets, more accurately referred to as desiccating toilets, take a different approach, eliminating odor by separating the urine from the solids, and then drying the solids to form a dry crust. As it turns out, most of the odor is generated when urine and solids are mixed, and by separating them, they can each be treated to avoid odor.
Properly treated urine has no smell —amazing, but true—and you can’t smell dried dog poop until you step in it (see page 18 “Additives Fight Urine Odor”). Separation is accomplished using a separating toilet seat that funnels urine away into a separate container and away from the solid waste (see page 16, “DIY Desiccating Head Options”). Composting systems use a mixer to chop up and blend the solids with the absorbent, making a mess you hope will start to compost. Desiccating toilets can take several approaches. The C-Head dry toilet uses a gentle wave motion to coat the solids with absorbent, the result is more like a cat litter box with lumps than a homogenous mixture (see page 23, “Clever C-head Downsizes the Waterless Toilet System”).
Non-churn systems allow you to line the container or bucket with a bag, making for truly simple servicing; no mixer to pull out or work around, no waste to pour into a bag, leaving no possibility of spills. This is a considerable advantage if guests or multiple users may make a mistake, inadvertently peeing in the solid waste side.
If urine and solid waste are mixed, you’ll need to start over to prevent odors, and this is easier if you use a bag liner. The down side of the bag approach is that you will need to add absorbent after each use. Additionally, if you leave the boat for more than a day or a few, it is best to empty the bin, a bag makes that easy.
All of these dry “treatment” options that involve separating liquid and solid waste will allow you to cruise longer than you could with a conventional portable toilet. Even the smallest waterless toilet system can hold a week or two. The larger ones can go weeks without requiring a shore stop.
This convenience doesn’t come cheap. You’d think the few pieces of plastic required to assemble a desiccating toilet would cost less than a quality portable or inexpensive marine head, but in fact they are 5-10 times that price.
Fortunately, there are DIY kits that include key parts, like a molded plastic urine diverter, so your DIY project will have a finished appearance. Our F-24 had a tiny space allotted for the head, commercial units were too expensive and not the right shape, and having designed municipal waste treatment systems, including odor control, I thought would give it a go, from optimizing the treatment chemistry to building a supercompact DIY unit.
Composting is a misnomer for dry toilets used on boats. They are desiccating systems, like a litter box, and the waste is only dried. Every few days to few weeks, and anytime you leave the boat for more than a day or two, you should empty the bin.
For day and weekend use, we opted for the no-churn method and bagging the waste. Initially we used WAG bags (see PS September 2018). These are a double bag system, with a 1-mil inner bag and a 2-mil outer Ziplock bag, plus an absorbent to contain liquids. (We bought them without absorbent and used our own).
Because the urine and solid waste go in the same bag during standard WAG bag usage, and they are gelled but not dried, a sturdy bag system is required. However, using the PS dry toilet design, the bucket waste is very dry and didn’t even stick to the bag, so we switched to quality kitchen bags and double bagged for disposal, just to be safe.
Common sense says don’t use the small waste bin by the marina office or the garbage can near the dinghy landing for your toilet waste. Walk it to the main dumpster.
If you still feel guilty, consider that the EPA estimates that 1.5 percent of the domestic trash stream is disposable diapers. We are not aware of any specific federal regulation regarding small quantity waste disposal from desiccating or composting toilets.
You can, of course, transport your bagged waste home for flushing (in small ‘doses’ only), using for compost, or adding to the trash bins. Alternatively, you can skip the bags, get a second bucket with a lid, and consider the churn method (see C-head review, page 20). True composting is more complex, and will take 6 months on the average. Do not use the finished compost for food crops, because human pathogens are still possible. Control access and run off.
As for the urine, taking the jugs ashore is simple. Some marinas forbid the disposal of portable toilet waste, but they’re taking about the blue-treated mess from a conventional portable toilet. Yes, many users dump it over the side. However, this is forbidden inside the 3-mile limit and there really is a lot of nitrogen and phosphorous in there. At the very least, avoid poorly flushed harbors.
OBSERVATIONS
Physiology differs and some will find it more difficult to get everything in the right spot. Sometimes it helps to urinate first, somewhat forward on the seat, and then slide back as it becomes mission critical.
Start with about two cups of absorbent in the bag. Cover the solids with about one cup of absorbent first, before adding TP, and then another cup of absorbent after. There’s no harm in using more absorbent, it will just fill the bucket sooner, but you will soon learn that you need less than you think.
Alternatively, you can place the toilet paper in a separate resealable bag to save space in the head. Doing this will reduce the amount of absorbent needed and the desiccation will dramatically reduce the waste volume. We found that a 3-gallon bucket will last one person about 10 days, toilet paper and all, assuming the toilet is used exclusively. A 5-gallon bucket should easily last two people one week. If you dispose the toilet paper separately, it will last 2-3 times longer and smell slightly less because the absorbent is more effective at controlling odor. We tested both ways, and concluded it comes down to personal preference and needs.
Spray the urine diverter with treatment after each use. A spray bottle filled with 5:1 – 10:1 dilution of one of the odor treatments recommended in “Additives to Fight Urine Odor” (see page 18). The chute in the back does not get soiled and does not require cleaning. It is only there to prevent a mess in the event of a stomach bug.
Solid waste should not be left in the toilet if the toilet is not going to be used for more than a few days. Empty the toilet every week regardless of how full it is and leave it clean if you are going to be away. Really, there is little advantage to being able to store large amounts of waste in the toilet. It only means a more difficult process when emptying becomes inevitable. Compost the waste outside in a compost tower or discard it (see below, “Disposing of Desiccated Waste”). If it is wet it will stink; this is rule number one. The drier you keep it, the easier it will be to empty the bucket and keep it clean.
Venting can help, but generally is not needed if the container is sufficiently dry. Following that thread, we experimented with keeping a container of calcium chloride or silica gel adsorbent cylinders (see “High and Dry for the Winter,” November 2012) in the enclosure (but not in the bucket itself). Yes, it seemed to help, since the drier the absorbent and the deposits, the less potential for smell. But do not add desiccant (silica gel or calcium chloride) to the bucket itself; we are trying to pull water out of the bucket, not draw it in. This is why we want a cover material with good wicking characteristics.
CONCLUSIONS
Using any of the recommended urine treatments and bowl sprays, we experienced zero odor for at least 3 days, and greatly reduced odor for up to a week. There is no reason to leave the jug longer than that. Mill work shavings are our favorite solids media, but many things will work, according to availability and personal preferences. Placing TP in a separate bag reduces odor by improving coverage and reduces volume by several times, but it works either way. We let short-term guests do as they like; if they can separate the pee and the poop, that’s victory enough. Hanging a small pouch of a pool chlorine powder inside the rim also reduced odor.
We had low expectations when we started this little project, procrastinating for years. How could a bucket ever serve our needs, in other than the crudest sense? In fact, we were stunned by how efficient desiccating toilets are. It suits our daysailing and short-term cruising needs far better than any portable head ever did. Odor is nearly zero, use is simple, and clean-up back at the dock simpler and less unpleasant; just seal the a bag and pitch it in a dumpster, and dump the urine in any toilet. We can see no advantage to conventional portable toilets, other than economy. Hopefully, with increased demand prices will fall, since they are simple constructions.
Desiccating toilets may also be superior to holding tank systems for sustained cruising in areas, such as freshwater lakes and estuaries, where pumpout facilities are far between. Some advocates prefer desiccating toilets for all applications, but we still see merit in a well designed holding tank system for larger boats cruising longer distances.
Composting takes time and space. We tested Air Head and Ecolet (“Composting Marine Heads,” November 2002) and found them functional, efficient, and a good bit bigger than traditional marine heads. And although the composting process certainly gets a start, it won’t get far in a head that is in continuous use.
A first glance, the C-head looks like a gussied up seat-and-bucket, but in fact they paid great attention to design basics. Instead of a horizontal mixer that tears through the waste, breaking it up, the motion gently rolls the waste into the media, covering it and eliminating odor without making a mess. This makes the bucket easier to dump and to clean.
For daysailors, bags are less messy to use, but you can make a bag-ready conversion for daysailing by simply putting a 3.5 gallon in place of the 5-gallon bucket or by cutting out a half moon section of the rim of any 5-gallon bucket to accommodate the urine funnel.
Visit the C-Head web site for information and a full discussion of the relative merits of churn and churnless methods ( www.c-head.com/post/churning-vs-churnless-versions ).
As we have explained, the same process can be accomplished without churning, but it uses more media and the user will have to cover their waste after each use.
C-head sells far more churn than churnless models, but they do make churnless models ($35 deduction).
Bottom line: We found the C-head to be well-finished and sturdy, and we couldn’t think of anything about it we could improve. Simple is good. Price is $699 for the basic churn model.
RELATED ARTICLES MORE FROM AUTHOR

Composting Head Disposal Options

Yes, We Are Talking About Boat Bidets
Hi Darrell, thanks for the article. Could you offer a link or hint where I could follow up on “… there are DIY kits that include key parts, like a molded plastic urine diverter…?”
I am contemplating longer (> 2 nights) stays on my 1995 Hunter h23.5, which was originally equipped with a 2.5 gal. Dometic, similar to your Corsair.
Seems like maybe there was some info in the print magazine and that didn’t make it into this electronic version. ?
We’ve been using a Natures Head “composting” toilet on a Macgregor 26M for the past 8 summers. We live aboard for 2 months in Summer at a marina so aren’t using the Head daily. However we’ve found the toilet works well. It’s solid capacity for two of us is around 17 days of use. We’ve been out sailing for up to 10 straight days and never experienced any odours. We use Coir ( coconut husks) as the desiccant. We vent it to a nicro solar vent. Toilet paper is bagged not put in the toilet. Clean up/emptying is easy and not smelly at all. Compared to our neighbours having to pump out, worrying about capacity, mess with Joker valves and the smell, we feel we’ve got the better deal.
I sail a Freedom 30. I singlehand mostly so my strategy may not be applicable to all.
I removed all of my head plumbing and holding tank five years ago. It was ridiculous, taking up lots of room and bizantine in its complexity. I never used it having transitioned to wag bags many years ago. I plugged the base of my marine toilet and it serves as a wag bag holder now.
I became aware of the urine mix issue about the same time I removed the holding tank. I started diverting by using my pee bottle, after all, we are peeing much more than #2 so you need somewhere to go when it is not possible or appropriate to pee overboard so a pee bottle has been part of my gear for a long time. One must carefully choose a bottle for proper opening size BTW.
This works quite well for me but those wag bags can smell like the Dickens even with no liquid in them. I tried coconut coir as a dessicant and that was a partial success but I still got smell. I then began storing the used bags in a 5 gal sealed home Depot bucket. But this felt like back to the past. Maybe not as sloshy as a holding tank, still…
About a year ago I came across the laveo dry flush toilet. It is a pretty interesting device, but no way I am paying a grand for the thing. Also it is big.
However, the Laveo did have one huge benefit. It contained waste in a mylar wrapper ( read about the toilet to see how it works, it’s kinda wild).
They claim once wrapped, no smell due to mylar impermeability. The wrapped waste simply stays in the toilet which will accomodate maybe 15 bombing runs.
I wanted to test this assertion so bought a pack of 1/2 gal sealable mylar bags on Amazon.
Absolutely amazing! When I place a used wag bag in the mylar bag and seal it…no odor at all, even with urine involved.
These can then be stored in some safe spot for shore disposal.
Mylar is not biodegradable so if you have misgivings about this, the wag bags can be emptied into the trash and the mylar bags reused.
This current Waypoints is very informative, but your editorial staff should have checked to make sure the links mentioned work. (IE give a date and issue numbe not just a page number). Also C-Head has been out of business for over 2 years and the price of their base model had risen to over $1100. I paid for one and never received it. There are several new entries in this market now under $500, maybe it’s time for a PS update?
Glad to see this topic addressed again. Like other folks, I was appalled at the price of the Air Head and similar products. I had looked into the C-Head as well. We even paid a visit to their office/manufacturing facility in Florida before they relocated and subsequently closed shop. I liked the idea of the unit but thought it was grossly overpriced. Based on what I’ve read in sev eral boating publications,I’m very happy that I didn’t go that route! I have an “85 Macgregor 25 which had a traditional PortaPotti when I bought it. Those devices always reminded me of an outhouse on the water. Stinky and very unpleasant to service. Since I’ve been refurbing my Mac 25, I wanted to change her head facility. I thought about a DIY dessicating head but with all the other things I had going on I decided to look at current commercially available solutions. These aren’t nearly as pricey as the churning units. They are a bit more fancy than the WAG Bag approach. I finally settled on a unit from Trelino, a German company (mytrelino.com). It has a modern European esthetic with clean lines. It is easy to service and is available in two lines each of which has three sizes offered. The medium unit fit the confined space in my boat. (BTW: I have no financial interest in this company.) There is also another German company, Boxio, with a similar type toilet. I ordered both and compared them side-by-side as to foot print and seating comfort. I prefer the look and feel of the Trelino. So far, it has worked well for me.
Well done article describing these heads and there use, Darrell. My son bought an Air Head but for my little 27′ Pacific Seacraft Orion that and other commercial models were too big so I built my own with a mixer (Youtube: Trails and Sails). I would add that we (2 of us) stir after each use and twice a day and use the coconut Coir, changing about 2 weeks. After use we spray the diverter with 1:2 dilution vinegar. I bought a bottle of Nilodor concentrate but have yet found a need to use it.
Thanks for the informative article. I’m disappointed at the complexity/cost of these solutions. With misgivings I bought a Thetford 345 a few years ago for my new 27’ tri and have been very happy with it for me and often one crew mostly cruising offshore for up to two months. I read a lot of the suggestions RV users posted and haven’t researched the ecology involved but it seems OK. First, the flush system is hopeless and wasteful. A one quart container of fresh water judiciously used works for 3-4 ‘flushes’. Second, dissolving bowl liners are essential. Third, an initial small dose of Napi-San takes care of the odour, with a subsequent sprinkle if needed. My partner is particularly sensitive to odour and speaks well of it. Continuous use by two people is good for five to seven days. Then it can be simply dumped offshore beyond the 3 mile limit. While unpleasant, it beats a shore trip. Perhaps our success is that virtually all our pee is in a bottle or bucket. I c the 345 as it has adequatez’ dangle room’, at least for me.
LEAVE A REPLY Cancel reply
Log in to leave a comment
Latest Videos

Tartan 30 | Boat Review

Fuel Contamination? The Baltimore Francis Key Bridge Collapse

Safety At Sea For You & Your Family – The Joe...

What’s The Best Vinyl Window Cleaner for Your Boat?
- Privacy Policy
- Do Not Sell My Personal Information
- Online Account Activation
- Privacy Manager
- Forums New posts Unanswered threads Register Top Posts Email
- What's new New posts New Posts (legacy) Latest activity New media
- Media New media New comments
- Boat Info Downloads Weekly Quiz Topic FAQ 10000boatnames.com
- Classifieds Sell Your Boat Used Gear for Sale
- Parts General Marine Parts Hunter Beneteau Catalina MacGregor Oday
- Help Terms of Use Monday Mail Subscribe Monday Mail Unsubscribe
Simple head plumbing
- Thread starter thelilnauti
- Start date Aug 23, 2020
- Tags head plumbing thru hull
- Forums for All Owners
- Ask All Sailors

thelilnauti
Hello everyone, With my boat finally on the hard and having its bottom done along with all new thru-hulls I am looking to simplify our head plumbing. I am wondering what many of you are using by way of a simple system? Our current system I believe is over complicated. Head discharge to a Y valve that sends it either to the holding tank or to another Y valve that then sends it who knows where but which I think is used to vent the system. I am thinking of simply re-plumbing the head to go directly into the holding tank and then have the holding tank go through a vented loop to the discharge thru-hull thus removing one of the existing Y valves completely. If any of you have any plans or photos of your simple systems I'd love to see them. I have attached a photo of my existing system. Thanks.
Attachments

The person to guide you on this is @Peggie Hall HeadMistress She knows her stuff. Also pick up a copy of her book, either in the SBO store or on Amazon .

Don S/V ILLusion
Your description omits a pump-out option which doesn’t complicate much other than adding a line to/from the tank. There are some simple to follow diagrams on the WM site as well as from a google search.

Dave Groshong
The options to send it a holding tank, overboard, or to a deck fitting are nice, a lot of municipalities will demand you a seal an overboard discharge, but for boat's transiting the oceans, it is mostly necessary.

Peggie Hall HeadMistress
thelilnauti said: Our current system I believe is over complicated. Head discharge to a Y valve that sends it either to the holding tank or to another Y valve that then sends it who knows where but which I think is used to vent the system. Click to expand

Originally, that boat was set up like mine, from the factory.. The head goes straight to the holding tank; the holding tank discharge goes to a hand diaphragm pump, through a high vented loop then to the discharge thru-hull. The other leg of a tee on the holding tank discharge goes to the deck pump out fitting.. I have been comfortable with that setup; the only valve is the thru hull. Here is the manual. Scroll down a bit for the plumbing diagrams.. https://sbo.sailboatowners.com/downloads/Hunter_31_83-87_64283881.pdf

A fellow sailor has a very simple system that he calls dump and chuck. Certainly not my style, but seems to suit his fancy. I suppose nothing more than a bucket, but just guessing here.
That is without doubt the most mysterious and seemingly unnecessary bit of plumbing I've ever seen, cannot imagine any possible need for TWO wye valves back to back on the discharge line for ONE head. Get Peggy's book and try to figure that mess out.

What do you do if your tank is full and you have no overboard discharge capability? Keeping that option might be a good idea - just in case.

I have the head (has a macerating pump) plumbed directly to the holding tank, pump out above tank, ball valve on bottom of tank that connects straight down to a seacock (gravity overboard discharge). Ball valve keeps hose to seacock clear when not using. Absolutely bullet proof, but I’m lucky in that tank is just above waterline above a through hull. Vented loop on head from intake pump to bowl as per raritan, no others needed; tank is obviously vented. All hose Peggie approved, a must (I have her book and highly recommend it). When discharging is ok- leave gravity discharge open and it goes right out. Not ok? Close it and tank fills. Easy.
Sounds good to me! --Peggie
Basically all you need to do is get (and read) Peggie’s book, figure out your plan, then ask her to review it (which she will kindly do). She knows her stuff and you will too after reading her book. I would also recommend Don Casey’s book as well for general repairs.
markwbird said: View attachment 184115 Click to expand
Thanks for the info folks. To clarify I intend to keep a pump out option on the deck as it were. As of right now I am thinking, head straight to holding tank by way of vented loop. Tank to new macerator pump to out thru hull (do I need another vented loop here? I have a spare) and have a deck pump out option somehwere. I assume i would want the Y valve between the tank out and the deck pump out? I will be reaching out to Peggy now.
You'll prob'ly need a vented loop between the overboard discharge pump and the thru-hull. If all flushes will go to the tank, you won't need one in the line from the toilet to the tank. However, you MIGHT need a loop--just a loop, not vented--if it's an uphill run from the toilet to the tank. Where to put it matters...I'll help you get it right. --Peggie
- This site uses cookies to help personalise content, tailor your experience and to keep you logged in if you register. By continuing to use this site, you are consenting to our use of cookies. Accept Learn more…
Marine Toilets: Everything You Need To Know
A marine toilet is has several components and what we consider to be a “toilet” is actually the least important element when it comes to maritime laws. As you’ll see further in this article, maritime law focuses on the storage and treatment of sewage with your Marine Sanitation Device (MSD). For starters, lets look at the element of a toilet that land-lubbers are familiar with, the toilet bowl.
Marine toilets are designed to allow for sanitary conditions while out at sea. It should be evident that a traditional toilet would not work well on a boat. Consider a rough sea and the boat rocking heavily. A traditional toilet would have water spilling from the toilet bowl as the boat rocks. Conversely, marine toilet bowls a kept dry until such time that they are being used, then water is pumped into the bowl.

The toilet pump comes in two basic styles, electric or hand-powered. The basic concept is the same in both cases, they pump water into the bowl or out of the bowl in two different operational modes, “wet” or “dry” pumping.
“Dry” Pumping is the term used to indicate that you are pumping all the water out of the bowl so you do not have water spilling over the edges of the toilet bowl while the boat is swaying or pitching.
Storage is the element of a marine toilet that needs serious attention. This is where the maritime laws come into play. Basically a toilet flushes the waste into a storage tank which makes up the main focus of the balance of this article.
Marine Sanitation Device (MSD):
A Marine Sanitation Device or otherwise known as MSD is defined in the Federal Water Pollution Act as “Any equipment for installation onboard a vessel that is designed to receive, retain, treat or discharge sewage, and any process to treat such sewage.”[ 3 ] This leads to some level of confusion because a fixed mounted toilet on a boat, known as the “head” as well as Coast Guard Certified Type I, II or III MSDs, units that not classified as the head, are also MSDs according to the Federal Water Pollution Act.
One clarification point: The typical head (marine toilet) on its own has ever been made that is Coast Guard certified. The way the Coast guard looks at MSDs is that the head is strictly the component that receives and discharges the sewage. The components that treat the sewage are considered to be Type I and Type II MSDs. This treatment component is separate from the head and these components are the elements that are certified by the Coast Guard.
Upon Further Examination of the MSD: The Federal Water Pollution Act has two key words that need some elaboration, “installation” and “sewage.”
Sewage Clarification: Sewage is defined in CFR 140.3 as, “human body wastes and the waste from toilet and other receptacles intended to receive or retain body waste.”[ 5 ] When is pertains to maritime law, sewage is strictly human bodily waste and does not include items such as galley water, food, oil, etc. However, the Great Lakes do require that “grey water” be held. Grey water is water used in showers, baths and in the galley.
Coast Guard Type I, II and II MSDs: The first point to remember is that the Coast Guard doesn’t care about the toilet. They view MSDs as the device where the toilet flushes into. Basically the Coast Guard is concerned with the holding and treatment of sewage.
Rob Cozen for the Marine-Surveyor.com does a nice job explaining the differences in Type I and Type II MSDs as shown below:
A Type I MSD must macerate (a macerator is essentially a “blender”) to no visible solids—in other words, totally liquefy solids and paper, and reduce the bacteria count to less than 1,000 per 100 milliliters. The discharge from a Type II MSD must contain less than 1,000 parts per 100 milliliters suspended particulate matter—in other words be almost absolutely clear (though not necessarily colorless)—and the bacteria count must be below 200 per 100 milliliters. A Type III MSD is a holding tank—any holding tank, including the holding tank in a portapotty. Vessels up to and including 65′ may use a Type I, II or III; vessels 66′ and over must use a Type II or III. Because a Type II is so much bigger, so much more expensive, and draws so much more power than a Type I, you aren’t likely to see a Type II on a vessel smaller than 66 feet.[ 6 ]
Regardless of the type of marine toilet that you have, it is always a great idea to discuss toilet ettiequte with your guests when hosting people on your boat. Instruct them on the proper way to use the pump and remind them that the only toilet paper that should be used is biodegradeable!
Keep in mind that the fines for overboard discharge of untreated sewage are constantly rising. Additionally, get in the mindset of protecting the environment. Learn where the local pump-out facilities are located. Some other tips for marine toilet maintenance include cleaning. We have found that mixing a solution of one part bleach to 10 parts water kills any bacteria during your cleaning process. One last point, prior to hauling out you boat for the season, flush, clean, and pump dry the holding tank. When the boat is land, completely drain any remaining water in the toilet to prevent freeze-up damage during the winter.
[1] http://www.boattest.com/view-news/3232_a-seacock-is-your-most-important-gear
[2] http://www.practical-sailor.com/issues/37_31/features/Joker-Valves-for-Marine-Heads_11065-1.html
[3] (10 pp, 170 K). https://www.gpo.gov/fdsys/pkg/USCODE-2013-title33/pdf/USCODE-2013-title33-chap26-subchapIII-sec1322.pdf
[4] http://www.epa.gov/enforcement/marpol-annex-vi
[5] https://www.law.cornell.edu/cfr/text/40/140.3
[6] http://www.marine-surveyor.com/newsletters/9910.html
Service Locator
- Angler Endorsement
- Boat Towing Coverage
- Mechanical Breakdown
- Insurance Requirements in Mexico
- Agreed Hull Value
- Actual Cash Value
- Liability Only
- Insurance Payment Options
- Claims Information
- Towing Service Agreement
- Membership Plans
- Boat Show Tickets
- BoatUS Boats For Sale
- Membership Payment Options
- Consumer Affairs
- Boat Documentation Requirements
- Installation Instructions
- Shipping & Handling Information
- Contact Boat Lettering
- End User Agreement
- Frequently Asked Questions
- Vessel Documentation
- BoatUS Foundation
- Government Affairs
- Powercruisers
- Buying & Selling Advice
- Maintenance
- Tow Vehicles
- Make & Create
- Makeovers & Refitting
- Accessories
- Electronics
- Skills, Tips, Tools
- Spring Preparation
- Winterization
- Boaters’ Rights
- Environment & Clean Water
- Boat Safety
- Navigational Hazards
- Personal Safety
- Batteries & Onboard Power
- Motors, Engines, Propulsion
- Best Day on the Water
- Books & Movies
- Communication & Etiquette
- Contests & Sweepstakes
- Colleges & Tech Schools
- Food, Drink, Entertainment
- New To Boating
- Travel & Destinations
- Watersports
- Anchors & Anchoring
- Boat Handling
- ← Maintenance
Marine Head Maintenance
Advertisement

Saltwater and uric acid (don't ask!) produce calcium scale inside marine toilets and discharge hoses. Such deposits cause the toilet to get progressively harder to flush and can lead to total blockage. Avoid this unpleasantry by pouring a pint of white vinegar into the bowl once a month and pumping it slowly — a single stroke every 4 or 5 minutes — through the toilet. The mildly acidic vinegar dissolves fresh scale deposits.
To keep the pump operating smoothly, follow the vinegar treatment with an ounce or two of mineral oil or a lubricant specifically formulated for marine toilets.
Related Articles
The truth about ceramic coatings for boats.
Our editor investigates the marketing claims of consumer-grade ceramic coatings.
Fine-Tune Your Side Scan Fishfinder
Take your side-scanning fishfinder off auto mode, and you’ll be spotting your prey from afar in no time
DIY Boat Foam Decking
Closed-cell foam flooring helps make boating more comfortable. Here’s how to install it on your vessel
Click to explore related articles
Contributor, BoatUS Magazine
Don Casey has been one of the most consulted experts on boat care and upgrades for 30 years, and is one of the BoatUS Magazine's panel of experts. He and his wife cruise aboard their 30-footer part of the year in the eastern Caribbean. His books include Don Casey's Complete Illustrated Sailboat Maintenance Manual, and the recently updated This Old Boat, the bible for do-it-yourself boaters.
BoatUS Magazine Is A Benefit Of BoatUS Membership
Membership Benefits Include:
Subscription to the print version of BoatUS Magazine
4% back on purchases from West Marine stores or online at WestMarine.com
Discounts on fuel, transient slips, repairs and more at over 1,200 businesses
Deals on cruises, charters, car rentals, hotel stays and more…
All for only $25/year!
We use cookies to enhance your visit to our website and to improve your experience. By continuing to use our website, you’re agreeing to our cookie policy.
JavaScript seems to be disabled in your browser. For the best experience on our site, be sure to turn on Javascript in your browser.
Free Shipping valid only within the continental USA for flat rate, ground shipping. Excludes Ground Promo, 2-Day, Overnight and Truck Freight/COD shipping.
Boat Plumbing 101: Understanding the Basics

Share this post
Boat plumbing is simpler than house plumbing, but if you’re new to boating or new to a boat with an on-board water system, then it may still be confusing (at first). Don’t worry – this guide will take you through the key components of your boat’s water system, their functions, and how they all work together.
Key Components of a Boat’s On-board Water System
There are typically seven components to a boat’s water system:
- Water reservoir tanks
- Water heaters
- Faucets and showers
- Boat drains
- Marine sanitation systems
Water Reservoir Tanks
Water reservoirs, or water tanks, are used to store water on a boat. They come in a range of shapes and sizes, but because even a small amount of water can be heavy, they are always mounted low in the boat.
Water reservoir tanks will usually have three threaded ports:
- One for the outlet
- One for the vent hose
- One for the fill hose
The outlet leads to a pump, manifold, or Y-valve depending on whether the boat has a single tank or multi-tank installation.
As water is sucked out of the tank, it creates a vacuum effect. This can cause the tank to implode as it becomes empty. The vent hose equalizes the pressure in the tank to keep it from imploding. This needs to be higher than the fill hose or it will overflow.
The fill hose is used to fill the tank with clean, potable water. For convenience, this may be connected to an on-deck fill cap using food-grade tubing.
The FDA requires all piping used to be non-toxic and approved for drinking water. The most preferred choice is cross-linked polyethylene (PEX) tubing. This tubing is available in opaque or semi translucent colors such as red, blue, and white to reduce algae growth.
Boats may have an electric or manual pump to keep the water system pressurized. Electric pumps are the preferred option, as they automatically run to rebuild pressure while a faucet is turned on. They may also have a pressure switch to activate when pressure drops below a pre-set value. The water reservoir tank’s outlet is plumbed into the electrical pump, and the faucets are supplied with water from the pump outlet.
Manual pumps use a rotating handle to pump the water through a single faucet. They are plumbed to the tank’s outlet side. Eco-conscious boaters may prefer manual pumps as they waste less water.
Water Heaters
Water heaters are insulated tanks most often used to heat water for showers. They are available in a range of types and sizes but typically use a heat exchanger and an electrical heating element. If you have a water heater, then you also need to have a pressurized water system for the pump to fill the water heater tank with water from the storage tank. Some may also use a heat exchanger coil to heat the water by circulating hot engine coolant while the boat engine is operating.
Water heaters may have up to four ports:
- One to connect a cold line to the water heater’s inlet.
- One to connect the outlet to the hot sides of any faucets.
- Two for the heat exchanger.
Faucets and Showers
Boat faucets and showers are almost exactly like the ones used in homes, though they may look different. They will be used in sinks and showers to direct the flow of water. They will always have at least one connection for cold water, though some may have two for both a cold supply line and a hot supply line that connects to the water heater outlet.
Boat Drains
Once you pump water into your faucet, you need to be able to get it out of your boat. That’s where boat drains come in. These use reinforced rubber tubing to connect the drain to a through-hull fitting. The general recommendation is to run the drains to the toilet bowl to reduce the risk of on-board flooding. You should not empty the water in the bilge, as it can become clogged and develop an odor. Instead, you should have a discharge pump.
Marine Sanitation Systems
Marine sanitation systems ensure that human waste doesn’t pose a threat to public health. They are required by federal law and work by reducing chloroform counts or providing a way to store the waste until it can be properly discarded.
How to Maintain Your Boat’s Plumbing
To keep your boat’s plumbing in good working condition, you should inspect it regularly. This check can be added to your normal boat maintenance routine. You also want to keep all faucets, sinks, and showers clean to prevent buildup in the pipes and connections.
If you ever have questions about your boat’s plumbing or need help with maintenance or repair, never hesitate to contact a local professional! They will be happy to help you keep your boat in the best condition possible so it will last you for years to come.
Please log into your account to post comments

- News
- General
- How-To
- Boating
- Watersports
- Fishing
- Care & Maintenance
- Safety
- Gear & Accessories
Please verify you are a human
Access to this page has been denied because we believe you are using automation tools to browse the website.
This may happen as a result of the following:
- Javascript is disabled or blocked by an extension (ad blockers for example)
- Your browser does not support cookies
Please make sure that Javascript and cookies are enabled on your browser and that you are not blocking them from loading.
Reference ID: 7e4387a9-f664-11ee-ae0d-5f8d4284fc22
Powered by PerimeterX , Inc.
- Vessel Reviews
- Passenger Vessel World
- Offshore World
- Tug and Salvage World
- Maritime Security World
- Specialised Fields
- Marine Projects World
- Small Craft World
- Tanker World
- Dry Cargo World
- Boxship World
- Aquaculture World
- Trawling World
- Longlining World
- Seining World
- Potting World
- Other Fishing Methods
- Regulation & Enforcement
- Feature Weeks
- Classifieds
- Book Reviews
VESSEL REVIEW | Sinichka – Electric commuter boats designed for Russia’s Moskva River

A series of three new electric monohull commuter ferries have already begun operational sailings on the Moskva River in the Russian capital Moscow.
Built by Russian shipyard Emperium, sister vessels Sinichka , Filka , and Presnya – all named after rivers in Moscow – are being operated by the Moscow Department of Transport and Road Infrastructure Development (Moscow Deptrans). They are the first units of a planned fleet of 20 vessels that will serve the capital city and other nearby communities. The new ferry system will be the water transport system to be operated on the Moskva River in 16 years.
Each vessel has a welded aluminium hull, an LOA of 21 metres, a beam of 6.2 metres, a draught of only 1.4 metres, a displacement of 40 tonnes, and capacity for 80 passengers plus two crewmembers. Seating is available for 42 passengers on each ferry, and the main cabins are also fitted with USB charging ports, wifi connectivity, tables, toilets, and space for bicycles and scooters. The cabin layout can be rearranged to allow the operator to adjust the distances between the seats and to install armrests of varying widths.
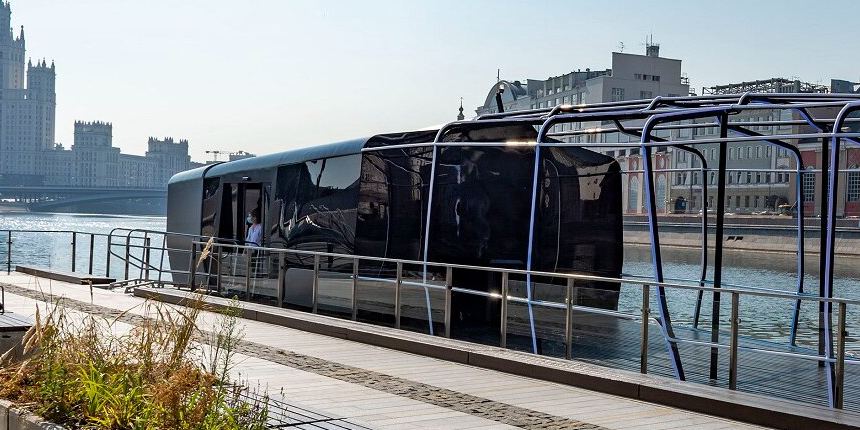
An open upper deck is also accessible to passengers and is the only area on each ferry where smoking is allowed.
The ferries are all of modular construction with each ferry’s wheelhouse, main cabin, and other structural elements being built as complete, separate components. This enables the ferries to be easily dismantled for transport to anywhere in Russia by rail and then quickly re-assembled within seven days.
The ferries are also ice-capable. Recently completed operational trials on the Moskva showed that the vessels can also easily navigate under mild winter conditions with broken surface ice, though year-round operations are planned for the entire fleet.
The ferries are each fitted with 500kWh lithium iron phosphate battery packs that supply power to two 134kW motors. This configuration can deliver a maximum speed of 11.8 knots, a cruising speed of just under 10 knots, and a range of 150 kilometres.
Emperium said the transfer of rotation of electric motors to the propeller is carried out by direct drive. As a propulsion installation, a pulling rotary propeller-steering column with double screws is used. The installation of double pulling screws, with similar power, allows an operator to increase the efficiency of the propulsion system to deliver a slightly higher speed or to reduce energy consumption. This arrangement also provides the ferries with enhanced manoeuvrability necessary for navigating in close quarters.
The batteries themselves have projected service lives of 10 to 12 years and are fitted with safety features such as built-in fire extinguishers and gas vents. Quick-disconnect features allow the batteries to be easily removed for replacement or maintenance.
Some of our readers have expressed disquiet at our publication of reviews and articles describing new vessels from Russia. We at Baird Maritime can understand and sympathise with those views. However, despite the behaviour of the country’s leaders, we believe that the maritime world needs to learn of the latest developments in vessel design and construction there.
Click here to read other news stories, features, opinion articles, and vessel reviews as part of this month’s Passenger Vessel Week.
Related Posts

Baird Maritime
Tags: Emperium Filka Moscow Moscow Department of Transport and Road Infrastructure Development Moskva River Presnya Russia Sinichka WBW newbuild
- Previous VESSEL REVIEW | Ferry Rokko – Second 194m Ro-Pax for Miyazaki Car Ferry
- Next Brighton man to be charged for illegal abalone haul
Baird Maritime , launched in 1978, is one of the world's premier maritime publishing houses.
The company produces the leading maritime new portal BairdMaritime.com , home of the world famous Work Boat World, Fishing Boat World, Ship World, Ausmarine, and Commercial Mariner sub-sites, and the industry-leading ship brokerage platforms WorkBoatWorld.com and ShipWorld.com .
Contact us: [email protected]
© Copyright - Baird Maritime
- Terms & Conditions
- Advertise with Baird Maritime
- Submit News/Leads
COMMENTS
In addition to either raw-water or freshwater plumbed toilets, there are portable toilets, composting toilets like the Air Head, hold-and-treat systems like Raritan's Lectro Scan, and vacuum-based systems like Sea-Land's VacuFlush. In addition, there are multiple ways to plumb a holding tank into the system. Most manufacturers of marine ...
Otherwise, if the head's internal valves are held open by debris — an inevitable occurrence — water will siphon back into the boat. Poor head installations sink boats every year. Mount the vented loop so it will remain above the waterline at all heel angles. Clean the anti-siphon valve regularly to keep it functioning.
Episode #180 - New Head Plumbing and Manual Black Water PumpHello Friends, This is a throwback project video from the summer of 2020 when we started the mass...
Dec 14, 2017. After: the Marine Elegance head lends a certain je ne sais quoi to the boat. The 30-year-old Raritan PH II head on our Pearson 39-2 project boat still worked, but reluctantly. The boat had sat on the hard for two years and if there's anything marine toilets need, it's regular exercise to stop rubber or leather parts from ...
Upgrading a Sailboat Head. When a new toilet was needed for a liveaboard family, they decided to go with a Lavac vacuum head. By Ben Zartman ... The biggest advantage of having it there is that there's a very short run of hose from the head to the tank—the plumbing doesn't pass under people's bunks or through any bulkheads and is 100 ...
Boat plumbing is a lot easier for the do-it yourselfer than plumbing at home, mainly because it doesn't involve rigid pipes running inside solid walls. Skip Links. Membership; ... the water is delivered through a pipe or hose to the shower head. A nice owner addition to almost any boat is a deck shower, easily installed by simply teeing into ...
Weekend boaters on a boat less than 26' may find a portable head sufficient. The number of people you plan on having aboard and how often you want to take it to a pump-out station to clean it out also have a bearing on what you choose. ... To winterize your head, drain all water from the bowl, pump mechanism, and connecting plumbing. Close the ...
A marine toilet or " head ", is a special type of toilet that allows for sanitary conditions out at sea. Its operation is the opposite of a traditional toilet you find on land. A traditional toilet is a terrible idea for a boat. This is because the water would spill from the toilet bowl as the boat rocks.
Separation is accomplished using a separating toilet seat that funnels urine away into a separate container and away from the solid waste (see page 16, "DIY Desiccating Head Options"). Composting systems use a mixer to chop up and blend the solids with the absorbent, making a mess you hope will start to compost.
Head cleaning and maintenance. Cleaning your boat's head system is a project you don't want to put off. 1) Cleaning the bowl and seat are the same as any household toilet so be sure to do this after every outing. 2) Discard any toilet paper bags or empty the bins. 3) Pump out the holding tank after every trip.
814. Pearson P30 202 Ottawa/Gatineau. Jan 10, 2020. #1. Hey everyone, another quick question, this spring I'll be redoing the plumbing in my g26, I'm confused as to the head plumbing, there seems to be too many hoses, I know the overboard discharge is not legal and there is no hoses connected to the thru hull, so I'm thinking about ...
Head discharge to a Y valve that sends it either to the holding tank or to another Y valve that then sends it who knows where but which I think is used to vent the system. I am thinking of simply re-plumbing the head to go directly into the holding tank and then have the holding tank go through a vented loop to the discharge thru-hull thus ...
Marine toilets are designed to allow for sanitary conditions while out at sea. It should be evident that a traditional toilet would not work well on a boat. Consider a rough sea and the boat rocking heavily. A traditional toilet would have water spilling from the toilet bowl as the boat rocks. Conversely, marine toilet bowls a kept dry until ...
Aug 2, 2017. Original: Jun 8, 2015. If there is one thing that sailors of any stripe—racer, cruiser, anything in between—can agree upon, it is that they universally detest holding tanks. There is no upside whatsoever to sailing around with a tankful of poop in your boat, and the number of holding tank horror stories bobbing around in ...
Marine Head Maintenance. Saltwater and uric acid (don't ask!) produce calcium scale inside marine toilets and discharge hoses. Such deposits cause the toilet to get progressively harder to flush and can lead to total blockage. Avoid this unpleasantry by pouring a pint of white vinegar into the bowl once a month and pumping it slowly — a ...
To determine the correct pump size for your system, first determine the number of outlets. A typical cruising boat has no more than three: galley, head and deck shower. Pumps are rated by their output in gallons per minute (gpm). To get good pressure at three outlets, you'll need a pump rated at 4gpm, or more if the plumbing runs are longer.
Water reservoirs, or water tanks, are used to store water on a boat. They come in a range of shapes and sizes, but because even a small amount of water can be heavy, they are always mounted low in the boat. Water reservoir tanks will usually have three threaded ports: One for the outlet. One for the vent hose. One for the fill hose.
marine plumbing. CONTACT WEST MARINE. Live Chat. 1-800-262-8464. Store Locator. Shop the best selection of Marine Plumbing from West Marine. Visit for products, prices, deals and more!
Walking tour around Moscow-City.Thanks for watching!MY GEAR THAT I USEMinimalist Handheld SetupiPhone 11 128GB https://amzn.to/3zfqbboMic for Street https://...
Explore the scenic and historic attractions of Moscow from the water with the best boat tours and cruises. Enjoy the views of the Kremlin, the Cathedral of Christ the Savior, and the Sparrow Hills on a relaxing or informative boat ride. Or, spice up your trip with some water sports and activities in Moscow. Find out more on Tripadvisor.
About Us. Baird Maritime, launched in 1978, is one of the world's premier maritime publishing houses.. The company produces the leading maritime new portal BairdMaritime.com, home of the world famous Work Boat World, Fishing Boat World, Ship World, Ausmarine, and Commercial Mariner sub-sites, and the industry-leading ship brokerage platforms WorkBoatWorld.com and ShipWorld.com.
On this map you can see the details of the longest and most classic of the Flotilla Radisson boat tours: 2. Companies that do boat tours on the Moskva River. There are many companies that do cruises on the Moskva River, but the 4 main ones are: Capital River Boat Tour Company (CCK) Mosflot. Flotilla Radisson.