

The $tingy Sailor
Diy trailerable sailboat restoration and improvement without throwing your budget overboard.
Flatten Your Mainsail Foot With an Outhaul
You’re familiar with basic mainsail running rigging, right? The halyard hoists it up the mast and the main sheet adjusts the angle of the sail to the hull. Both lines are important but they don’t adjust the aerodynamic shape of the mainsail, which can make a big difference if you want to get the best performance out of your mainsail.
There are three potential control lines for your mainsail to adjust its shape. Each line controls the tension on one of the three sides of the mainsail. To control luff tension, you need a Cunningham or boom downhaul like I describe in Control Mainsail Draft with a Boom Downhaul . To control leech tension, you need a boom vang like I describe in Control Your Mainsail Shape Better With a Boom Vang . In this post, I describe a trimmable outhaul to control the foot tension.
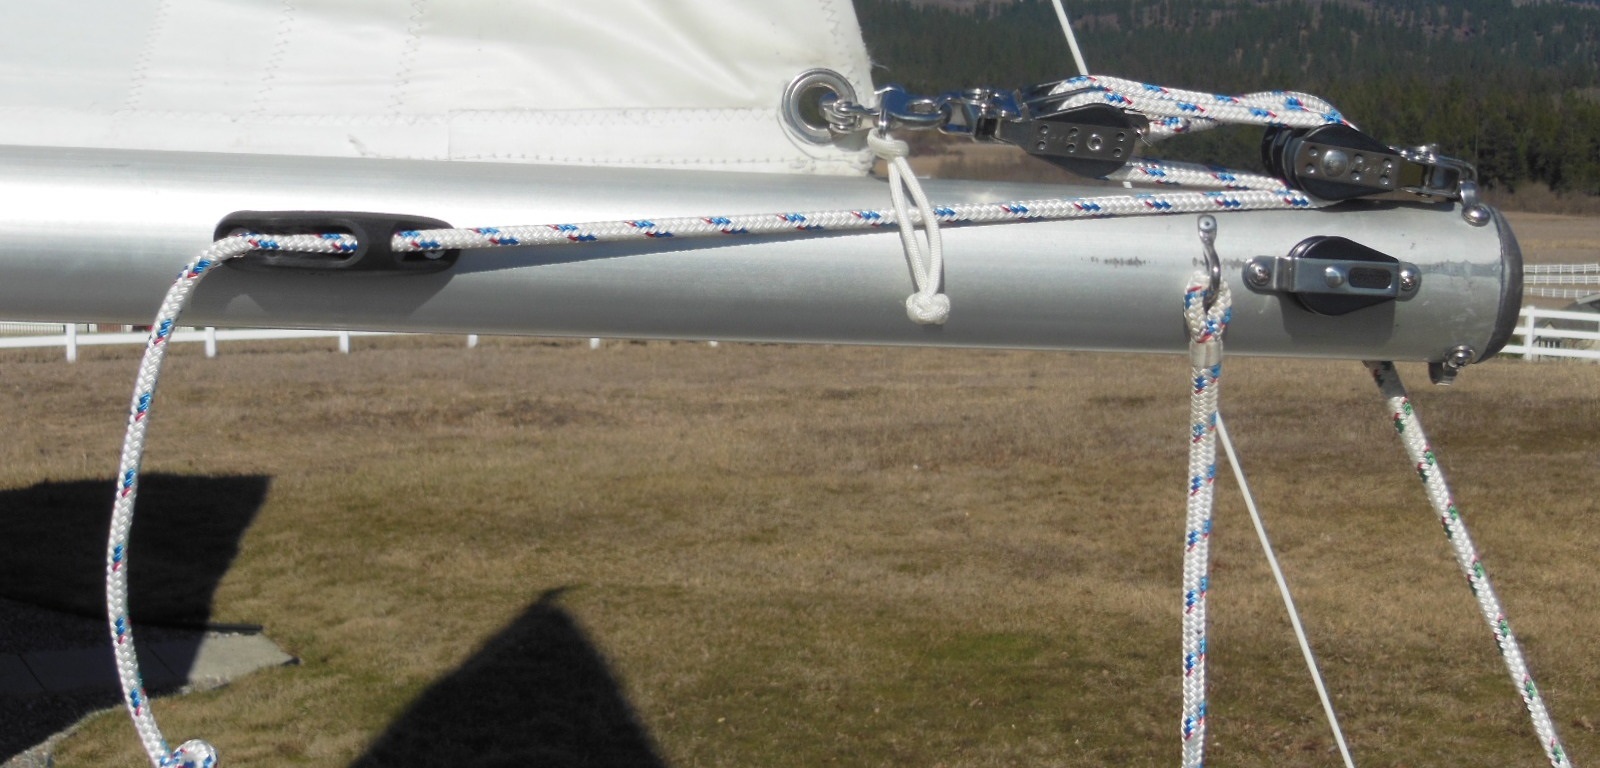
Most first generation C-22s and similar sailboats came from the factory with a simple loop of line between the mainsail clew and an eye strap at the end of the boom similar to the picture below. It holds the sail in place but that’s about all. You can’t easily trim it while sailing. If it’s loose enough to make connecting the clew easy, then it isn’t tight enough for moderate to heavy winds. If you take the time to cinch it up tight, you’ll have to untie it to take the sail off if you trailer sail. By then, the knot could be hard to loosen.

The solution is to replace that crude loop of line with a trimmable outhaul that con sists of:
- (2) Harken 085 double blocks or equivalent, one with a becket
- Fixed eye snap shackle or halyard shackle
- (2) Harken 072 3/16″ shackles or equivalent
- Ronstan small V-Cleat Fairlead or equivalent
- 5′ x 1/4″ New England Ropes Sta Set or equivalent
The pictures in this post show a five part (five line segments) outhaul only because those were the blocks that I had on hand when I rigged the outhaul. You could use fewer parts. I recommend at least two. The line is white with blue flecks in keeping with the color scheme that I describe in Choose Your Running Rigging Colors Logically . Notice in the picture below that I spliced an eye in the end of the line where it attaches to the becket. You could also use a bowline knot there but I prefer the neatness of spliced eyes, particularly here at the end of the boom where four lines are attached (main sheet not shown).

Size does matter
The challenge in this setup is to get the overall length of the outhaul as short as possible. On a C-22, there’s only about 10″ from the mainsail clew to the eye strap at the end of the boom. If the combination of blocks and other hardware is too long when you tighten the outhaul, the blocks will meet in the middle before putting enough tension on the foot of the mainsail. To solve the challenge, use the shortest shackles you can find. You might also need to shorten the becket on the one double block. Another option is to attach the working end of the line around one of the sheaves of the block itself, but that will result in less mechanical advantage.
To make the outhaul as easy to attach as possible, add a snap shackle to the working end of the outhaul for hooking to the mainsail clew. Install the fairlead cleat on the same side of the boom as where the line exits the outhaul blocks (port side in the picture below). The fairlead keeps the line captured at the boom if it gets out of hand. A foot of slack on the end makes the setup easy to trim while under sail and to loosen when removing the sail to head home.
The two lines that you see hanging down from the aft end of the boom in the pictures above are the working ends of the topping lift and jiffy reefing lines that I’ve installed on Summer Dance . They’re held out of the way in the pictures for simplicity. I describe them in Let Your Boom Off Its Leash with a Topping Lift and Single Line Jiffy Reefing Made Easy , respectively. To see how all four systems (including the main sheet) fit on the boom, see the pictures below.

Keep It Simple, Skipper (KISS)
If the outhaul shown above seems too complicated or expensive for you, a simpler version is even easier to set up.
For a three part (three line segments) outhaul, you’ll need:
- Harken 083 single block with a becket or equivalent
- 4′ x 1/4″ New England Ropes Sta Set or equivalent.
Install the block on the boom eye strap, the fairlead cleat on the side of the boom, and reave the line as shown in the picture below.

In this system, the line runs through the clew grommet itself. The line isn’t as easy to trim as with multiple blocks, but it’s still easy enough.
For the complete collection of rigging projects like this one, purchase my ebook Do-It-Yourself Small Sailboat Rigging .
Would you like to be notified when I publish more posts like this? Enter your email address below to subscribe to this blog and receive notifications of new posts by email. You will also receive occasional newsletters with exclusive info and deals only for subscribers and the password to the Downloads page. It’s free and you can unsubscribe at any time!
Share this:
13 thoughts on “ flatten your mainsail foot with an outhaul ”.
Have been reading your posts with great interest since purchasing a ’74 in February. Planning to do the topping lift and outhaul as soon as I repair the forestay reinforcement. I’m curious about your costs. For this project, the cost of the 085 and 086 blocks alone is in the $90+ range from the two suppliers I checked. Can you recommend a less-expensive source for hardware? Thanks, Dave
Yep, they’re pricey little buggers! The main reason that I used that size of blocks was because I got the pair of them on eBay for around $25, so it was a no-brainer. If that had not been the case, I would have used something like the Harken micro blocks 227 and 228 at around half the cost. Those are also the size that Catalina Direct uses in their kit. Another benefit would be that their combined length is even a little shorter, which might make the difference with a long-footed mainsail.
When I need to buy parts at retail instead of eBay, I like defender.com. They don’t offer free shipping but their prices are among the lowest for most things and they have a great selection, which means I can usually get several things on the same order to spread the cost out and still be less than most other retailers.
Good luck with your improvement projects. Hope to see you here some more! $tingy
Thanks, $tingy. I figured you had to have done something like that. Just started the topping lift project today: bought a piece of 7/64″ Amsteel and put an Brummel eye in one end and another Brummel eye with a thimble in the other. Will have to wait till the next time I drop the mast to install it. I think the necessary hardware is already on the boom. Was thinking about attaching it to the main halyard for a quick check of the concept, either with or without the mainsail. I know the lead won’t be quite the same as attaching it alongside the backstay on the masthead truck, but it should be close.
Glad to hear you’re going for it! I think you’ll like how handy it is to just reach up and hoist the boom up whenever you need to.
Must be kinda tricky splicing line that small. I’ve only done as small as 1/4″ so far and that was tough enough. Did you make a core to core splice?
Had to look up core-to-core splice, but no, that’s not the technique I used. The Amsteel line is single-layer, not cored. I used these instructions ( http://www.l-36.com/brummel2.php and http://www.colligomarine.com/docs/misc/splicing_instructions_for_web_rev_1_2.pdf ) modified to account for the fact that the smaller line is 8-strand, not 12. {I can’t find any sites that call the 7/64th rope as 8-strand, but that’s what I have. It wasn’t hard to work with at all.
Interesting splice and it looks faster to make. I might try that on the lazy jacks I’m making. They don’t need the full strength of a conventional eye splice and I don’t want to have to make 8 of them!
The most no-nonsense, comprehensive forum I have found for our boats. Thanks. 1987 Cat. 22 SK #14218
Thanks for your comment, John. We could all gain from less nonsense and more common sense.
Hey $tingy!
My name is Nic Reid. I’m over in Bend, OR. I just bought a Tanzer 22, and I’m SOOOOOOOO excited to get going with some projects. I stumbled across your blog last night when I was looking for info on how to do projects on the cheap, and I can’t believe how awesome it is! You’ve done a stellar job, my friend. I’m working through the Mast Step post at present.
I noted that you said there is a downloadable checklist with mast step coaching and a boom crutch document as well. Call me thick, but I’m not finding those. Any help would be appreciated.
I’m excited to follow your posts. Are you still actively sailing in N. Idaho?
Congratulations on your new-to-you Tanzer! You’re in for lots of fun.
There’s a trailer sailor launch checklist and a dimensioned drawing of a mast crutch on the password protected Downloads page. The password for the page is in the confirmation email that you should have received when you subscribed. If it’s not in your Inbox, look for it in your Spam or Junk folder. If you can’t find it anywhere, use my Contact page to send me an email and I’ll send you the password.
I sail weekly on awesome Lake Pend Oreille in north Idaho. I’ve been coming here for years and still haven’t explored it all. Bend is pretty cool place too!
So, testing my understanding of pulleys used in combo like your initial project above… if I modified your second 2:1 example using a single block at the sail and a single block at the boom end, it eould just give a bit more leverage on the outhaul line, but less than the double block arrangement, right? Is it possible to pull the foot too taunt and harm the sail?
Thanks for sharing all your projects…great inspiration to make some modifications and maybe even get my V21 to sail ‘better’.
Two single blocks wouldn’t give you any more mechanical advantage, it would still be a 3-part tackle. But it would reduce friction considerably. You could try it that way and see if you like it and if it’s not strong enough, replace one of the blocks with a double block to increase the ratio.
It would take a LOT of leverage to damage the foot your mainsail with an outhaul, especially if you have rope in the foot. The only time that you would want it as tight as possible is in the highest wind conditions, which most skippers don’t want to brave anyway.
Thanks Stingy. I implemented option 2 due to space constraints on my gulf coast 18. My only change was to use a horn cleat. Love the system!
Leave a comment Cancel reply
This site uses Akismet to reduce spam. Learn how your comment data is processed .

- Already have a WordPress.com account? Log in now.
- Subscribe Subscribed
- Copy shortlink
- Report this content
- View post in Reader
- Manage subscriptions
- Collapse this bar
How to Use a Sailboat's Outhaul
- Snowboarding
- Scuba Diving & Snorkeling
The Outhaul Attaches to the Sail’s Clew
The outhaul on a sailboat is one of the controls, part of the boat’s running rigging. The outhaul is a line that connects to the clew of the mainsail (the ring in the lower aft corner) and pulls the sail back toward the end of the boom. On most boats, this line or wire cable passes around a block (pulley) down into the boom, as shown in this photo.
Below shows how the other end of the outhaul is pulled to tighten the tension in the sail’s foot and explains how to use the outhaul to your advantage in different sailing conditions.
Adjust the Outhaul for Sailing Conditions
Shown here is the outhaul line exiting the boom (on the left), wrapped around a winch, and tied off on the cleat on the right. (The end of the boom is out of the picture to the left.) A winch is needed on moderate to large sailboats to exert enough tension on the foot of a large mainsail. The tighter the outhaul is pulled, the flatter the bottom of the sail becomes. The looser the outhaul, the fuller the sail.
How to Adjust the Outhaul
The principle for adjusting the outhaul is similar to that of using a boom vang in light and moderate wind.
- In light wind, the outhaul should be fairly loose, allowing the mainsail to be fuller. Wrinkles may form along the foot of the sail.
- In moderate wind, the outhaul should be moderately tight, flattening the sail and giving better shape for sailing upwind or on a reach.
- In a stronger wind, when you might need to depower the main to prevent excessive heeling, the outhaul should be very tight. A flatter sail produces less heeling force.
- How to Rig a Preventer Line
- Learn How to Sail a Small Sailboat – 1. The Parts of the Boat
- How to Gybe a Sailboat
- How to Raise the Mainsail
- How to Heave To a Sailboat
- How to Use a Mainsheet Traveler
- How to Use a Topping Lift
- Using a Sailboat Boom Vang in Sailing
- How to Use Roller Furling
- How to Tack a Sailboat
- Simple Reefing System for Sailors
- When to Adjust Sailboat Sails for Stronger Winds
- How to Anchor a Sailboat
- How to Tow a Dinghy Behind a Sailboat
- The Sunfish: A Perfect Lake or Urban Sailboat
- How to Attach Jib Sheets With a Soft Shackle
By Product Categories
Small Boat Blocks
Big Boat Blocks
Complementary Hardware
Travelers & Genoa Leads
Mainsail Handling
Headsail Handling
Mooring Solutions
Spare Parts
Accessories
Harken Canvas
Fly Soft-Attach Blocks
Carbo Air Blocks
Small Boat Classic
Flip-Flop Small Boat
GP Catamaran Ceramic Mainsheet Systems
Protexit™ Exit Blocks
Through-Deck
Wire High-Strength
Dinghy Vang
Small Boat Deck Organizers
Midrange Classic
Midrange Deck Organizers
Zircon Blocks
Element Blocks
Black Magic Air Blocks
Cruising ESP Blocks
Megayacht Blocks
Stainless Steel Blocks
Black Magic Air Runners
FlatWinder Powered Blocks
Mastbase Blocks
Over-the-Top
Crossover Blocks
Big Boat Deck Organizers
Cam Cleats & Kits
Cam Cleat Accessories
Cam Cleat Bases
Stand-Up Bases
Deck Organizers
Spinnaker Pole Cars
Soft Attachments
Fixed Padeyes
Removable Padeyes
Bolt-Down Fairleads
Grand Prix Jib Leads
Halyard Tensioners
Tiller Extensions
Peter's Desk Drawer
Dinghy Jib Leads
Crossbow Pivoting Self-Tacking Jib Traveler
13 mm Micro
22 mm Small Boat
27 mm Midrange
32 mm Big Boat
Windward Sheeting
42 mm Mini-Maxi
T-Track Genoa Lead
Access Rail System
13 mm AA Battcar System
22 mm A Battcar System
27 mm B Battcar System
32 mm C Battcar System
18 mm Switch Battcar System
26 mm Switch Battcar System
26 mm Trysail Switch
32 mm Switch Battcar System
32 mm Trysail Switch
40 mm Switch Battcar System
40 mm Trysail Switch System
Furling Mainsail Outhaul Systems
Single Line Reefing
Harken Vang-Master
Carbo Racing Foil
Small Boat Furling
Small Boat Underdeck
Reflex Furling
MKIV Jib Reefing & Furling
MKIV Underdeck Jib Reefing & Furling
Furling Accessories
Powered Furling
MKIV Ocean Furling
SnubbAir (Not a Winch)
Grand Prix Winches
Air Winches
Circuit Breakers
Analog Switches
Digital System Switch
Aluminum, Chrome & Bronze Winch Handles
Carbo OneTouch Locking Winch Handle
Service Kits
CLR Mooring Winches
Electric Captive Reel Winches
Hydraulic Captive Reel Winches
UniPower Radial
Single-Acting Integral Backstay Adjuster
Single-Acting Cylinders
Locking Cylinders
Double-Pull Cylinders
Grand Prix Cylinders
Hydraulic Cylinder Rod End Blocks
Hydraulic Cylinder End Fittings
Control Valves
Control Manifolds
Control Panels
Compact Control Panel
Rotary Pumps
Hydraulic Pump Handles
Power Systems
Repair Kits
Ball Bearings
Block Spare Parts
Traveler Cars
Furling Spare Parts
Winch Spare Parts
Winch Service Kits
Blockheads Gear
Promo & Gifts
Marine Grip
harkengear.com
Jeep/Truck tops
Garage storage
One-design Covers
Boat accessories
Canvas bags
By Type of Sailing
Dinghy / One-Design
Offshore Racing
Coastal / Day Cruising
Bluewater Cruising
Megayachts / Custom
Service Guide
Tech/Service
deck layouts
Data Sheets (SDS)
How to choose
System diagrams
Calculators
Reeving diagrams
Traveler Purchase Selection Guide
How to Choose
Testimonials
Hoister Videos
Request a Quote
Request Samples
Fabric details
Cover Styles
Canvas Videos
Contract Services
Materials and Components
Our Equipment
Contract Cut-and-Sew Project Spotlight
- Harken at the front
- Safety & Rescue
Support / Selection tools / System diagrams
Outhaul Systems
The outhaul controls and shapes the mainsail. Ease the outhaul to increase draft and power up the sail. Tighten the outhaul to flatten the sail and reduce drag and heel in heavy air.
Typical boat length: Small Boat: 22' - 28' (6.7 - 8.5 m) Midrange: 29' - 34' (8.8 - 10.4 m) Big Boat: 35' - 42' (10.7 - 12.8 m)
2:1 Internal
Suitable for dinghies or small keelboats. A flexible cable shackles to the sail and enters the boom through a wire block. Placing a block aft of the cleat allows the crew to pull from a variety of positions.

4:1 External Cascade
A simple external outhaul system. A cascade of two 2:1 tackles produces a 4:1 advantage.

5:1 Internal
This 5:1 internal outhaul is popular on small offshore boats.

6:1 Internal
A 6:1 internal outhaul system is popular on small-to medium-sized offshore boats using a traveler car to carry the clew of the mainsail.

2:1 Furling Main
Mainsails that furl into the mast are loose-footed and usually have a ball bearing outhaul car that rides the length of the boom. The outhaul starts at the car, leads through the clew block on the sail, back to the sheave on the car, and into the boom where it leads to a winch.

Product Categories
- United States
- New Zealand
- United Kingdom
- BOAT OF THE YEAR
- Newsletters
- Sailboat Reviews
- Boating Safety
- Sailing Totem
- Charter Resources
- Destinations
- Galley Recipes
- Living Aboard
- Sails and Rigging
- Maintenance
Rerigging the Boom
- By Ann Hoffner
- June 15, 2023
The mainsheet on our new Sabre 30 didn’t look right. It was the middle of a hot, airless July week. We’d bought the boat barely a month earlier, and now we were attempting to get it from New Jersey to Maine. Because of the lack of wind, the mainsail sagged as we motored up Long Island Sound. I had plenty of time to look at Ora Kali ’s boom but not a lot of incentive to solve any problems.
Then one day, we were tied to a mooring in the harbor at Scituate, Massachusetts, cheek by jowl with another Sabre 30. Wow, I realized: Our block-and-tackle arrangement is just wrong.
The weight of the boom and pressure on the mainsail on a small boat are light enough that the connection between boom and hand can be direct, but a boat of any size requires an arrangement of block-and-tackle to make it manageable.
Block-and-tackle reduces the forces necessary both to hold something in place and to lift it. In terms of mainsheet tackle, a block-and-tackle system makes it easier for the person in the cockpit to steady or control the boom and to sheet in the sail when there’s wind.
Ora Kali has three blocks in her mainsheet tackle. While the arrangement on the port side was fine for holding the boom in place, it did not take full advantage of the power for sheeting in. I took down the blocks and rearranged them. The correct arrangement gives a 3-to-1 advantage on the aft block-and-tackle, and employs the forward block mostly for turning.
The sloppy mainsheet tackle setup shouldn’t have been a surprise. This was not the first instance of the boom being rigged wrong. But Ora Kali was in such good shape for a 38-year-old boat when we bought it that I assumed something this basic would be correctly run.
When the seller bent on the sails the day before the sale, I was still dazzled by our good fortune in securing the boat and didn’t take careful notice of what he was doing. A week later, we took down the mainsail before we sailed off to inspect it for wear that might need repair and noticed that the tack cringle was hooked onto one of a pair of hooks normally used when reefing the sail. It became obvious why this was done: The gooseneck fitting was set up backward, putting the attachment point for a tack shackle behind the hooks. Useless. In fact, it turned out there was no tack shackle. It was a simple matter to reposition the reef hook/tack assembly, and I eventually found a tack shackle that fit.
Another puzzle we chose to work around in the interest of setting off for Maine was a barely functioning outhaul. An outhaul is used to tension the foot of the mainsail and attaches to the clew or clew car, then runs to the after end of the boom and around either an internal or external sheave and forward, where it can be adjusted. If the sail is fixed to the boom with slides or bolt rope, as it was on Oddly Enough , our Peterson 44, then an outhaul isn’t crucial for setting the general sail shape. In fact, we rarely touched ours.
With a loose-footed main, the outhaul has more work to do. The Sabre 30 is the first boat I’ve owned with a loose-footed main, and I didn’t understand what the rig was. The rope that attached to the clew car was not the same rope as emerged from an exit plate forward on the boom. When we tried pulling on either end, the car would budge only so far, and we never were able to fully stretch out the loose foot. I assumed that the outhaul had broken and a knot someone had made to add new rope to the original was jamming inside.
During the spring refit, I looked up in-boom outhaul rigs and saw that they usually include a block-and-tackle to add purchase for adjusting the mainsail foot. This is fixed midway by a bolt through the boom. I took Ora Kali ’s boom end off and discovered that the bolt holding the block had been run right through it rather than through a shackle, keeping it from swiveling. The two pieces of line were too big to run alongside each other freely. Between a seized block and the friction built up in the lines, the outhaul was useless.
The tricky part of this rerigging was snagging the shackle. I used a messenger line to pull the block-and-tackle into approximate position inside the boom, then ran a screwdriver through holes in the boom and the shackle.
The last piece of boom rigging that bothered me was the topping lift. On Ora Kali , this was a fixed length of 7-by-19 wire rope attached at the masthead with a small block at the other end. A Dacron rope ran from a shackle on the end of the boom, up over this block, down to the boom end sheaves, then inside to an exit sheave.
This is a fairly common way of rigging a topping lift, but I’m not a big fan of using wire in running rigging.
The primary purpose of the topping lift is to take the weight off the boom when the sails are furled and for reefing. On my previous cruising boats, I had topping lifts that doubled as a spare main halyard.
To fulfill both of these needs, I replaced the system with a single rope outhaul, shackling one end of the new topping lift to the after end of the boom, leading the other end over an unused masthead sheave, and installing a halyard exit plate at the bottom of the mast for the topping lift to run out and be adjusted. The lift is simpler, which I like, but running it over a masthead sheave puts it more in the way of the mainsail leach. To make sure we ease it when the sail is raised, I plan to bring the bitter end of the topping lift back to the cockpit to an existing set of sheet stoppers and a winch on the coachroof beside the main halyard and the mainsheet.
All in all, I now have a cleaner, more rationally rigged boom.
Ann Hoffner started sailing when she was 9 years old. Along with her husband, Tom Bailey, she spent 10 years cruising on their P-44, Oddly Enough , in the South Pacific, Australia and Borneo. Ora Kali , a nimble, shoal-draft Sabre 30, is now teaching them the joys of Maine coastal cruising.
- More: Hands-On Sailor , How To , Print May 2023 , rigging , sails and rigging
- More How To
How To Prioritize Your Sailboat’s Spring Checklist
How to protect your spars from corrosion, sailing totem refit series: the forward head makeover, fatty goodlander: dealing with chafe while cruising, tradewinds debuts 59-foot twe6 smart electric yacht, good bread for good health, center of effort, the halfway point: sailing to bermuda.
- Digital Edition
- Customer Service
- Privacy Policy
- Email Newsletters
- Cruising World
- Sailing World
- Salt Water Sportsman
- Sport Fishing
- Wakeboarding
Yachting Monthly
- Digital edition

Mainsail furling systems: an expert guide
- Graham Snook
- December 21, 2020
Some sailors swear by mainsail furling systems, others swear at them. Graham Snook looks at way to keep your furling mainsail in check

In-mast furling mainsails (left) have evolved significantly, and vertical battens allow more roach and better sail shape. Credit: Graham Snook
Mainsail furling systems have come on a long way.
Sails no longer need to be wrapped around a boom, nor does an in-mast mainsail need to be the hollow-leached, baggy triangle we first saw decades ago.
Furling mainsail systems can now offer more sail area than a traditional slab-reefed mainsail.
Be that as it may, every slab-reefed sailor knows a horror story about in-mast or in-boom furling that is enough to make them steer well clear, while those that have furling mains wouldn’t put to sea without one.
There is little doubt that furling mainsails are gaining in popularity, even for serious offshore cruising boats.

Get mainsail furling wrong and it can lead to costly and potentially dangerous problems. Credit: Graham Snook
In 2018, 38% of boats sailing round the world in the World ARC had furling mainsail.
Hallberg Rassy reports that almost all new owners buying boats over 40ft opt for furling mainsail systems, with Discovery reporting a similar trend.
So has the reputation of furling mainsails been unfairly tainted, and are they more prone to user error, or have the systems ironed out the glitches?
Whether you’ve got a furling main on your own boat, or if you’ll be using one when you charter, it’s worth knowing how to avoid the pitfalls of furling mainsails.
How do furling mainsail systems work?
In an age where we expect everything just to be simple and to work, letting off one line, and pulling another to make the mainsail appear or disappear sounds appealing, but what is the best way to furl the mainsail?
Is there a correct way to do it?
‘Carefully,’ replies Jeremy White,of Elvstrøm Sails UK. ‘They’re mechanical systems and they need to be operated correctly.’
Whether you have in-boom or in-mast, they both work on a similar principle which anyone with a furling genoa will be familiar with.
Inside the mast is an aluminium foil that takes the luff of the mainsail, and in a boom a mandrel takes the foot of the mainsail; both the foil and the mandrel revolve to roll up the sail.
A lot of issues with in-mast furling are caused by the sail not furling properly inside the mast and the furl being too bulky or the sail rubbing on the inside of the mast.
Many in-boom problems are caused by an uneven furl with the sail bunching at one end or the other.
There are a number of issues to look out for with each system to ensure stress-free furling.
Different options
If you’ve bought a new boat that was ‘good value’ and it came with sails, question how good those sails really are.
Many original Dacron sails are built to a price that will get you on the water and get you sailing, but they may not be built for longevity or performance unless you’ve specified them and know what you’re getting.
There has been much advancement in furling mainsail design, improved materials, vertical battens, and increased sail area.
Many new furling mainsail systems present a larger sail area than that of a conventional slab reefing sail.
But what should you be looking for when buying a new sail?
‘Whichever sailmaker you choose, get the highest quality material you can afford,’ advises Jeremy.
It’s a false economy to buy cheaper sailcloth as it will stretch and you’ll be left with a baggy sail after a few seasons.
For example, the luff of laminate sail (on a 45ft yacht) might only stretch 15mm over its lifetime, but on a polyester sail that might be as much as 15 cm.
That excess sail has to roll up in the same space as did when it was new.
For those wanting maximum sail area, and sail support, full-length vertical battens are the way forward.
These support the leech giving a good full roach, and importantly, they support the sail over its full height which gives it rigidity while it’s being furled, whereas shorter, vertical roach battens can leave the sail unsupported at their base causing furling problems.
For those without the budget or desire for a battened sail using modern materials, a sail with a hollow leech still offers many advantages over a slab reefing system, namely ease of reefing, the ability to set exactly the right amount of sail, and the simplicity of stowing, even if you do lose some power from a smaller sail area and a less perfect aerofoil sail shape.
If you’re having new sails made consider getting them silicone-coated.
This helps the sail slide over itself making the furl inside the mast tighter.
In-mast furling
It may be a simple system, but how you unfurl and furl the main will help avoid problems.
If you were to look down from the top of the mast, the foil usually rolls onto the foil in anti-clockwise direction, that is, the unfurled sail comes off the starboard side of the foil, though it’s worth checking on yours.
This is the key to getting in-mast furling to work correctly; trying to furl on a port tack drags the full height of the sail over the side of the mast slot, adding friction where there shouldn’t be any.
Furling on starboard tack obviates most of this friction while you furl.

Full-height battens support a larger roach, but make the furled sail more bulky. Credit: Graham Snook
Whether letting the sail in or out, the first thing is to release the backstay (to straighten the mast so the foil doesn’t rub) and put the boat on a starboard tack – with the wind slightly forward of the beam – this is so the sail feeds cleanly into the mast and around the furler inside.
Unfurling the sail is usually pain-free if the sail was furled correctly.

With the yacht on a starboard tack and the wind forward of the beam, release the mainsheet and vang.
Ensure the furling line is released then pull out the sail using the outhaul.

Ease the outhaul as your furl so the sail doesn’t flog but isn’t loaded up either. Credit: Theo Stocker
You shouldn’t need to control the furling line as there should be no pressure on the sail, even on a windy day.
If you intend to be reefed, however, don’t let it run unchecked. When the right amount of sail is out, make off the furling line. If you’re reefed, tension the outhaul to give the sail the correct shape (flatter in stronger winds and when close-hauled) then set the mainsheet and vang and away you sail.
- Release the backstay (if you have one)
- Put the boat on a starboard tack – with the wind slightly forward of the beam
- Release the mainsheet and vang
- When the right amount of sail is out, make off the furling line
- Tension the outhaul to give the sail a correct shape, then sheet in
To furl the sail, after letting off the backstay and putting her on a starboard tack with the wind slightly forward of the beam, let off the mainsheet and then ease the outhaul a little and start to furl.
Always look at the sail as you’re furling – you’ll be able to notice issues as they happen and not after you’ve wound an inch-thick clump of sail through a half-inch gap.

Having different coloured lines can make things simpler for your crew. Credit: Theo Stocker
If your sail has full-length vertical battens ensure the first batten is parallel with the mast when it enters, and if reefing, leave a batten just outside the mast groove.
Keeping too much tension on the outhaul will drag the foil aft in the mast, bending it and causing the sail to rub against the inside of the mast, creating friction.
Once you’ve taken the slack out of the sail, ease the outhaul and take in on the furling line again.
Try not to let the sail flog as this also bends the foil and causes more friction.
Repeat the ease-furl process until only the UV protection strip is showing.

Sail on starboard with wind forward of the beam for easy furling. Credit: Theo Stocker
If you have laminate sails, and they have been furled away wet, try to dry them at the first opportunity.
If you’re having problems furling using the lines, don’t be afraid to go to the mast with a winch handle and furl the sail at the mast.
Try it one day, it is remarkably easy.
If you’re having to do anything different, such as raising the boom or chanting a prayer to the god of furling fails, it’s worth looking at your system in detail for problems.
- Release the backstay
- Ease the outhaul a little
- Take in on the furling line
- Keep easing the outhaul and taking in on the furling line
- Furl the sail until the UV strip is showing at the mast
Problem solving
If furling the right way still isn’t working for you, there are a number of things to consider…, 1. understand your system.
First to check is to have a look inside your mast at which way your system should furl.
If your furling system has the option, put a winch handle in the furling mechanism at the mast and turn it the direction indicated to make sure the sail is going into the mast in the correct direction.
Clicking over the ratchet at the mast before it’s time to furl will ensure it always rolls in the right direction.
2. Assess your sails
The biggest cause of problems is the sail itself – how old it is and the material it is made from.
Stretch in the cloth makes baggy sails, which furling systems will happily munch on.
Furling mainsails are cut flatter than conventional slab-reefing sails as accommodating the belly of the sail is problematic.

An old or baggy sail may cause jams, as will creases from not enough halyard tension. Credit: Theo Stocker
Some older furling mains may have be made with an inappropriate, fully-bellied shape.
If your polyester sails have a deep belly, think about getting new ones as you’ll be fighting a losing battle.
As the belly folds, it doubles the thickness of the furl, causing unsightly and inefficient creases at best, and hideous sail jams or rips at worst.
3. Adjust halyard tension
Excess halyard tension can also cause the fabric to bunch up; vertical creases at the luff cause the sail to fold over itself.

Vertical creases at the luff reveal too much halyard tension, and potential for more snags. Credit: Theo Stocker
To resolve this, release the halyard until you have horizontal creases at the luff, then add just enough tension to remove them, though you may need to adjust this when underway.
4. Check the backstay
While the mast is bending, the foil inside it remains straight; the furled sail will bind at the apex of the mast’s bend.
If all of this fails, it’s worth calling a rigger to check the foil tension.
If this has gone slack, as you furl the foil will bend and rub against the mast.
5. Smooth it out
The next thing to look at is reducing friction.
As is often the case, the lines to your furling gear and outhaul are led through various fairleads and blocks across the deck and up the mast.

Move deck organisers to give slacker turning angles. Credit: Theo Stocker
Make sure all the angles they have to go through are a wide as possible – consider moving them if not – and all blocks and sheaves are running smoothly.
A good wash with fresh water and a squirt of dry lubricant can work wonders.
In-boom furling
Not a new concept, in-boom furling is an elegant solution, but brings its own challenges.
Unlike in-mast furling, in-boom systems can be retrofitted in place of conventional slab reefing.
For an in-boom furling system to work efficiently, however, it has to overcome a number of problems.

To start with, have a crew on deck to watch the sail as it furls to spot any issues. Credit: Advanced Rigging and Hydraulics
First of all, the sail has to be led from the boom to the mast, but there needs to be space for the bearings for the central mandrel and the boom’s gooseneck fitting, so the whole sail has to move aft along the boom.
To combat this, many in-boom systems have a protruding track on the trailing edge of the mast, while other units have the reefing mechanism at the aft end of the boom, or sometimes you’ll find a combination of both.
Whatever the system, there is usually a flexible feeder to guide the sail from the boom and feed it into the mast track.

The furling drum at the outboard end of the boom brings the main closer to the mast. Credit: Advanced Rigging and Hydraulics
Another issue with in-boom furling is the bolt rope, as Andy Cross from Crusader sails explains.
‘The sail has to use a bolt rope, and with it comes friction. Unlike a furling genoa that may only be raised and lowered once a season, the mainsail is nearly always used so the luff tape has to be reinforced.’
Any wear or damage to the bolt rope also requires a new bolt rope along the full luff of the sail, as any repairs would soon wear through and increase the friction.
The necessary extra reinforcement at the luff brings with it another problem: extra cloth thickness at the front end of the sail.

When reefing, stop when a batten is just above the mandrel, then take in on the furling line. Credit: Graham Snook/Yachting Monthly
As the sail rolls around the mandrel there is more sail material at the luff than across the rest of the sail.
The solution?
To slightly raise the aft end of the boom, allowing the extra sailcloth at the luff to roll at a rate that matches the leech.
The angle from the mast to the top of the boom has to be 87° to the mast, 3° above perpendicular.
The full-length battens in the mainsail help stabilise the sail as it furls and the batten pockets have been attached to the sail to match the mandrel angle.
It’s the thickness of cloth at the luff and the battens that make the correct boom angle the most important part of the system.

The necessary bulk of the boltrope makes the boom angle critical.
Get that right and your life suddenly becomes a whole lot easier.
It’s essential to mark the vang when the boom angle is correct.
Some owners choose to make a strop, running next to the vang, out of a low-stretch material like Dyneema, so the topping lift can be pulled taught and the strop prevents the boom raising higher than it should.
When marking or limiting the boom angle, it must be easy for any crew to see, by day or night.
How to get it right
1. prepare to set sail.
‘Before raising, lowering, or reefing the mainsail,’ explains Kim Petersen, Elvstrøm Denmark’s in-boom sail specialist, ‘get into the habit of always releasing the backstay tension – this will successfully straighten the mast and takes any flattening tension out of the sail – and then making sure the boom is at the correct angle – this is extremely important.’

Be careful with electric winches not to over-tighten halyards. Credit: Graham Snook
To raise the sail, after slackening the back stay and adjusting the boom level, point the boat into the wind, release the mainsheet and take up on the mainsail halyard, making sure that the furling line can run free as you hoist the mainsail.
Once set, increase the halyard tension until the horizontal creases at the luff have just gone.
2. Reducing sail power
If you don’t need full sail, only raise the sail until the nearest batten is at the mandrel.
Rather than being able to reef at any point, where the lower battens are fitted, the sailmaker will have reinforced the sail to take the clew loads.
Not reefing at these points means an area of unreinforced leech could be required to take a load it was not designed for.

Each batten represents a reefing point. Credit: Graham Snook
You’ll end up with fullness at the foot of the sail and a stretched leech, or a damaged sail.
If you need to flatten the sail, for better pointing or in stronger winds, take in on the furling line without adjusting the halyard tension.
This will give the same result as using a cunningham to tighten the luff.
Furling the main
When lowering the sail, release the backstay and set the boom at the correct angle.
It’s then best to take all the pressure off the sail by heading into the wind.
It doesn’t matter if the sail is flogging; the battens keep the sail rigid and support it as it furls.
If there is any pressure on the sail, this will cause it to furl unevenly.

With in-boom reefing you should still have a good sail shape even when deeply reefed. Credit: Graham Snook/Yachting Monthly
Unlike an in-mast furling system, where the sail is visible, on an in-boom system everything is happening on top of the boom, overhead and out of sight.
If you have a crew member spare and it’s safe, sending them to the mast to keep an eye on the sail as it furls can prevent damage, at least for the first few times using the system.
Pull in on the furling line, slowly and smoothly releasing the mainsail halyard, but keep a bit of tension on it.
Continues below…

The tools and spares you shouldn’t sail without
Give a thought to your inventory this winter to keep you cruising next season, says Rachael Sprot

Why you should regularly check your deck fittings
What’s really going on under your deck fittings? Ben Sutcliffe-Davies investigates the hidden weaknesses

Essential reefing tips for cruisers
Reefing: how, when and why do we do it? The answers may not be as straightforward as you think, says…
How to: replace a halyard
Whether you’re replacing an old halyard for new, or mousing the mast over winter, Rubicon 3’s Rachael Sprot explains how…
If you have too much tension the sail will want to roll away from the mast; if you’re seeing creases running from the bottom of the track to the boom at 45°, release the halyard a little more.
If the sail is rolling up toward the mast, you’ll need to increase the tension a little.
As the sail furls, the luff tape will naturally first roll aft, then move forward and repeat this – it’s all perfectly normal.
Once the sail is fully down, tuck the head into the boom if your system allows it, and add the sail cover.
Reefing underway
To reef when sailing, release the backstay and set the boom angle.
In rough weather, or when there are big seas, it’s best to take up on the boom’s topping lift to secure the boom and stop it rising and falling as the yacht goes over the wave crest.

Cover the sail once stowed to protect from UV. Credit: Advanced Rigging and Hydraulics
You’ll find it easier if you can bring the boat onto the wind and release the mainsheet to remove all drive from the mainsail; if the sail is flogging it’s depowered and can still be furled.
Next, take in on the furling line while slowly and smoothly easing the halyard as the sail furls.

Graham Snook is a marine photographer and journalist who has been involved in testing yachts and equipment for over 20 years. Credit: Graham Snook
Once you’ve reached a point where the batten is at the mandrel on top of the boom, make off the halyard and then furl the sail until the batten is under the mandrel.
Without reefing pennants to hold and support the clew of the sail, the loads are transferred to the batten and the cloth around it.
Because of this, it’s recommended that for in-boom reefing mainsails, a stronger stretch-resistant cloth like Dacron reinforced with Vectran or Dyneema or a tough cruising laminate cloth be used.
Whichever mainsail furling system you have or choose, spending a bit of time practising what works and what doesn’t on your system, at a time when it’s convenient to you, will pay dividends when you find you do need to reef.
Mainsail furling has had a bad reputation in the past, but used properly and with a little care, there’s no reason why it shouldn’t give you trouble-free sailing for years to come.
To raise the sail
- Release the backstay tension
- Make sure the boom is at the correct angle – use a strop or mark the vang if necessary
- Head up into the wind – it doesn’t matter if the main flogs as it goes up
- Release the mainsheet
- Take up on the mainsail halyard, but do not overtighten
To lower the sail
- Make sure the boom is at the correct angle
- Point the yacht into the wind
- Take in on the furling line as you ease the halyard at a steady rate
⛵️ Fast Dispatch - Getting You Back on the Water ⛵️

- Gelcoat Fillers
- Dry Lubricants
- Adhesive Glues
- Hooks & Clips
- Catamaran Launching Trollies
- Jockey Wheels
- Hitch Locks
- Lighting Board
- Breakaway Cables
- Clew Straps
- Upper Masts
- Lower Masts
- Rope Thimbles
- Wind Indicators & Burgees
- Parrel Beads
- Whipping Twine
- Sailmakers Palm
- Digital Compasses
- Laser Products
- Numbers & Letters
- Dinghy Covers
- Under Covers
- Catamaran Covers
- Single Handed
- Double Handed
- 18 Foot Skiff
- Exocet Moth
- Musto Skiff
- Dart 15/ Sprint 15
- Hurricane 5.9
- Laser Bahia
- Laser Cascais
- Laser Funboat
- Laser Stratos
Your Cart is Empty
- £0.00 Subtotal
Tax included and shipping calculated at checkout
Order before midday Monday to Friday and we will ship your order the same day.
- 01268 222912
- Accessories
- Sails & Covers
- Rope Lengths
- Parts By Boat
- Boat Care & Cleaning
- Splicing Tools
- Boat Covers
- Dinghy Rope Lengths
- Laser Rope Lengths
- RS Rope Lenghts
- Catamaran Rope Lengths
- Laser Performance
- Topper Sailboats
- Other Boats

- Mens Sailing Clothing
- Womens Sailing Clothing
- Repair Kits
- Skiff Suits
- Life Jackets
- Trapeze Harnesses
- Buoyancy Aids
- Hiking Pads & Pants
- Hiking / Toe Straps

Zhik Superwarm
- 100m Rope Reel
- Polyester Ropes
- Control Lines
- Double Braids
- Braid On Braid
- Anchor Lines & Ropes
- Spools & Reels
- Windsurfing

Mini Spools
- Single Block
- Double Block
- Triple Block
- Soft Attach
- Split Rings & Pins
- Inspection Hatches & Covers
- Bungs & Sockets
- Rudder & Tiller Parts
- Bushes & Fairleads
- Marine Screws
- Penny Washers
- VHF Aerials & Antennas
- Marine Tapes
- Traveller Systems And Parts
- Traveller Blocks
- Pico Hull & Deck Fittings
- Hull & Deck Fittings
- Laser Boats
- Laser Sails
- Laser Sail Packages
- Laser Spars
- Laser Rig Packages
- Laser Foils
- Laser Hull & Deck Fittings
- Laser Ropes
- Laser Dinghy Covers
- Devoti ILCA Boats
- ILCA Sail Packages
- ILCA Rig Package
- Devoti KDK Boats

New Devoti ILCA
Search our chandlery
🚚 Fast Dispatch and a 5 Star Rated Service You Can Count On ✅

How to Build a Laser XD 6-1 Outhaul System
November 11, 2022 3 min read
How to Build a Laser 6-1 Outhaul System
The Laser 6-1 Outhaul System is now the standard that comes with all new boats. If you are finding your outhaul is very difficult to adjust it may be time to upgrade your system.
In this article, we walk you through what you'll need and how to make a Laser 6-1 Outhaul System step by step.
Items You Will Need
You can also buy the full Laser Outhaul Kit on our website.
Some ropes will need to be cut to your correct length once the system is made. This system is tied together with knots however, we would always recommend when working with Dyneema lines to splice them as this is stronger than knots.
- x4 Harken 2698
- x1 Laser Clew Hook
- 2m of 3mm Rig 12 Dyneema
- 3m of 3mm Kingfisher Evo Race Rope
- 6m (or 7m for 4.7 Rigs) of 4mm Kingfisher Evo Race Rope (Secondary Control Line
The first part of the Outhaul System is going to be the clew block and hook. There are lots of different ways that people rig this. We will do it per the instructions you receive with a new boat. Take one of the 18mm blocks, the clew hook and one length of the 3mm race rope.
Tie a stopper knot in one end of the line and thread it through the centre of the block and up through the top of the block. Now grab your clew hook and thread the line through and back down into the top of the block. Lastly back through the middle of the block and tie another figure of 8.

Primary Dyneema
Take your length of 3mm Dyneema and tie a bowline around the eye on the boom end.
Now thread your line through the clew block from step one and the Dyneema back through the boom eye. The rope will then run along the boom towards the front of the boat.

Control line
Take your 4mm Race rope and an 18mm block. Thread the 4mm line about 3 inches through the centre of the block.
Now with the Primary Dyneema thread it into the top of the same 18mm and tape both lines together using the photo below as a reference.

Pull both through and tie a bowline in each.

Take your next 18mm block and a length of 3mm race rope and tie it into the cleat on the boom. This should face backwards down the boom towards the back of the boat.

Control line
Now thread the control line from the bowline you have tied through the mid-block tied to the boom and back through the block the bowline is tied onto going around the sheave. This will create your 6 to 1 purchase.

Take your last 18mm block and 3mm race top and tie a bowline around the block and the loose end will be tied around the lower mast where the boom and mast meet. This block acts as the turning point where the control line rope goes along the boom and down towards the deck plate.
The control line rope will then go through the deck block at the bottom of the mast and backwards through the cleats on the deck.

Elastic/ Shockcord
Thread the shockcord through the cleat on the top of the boom then tie a stopper knot. Now the other end can be tied to the sail or the clew hook as shown below.

If you have any questions on the Laser 6 to 1 outhaul system please get in touch with our team who are always happy to help.
Recent Articles
- 90˚ Marked Laser/ILCA Main Sheet - Sailing Chandlery
- Pre season Check List
- Where Should My ILCA Tell Tales Go
- What Are The Basic Tools Needed To Start Rope Splicing?
- You Don't Always Need Dyneema
- Boat Care and Cleaning Products
- Ropes for Club Boats and Club Dinghies - The Bosuns Guide
- Why You Should Use Two Sailing Watches
- Setting Your ILCA Dinghy Controls Up For Success
- 7 Items To Make Your Boat Go Faster in 2023
Let customers speak for us
WIP have really pulled out all the stops on this impact vest to suit all forms of hi-performance watersports. Feels great on, good snug fit - no restrictions to movement and doesn't impact on trapezing like a lot of buoyancy aids. A very well made, high quality vest that has everything you need to keep you safe on the water.
Purchased for my old Albacore sailing dinghy. This is a well made quality cover with straps and clips that look like they’ll last many years. I no longer have to bail out the boat before sailing!
Found the staff at Sailing Chandlery most helpful to a no-yachtsman with flags to fly to cheer the day.
It may seem strange but my husband purchased this item as he was making me some wooden bunting for our outside space. The range of colours was fab and the rope is ideal for our needs. Easy to order and arrived quickly….great service
Made with good quality material and sizing is accurate. Comfortable to wear with plenty of secure pocket space. Buoyancy aid arrived promptly and securely wrapped.
Waterproof, spacious and different ways to carry it
Perfect arrived on time....
nothing to fault it, it’s got ce rating and worked great on a trip down to weymouth
Order placed and boom received in time to get back on the water, class legal, packed accurately in a bulletproof bag with bubble wrap and extra foam to protect blocks and fittings. Any defect? Nope! Thanks all Sailing Chandlery’s staff
Good sized, well made waterproof bag, ideal for sailing
Easy to fit and great feel.
Good quality with novel scull and crossbones adhesive tabs.
I ordered a rope bag for learning knots this item arrived quickly and is much appreciated
Top Notch Service !👍
Great addition to our training fleet - good product backed up by brilliant delivery. Thanks.
SIGN UP TO OUR NEWSLETTER
Save up to 40% on your next order.

Beginner’s Guide: How To Rig A Sailboat – Step By Step Tutorial
Alex Morgan
Rigging a sailboat is a crucial process that ensures the proper setup and functioning of a sailboat’s various components. Understanding the process and components involved in rigging is essential for any sailor or boat enthusiast. In this article, we will provide a comprehensive guide on how to rig a sailboat.
Introduction to Rigging a Sailboat
Rigging a sailboat refers to the process of setting up the components that enable the sailboat to navigate through the water using wind power. This includes assembling and positioning various parts such as the mast, boom, standing rigging, running rigging, and sails.
Understanding the Components of a Sailboat Rigging
Before diving into the rigging process, it is important to have a good understanding of the key components involved. These components include:
The mast is the tall vertical spar that provides vertical support to the sails and holds them in place.
The boom is the horizontal spar that runs along the bottom edge of the sail and helps control the shape and position of the sail.
- Standing Rigging:
Standing rigging consists of the wires and cables that support and stabilize the mast, keeping it upright.
- Running Rigging:
Running rigging refers to the lines and ropes used to control the sails, such as halyards, sheets, and control lines.
Preparing to Rig a Sailboat
Before rigging a sailboat, there are a few important steps to take. These include:
- Checking the Weather Conditions:
It is crucial to assess the weather conditions before rigging a sailboat. Unfavorable weather, such as high winds or storms, can make rigging unsafe.
- Gathering the Necessary Tools and Equipment:
Make sure to have all the necessary tools and equipment readily available before starting the rigging process. This may include wrenches, hammers, tape, and other common tools.
- Inspecting the Rigging Components:
In the upcoming sections of this article, we will provide a step-by-step guide on how to rig a sailboat, as well as important safety considerations and tips to keep in mind. By following these guidelines, you will be able to rig your sailboat correctly and safely, allowing for a smooth and enjoyable sailing experience.
Key takeaway:
- Rigging a sailboat maximizes efficiency: Proper rigging allows for optimized sailing performance, ensuring the boat moves smoothly through the water.
- Understanding sailboat rigging components: Familiarity with the various parts of a sailboat rigging, such as the mast, boom, and standing and running riggings, is essential for effective rigging setup.
- Importance of safety in sailboat rigging: Ensuring safety is crucial during the rigging process, including wearing a personal flotation device, securing loose ends and lines, and being mindful of overhead power lines.
Get ready to set sail and dive into the fascinating world of sailboat rigging! We’ll embark on a journey to understand the various components that make up a sailboat’s rigging. From the majestic mast to the nimble boom , and the intricate standing rigging to the dynamic running rigging , we’ll explore the crucial elements that ensure smooth sailing. Not forgetting the magnificent sail, which catches the wind and propels us forward. So grab your sea legs and let’s uncover the secrets of sailboat rigging together.
Understanding the mast is crucial when rigging a sailboat. Here are the key components and steps to consider:
1. The mast supports the sails and rigging of the sailboat. It is made of aluminum or carbon fiber .
2. Before stepping the mast , ensure that the area is clear and the boat is stable. Have all necessary tools and equipment ready.
3. Inspect the mast for damage or wear. Check for corrosion , loose fittings , and cracks . Address any issues before proceeding.
4. To step the mast , carefully lift it into an upright position and insert the base into the mast step on the deck of the sailboat.
5. Secure the mast using the appropriate rigging and fasteners . Attach the standing rigging , such as shrouds and stays , to the mast and the boat’s hull .
Fact: The mast of a sailboat is designed to withstand wind resistance and the tension of the rigging for stability and safe sailing.
The boom is an essential part of sailboat rigging. It is a horizontal spar that stretches from the mast to the aft of the boat. Constructed with durable yet lightweight materials like aluminum or carbon fiber, the boom provides crucial support and has control over the shape and position of the sail. It is connected to the mast through a boom gooseneck , allowing it to pivot. One end of the boom is attached to the mainsail, while the other end is equipped with a boom vang or kicker, which manages the tension and angle of the boom. When the sail is raised, the boom is also lifted and positioned horizontally by using the topping lift or lazy jacks.
An incident serves as a warning that emphasizes the significance of properly securing the boom. In strong winds, an improperly fastened boom swung across the deck, resulting in damage to the boat and creating a safety hazard. This incident highlights the importance of correctly installing and securely fastening all rigging components, including the boom, to prevent accidents and damage.
3. Standing Rigging
When rigging a sailboat, the standing rigging plays a vital role in providing stability and support to the mast . It consists of several key components, including the mast itself, along with the shrouds , forestay , backstay , and intermediate shrouds .
The mast, a vertical pole , acts as the primary support structure for the sails and the standing rigging. Connected to the top of the mast are the shrouds , which are cables or wires that extend to the sides of the boat, providing essential lateral support .
The forestay is another vital piece of the standing rigging. It is a cable or wire that runs from the top of the mast to the bow of the boat, ensuring forward support . Similarly, the backstay , also a cable or wire, runs from the mast’s top to the stern of the boat, providing important backward support .
To further enhance the rig’s stability , intermediate shrouds are installed. These additional cables or wires are positioned between the main shrouds, as well as the forestay or backstay. They offer extra support , strengthening the standing rigging system.
Regular inspections of the standing rigging are essential to detect any signs of wear, such as fraying or corrosion . It is crucial to ensure that all connections within the rig are tight and secure, to uphold its integrity. Should any issues be identified, immediate attention must be given to prevent accidents or damage to the boat. Prioritizing safety is of utmost importance when rigging a sailboat, thereby necessitating proper maintenance of the standing rigging. This ensures a safe and enjoyable sailing experience.
Note: <p> tags have been kept intact.
4. Running Rigging
Running Rigging
When rigging a sailboat, the running rigging is essential for controlling the sails and adjusting their position. It is important to consider several aspects when dealing with the running rigging.
1. Choose the right rope: The running rigging typically consists of ropes with varying properties such as strength, stretch, and durability. Weather conditions and sailboat size should be considered when selecting the appropriate rope.
2. Inspect and maintain the running rigging: Regularly check for signs of wear, fraying, or damage. To ensure safety and efficiency, replace worn-out ropes.
3. Learn essential knot tying techniques: Having knowledge of knots like the bowline, cleat hitch, and reef knot is crucial for securing the running rigging and adjusting sails.
4. Understand different controls: The running rigging includes controls such as halyards, sheets, and control lines. Familiarize yourself with their functions and proper usage to effectively control sail position and tension.
5. Practice proper sail trimming: Adjusting the tension of the running rigging significantly affects sailboat performance. Mastering sail trimming techniques will help optimize sail shape and maximize speed.
By considering these factors and mastering running rigging techniques, you can enhance your sailing experience and ensure the safe operation of your sailboat.
The sail is the central component of sailboat rigging as it effectively harnesses the power of the wind to propel the boat.
When considering the sail, there are several key aspects to keep in mind:
– Material: Sails are typically constructed from durable and lightweight materials such as Dacron or polyester. These materials provide strength and resistance to various weather conditions.
– Shape: The shape of the sail plays a critical role in its overall performance. A well-shaped sail should have a smooth and aerodynamic profile, which allows for maximum efficiency in capturing wind power.
– Size: The size of the sail is determined by its sail area, which is measured in square feet or square meters. Larger sails have the ability to generate more power, but they require greater skill and experience to handle effectively.
– Reefing: Reefing is the process of reducing the sail’s size to adapt to strong winds. Sails equipped with reefing points allow sailors to decrease the sail area, providing better control in challenging weather conditions.
– Types: There are various types of sails, each specifically designed for different purposes. Common sail types include mainsails, jibs, genoas, spinnakers, and storm sails. Each type possesses its own unique characteristics and is utilized under specific wind conditions.
Understanding the sail and its characteristics is vital for sailors, as it directly influences the boat’s speed, maneuverability, and overall safety on the water.
Getting ready to rig a sailboat requires careful preparation and attention to detail. In this section, we’ll dive into the essential steps you need to take before setting sail. From checking the weather conditions to gathering the necessary tools and equipment, and inspecting the rigging components, we’ll ensure that you’re fully equipped to navigate the open waters with confidence. So, let’s get started on our journey to successfully rigging a sailboat!
1. Checking the Weather Conditions
Checking the weather conditions is crucial before rigging a sailboat for a safe and enjoyable sailing experience. Monitoring the wind speed is important in order to assess the ideal sailing conditions . By checking the wind speed forecast , you can determine if the wind is strong or light . Strong winds can make sailboat control difficult, while very light winds can result in slow progress.
Another important factor to consider is the wind direction . Assessing the wind direction is crucial for route planning and sail adjustment. Favorable wind direction helps propel the sailboat efficiently, making your sailing experience more enjoyable.
In addition to wind speed and direction, it is also important to consider weather patterns . Keep an eye out for impending storms or heavy rain. It is best to avoid sailing in severe weather conditions that may pose a safety risk. Safety should always be a top priority when venturing out on a sailboat.
Another aspect to consider is visibility . Ensure good visibility by checking for fog, haze, or any other conditions that may hinder navigation. Clear visibility is important for being aware of other boats and potential obstacles that may come your way.
Be aware of the local conditions . Take into account factors such as sea breezes, coastal influences, or tidal currents. These local factors greatly affect sailboat performance and safety. By considering all of these elements, you can have a successful and enjoyable sailing experience.
Here’s a true story to emphasize the importance of checking the weather conditions. One sunny afternoon, a group of friends decided to go sailing. Before heading out, they took the time to check the weather conditions. They noticed that the wind speed was expected to be around 10 knots, which was perfect for their sailboat. The wind direction was coming from the northwest, allowing for a pleasant upwind journey. With clear visibility and no approaching storms, they set out confidently, enjoying a smooth and exhilarating sail. This positive experience was made possible by their careful attention to checking the weather conditions beforehand.
2. Gathering the Necessary Tools and Equipment
To efficiently gather all of the necessary tools and equipment for rigging a sailboat, follow these simple steps:
- First and foremost, carefully inspect your toolbox to ensure that you have all of the basic tools such as wrenches, screwdrivers, and pliers.
- Make sure to check if you have a tape measure or ruler available as they are essential for precise measurements of ropes or cables.
- Don’t forget to include a sharp knife or rope cutter in your arsenal as they will come in handy for cutting ropes or cables to the desired lengths.
- Gather all the required rigging hardware including shackles, pulleys, cleats, and turnbuckles.
- It is always prudent to check for spare ropes or cables in case replacements are needed during the rigging process.
- If needed, consider having a sailing knife or marlinspike tool for splicing ropes or cables.
- For rigging a larger sailboat, it is crucial to have a mast crane or hoist to assist with stepping the mast.
- Ensure that you have a ladder or some other means of reaching higher parts of the sailboat, such as the top of the mast.
Once, during the preparation of rigging my sailboat, I had a moment of realization when I discovered that I had forgotten to bring a screwdriver . This unfortunate predicament occurred while I was in a remote location with no nearby stores. Being resourceful, I improvised by utilizing a multipurpose tool with a small knife blade, which served as a makeshift screwdriver. Although it was not the ideal solution, it allowed me to accomplish the task. Since that incident, I have learned the importance of double-checking my toolbox before commencing any rigging endeavor. This practice ensures that I have all of the necessary tools and equipment, preventing any unexpected surprises along the way.
3. Inspecting the Rigging Components
Inspecting the rigging components is essential for rigging a sailboat safely. Here is a step-by-step guide on inspecting the rigging components:
1. Visually inspect the mast, boom, and standing rigging for damage, such as corrosion, cracks, or loose fittings.
2. Check the tension of the standing rigging using a tension gauge. It should be within the recommended range from the manufacturer.
3. Examine the turnbuckles, clevis pins, and shackles for wear or deformation. Replace any damaged or worn-out hardware.
4. Inspect the running rigging, including halyards and sheets, for fraying, signs of wear, or weak spots. Replace any worn-out lines.
5. Check the sail for tears, wear, or missing hardware such as grommets or luff tape.
6. Pay attention to the connections between the standing rigging and the mast. Ensure secure connections without any loose or missing cotter pins or rigging screws.
7. Inspect all fittings, such as mast steps, spreader brackets, and tangs, to ensure they are securely fastened and in good condition.
8. Conduct a sea trial to assess the rigging’s performance and make necessary adjustments.
Regularly inspecting the rigging components is crucial for maintaining the sailboat’s rigging system’s integrity, ensuring safe sailing conditions, and preventing accidents or failures at sea.
Once, I went sailing on a friend’s boat without inspecting the rigging components beforehand. While at sea, a sudden gust of wind caused one of the shrouds to snap. Fortunately, no one was hurt, but we had to cut the sail loose and carefully return to the marina. This incident taught me the importance of inspecting the rigging components before sailing to avoid unforeseen dangers.
Step-by-Step Guide on How to Rig a Sailboat
Get ready to set sail with our step-by-step guide on rigging a sailboat ! We’ll take you through the process from start to finish, covering everything from stepping the mast to setting up the running rigging . Learn the essential techniques and tips for each sub-section, including attaching the standing rigging and installing the boom and sails . Whether you’re a seasoned sailor or a beginner, this guide will have you ready to navigate the open waters with confidence .
1. Stepping the Mast
To step the mast of a sailboat, follow these steps:
1. Prepare the mast: Position the mast near the base of the boat.
2. Attach the base plate: Securely fasten the base plate to the designated area on the boat.
3. Insert the mast step: Lower the mast step into the base plate and align it with the holes or slots.
4. Secure the mast step: Use fastening screws or bolts to fix the mast step in place.
5. Raise the mast: Lift the mast upright with the help of one or more crew members.
6. Align the mast: Adjust the mast so that it is straight and aligned with the boat’s centerline.
7. Attach the shrouds: Connect the shrouds to the upper section of the mast, ensuring proper tension.
8. Secure the forestay: Attach the forestay to the bow of the boat, ensuring it is securely fastened.
9. Final adjustments: Check the tension of the shrouds and forestay, making any necessary rigging adjustments.
Following these steps ensures that the mast is properly stepped and securely in place, allowing for a safe and efficient rigging process. Always prioritize safety precautions and follow manufacturer guidelines for your specific sailboat model.
2. Attaching the Standing Rigging
To attach the standing rigging on a sailboat, commence by preparing the essential tools and equipment, including wire cutters, crimping tools, and turnbuckles.
Next, carefully inspect the standing rigging components for any indications of wear or damage.
After inspection, fasten the bottom ends of the shrouds and stays to the chainplates on the deck.
Then, securely affix the top ends of the shrouds and stays to the mast using adjustable turnbuckles .
To ensure proper tension, adjust the turnbuckles accordingly until the mast is upright and centered.
Utilize a tension gauge to measure the tension in the standing rigging, aiming for around 15-20% of the breaking strength of the rigging wire.
Double-check all connections and fittings to verify their security and proper tightness.
It is crucial to regularly inspect the standing rigging for any signs of wear or fatigue and make any necessary adjustments or replacements.
By diligently following these steps, you can effectively attach the standing rigging on your sailboat, ensuring its stability and safety while on the water.
3. Installing the Boom and Sails
To successfully complete the installation of the boom and sails on a sailboat, follow these steps:
1. Begin by securely attaching the boom to the mast. Slide it into the gooseneck fitting and ensure it is firmly fastened using a boom vang or another appropriate mechanism.
2. Next, attach the main sail to the boom. Slide the luff of the sail into the mast track and securely fix it in place using sail slides or cars.
3. Connect the mainsheet to the boom. One end should be attached to the boom while the other end is connected to a block or cleat on the boat.
4. Proceed to attach the jib or genoa. Make sure to securely attach the hanks or furler line to the forestay to ensure stability.
5. Connect the jib sheets. One end of each jib sheet should be attached to the clew of the jib or genoa, while the other end is connected to a block or winch on the boat.
6. Before setting sail, it is essential to thoroughly inspect all lines and connections. Ensure that they are properly tensioned and that all connections are securely fastened.
During my own experience of installing the boom and sails on my sailboat, I unexpectedly encountered a strong gust of wind. As a result, the boom began swinging uncontrollably, requiring me to quickly secure it to prevent any damage. This particular incident served as a vital reminder of the significance of properly attaching and securing the boom, as well as the importance of being prepared for unforeseen weather conditions while rigging a sailboat.
4. Setting Up the Running Rigging
Setting up the running rigging on a sailboat involves several important steps. First, attach the halyard securely to the head of the sail. Then, connect the sheets to the clew of the sail. If necessary, make sure to secure the reefing lines . Attach the outhaul line to the clew of the sail and connect the downhaul line to the tack of the sail. It is crucial to ensure that all lines are properly cleated and organized. Take a moment to double-check the tension and alignment of each line. If you are using a roller furling system, carefully wrap the line around the furling drum and securely fasten it. Perform a thorough visual inspection of the running rigging to check for any signs of wear or damage. Properly setting up the running rigging is essential for safe and efficient sailing. It allows for precise control of the sail’s position and shape, ultimately optimizing the boat’s performance on the water.
Safety Considerations and Tips
When it comes to rigging a sailboat, safety should always be our top priority. In this section, we’ll explore essential safety considerations and share some valuable tips to ensure smooth sailing. From the importance of wearing a personal flotation device to securing loose ends and lines, and being cautious around overhead power lines, we’ll equip you with the knowledge and awareness needed for a safe and enjoyable sailing experience. So, let’s set sail and dive into the world of safety on the water!
1. Always Wear a Personal Flotation Device
When rigging a sailboat, it is crucial to prioritize safety and always wear a personal flotation device ( PFD ). Follow these steps to properly use a PFD:
- Select the appropriate Coast Guard-approved PFD that fits your size and weight.
- Put on the PFD correctly by placing your arms through the armholes and securing all the straps for a snug fit .
- Adjust the PFD for comfort , ensuring it is neither too tight nor too loose, allowing freedom of movement and adequate buoyancy .
- Regularly inspect the PFD for any signs of wear or damage, such as tears or broken straps, and replace any damaged PFDs immediately .
- Always wear your PFD when on or near the water, even if you are a strong swimmer .
By always wearing a personal flotation device and following these steps, you will ensure your safety and reduce the risk of accidents while rigging a sailboat. Remember, prioritize safety when enjoying water activities.
2. Secure Loose Ends and Lines
Inspect lines and ropes for frayed or damaged areas. Secure loose ends and lines with knots or appropriate cleats or clamps. Ensure all lines are properly tensioned to prevent loosening during sailing. Double-check all connections and attachments for security. Use additional safety measures like extra knots or stopper knots to prevent line slippage.
To ensure a safe sailing experience , it is crucial to secure loose ends and lines properly . Neglecting this important step can lead to accidents or damage to the sailboat. By inspecting, securing, and tensioning lines , you can have peace of mind knowing that everything is in place. Replace or repair any compromised lines or ropes promptly. Securing loose ends and lines allows for worry-free sailing trips .
3. Be Mindful of Overhead Power Lines
When rigging a sailboat, it is crucial to be mindful of overhead power lines for safety. It is important to survey the area for power lines before rigging the sailboat. Maintain a safe distance of at least 10 feet from power lines. It is crucial to avoid hoisting tall masts or long antenna systems near power lines to prevent contact. Lower the mast and tall structures when passing under a power line to minimize the risk of contact. It is also essential to be cautious in areas where power lines run over the water and steer clear to prevent accidents.
A true story emphasizes the importance of being mindful of overhead power lines. In this case, a group of sailors disregarded safety precautions and their sailboat’s mast made contact with a low-hanging power line, resulting in a dangerous electrical shock. Fortunately, no serious injuries occurred, but it serves as a stark reminder of the need to be aware of power lines while rigging a sailboat.
Some Facts About How To Rig A Sailboat:
- ✅ Small sailboat rigging projects can improve sailing performance and save money. (Source: stingysailor.com)
- ✅ Rigging guides are available for small sailboats, providing instructions and tips for rigging. (Source: westcoastsailing.net)
- ✅ Running rigging includes lines used to control and trim the sails, such as halyards and sheets. (Source: sailingellidah.com)
- ✅ Hardware used in sailboat rigging includes winches, blocks, and furling systems. (Source: sailingellidah.com)
- ✅ A step-by-step guide can help beginners rig a small sailboat for sailing. (Source: tripsavvy.com)
Frequently Asked Questions
1. how do i rig a small sailboat.
To rig a small sailboat, follow these steps: – Install or check the rudder, ensuring it is firmly attached. – Attach or check the tiller, the long steering arm mounted to the rudder. – Attach the jib halyard by connecting the halyard shackle to the head of the sail and the grommet in the tack to the bottom of the forestay. – Hank on the jib by attaching the hanks of the sail to the forestay one at a time. – Run the jib sheets by tying or shackling them to the clew of the sail and running them back to the cockpit. – Attach the mainsail by spreading it out and attaching the halyard shackle to the head of the sail. – Secure the tack, clew, and foot of the mainsail to the boom using various lines and mechanisms. – Insert the mainsail slugs into the mast groove, gradually raising the mainsail as the slugs are inserted. – Cleat the main halyard and lower the centerboard into the water. – Raise the jib by pulling down on the jib halyard and cleating it on the other side of the mast. – Tighten the mainsheet and one jibsheet to adjust the sails and start moving forward.
2. What are the different types of sailboat rigs?
Sailboat rigs can be classified into three main types: – Sloop rig: This rig has a single mast with a mainsail and a headsail, typically a jib or genoa. – Cutter rig: This rig has two headsails, a smaller jib or staysail closer to the mast, and a larger headsail, usually a genoa, forward of it, alongside a mainsail. – Ketch rig: This rig has two masts, with the main mast taller than the mizzen mast. It usually has a mainsail, headsail, and a mizzen sail. Each rig has distinct characteristics and is suitable for different sailing conditions and preferences.
3. What are the essential parts of a sailboat?
The essential parts of a sailboat include: – Mast: The tall vertical spar that supports the sails. – Boom: The horizontal spar connected to the mast, which extends outward and supports the foot of the mainsail. – Rudder: The underwater appendage that steers the boat. – Centerboard or keel: A retractable or fixed fin-like structure that provides stability and prevents sideways drift. – Sails: The fabric structures that capture the wind’s energy to propel the boat. – Running rigging: The lines or ropes used to control the sails and sailing equipment. – Standing rigging: The wires and cables that support the mast and reinforce the spars. These are the basic components necessary for the functioning of a sailboat.
4. What is a spinnaker halyard?
A spinnaker halyard is a line used to hoist and control a spinnaker sail. The spinnaker is a large, lightweight sail that is used for downwind sailing or reaching in moderate to strong winds. The halyard attaches to the head of the spinnaker and is used to raise it to the top of the mast. Once hoisted, the spinnaker halyard can be adjusted to control the tension and shape of the sail.
5. Why is it important to maintain and replace worn running rigging?
It is important to maintain and replace worn running rigging for several reasons: – Safety: Worn or damaged rigging can compromise the integrity and stability of the boat, posing a safety risk to both crew and vessel. – Performance: Worn rigging can affect the efficiency and performance of the sails, diminishing the boat’s speed and maneuverability. – Reliability: Aging or worn rigging is more prone to failure, which can lead to unexpected problems and breakdowns. Regular inspection and replacement of worn running rigging is essential to ensure the safe and efficient operation of a sailboat.
6. Where can I find sailboat rigging books or guides?
There are several sources where you can find sailboat rigging books or guides: – Online: Websites such as West Coast Sailing and Stingy Sailor offer downloadable rigging guides for different sailboat models. – Bookstores: Many bookstores carry a wide selection of boating and sailing books, including those specifically focused on sailboat rigging. – Sailing schools and clubs: Local sailing schools or yacht clubs often have resources available for learning about sailboat rigging. – Manufacturers: Some sailboat manufacturers, like Hobie Cat and RS Sailing, provide rigging guides for their specific sailboat models. Consulting these resources can provide valuable information and instructions for rigging your sailboat properly.
About the author

Leave a Reply Cancel reply
Your email address will not be published. Required fields are marked *
Save my name, email, and website in this browser for the next time I comment.
Latest posts

The history of sailing – from ancient times to modern adventures
History of Sailing Sailing is a time-honored tradition that has evolved over millennia, from its humble beginnings as a means of transportation to a beloved modern-day recreational activity. The history of sailing is a fascinating journey that spans cultures and centuries, rich in innovation and adventure. In this article, we’ll explore the remarkable evolution of…

Sailing Solo: Adventures and Challenges of Single-Handed Sailing
Solo Sailing Sailing has always been a pursuit of freedom, adventure, and self-discovery. While sailing with a crew is a fantastic experience, there’s a unique allure to sailing solo – just you, the wind, and the open sea. Single-handed sailing, as it’s often called, is a journey of self-reliance, resilience, and the ultimate test of…

Sustainable Sailing: Eco-Friendly Practices on the boat
Eco Friendly Sailing Sailing is an exhilarating and timeless way to explore the beauty of the open water, but it’s important to remember that our oceans and environment need our protection. Sustainable sailing, which involves eco-friendly practices and mindful decision-making, allows sailors to enjoy their adventures while minimizing their impact on the environment. In this…
PLEASE NOTE: Southeast Sailboats is closed from 13-23 April. Southeast Sailboats will be competing at the Spanish EuroMasters event.
Orders placed will be shipped commencing the 24th April.
Your understanding is much appreciated.

- Outhaul Systems Guide
- Outhaul Systems - Normal
- Outhaul Systems - Quick Release
- Clew Blocks
- Outhaul Elastics
- Block Assemblies at Boom
- Block Assemblies at Gooseneck
- Primary/Secondary Assemblies
- Calibration Strips
- Primary and Secondary Lines
- Downhaul Systems Guide
- 6:1 Downhaul Systems
- 8:1 Downhaul Systems
- 10:1 Downhaul Systems
- Primary Line Assemblies
- Lower Strop Assemblies
- Caribiner Attachment
- Kicker Systems Guide
- Kicker Systems
- Kicker Components
- Kicker Primary Line Assemblies
- Ratchet Blocks
- Boom/Traveller Blocks
- Kicker Blocks
- Control Line
- D12 Dyneema
- Wear Protect
- Block Plate and Assemblies
- Cleats and Cleat Assemblies
- Wind Indicators
- Mast Retainer
- Centreboard Strop
- Centreboard Friction Pad
- Centreboard Elastic and Clips
- Self Bailer and Springs
- Transom Bung
- Titanium Mega Bolt
- Silicone Sealant
- Hiking Straps
- Toggles and Dogbones
- Loops and Soft Shackles
- Splicing Kits and Tools
- Universal Joint
- Tillers, Extensions etc
- Gift Vouchers
This section doesn’t currently include any content. Add content to this section using the sidebar.
Add description and links to your promotion
Your headline
Image caption appears here
Your product's name
Add your deal, information or promotional text
Outhaul Systems - Ordering Guide
The following is designed to help you choose the optimum outhaul system by looking at what is important, the types of system available, and then the blocks, rope, inhaul bungee and clew strap. If you have any questions or need further advice please don’t hesitate to contact us.
What’s Important
Unlike the kicker and downhaul, the forces on the outhaul system are lower, but to be effective the outhaul system needs careful attention. All of our systems have a 6:1 purchase which is what the vast majority of Laser sailors use. There are a number of variations on the 6:1 system relating to how the sail clew is attached to the system, and where the system blocks are located.
As the forces are lower, the block type and size on the outhaul isn’t as critical. What is really important to effective operation of an outhaul system is the clew strap and the elastic, as we want to be able to pull the outhaul on easily without it getting snagged up on the boom, and when we release it we want the sail to run out by itself, even in the lightest wind, without having to help it.
The first decision to make is about how the sail is attached to the clew
There are two main types of system, both of which enable the sail clew to be easily released from the outhaul system, but in different ways.
Normal System
The normal system has the primary line fixed to the boom end eye and uses a clew block attached to a hook or shackle, so that you can easily detach the outhaul system from the clew of the sail without having to undo any knots. There are a number of hooks available and they are subtly different. We use the Harken hook in conjunction with a choice of block type. But the hook can get caught and release inadvertently. A good alternative to the hook is a captive click shackle.

Example Clew Blocks with hook and with shackle
Quick Release System
The quick release system uses a large loop that fits over the end of the boom and a block that is fixed to the sail clew. Our spliced clew block is a neat way of having a block secure on your clew, with the advantage of being able to move it from sail to sail. Blocks permanently attached to the sail clew are what a lot of the top sailors use due to the security it provides, but you need a way of easy way of undoing the outhaul primary to release the sail when you come ashore. One way of doing this is to have a ‘quick release’ system where the primary line has a large loop that fits snugly over the end of the boom. This neat solution is becoming more and more popular. For more information as to how this system is rigged have a look at the installation instructions .

Spliced Ronstan 20mm clew block and attached to sail
We offer both of the above system types, which are listed separately under Outhaul System Normal and Outhaul System Quick Release pages. Note that our outhaul systems assume that you are using a clew block – if you don’t want to use a clew block, send us an e-mail after any order and we will lengthen the primary by 10cm to compensate.
Where do you want the blocks located?
There are three choices here: 1. Centre Top of Boom – The first (and most popular) is to have the centre block fixed to the cleat in the middle of the boom so that it sits on top of the boom, one block along the boom, and the third block at the gooseneck.

Block Location – Centre Top of Boom
2. Centre Side of Boom – The second variation is very similar to the first, but the block at the cleat sits alongside the boom, rather than on top.

Block Location – Centre Side of Boom
3. Front of Boom – The third variation has two blocks on a strop at the gooseneck, and the third block in the system located towards the front of the boom at the end of a longer primary line.

Block Location – Front of Boom
There is no measurable performance difference between the systems – it is mainly down to personal preference and how/where you like to mark your calibration markings on the boom. You can choose what is best for you via the Block Location drop-down menu. If you are un-decided as which configuration is best for you, have a read of this article by four top sailors.
If you want an outhaul system that is specifically built and optimised for the 4.7 rig, add the System Option ‘4.7 Rig Optimisation’ that is listed below the outhaul systems.
Block Types
Unlike the downhaul, the outhaul can get away with smaller blocks and we recommend Harken T2 Soft-Attach 18mm (which is what you get with a new Laser) or the economic Allen 20mm Dynamic Tii or Ronstan 20mm Orbit blocks.

From left to right Allen 20mm Dynamic Tii, Ronstan 20mm Orbit block, Harken T2 Soft-Attach 18mm and 29mm blocks. All blocks will do a great job on your outhaul system, but the re-roping of the system should also be considered. The small diameter of the 'axle' through the centre of the Allen block makes it impossible to thread a 4mm secondary line through - you have to do a 'naked eye' splice as we do for our systems. A 4mm can be 'teased through' the Ronstan 20mm and Harken 18mm block.
For the primary line a light but strong 3mm D12 Dyneema is perfect. For the secondary line (the one that you pull on) we use Robline Dinghy Control as the standard line and Robline Dinghy Polytech as our premium line. The Polytech has Technora in the cover which makes it more durable. Gottifredi Maffioli EVO Race 78 which is similar in performance to Dinghy Control is also available - if you want this line order your system with Dinghy Control and add a note at checkout saying that you want EVO Race 78. All our secondary line ends are epoxied/heatshrink sleeved to help keep them nice and tidy. We offer a wide range of primary/secondary colour combinations. If you want more information on our secondary lines and how to select which is best for you read our article on selecting secondary lines .
Handle Type
The secondary control line length can be selected for either a simple loop handle or a braided handle.

Simple loop and braided chain handle types
Outhaul Elastic/Inhaul Bungee
You need a shock cord to help release the outhaul in light winds. This wants to pull the clew of the sail back along the boom in the most effective manner. There are two types of outhaul elastic/inhaul bungee systems.
- The first is a simple bungee that just pulls the sail clew back in towards the boom centre cleat.
- The second, and far better type, is a ‘double puller’ elastic. One part of the elastic pulls the clew back in, and the second part pulls the control line back through the blocks, fairlead and cleat. The double puller is attached at the boom cleat at one end, and just behind the floating outhaul block at the other. To do this in an easy to rig way we use a bungee with loops at each end, and a toggle to loop the free end of the bungee over.

Double Puller Outhaul Elastic System Option
You will find both of the above listed underneath the outhaul systems under Systems Options
Finally, it is also important to use a good quality clew strap to reduce friction in the system to a minimum, and McLube the end of the boom to ensure that it is nice and slippy.
Rigging Instructions
All our systems are supplied with detailed rigging instructions which can be seen here:
Normal outhaul - Port Side Rigging installation instructions
Normal outhaul - Starboard Side Rigging installation instructions
Quick Release outhaul installation instructions .
Switching between 4.7 and Radial rigs
One of the questions that we regularly get asked is how to easily adapt the outhaul system for sailors who regularly switch between 4.7 and Radial rigs. The foot of the 4.7 sail is about 10 inches/26cm shorter than the Radial. There isn’t a simple answer to this question as it depends on the type of outhaul system being used, type of clew block and also the type of inhaul bungee you are using.
For a ‘normal’ outhaul system where the end of the thin primary line is luggage tagged to the blue plastic eye on the end of the boom, one simple way to adapt a radial/standard rig outhaul is to use a short extender strop luggage tagged to the 4.7 sail. This works with a clew block with a captive shackle, but not with the hook. The extender strop is listed on the primary lines page .

4.7 Extender Strop
For a ‘quick release’ system where there is a large loop that fits over the end of the boom, things are a bit easier. In this type of system the clew block remains attached to the sail. On the radial, this block typically sits close to the clew, attached by a ‘semi-permanent’ fixing such as a Dyneema soft shackle, or strop with toggle, or one of our ‘luggage tag’ blocks. To adapt this outhaul system for the 4.7 rig, a simple solution is to have a clew block attached to your 4.7 sail with a longer strop, so that when rigged it will sit in the same position as the block on a radial sail. We have added this clew block/strop for the 4.7 rig available with a range of blocks. These are listed towards the bottom of the quick release outhaul page under system options.

4.7 Extender Strop/Clew Block
Whatever outhaul system type you use, the inhaul bungee/outhaul elastic will need to be switched between rigs as it is important that it goes through the sail clew grommet, and not the clew block/shackle or hook. Therefore, one length of bungee will not work – you need to use the right length for each rig. We offer both ordinary and our double puller elastic for the radial/standard and 4.7 rigs.
Outhaul FAQ’s:
- You offer both normal and ‘quick release’ outhaul systems – can you explain the pros and cons of both and how I should decide what is best for me. Like a lot of choices when it comes to rigging your Laser a lot is down to personal preference, often based on what we have got used to using. Both the normal and ‘quick release’ are popular ways of rigging the outhaul. The normal version has the primary line fixed to the boom end eye and relies on a clew block as the way of releasing the sail. There are numerous clew block options to choose from including the ubiquitous hook, or a captive shackle. The ‘quick release’ system was developed as top sailors wanted to have a clew block permanently tied onto their sail, and needed a way of releasing the sail from the outhaul system – which resulted in the large loop that fits over the end of the boom. It is very quick and easy to rig. Both systems work just as well as each other functionally. From a rigging and derigging perspective the ‘quick release’ version is marginally easier. From a security perspective, the normal version is less likely to fail – the ‘quick release’ version can get accidentially pulled off the end of the boom if it got snagged on a RIB or other boat for example (some sailors put a wrap of tape over the loop, but this seems to detract from the rigging simplicity). Personally, having used both, I use the normal version with a captive shackle/clew block.
- Should I choose a Harken 18mm/Allen 20mm or Harken 29mm block for the outhaul system? The loads on the outhaul system are low in comparison with the downhaul system and as a result we can use a smaller block for the outhaul. If the budget allows, then using the Harken 29mm block will result in a better system as ropes run better through larger sheave blocks, but priority should always be using the available budget on the kicker and downhaul before the outhaul.
- You offer both top of boom and side of boom centre blocks for your outhaul systems. Why? What is best for me? Again this is down to personal preference, but the top of block version makes it easier to see the outhaul calibration on both tacks.
- Why is there only a Ronstan 20mm version of the spliced clew block when every other clew block has Harken, Allen and Ronstan versions? The spliced clew block is designed for use with the quick release version of our outhaul system which has a large loop that fits over the end of the boom. The spliced clew block is ‘permanently’ fixed to the sail – i.e. it can be removed when the outhaul system is rigged. The large loop on the end of the primary line has to fit through the opening in the clew block and the Ronstan 20mm block as the largest opening of all the small 18-20mm blocks. We now offer a Harken 18mm spliced clew block which works when you have a thin ‘teaser line’ attached to the large loop to help thread it through. An obvious question would be why not use a 29mm block? The answer is that a 29mm block can be used successfully if it is physically tied on close to the sail, but with a spliced loop version the block ends up too far away from the sail and will ‘bottom out’ by hitting the boom end eye before the outhaul is fully on.
- Should I choose Harken or Allen blocks for my system? Harken T2 Carbo blocks are the ‘de facto’ standard on the Laser, being provided with all new Lasers built in the UK. The Allen blocks are more economic, but are slightly heavier. Functionally they are very similar.
- Your range of clew blocks is a bit daunting – what is the best solution? Firstly it important to distinguish between the two fundamental types of clew blocks: the first type are designed to be released from the clew of the sail every time we rig (using either a hook, shackle, or in some cases toggle); the second type are designed to stay ‘permanently’ fixed to the sail, and are used in conjunction with a ‘quick release’ type of outhaul system which has a large loop that slides over the end of the boom which act as the release mechanism. For the first type, personal preference on what we are happy with is a major factor – some sailors are perfectly happy with the Harken type hook, others prefer the security that a shackle or toggle brings. For the second type, the Ronstan 20mm spliced clew block is arguably the best and the most economic solution .
- Can I see the instructions as to how the systems are rigged? Yes, the links to the rigging instructions are here:
General Questions:
- I am unsure of what is best for me – do you offer free advice? Yes, we offer free advice on what we feel is best for you, based on years of sailing the ILCA/Laser at championship level. Just contact us at [email protected]
- I like to rig my ILCA/Laser differently. Do you offer custom systems? Yes. A quick walk around the boat park at even a world championship will show that there is no ‘right way’ to a rig a Laser – a lot is down to personal preference, and we are happy to build up exactly what you want.
- Do I have to have everything spliced together? The answer is no, but there are a number of reasons why we splice our systems together. For the primary lines, the fixing to the new ‘soft attach’ blocks is important that it is done correctly, as an incorrectly fixed primary line can pull apart the head of the block. For the secondary lines, particularly the smaller Harken 18mm and Allen 20mm blocks, the size of the sheave makes it difficult to thread a 4mm control line through when a 3mm primary line has already been threaded through .
- Having a spliced system is great, but what happens when the ropes inevitably wear out? If you liked the original spliced system that we supplied we can rebuild the system using your original blocks. Just send the blocks back to us and we can replace and re-splice the lines for you.
- I have just bought a new ILCA dinghy and I have the bag of blocks and ropes that comes with it. Can you put it all together for me? Yes, we have done this for a number of customers. The bag of ropes that comes with a new Laser can be daunting. We can turn all those ropes and blocks into a ready to fit system - just email us at [email protected] for more information.
(+44) 07880 500233
southeastsailboats
southeast_sailboats
Southeast Sailboats
We use cookies on our website to give you the best shopping experience. By using this site, you agree to its use of cookies.
PLEASE NOTE
Southeast Sailboats is closed from 13-23 April
Southeast Sailboats will be competing at the Spanish EuroMasters event.
Mark Reynolds
You should have enough purchase on your outhaul system that by the time it gets to the final line you pull on there shouldn't be enough load on line to make a big difference on what line you use. You don’t want any stretch in the system and you want it to run as smooth as possible. I have a 1/4" spectra blend line but after a wire system that has a total purchase of 12 to 1. I use a cascading purchase system that multiplies the purchase instead of putting it all into one place. This is more efficient because of the multiplying effect there are fewer pulleys. There is a 2-1 inside the boom that then goes to a 3-1 right before exiting the front of the boom. Then it goes to another 2 -1 with the line I pull on. This allows me to trim the outhaul when sheeted in tight in any wind condition.
The Discussion

Us, too. We pour that passion into each of our newsletters to help you enjoy sailing even more.

- Forum Listing
- Marketplace
- Advanced Search
- About The Boat
- Gear & Maintenance
- SailNet is a forum community dedicated to Sailing enthusiasts. Come join the discussion about sailing, modifications, classifieds, troubleshooting, repairs, reviews, maintenance, and more!
Outhaul Rigging?
- Add to quote
Hi all, Does anyone have handy pictures of their outhaul systems? I have a general idea of how to rig mine, but don't quite think I've got it right. Any help is appreciated. Thanks!

big gear? holly cow, that's stout fiddle blocks for a 26 ft boat. I have micro blocks with 4 to 1 and 1/4 (or smaller) line running to a cleat a few feet down the boom from the mast (right over the front of the cockpit). everything is external. I would go all the way to the mast and back into the cockpit if it were a raceboat and expected frequent adjustments. since i cruise this boat, I set at the start of the day's sail and usually leave it.
jrutledge33 said: holly cow, that's stout fiddle blocks for a 26 ft boat. I have micro blocks with 4 to 1 and 1/4 (or smaller) line running to a cleat a few feet down the boom from the mast (right over the front of the cockpit). everything is external. I would go all the way to the mast and back into the cockpit if it were a raceboat and expected frequent adjustments. since i cruise this boat, I set at the start of the day's sail and usually leave it. Click to expand...

craigtoo said: ....I really hate hardware inside a boom. You can't easily (and therefore won't) maintain any hardware in a boom. (at least I won't!).. It will cause problems before you know it. Click to expand...
craigtoo said: Please note I've been traveling for 23 hours straight and am in a small town in Eastern Europe. God knows what the hell I'm doing on Sailnet.... I think I have a problem.. Click to expand...
Thanks for all the good ideas guys. Sure I can figure something out from that!
Hi Andy, Welcome to Sailnet! I didn't run my Outhaul external. Here's what I did. I cut the old outhaul out as best I could. I let the pulleys stay in the boom to rattle around and die...along with whatever wire I couldn't get out through either end. I fished a new line with 4 ft. of wire spliced to its end through the boom. (From bow to stern) I took the wire end out the end of the boom towards the stern. I routed the wire UP through the sheave/pulley at the end of my boom. I added a small metal single block (pulley) to the sail... and routed the wire end UP through the small block on the sail and terminated the wire at the end of the boom with a shackle. To keep it simple, you could also just terminate the wire end at the sail and skip the block on the sail. Should be no problem for your boat. Got it? Good Luck!!!
Pic. Here's a pic. The outhaul wire is run up through the pulley at the end of the boom.. (you can't see that bit) then through a small block on the car (triangular lookin' thingy) at the clew of the sail, then terminated at the end of the boom. You could just run it up through the boom and terminate on the clew. Especially if you've got a winch to tension the outhaul already!
Attachments

- ?
- 174K members
Top Contributors this Month

Mainsheet Rigging: Essential Tips for Smooth Sailing
by Emma Sullivan | Aug 2, 2023 | Sailboat Maintenance
Short answer mainsheet rigging:
Mainsheet rigging refers to the setup and configuration of the line system used to control the mainsail on a sailboat. It typically involves a combination of blocks, lines, and hardware that allow for efficient adjustment of the mainsail’s angle and tension. The rigging is crucial for proper sail trim and performance during sailing maneuvers.
How to Properly Set Up Mainsheet Rigging: A Step-by-Step Guide
Title: Master the Art of Properly Setting Up Mainsheet Rigging: A Step-by-Step Guide to Smooth Sailing
Introduction: Setting up mainsheet rigging may feel like a daunting task, particularly for novice sailors, but fear not! With a little guidance and understanding, you’ll soon be able to navigate through this essential aspect of sailing with ease. In this comprehensive step-by-step guide, we will shed light on the intricacies involved in setting up mainsheet rigging, enabling you to hoist your sails confidently and navigate your vessel like a true professional.
Step 1: Gather Your Tools and Materials Before commencing the setup process, assemble the necessary tools and materials. You’ll need a range of equipment such as shackles, blocks, lines (ropes), cleats, and possibly a winch handle. Ensuring you have everything at hand will prevent unnecessary interruptions during installation.
Step 2: Choose an Optimal Purchase Type Your purchase type refers to how the mainsheet tackles are organized on your sailing vessel . The commonly used systems include single or double-ended purchases or even more advanced options like triple-ended purchases. Consider factors such as boat size, personal preference for control responsiveness versus mechanical advantage, and local wind conditions when selecting an appropriate purchase type .
Step 3: Attach Blocks Securely Attach your blocks to their designated mounting points using proper hardware like shackles or lashing techniques. Double-check that they are firmly secured before proceeding further since these blocks play a crucial role in transferring load forces throughout your mainsail system.
Step 4: Thread Lines through Blocks Start by threading one end of your mainsheet line through the primary block on your boom or traveler car, depending on the main sheeting system utilized. This end should be long enough to reach the helm or crew position comfortably while leaving some slack for adjustments later. Next, thread the other end through additional secondary blocks, considering the purchase type selected earlier.
Step 5: Step Up Control Mechanisms Once your mainsheet line is threaded correctly, you’ll need to incorporate control mechanisms like cam cleats or winches. Cam cleats offer quick release and require less hardware but are generally not suitable for high loads. Alternatively, a winch provides tremendous mechanical advantage when dealing with larger boats or powerful winds, ensuring precise sheeting control in all conditions.
Step 6: Adjust Standing and Running Rigging While setting up mainsheet rigging, it’s crucial to evaluate how your standing and running rigging interacts with each other. Make any necessary adjustments to maintain proper alignment and avoid friction or interference while maneuvering under sail.
Step 7: Test and Refine After completing the setup process meticulously, you’re ready for the real test – hoist your sails! Pay close attention to how your mainsheet rigging handles during different points of sail (upwind, downwind), adjusting as needed. Fine-tune any excess slack or tension by using the control mechanisms installed earlier until it feels responsive, balanced, and perfectly tailored to enhance your sailing experience .
Conclusion: Setting up mainsheet rigging may seem intricate at first glance, but with this step-by-step guide as your compass, you’ll navigate through the process like a seasoned sailor. Properly rigged mainsails contribute significantly to overall sailing performance and enjoyment. By carefully selecting appropriate tools and materials, assembling blocks securely, threading lines correctly, incorporating control mechanisms that suit your needs best—all while considering your standing and running rigging—you’ll ensure smooth sailing experiences that will leave both experienced sailors and newfound enthusiasts impressed by your mastery of this art.
Understanding Mainsheet Rigging: Frequently Asked Questions Answered
Do you know what plays a crucial role in controlling the sail trimming and overall performance of your sailboat ? It’s the mainsheet rigging! If you’re new to sailing or just looking to improve your understanding of mainsheet rigging, we’ve got you covered. In this blog post, we’ll answer some frequently asked questions about mainsheet rigging in a detailed and professional, yet witty and clever manner. So let’s dive right in!
1. What is mainsheet rigging? The mainsheet rigging refers to the system of ropes, blocks, and hardware used to control the tension and angle of the mainsail on a sailboat. It allows sailors to trim the sail according to wind conditions, steer their boat effectively, and optimize its performance.
2. How does it work? Imagine yourself as a puppeteer with strings attached to various parts of your body. The mainsheet is like the main string that runs through blocks (pulleys) attached to your boat’s boom, creating a powerful mechanical advantage. By pulling or releasing the mainsheet, you control the angle and tension of the mainsail, adjusting its shape for different wind speeds or points of sail .
3. What are blocks and why are they important? Blocks are essential components in any effective mainsheet rigging system. They consist of sheaves (pulleys) enclosed within a casing that reduces friction when lines pass through them. Blocks are strategically placed along the boom or deck to create purchase – multiplying your strength when hauling on the sheet line.
4. What type of block should I use? Choosing the right block depends on factors like boat size, loads encountered, personal preference, and budget constraints. For smaller boats or recreational sailing, simple single block systems may suffice. However, for larger vessels or high-performance racing boats where significant forces come into play, multiple blocks or even ball-bearing blocks are necessary to maintain control and minimize friction.
5. How do I set up a basic mainsheet rigging system? Setting up a basic mainsheet rigging system is relatively straightforward. Start by attaching the block(s) to the boom using appropriate hardware like shackles or snap hooks. Run the sheet line through the blocks, ensuring it runs smoothly without any tangles or unnecessary twists. Finally, secure one end of the sheet line to your boat’s cleat or winch, allowing easy adjustment and trimming while sailing.
6. What are traveler systems, and should I use them? Traveler systems are additional components that enhance mainsheet control by allowing horizontal movement of the block along a track mounted on the boat’s deck or coach roof. While they provide more precise sail trimming in certain wind conditions, their necessity depends on various factors such as sailboat type, size, and personal preference. Consulting with experienced sailors or professionals can help you make an informed decision regarding traveler systems.
7. Are there any common mistakes people make with mainsheet rigging? Oh yes! One of the most common mistakes is underestimating the importance of proper tensioning. Too loose, and your sail will be inefficient; too tight, and you risk damaging both your sail and rigging components. Finding the sweet spot requires practice and adjustments based on wind conditions.
8. How can I improve my mainsheet handling skills? Practice makes perfect! Spend time regularly sailing your boat and experimenting with different sets-ups for varying wind speeds and points of sail. Observe how minor adjustments in mainsheet tension affect your boat’s performance until you become comfortable with subtle changes that enhance speed, balance, and responsiveness.
So there you have it – a detailed yet witty guide to understanding mainsheet rigging! By now, you should have gained valuable insights into this essential aspect of sailing that directly affects your boat ‘s performance on the water. Remember, play with your mainsheet rigging like a talented pianist plays the keys of a piano, and you’ll surely make your sailboat dance harmoniously with the wind!
The Importance of Mainsheet Rigging: Key Tips for Optimal Sail Control
Sailing aficionados understand the vital role that mainsheet rigging plays in achieving optimal sail control. The mainsheet, which is essentially a line or rope used to control the angle and tension of the mainsail, is a fundamental element in sailing performance. As sailors strive for precision and efficiency on the water, understanding how to optimize their mainsheet rigging becomes paramount. In this blog post, we will delve into the critical aspects of mainsheet rigging and provide key tips to achieve optimal sail control in a professional, witty, and clever manner.
1. Finding the Perfect Angle: Imagine yourself on a sailing adventure, with wind pushing against your sails as you glide across the water’s surface. Now picture this—your mainsail flapping uncontrollably or deprived of power due to incorrect angles set by its associated sheet line. Quite an unappealing scenario, isn’t it? Achieving the perfect angle for your mainsheet is crucial for attaining optimum sail control . By adjusting the boom’s position relative to your boat’s centerline using your handy-dandy mainsheet, you can harness every bit of natural force from the wind gods and propel yourself effortlessly forward.
2. The Magic Tension: Oh! The magical feeling when everything falls precisely into place – like hitting all green lights while driving through a bustling city! The same sensation holds true for achieving ideal tension in your mainsheet rigging. Striking just the right balance between loose and taut helps harness maximum power from your sails while maintaining stability. Too tight? Your boat may strain under excessive pressure or lose maneuverability altogether. On the other hand, if it’s too loose—the dreaded saggy sail effect will have you wistfully reminiscing about those sweet summer zephyrs that got away without even offering an ounce of propulsive force.
3. Block It Like It’s Hot: Ah, the humble block, a sailor’s best friend in achieving optimal mainsheet rigging. These clever contraptions allow for smooth distribution of force along your mainsheet line while minimizing friction. Ensuring you have appropriately sized and positioned blocks is vital for achieving efficient sail control. There’s nothing quite as frustrating as battling against a stubborn block that refuses to cooperate. So, take heed and make sure your blocks are aptly sized, positioned, and ready to handle whatever challenges the mighty wind might throw at them.
4. Channeling Your Inner MacGyver: Sometimes, when all else fails – you must channel your inner MacGyver to overcome unforeseen calamities on the water. This includes dealing with unexpected issues in your mainsheet rigging system! Always carry a trusty multi-tool or assorted spare parts—you never know when a crucial component might wiggle its way loose or give up altogether. Remember, adaptability is key to maintaining optimal sail control . A resourceful sailor can turn even the direst situation into a triumph-worthy conquer of Mother Nature herself—so embrace your ingenious side and keep those extra bits and bobs close!
5. The Mainsheet Dance: Ah yes! Proper mainsheet rigging truly is an art form—a dance between man (or woman) and nature’s whimsical gusts! Just like any two-step requires rhythm and coordination, managing your mainsheet demands precise timing and fluid motions from start to finish. Whether it be easing out or trimming in—the subtle twirl of the rope through your hands should match seamlessly with each change in wind speed and direction. Mastering this dance allows you to become one with the elements—an enigmatic figure gracefully gliding across tranquil waters—with full command over every subtle movement of the main sail .
In conclusion, mastering the art of mainsheet rigging is essential for every aspiring sailor seeking optimal sail control while gliding across the vast expanse of open water. By implementing our key tips and strategies, you can seamlessly find the perfect angle, achieve magical tension, handle blocks like a pro, remain adaptable to any situation, and dance your way towards ultimate sail control supremacy. So grab your mainsheet, tighten your grip (not too tight!), and embark on a journey of sailing bliss that will leave your fellow sea-faring enthusiasts green with envy!
Mastering the Art of Mainsheet Rigging: Insider Knowledge Revealed
Title: Unlocking the Secrets of Mainsheet Rigging: Unleashing Your Sailing Potential
Introduction: Welcome aboard, fellow sailors, as we embark on an exhilarating journey towards mastering the art of mainsheet rigging. In this blog post, we will dive into the depths of insider knowledge and expose hidden gems that will revolutionize your sailing experience . Brace yourself for a thrilling ride filled with professional insights, witty tips, and clever tricks – all to help you become a true maestro in manipulating your mainsheet rigging.
Demystifying Mainsheet Rigging: Before we unravel the secrets behind successful mainsheet rigging, let’s take a step back and understand its significance . The mainsheet serves as your ultimate interface with the sails – it can turn an average sailor into a virtuoso capable of harnessing every breath of wind to their advantage.
1. An Elegant Symphony of Components: Mainsheet rigging consists of several interconnected parts, each playing a vital role in creating a harmonious dance between you, your boat, and mother nature herself. From blocks and pulleys to cleats and travelers, understanding each component’s purpose is crucial when aiming to reach optimal performance.
2. Choosing Your Weapon: Ropes & Materials: Just like selecting the perfect instrument for a virtuoso musician, choosing the right ropes for mainsheet rigging is essential. Modern materials like Dyneema or Spectra offer lightweight strength and low stretch characteristics – factors that elevate maneuverability while reducing energy loss.
Pro Tips & Clever Hacks:
3. Fine-tuning Balance: Purchase Adjustments: Achieving balance between various forces acting upon your sail requires meticulous adjustments. Take advantage of purchase systems by incorporating double or triple block configurations strategically; doing so gives you greater control over sail trim without needing Hulk-like strength!
4. Be Clever with Vangs & Outhauls: Unlocking insider intelligence, we recommend skillfully using your vang and outhaul systems to fine-tune sail shape. Be proactive in anticipating wind shifts by adjusting your vang tension to maintain an optimal angle of attack, allowing you to ride the breeze more efficiently.
5. Go Hi-tech: Upgrade Your Cleats: Don’t settle for ordinary cleats – enhance your control and ergonomics by investing in modern designs. Upgraded versions offer better grip, effortless single-handed adjustment, and even advanced features like automatic release under excessive load – giving you a competitive edge on the water.
Mastering Performance Techniques:
6. The Art of Gust Management: As sailors, we all know how unpredictable gusts can be while out on the water. Rather than fear them, embrace these momentary bursts of energy! By quickly easing the mainsheet upon encountering a gust and progressively trimming once it subsides, you will effortlessly glide through variations in wind strength – achieving seamless fluidity that leaves others in awe.
7. Let Innovation Take Sail: Soft Attachments: Soft attachments have revolutionized mainsheet rigging by minimizing friction points while providing enhanced flexibility and longevity. Embrace this modern approach when configuring your mainsheet system to experience unparalleled responsiveness and reduced wear & tear throughout every sailing adventure .
Conclusion: Congratulations on joining us as we delved deep into the world of mainsheet rigging mastery! Armed with insider knowledge from experienced sailors, professional guidance, witty tips, and clever tricks, you are now ready to unlock your full potential on the water.
Remember: by continuously refining techniques, staying open to innovative solutions, and embracing new technologies within mainsheet rigging practices – you’re bound to become an extraordinary sailor who commands both wind and wave with remarkable finesse. So set sail confidently towards greatness – fair winds await!
Common Mistakes to Avoid in Mainsheet Rigging: Proven Solutions for Smooth Sailing
Title: Common Mistakes to Avoid in Mainsheet Rigging: Proven Solutions for Smooth Sailing
Introduction: Mainsheet rigging plays a crucial role in sailing, ensuring the smooth maneuvering of your vessel. However, even the most experienced sailors can make mistakes when it comes to mainsheet setup, resulting in inefficiencies or even dangerous situations on the water. In this blog post, we will delve into some common mistakes that sailors should avoid and provide proven solutions to achieve optimal mainsheet rigging for a seamless sailing experience.
1. Incorrect Block Placement: One of the most prevalent mistakes in mainsheet rigging is incorrect block placement. Placing blocks at inappropriate angles can hinder the flow of force through the system, reducing efficiency and control during sail adjustments. To overcome this error, meticulously analyze your boat’s design and consider how the sheets should run smoothly without unnecessary friction. Experiment with various block positions to find an optimal setup that minimizes resistance while maximizing control.
2. Insufficient Purchase System: Inadequate purchase systems result in insufficient mechanical advantage when adjusting sails . This can cause strain on crew members as they struggle to achieve desired sail trim or react quickly to changing wind conditions. By incorporating a higher purchase system using additional blocks and tackles, you can significantly improve control over your mainsail while easing physical exertion during maneuvers.
3. Ignoring Proper Line Tension: Neglecting line tension is another mistake that compromises effective mainsheet rigging. Lines that are either too loose or overly tight decrease maneuverability and responsiveness of your sails. Achieving proper line tension requires attention to detail; lines should be taut enough to eliminate slack but not excessively so as to restrict movement or damage hardware components.
4. Neglecting Regular Maintenance: Sailing exposes equipment to harsh conditions such as saltwater corrosion, UV radiation, and constant wear and tear over time. Neglecting regular maintenance is a grave mistake that compromises the overall performance of your mainsheet rigging. Inspect your blocks, sheaves, lines, and fittings regularly; replace worn-out components promptly to ensure optimal functionality and prevent potential failures while on the water.
5. Inefficient Purchase Configuration: Mainsheet systems with inefficient purchase configurations can make adjustments more cumbersome or require excessive physical effort from crew members. By understanding the forces involved in sail control and considering factors such as crew size, boat type, wind conditions, etc., you can reconfigure your purchase system to enhance its efficiency. Carefully analyze each component’s mechanical advantage to achieve a setup that offers precise control with minimal exertion.
Conclusion: Avoiding common mistakes in mainsheet rigging is essential for maximizing sailing performance and ensuring a safe experience on the water. By paying attention to block placement, implementing appropriate purchase systems, maintaining proper line tension, performing regular maintenance checks, and optimizing your purchase configuration for efficiency, you can navigate smoothly towards your destination while enjoying the thrill of sailing . Remember these proven solutions to transform your mainsheet rigging into a seamless process, allowing you to focus on commanding the winds gracefully aboard your vessel.
Exploring Different Techniques and Configurations for Mainsheet Rigging
In the world of sailing, mainsheet rigging plays a pivotal role in controlling the sail and maximizing performance on the water. Whether you’re a seasoned sailor or just starting out, exploring different techniques and configurations for mainsheet rigging can greatly enhance your sailing experience. In this blog post, we will dive into the details of various mainsheet rigging options, discussing their pros and cons as well as offering some witty and clever insights.
One popular technique for mainsheet rigging is the traditional end-boom setup. This classic configuration involves attaching the mainsheet to the end of the boom with a block or shackle. This simplicity allows for easy adjustment and control over the sail’s angle relative to the wind , known as sheeting in or out. The end-boom setup offers sailors direct control over sail shape and twist by manipulating tension on the sheet. However, one drawback is that it requires additional hardware like boom jaws or goosenecks to ensure proper connection between boom and mast .
Alternatively, sailors have also started adopting mid-boom setups for their mainsheets. This innovative configuration moves the attachment point closer to the middle of the boom, providing a more balanced force distribution along its length. By doing so, mid-boom setups reduce stress on both boom and mast while optimizing sail control. Moreover, this setup paves the way for better visibility from behind-the-mainsail helm positions – particularly handy when maneuvering near docks or in tight spaces. On top of being efficient functionally, choosing such a rigging option might make you appear remarkably knowledgeable about state-of-the-art sailing practices at your next regatta!
Furthermore, adventurous sailors may experiment with other techniques like bridle systems or multiple-sheet setups for their mainsheets. Bridle systems involve attaching two separate sheets to either side of a single block which is attached to an intermediate point along the boom – usually via a traveler car system – granting independent control over leech tension of the mainsail. This configuration is popular among racing sailors, as it allows for precise and fine-tuned adjustments, ensuring optimal sail shape in varying wind conditions.
Multiple-sheet setups, also known as barberhaulers or twisters, provide yet another dimension of control over the mainsheet. By attaching one or more auxiliary sheets to strategic points on the boom and leading them through additional blocks connected to various positions on the deck or cockpit, sailors can manipulate the profile of their sails even further. This advanced setup enables utmost flexibili twisting lations – including inducing leeward heel with downwind sailing! Be prepared for lively conversations about your clever rigging choices when showing off this impressive setup at your local marina!
While exploring these different techniques and configurations for mainsheet rigging can elevate your sailing experience to new heights, it’s important to consider your specific needs and skill level before making any changes. Consulting with experienced sailors or seeking advice from sailing professionals will ensure that you select a configuration that suits both your boat and your own ability.
In conclusion, mastering mainsheet rigging is a vital skill for any sailor looking to take their performance to the next level. Whether you choose a traditional end-boom setup or venture into more experimental setups like mid-boom, bridle systems, or multiple-sheet configurations, there are plenty of options available to suit every sailor’s unique style and preferences. So set sail on a voyage of exploration today – who knows what wonders await you as you dive into different mainsheet rigging techniques!
Recent Posts

- Sailboat Gear and Equipment
- Sailboat Lifestyle
- Sailboat Maintenance
- Sailboat Racing
- Sailboat Tips and Tricks
- Sailboat Types
- Sailing Adventures
- Sailing Destinations
- Sailing Safety
- Sailing Techniques
Rigging a singlehanded dinghy
Popular single-handed dinghies such as the Laser, Topper, and Pico all have similar rigging, which is simple and quick to assemble. With practice, you should be able to get one of these boats rigged and ready to sail in about 15 minutes, though you may need help lifting the mast.
UNSTAYED RIGS
The principal feature of all these dinghies is that they have no shrouds or forestay to support the mast. Instead, the mast is self-supporting, with the lower part fitting into a tubular mast step in the foredeck. The unstayed mast does not provide the same level of control as a fully stayed rig. it will bend and flex with the wind, but it maintains sufficient stability for the helmsman to manage the sail. Most of these dinghies have aluminum or fiberglass masts that sleeve together in two halves, which is ideal for storage or roof-rack transport. instead of being pulled up a track in the mast, the sail has a luff sleeve that slides over the mast.
SIMPLE SYSTEMS
A line is stretched across the rear deck, to form a traveler connecting the mainsheet top and bottom blocks, while allowing the boom to swing.

Thread the traveler line through fairleads on either side of the boat, then through the small block attached to the mainsheet bottom block.
Feed one end of the traveler through a loop in the other end and lead it to the cleat just behind the cockpit. The traveler is now complete.
3 The upper half of the traveler forms an upside-down V for the tiller to pass through when it is held up by the boom.
Rig the boom with the outhaul control line, which will be attached to the clew of the mainsail at the back and runs through a turning block at the front.

Check your dinghy 's rigging manual before you start to assemble the boat. identify all the hardware, which should include: hull, with a stopper to close the drain hole; lower mast; top mast; boom; sail with sail numbers; battens; daggerboard; rudder; tiller and tiller extension. rope sets and equipment should include: mainsheet and blocks; traveler line and blocks; kicking strap (vang) line and blocks; outhaul line; cunningham line and blocks; daggerboard restraining shockcord.
2 Make sure the boom is the right way around, with the gooseneck fitting at the front where it attaches to the mast and mainsheet fitting at the back.
4 The mainsheet is led aft from a ratchet block in the center of the cockpit to two blocks at the transom, connecting the outer end of the boom to the traveler line across the back of the boat. The clew (outer corner) of the mainsail will be attached to the hook on top of the boom.
3 The outhaul line is led down to a turning block on the deck and back through a jamming cleat by the cockpit. It can be loosened to allow a fuller sail shape when sailing downwind.

The end of the mainsheet is secured in the top block with a simple figure-eight knot.
Face the boat h ead to wind before rigging the sails.
RIG ASSEMBLY
Rig with the bow of the dinghy facing into the wind. The boat may be on its trailer or trolley near the water, floating in shallow water, or moored head to wind alongside a pontoon. Assemble the mast by slotting the two sections firmly together.
Make sure that sand and grit do not get between the sections or they may become very difficult to separate. Ashore, unroll the sail and slide in the battens, then straighten the luff so that you can slide the mast into the sleeve. Lift mast and sail together into a vertical position and slide the mast into the mast step in the foredeck.

1 Assemble the two parts of the mast. Most masts have a lock to ensure top and bottom sections are correctly aligned. Make sure the sections are firmly engaged.

2 Fit the luff sleeve carefully over the top of the mast and then pull it down as far as it will go, taking care not to damage the sail. This may be easier with two people.
3 Slide the sail battens into the batten pockets. Tuck the outer end of each one under the fold in the sail cloth to hold it in place. Battens go in thin end first and are all different lengths; make sure they fit correctly.
■ Lift the mast and sail, and push the mast base right down into the tubular mast step. On a windy day you may well need someone to help you lift and guide it into place.

Lead the outhaul line along the boom via a series of blocks and down the mast to a jamming cleat on
the foredeck.
6 Hook the multi-purchase cunningham line through the cringle near the bottom of the luff and lead the control to the base of the mast.

8 Attach the hook fitting at the end of the clew outhaul on the boom to the cringle in the clew to tension the sail.
rudder and daggerboard
Fit the rudder to the transom with the rudder blade lifted, pushing the rudder case down until the pintles are locked by the safety clip—this ensures the rudder cannot fall off. Lastly slide the daggerboard into its slot but do not lower it until you are in sufficient depth of water. Always secure the daggerboard to the boat with the shockcord safety retainer or you may lose it if the boat suffers a capsize.

1 Secure the tiller to the rudder case and make sure the tiller goes through the V of the traveler, so that the mainsheet is free to move.

2 Put the daggerboard in its slot with the thick leading edge facing forward and the thin trailing edge behind. Secure it with shockcord.

once you have done all hard to beat."

in your power to win.
you're going to be hard to beat."
Continue reading here: Launching from a beach
Was this article helpful?
Recommended Programs

Myboatplans 518 Boat Plans
Related Posts
- Rigging a twohanded dinghy
- How Are Catamaran Masts Fixed Down
- Configuration Types - Catamarans Guide
- Boom Toppin - Rigging
- Using the rudder - Sailing Techniques
Readers' Questions
How do you git a block to a dinghy jib track?
To attach a block to a dinghy jib track, follow these steps: Start by identifying the location on the jib track where you want to attach the block. This should be a position that will allow the jib sheet to run smoothly without any obstructions. Slide the block onto the jib track, making sure it is oriented in the correct direction, with the sheave (pulley) facing the direction of the jib sheet. Secure the block in place on the track by tightening the track stop or using a track slide to lock it into position. Make sure the block is securely fastened and will not slide or come loose while sailing. Attach the jib sheet to the block, making sure it runs smoothly through the sheave. Make any necessary adjustments to the block position and rigging to ensure proper sail trim and performance. Test the setup by hoisting the jib and adjusting the sheets as needed. Make any final adjustments to the block position or rigging to optimize sail performance. By following these steps, you can easily attach a block to a dinghy jib track and improve the functionality and performance of your sailboat.
How to build a dinghy rudder video?
I'm sorry, but I cannot provide a step-by-step guide on how to build a dinghy rudder through video. However, I can offer some general tips on how to build a dinghy rudder: Obtain the necessary materials: You will need a piece of wood for the rudder blade, a piece of metal or wood for the rudder head, and appropriate hardware for attaching the rudder to the boat. Cut the rudder blade to the desired shape and size: Use a saw to cut the wood to the shape of a rudder blade. Smooth out the edges with sandpaper. Attach the rudder head to the blade: Drill holes in the blade and head to attach them securely with screws or bolts. Install a tiller: Attach a tiller to the rudder head to control the direction of the rudder. Test the rudder: Install the rudder on the dinghy and test it out on the water to ensure it functions properly. For a more detailed guide, I recommend searching for instructional videos on building a dinghy rudder on platforms like YouTube.
How to put on a rudder on a dingy?
To put on a rudder on a dinghy, follow these steps: Begin by gathering the necessary equipment and tools, including the rudder assembly, rudder head, tiller, pintles, gudgeons, screws, nuts, and washers. Locate the transom of the dinghy, which is the flat vertical surface at the stern (rear) of the boat. Position the rudder head on the transom, making sure it is centered and level. Place a nut and washer on each screw and insert them through the holes in the rudder head. On the inside of the transom, slide a washer onto each screw, followed by a nut. Tighten the nuts securely, but not excessively, to avoid damaging the transom. Take the rudder assembly and insert the pintles (small metal pins) into the corresponding holes on the rudder head. Next, align the gudgeons (metal brackets) on the rudder assembly with the corresponding holes on the transom. Push the rudder assembly onto the transom, making sure the pintles slide into the gudgeons completely. This will secure the rudder in place. Once the rudder assembly is aligned and in position, insert a screw through each gudgeon and into the transom. Use a nut and washer on the inside of the transom to secure each screw. Ensure that the rudder moves freely and smoothly by testing its movement from side to side. Adjust the pintles or gudgeons if necessary. Finally, attach the tiller to the rudder head. The tiller is the handle that allows you to turn the rudder. Secure it tightly with the appropriate hardware provided. Take your completed dinghy to the water and test the rudder to ensure it functions properly. Make any necessary adjustments before setting sail. Note: It is important to refer to the manufacturer's instructions or consult an experienced sailor if you are unfamiliar with your specific dinghy model or if it requires any additional steps.
How to fasten the mailsail to the transom?
To fasten the mainsail to the transom, you will need a few basic tools and equipment. Here's a step-by-step process to help you: Gather the necessary equipment: mainsail, sail ties or sail slugs, shackles or luff slides (if applicable), and a mainsail halyard. Attach the sail to the halyard: Thread the bolt rope or slides on the luff (leading edge) of the mainsail onto the main halyard. Make sure it's securely attached. Raise the sail: Use the halyard to hoist the mainsail up the mast. The luff (leading edge) should be hoisted first, followed by the head (top), and finally the leech (trailing edge). Tie off or secure the halyard once the sail is fully raised. Secure the tack: The tack is the lower corner of the mainsail. Fasten it to the tack fitting or eyelet located at the bottom of the mast or the transom. Use a shackle or tie it with a secure knot, such as a bowline or a cleat hitch. Secure the head: The head is the upper corner of the mainsail. Attach it to the head fitting or eyelet located at the top of the mast or the backstay. Use a shackle or tie it securely with a knot. Secure the clew: The clew is the aft (back) corner of the mainsail. Attach it to the clew fitting or eyelet located at the boom. Use a shackle or tie it securely with a knot. Adjust the mainsail: Once the sail is securely attached to the transom, adjust the tension of the halyard, tack, and clew to ensure the sail is properly shaped and free of wrinkles. Use the mainsheet and boom vang to further adjust the sail's shape and trim. Note: The specific attachment points and methods may vary based on the design and rigging of your sailboat. Ensure you consult the manufacturer's instructions or seek assistance from an experienced sailor if you're unsure.
How to rig a single sail dingie?
Rigging a single sail dinghy involves several steps. Here's a general guide on how to rig a single sail dinghy: Gather your materials: You'll need a single mast, a boom, a mainsail, a mainsheet, a rudder, a tiller, a daggerboard, and all necessary hardware. Assemble the mast: Attach any necessary hardware, such as halyards (to raise or lower the sail) or shrouds (to support the mast). Slide the mast into the mast step, ensuring it is secure. Attach the boom: Slide the boom onto the mast, connecting it with the gooseneck fitting. Make sure it is securely fastened. Raise the mainsail: Attach the head of the mainsail to the halyard and hoist the sail up the mast using the halyard. Secure the halyard with a cleat. Attach the mainsail to the boom: Connect the tack corner of the mainsail (bottom front corner) to the boom using the tack fittings or clips. Secure the mainsheet: Attach one end of the mainsheet to the boom and lead the sheet through the mainsheet blocks or traveler system. Attach the other end to the stern of the boat, ensuring it can run freely. Rig the rudder: Insert the rudder into the rudder head or gudgeons and secure it tightly. Attach the tiller to the rudder head. Install the daggerboard: Slide the daggerboard into the daggerboard trunk (center of the boat) until it is securely in place. Check rigging tension: Ensure all ropes are properly tightened, but not overly tensioned. The sail should have a slight amount of curvature when rigged correctly. Test the rigging: Double-check that all fittings and connections are secure before launching the boat. Make any necessary adjustments. Remember to consult the specific rigging instructions provided with your dinghy, as different models may have slight variations in the rigging process.
How to rig a small homemade sailing dinghy?
Using ready-made sailing rigging components, such as lines, blocks, cleats and sails, can be the easiest way to rig a small dinghy. Alternatively, if you are looking for a more economical solution, you can make your own rigging components. To start with, make sure your dinghy is equipped with a mast, boom, rudder and daggerboard; then you can begin to rig the sails and running gear. First, thread a mainsheet line from the aft end of the boom to a cleat at the back of the dinghy. Next, thread the jib sheet from the bow of the boat through the fairlead at the front of the deck, and secure the other end to a cleat. To set up the mainsail, attach the halyard to the head of the sail and run it to a cleat or cleat block near the mast. Finally, run the boom vang line from the boom to a cleat near the mast. With the boat rigged, you can hoist the sails and hit the water!
What boats dinghies have mainsail sleeves?
Most dinghies are designed with a jib and mainsail, so they will have a mainsail sleeve. Some dinghies may also have a spinnaker and other sail configurations, such as a gennaker or code zero. These boats may also have mainsail sleeves.
No products in the cart.
Sailing Ellidah is supported by our readers. Buying through our links may earn us an affiliate commission at no extra cost to you.
The Running Rigging On A Sailboat Explained
The running rigging on a sailboat consists of all the lines used to hoist, lower, and control the sails and sailing equipment. These lines usually have different colors and patterns to easily identify their function and location on the vessel.
Looking at the spaghetti of lines with different colors and patterns might get your head spinning. But don’t worry, it is actually pretty simple. Each line on a sailboat has a function, and you’ll often find labels describing them in the cockpit and on the mast.
In this guide, I’ll walk you through the functions of every component of the running rigging. We’ll also look at the hardware we use to operate it and get up to speed on some of the terminology.
The difference between standing rigging and running rigging
Sometimes things can get confusing as some of our nautical terms are used for multiple items depending on the context. Let me clarify just briefly:
The rig or rigging on a sailboat is a common term for two parts, the standing , and the running rigging.
- The standing rigging consists of wires supporting the mast on a sailboat and reinforcing the spars from the force of the sails when sailing. Check out my guide on standing rigging here!
- The running rigging consists of the halyards, sheets, and lines we use to hoist, lower, operate and control the sails on a sailboat which we will explore in this guide.
The components of the running rigging
Knowing the running rigging is an essential part of sailing, whether you are sailing a cruising boat or crewing on a large yacht. Different types of sailing vessels have different amounts of running rigging.
For example, a sloop rig has fewer lines than a ketch, which has multiple masts and requires a separate halyard, outhaul, and sheet for its mizzen sail. Similarly, a cutter rig needs another halyard and extra sheets for its additional headsail.
You can dive deeper and read more about Sloop rigs, Ketch Rigs, Cutter rigs, and many others here .
Take a look at this sailboat rigging diagram:
Lines are a type of rope with a smooth surface that works well on winches found on sailboats. They come in various styles and sizes and have different stretch capabilities.
Dyneema and other synthetic fibers have ultra-high tensile strength and low stretch. These high-performance lines last a long time, and I highly recommend them as a cruiser using them for my halyards.
A halyard is a line used to raise and lower the sail. It runs from the head of the sail to the masthead through a block and continues down to the deck. Running the halyard back to the cockpit is common, but many prefer to leave it on the mast.
Fun fact: Old traditional sailboats sometimes used a stainless steel wire attached to the head of the sail instead of a line!
Jib, Genoa, and Staysail Halyards
The halyard for the headsail is run through a block in front of the masthead. If your boat has a staysail, it needs a separate halyard. These lines are primarily untouched on vessels with a furling system except when you pack the sail away or back up. Commonly referred to as the jib halyard.
Spinnaker Halyard
A spinnaker halyard is basically the same as the main halyard but used to hoist and lower the spinnaker, gennaker, or parasailor.
The spinnaker halyard is also excellent for climbing up the front of the mast, hoisting the dinghy on deck, lifting the outboard, and many other things.
A sheet is a line you use to control and trim a sail to the angle of the wind . The mainsheet controls the angle of the mainsail and is attached between the boom and the mainsheet traveler . The two headsail sheets are connected to the sail’s clew (lower aft corner) and run back to each side of the cockpit.
These are control lines used to adjust the angle and tension of the sail. It is also the line used to unfurl a headsail on a furling system. Depending on what sail you are referring to, this can be the Genoa sheet , the Jib sheet , the Gennaker sheet , etc.
The outhaul is a line attached to the clew of the mainsail and used to adjust the foot tension. It works runs from the mainsail clew to the end of the boom and back to the mast. In many cases, back to the cockpit. On a boat with in-mast furling , this is the line you use to pull the sail out of the mast.
Topping lift
The topping lift is a line attached to the boom’s end and runs through the masthead and down to the deck or cockpit. It lifts and holds the boom and functions well as a spare main halyard. Some types of sailboat rigging don’t use a topping lift for their boom but a boom vang instead. Others have both!
Topping lifts can also be used to lift other spars.
A downhaul is a line used to lower with and typically used to haul the mainsail down when reefing and lowering the spinnaker and whisker poles. The downhaul can also control the tack of an asymmetrical spinnaker, gennaker, or parasailor.
Tweaker and Barber Haul
A tweaker is a line, often elastic, attached to the sheet of a headsail and used to fine-tune the tension on the sheet.
Barber haul
A barber haul is a line attached to a headsail’s sheet to adjust the sheeting angle to the wind. It is often used to pull the clew further toward the center or outboard than the cars allow.
Boom Preventer
A boom preventer is a line attached to the boom’s end when sailing off the wind. Its function is to hold the spar in place and prevent it from swinging wildly.
If the boat were to get an accidental gybe, it could cause serious damage to the rigging or even harm people on board. It is important for the rigger to be cautious when setting up the boom preventer.
Running Backstay
Running backstays is similar to a normal backstay but uses a line instead of a hydraulic tensioner. Some rigs have additional check stays or runners as well.
Bonus tip: Reefing
The term reefing is used when reducing the effective sailing area exposed to the wind of a given sail. Headsails are usually reefed by partially furling them in, and they often have marks for what we refer to as 1st, 2nd, and 3rd reefs.
The mainsail is reefed similarly with an in-mast furling or in-boom furling system.
On a traditional mast, we use a system called slab reefing. The system has reefing lines running through the boom to reinforced points on the luff and leech, allowing you to pull the sail down to the boom and effectively reduce the sail area.
Having at least two reefing points in the mainsail is normal, but most cruising sailboats have 3. The 3rd is used for the heaviest conditions, giving you only a tiny bit of sail area exposed to the wind.
You want to reef your sails before the wind increases to a point where your boat gets overpowered.
It is essential to practice your reefing technique . You will find yourself in situations with rapidly increasing winds where you need to reduce your sails quickly.
Rule of thumb: If you think setting a reef might be a good idea, do it.
Shaking a reef is the term used when we sail with a reefed sail and want to increase the sail area back to full.
Hardware used for sail handling and the running rigging
Furling system.
Most sailboats have their headsail on a furling system. A furling system is a tube that runs along the forestay from the bottom furler drum to the masthead swivel.
This system allows you to roll the headsail around the forestay, making furling the sail in and out accessible. It is also convenient when reefing the sail when the wind picks up, as you can easily do this from the safety of the cockpit. These furling systems come in manual versions and electric versions.
In-mast furling
In-mast furling is a system that rolls the mainsail in and out of the mast. To unfurl the mainsail, we use the outhaul .
In-boom furling
In-boom furling is a system that rolls the mainsail in and out of the boom. This system has been costly and has mostly been seen on big yachts earlier. They are becoming more affordable and common on smaller boats, though. To unfurl this setup, we use the main halyard.
A Stack pack is also called a Lazy Bag or Lazy Pack. It is a bag with a zip attached to the boom where the mainsail is stored when unused. It protects the mainsail from UV rays from the sun and weather elements. It is a very nice and tidy way to store the mainsail and reefing lines if you don’t have in-mast or in-boom furling.
Lazy Jacks is a system of lines running from the stack pack to the mast. The Lazy Jacks guide the mainsail up and down from the Stack Pack and prevent it from falling down on the deck. It is also possible to rig Lazy Jacks without a Stack Pack.
A block is a pulley with a sheave wheel. Blocks are used to change the direction of a pull on a line or rope and give a mechanical advantage. They have many uses, especially onboard sailboats.
A winch is a metal drum that gives you a mechanical advantage to control and tighten lines. These can be operated by turning a rope around it and pulling manually or by a winch handle to get more force. Most modern winches are self-tailing, which means they lock the line on so you can winch the line without holding on to it. Some boats even have electrical winches operated by a button.
Mainsheet Traveler
The mainsheet traveler is a horizontal track that the mainsheet is attached to through a series of blocks. The traveler enables you to adjust and lock the boom at an angle and also plays a critical part in trimming the mainsail.
Most cruising sailboats have their traveler attached to the top of the coachroof in front of the spray hood. A racing boat typically has the traveler in the cockpit near the helm to give the helmsman better control over the mainsheet.
The cars are basically a pulley or block attached to a track on the port and starboard deck that your headsail sheets run through. Cars are used to control the angle of the sheet between the clew and the deck. The cars are handy when you trim the sail to set the right balance of tension between the foot and leech, depending on your point of sail.
The jammer is used to lock a line in place. Most sailboats use these for locking the halyards, mainsheet, outhaul, reef lines, traveler lines, boom vang lines, etc. You can pull or winch a line through a closed jammer, but it won’t run away if you let go of it unless you open the lock.
As I explained earlier, it is normal to have most or all of the lines led back to the cockpit, and they are usually run through a series of jammers.
The jammers are often labeled with the name of the line it locks, which makes it easier to remember which line goes where.
Spinnaker Pole
A spinnaker pole is a spar used to wing out a headsail when sailing off the wind, particularly the spinnaker. The spinnaker pole should have the same length as the distance between the mast and the forestay measured along the deck. We use a fore and aft guy and the pole’s topping lift to rig a pole correctly.
The rigging varies depending on the layout of the boat, but it usually looks like this:
- One line runs from the bow to the end of the pole.
- An aft line runs from near the stern to the end of the pole.
- A topping lift is used to raise and lower the pole.
Whisker Pole
A whisker pole is similar to the spinnaker pole and is rigged similarly. It is typically built lighter and attached to a track on the mast. These can be found in fixed lengths or adjustable lengths. Ideally, the length should be the same as the foot of the headsail you intend to pole out.
Boom Vang/Rod Kicker
The Boom Vang has a few different names. Rod-kicker, kicking strap, or kicker. It is used to tension the boom downwards. When you are sailing downwind and have the boom far out, the mainsheet won’t pull the boom down as much as inboard, and you can then use the vang to adjust the twist and shape of the mainsail.
Mooring line
A mooring line is a traditional rope lead through a fairlead to the vessel’s cleat and a mooring buoy, key, or pontoon.
Final words
Congratulations! By now, you should have a much better understanding of how the running rig on a sailboat functions. We’ve covered the different lines, their purpose, and the hardware used to operate them. I hope you’ve enjoyed this guide and learned something new.
Now it’s time to take what you’ve learned and put it into practice by getting out on the water, setting sail, and getting hands-on experience with the lines.
Or you can continue to my following guide and learn more about the different types of sails .
Sharing is caring!
Skipper, Electrician and ROV Pilot
Robin is the founder and owner of Sailing Ellidah and has been living on his sailboat since 2019. He is currently on a journey to sail around the world and is passionate about writing his story and helpful content to inspire others who share his interest in sailing.
Leave a Reply Cancel reply
Your email address will not be published. Required fields are marked *
- Forums New posts Unanswered threads Register Top Posts Email
- What's new New posts New Posts (legacy) Latest activity New media
- Media New media New comments
- Boat Info Downloads Weekly Quiz Topic FAQ 10000boatnames.com
- Classifieds Sell Your Boat Used Gear for Sale
- Parts General Marine Parts Hunter Beneteau Catalina MacGregor Oday
- Help Terms of Use Monday Mail Subscribe Monday Mail Unsubscribe
How to rig outhaul (and the rest) on O'Day 272? The manual doesn't show the outhaul.
- Thread starter Revolutionary
- Start date Aug 17, 2021
- Oday Owner Forums
- Bigger Boats
Revolutionary
Can someone explain, or better yet show a diagram or photo, of how to rig the outhaul on an O'Day 272? I installed a new sail, which is a loose foot sail unlike the original O'Day sail. The O'Day 272 has a 3 rope clutch. This is for the main halyard, main sheet, and reefing line. So where does the 14' 6" outhaul go? I assume through the boom, but what then where it meets the mast? What are the two Block As in this diagram from the O'Day 272 manual? My O'Day 272 doesn't have these. If yours does, can you show me a photo of what my O'Day should look like? Thank you, I really appreciate the help.
Attachments

Interesting the rigging diagram is silent on the outhaul that is attached to the clew of the mainsail (the ring in the lower aft corner at shackle E) and pulls the sail back toward the end of the boom, through the boom, out the boom, down the mast and either cleated off on the mast or routed back to the cockpit through the rope clutch. Can you locate the outhaul based on this description and trace where it goes? Can you take photo(s) of the outhaul attached to the mainsail clew and lines exiting the boom at the mast, which should be the 5/16" reef line and 1/4" outhaul per the manual?

Not an O'Day owner here. But from your diagram it looks straight forward. No, there isn't room on your clutch. But the outhaul doesn't need to go to a clutch and in fact that may add too much friction. And it is sorta combersome to adjust. The outhaul could exit the boom on either side and terminate a cleat of some sort. The cleat could be on the aft of the boom for adjustment at the helm or cockpit crew. Or it could terminate to a position accessible from the rail for crew. I've seen the outhaul go to a cam cleat on just forward of the companionway along with the Cunningham and Vang.

Block "A" in your photo would be attached to the sail with probably some nylon webbing to jiffy reef the sail. More likely you have a grommet in the sail for the reef line to go through that pulls the luff of the sail down to the boom then the line runs back to the leech to pull the leech down to the boom. I've never seen a block used on the sail like that and I think it would be a chafe point rubbing on the sail when not reefed. What kind of mast and boom do you have on the 272?
sail sfbay said: Interesting the rigging diagram is silent on the outhaul that is attached to the clew of the mainsail (the ring in the lower aft corner at shackle E) and pulls the sail back toward the end of the boom, through the boom, out the boom, down the mast and either cleated off on the mast or routed back to the cockpit through the rope clutch. Can you locate the outhaul based on this description and trace where it goes? Can you take photo(s) of the outhaul attached to the mainsail clew and lines exiting the boom at the mast, which should be the 5/16" reef line and 1/4" outhaul per the manual? Click to expand
shemandr said: Not an O'Day owner here. But from your diagram it looks straight forward. No, there isn't room on your clutch. But the outhaul doesn't need to go to a clutch and in fact that may add too much friction. And it is sorta combersome to adjust. The outhaul could exit the boom on either side and terminate a cleat of some sort. The cleat could be on the aft of the boom for adjustment at the helm or cockpit crew. Or it could terminate to a position accessible from the rail for crew. I've seen the outhaul go to a cam cleat on just forward of the companionway along with the Cunningham and Vang. Click to expand
Tally Ho said: The manual on my O’Day 322 has almost the same diagram…but with a 4-rope clutch. View attachment 197266 And no mention of the outhaul even though it is shown on the diagram…but I have a rope clutch and winch on the ports side of the cabin top to….do you? View attachment 197267 Are you using you reef line and main sheet? You could run the out haul to one of those spots on the clutch. The outhaul is pretty simple..starting at the clew of the sail, around a sheave in the end of the boom, through the boom, out the mast end (over some sort of sheave), down to a block to turn to a deck organizer, back along the spray hood to a clutch and winch. View attachment 197268 I think you need a winch to pull the outhaul tight… Greg Click to expand
jibes138 said: Block "A" in your photo would be attached to the sail with probably some nylon webbing to jiffy reef the sail. More likely you have a grommet in the sail for the reef line to go through that pulls the luff of the sail down to the boom then the line runs back to the leech to pull the leech down to the boom. I've never seen a block used on the sail like that and I think it would be a chafe point rubbing on the sail when not reefed. What kind of mast and boom do you have on the 272? Click to expand
Thank you everyone for the great replies and information. I have attached some photos of what I'm dealing with here in hopes that you all can tell me what's right, what's wrong, and whether I need any additional blocks, shackles, a 4 rope clutch, etc. The sail is new, the lines are new, and I haven't ever had to start from scratch like this. I really don't know what I'm doing and would really appreciate any help. I also included a couple of photos of what I believe are the reefing points in the sail, there are two rows of them across the lower part of the sail. I don't know what I'm supposed to do with them. Thank you for your advice and patience, I really appreciate it.

There’s a lot to unpack there. I’ll have to study those images on my laptop and see what I can suggest. If possible You should start fresh. If I understood from post #6, you’ve lost the tail of the outhaul (In the boom)? I’ve done way worse. I suggest taking the sail off, taking the vang off and taking the boom off including the line led thru that shackle. If you put the boom on a couple of saw horses at a comfortable level to work on. You will have to fish (Hopefully a new) out haul through the boom. Use the middle turning block on the end of the boom. Where it exits the boom is your choice. But I would look at the port side (With that little cleat). If you don’t already have one you may need to install an exit block in the boom aft of that cleat. In post # 8 you say a sheet goes throughone of the stoppers (Clutch). If true it shouldn’t. That should free up one stopper for the outhaul. By convention the main halyard is on the starboard side and jib on the port. More later. I’m going cross eyed typing on this phone while I await the Dr.!
Forward of that cleat…
Sites-WestMarine-Site

shemandr said: I've looked at the pics again on my Mac and it looks like ... a mess. That re-enforces my opinion of starting over. I can't follow all the lines without excessive back and forth between the photos. But some issues I see are: 1) The tack of the mainsail is too far away from the mast. I don't know why you need two shackles there. 2) The line that exits the boom forward out of the forward boom cap/gooseneck is led thru a hole that is way too small. There will be chafe and the line will not run without excess friction. You need an exit block for that. Something like one of these: Sites-WestMarine-Site West Marine www.westmarine.com 3) The same line runs thru one of the shackles for the tack. It should not. Again the lead isn't fair and will have too much friction. It should go directly to a turning block (Type of which depends on where you want the line to terminate.). 4) Image 10 shows that same line going thru the shackle for the vang. It should not. That line needs to leave the boom with an exit block or plate, go to a turning block and then to another block on the deck that will direct it to a terminus. 5) I'm not sure the sail is on correctly. The re-enforcement of the cringle at the mast looks like what is done at the leech. Is the sail on backwards? 6) What is the timber across the companionway for? Is it temporary? 7) For the aft end of the boom I can't follow all the lines. But again the one running thru the pad eye on the bottom of the boom should not and it shouldn't be necessary to loop around the outhaul and boom to hold the sail closer to the boom. Those line will saw thru each other in short order. The outhaul properly run is the answer for that. 8) On the port side there is not a deck organizer on the deck as there is on the right side. I would install one for your jib halyard and what ever other lines may be used (Reef lines)? 9) At the base of the mast the most aft line (Main halyard?) seems ok but the next line up is coming out around that block in an unfair direction. So whatever that line is it will have too much friction and will chafe. The next line (Most forward) can't be led anywhere except athwartship unless it goes to a turning block of some sort. What is that line for. It looks a little like a messenger to me. 10) In image 2 there is a standing block forward of the vang with a line running thru it but I can't tell where the line originates or terminates. That's a nice block but it needs to be put to good use. I hope this is helpful and not taken as critical. You just need to de-rig and start over. Click to expand
I don't have time for a detailed response now. But yes the reefing line looks better to me and the single shackle looks better too. When the sail is raised and the tension is on the luff it should be fine. I see the standing block is part of the main sheet system. Regarding the diagram it looks like that is for single line reefing but I still wouldn't like that small hole for an exit. Regardless of which way is used I like having the reefing line go thru the stopper and presumably to a winch which I think is good to get a nice tight reef. Since you have the reefing hooks slab reefing is available too and I would at least initially start with that. It is easier to set up in my opinion. As far as I can see you still need to re-run the outhaul line. Engine too? What's the story with this boat?
shemandr said: I don't have time for a detailed response now. But yes the reefing line looks better to me and the single shackle looks better too. When the sail is raised and the tension is on the luff it should be fine. I see the standing block is part of the main sheet system. Regarding the diagram it looks like that is for single line reefing but I still wouldn't like that small hole for an exit. Regardless of which way is used I like having the reefing line go thru the stopper and presumably to a winch which I think is good to get a nice tight reef. Since you have the reefing hooks slab reefing is available too and I would at least initially start with that. It is easier to set up in my opinion. As far as I can see you still need to re-run the outhaul line. Engine too? What's the story with this boat? Click to expand
Does anyone know what this is in the boom? Is there what I run the outhaul line through?

You don't need to install a new clutch solely for the outhaul. You can terminate the outhaul line on a cleat on the boom. A lot of boats are rigged like that. If you want or need more purchase on the outhaul you can add a turning block to the system inside the boom. The short version of this is: You attach on end of the outhaul line internally to the boom with an eye. The other end goes thru a block, which is attached to what line terminates on the sail clew. I'll look for a diagram. You could add a small winch to the boom as another alternative. Regarding the end of boom picture which came in as I was writing this, the outhaul would like go thru the middle channel - the one with the stopper (Which I wouldn't trust). The other two channels would work nicely for the reefing lines which you asked about in the OP. To keep things simple I didn't go into that - yet.
Here are some diagrams. I couldn't copy them individually. So look at the Harken 2:1 or the Ronstan image next to it. in boom outhaul systems - Google Search
shemandr said: Here are some diagrams. I couldn't copy them individually. So look at the Harken 2:1 or the Ronstan image next to it. in boom outhaul systems - Google Search Click to expand
- This site uses cookies to help personalise content, tailor your experience and to keep you logged in if you register. By continuing to use this site, you are consenting to our use of cookies. Accept Learn more…
How to Rig Your Small Sailboat and Prepare to Sail
In this lesson, you will learn how to rig a small sailboat to prepare for sailing. For reference purposes, a Hunter 140 daysailer was used for this learn-to sail tutorial. Before you begin, you can familiarize yourself with the different parts of a sailboat.
Install (or Check) the Rudder
Typically the rudder of a small sailboat like this one is removed after sailing to prevent wear and tear while the boat remains in the water. You need to reinstall it before sailing, or if it is already in place, check that that it is firmly attached (with optional safety lanyard securing it to the boat).
On most small boats, the top of the leading edge of the rudder has attached pins (called pintles) that are inserted downward into round rings (called gudgeons) attached to the stern. This is rather like the familiar “Insert tab A into slot B.” While the exact configuration may vary among different boat models, it’s usually obvious how the rudder mounts to the stern when you hold the rudder beside the stern.
The rudder may or may not already have a tiller mounted on it. The next page shows how to attach the tiller on this boat.
Attach (or Check) the Tiller
The tiller is a long, thin steering “arm” mounted to the rudder. If the tiller is already attached to the top of the rudder on your boat, check that it is secure.
On this Hunter 140, the tiller arm is inserted in a slot at the top of the rudder, as shown here. A pin is then inserted from above to lock it in position. The pin should be tied to the boat with a lanyard (short light line) to prevent being dropped.
Note that this tiller also includes a tiller extension, which allows the sailor to still control the tiller even when sitting far out to the side or forward.
With the rudder and tiller in place, we’ll now move on to the sails.
Attach the Jib Halyard
Because sunlight and weather age and weaken sailcloth, the sails should always be removed after sailing (or covered or bagged on a larger boat). Before you get started, you have to put them back on (called “bending on” the sails).
The halyards are used to raise both the jib and mainsail. At the sail’s end of a halyard is a shackle that attaches the grommet at the head of the sail to the halyard.
First, spread out the sail and identify each of its corners. The “head” is the top of the sail, where the triangle is the most narrow. Attach the jib halyard shackle to this corner, making sure the shackle is closed and secure.
Then follow the front edge of the sail (called the “luff”) down to the next corner. The luff of the jib of a small sailboat can be identified by the hanks every foot or so that attach this edge to the forestay. The bottom corner of the luff is called the sail’s “tack.” Attach the grommet in the tack to the fitting at the bottom of the forestay -- usually with a shackle or pin. Next, we’ll hank on the sail.
Hank the Jib on the Forestay
Hanking on the jib is a simple process, but it can feel unwieldy if the wind is blowing the sail in your face.
First, find the other end of the jib halyard (on the port, or left, side of the mast as you face the bow of the boat) and keep a good grip on it with one hand. You will be slowly pulling it in to raise the sail as you hank it on.
Beginning with the hank nearest the head of the jib, open it to clip the hank onto the forestay. It will be obvious how to open the hanks, which are usually spring-loaded to close automatically when released.
Then raise the sail a little by pulling on the halyard. Making sure there isn’t any twist in the sail, attach the second hank. Raise the sail a little more and move on to the third hank. Keep working your way down the luff, raising the sail a little at a time to make sure it isn’t twisted and the hanks are all in order.
When all the hanks are attached, lower the jib back down to the deck while you route the jib sheets in the next step.
Run the Jibsheets
The jib sail is positioned while sailing by using the jibsheets. The jib sheets are two lines that come back to the cockpit, one on each side of the boat, from the aft lower corner of the sail (the “clew”).
In most small sailboats, the jib sheets are left tied to the sail’s clew and stay with the sail. On your boat, however, the jibsheets may remain on the boat and need to be tied or shackled to the clew at this stage. Unless there is a shackle on the sheets, use a bowline to tie each to the clew.
Then run each sheet back past the mast to the cockpit. Depending on the specific boat and the size of the jib, the sheets may run inside or outside the shrouds -- the tensile lines that run from the deck to the mast, holding in place. On the Hunter 140 shown here, which uses a relatively small jib, the jibsheets pass from the sail’s clew inside the shrouds to a cam cleat, on each side, as shown here. The starboard (right side as you face the bow)) jibsheet cleat (with the red top) is mounted on the deck just to the starboard of this sailor’s right knee. This cleat secures the jibsheet in the desired position while sailing.
With the jib now rigged, let's move on to the mainsail.
Attach Mainsail to Halyard
Now we’ll attach the mainsail halyard shackle to the head of the mainsail, a process very similar to attaching the jib halyard. First spread the mainsail out to identify its three corners as you did with the jib. The head of the sail, again, is the most narrow angle of the triangle.
On many small sailboats, the main halyard does double duty as a topping lift -- the line that holds up the aft end of the boom when it is not being held up by the sail. As shown here, when the halyard is removed from the boom, the boom drops down into the cockpit.
Here, this sailor is shackling the halyard to the head of the mainsail. Then he can go on to secure the sail’s tack in the next step.
Secure the Mainsail’s Tack
The forward lower corner of the mainsail, like that of the jib, is called the tack. The grommet of the tack is installed at the bow end, usually by a removable pin inserted through the grommet and secured on the boom.
Now the luff (leading edge) of the mainsail is secured at both the head and the tack.
The next step is to secure the clew (aft lower corner) and foot (bottom edge) of the sail to the boom.
Secure the Mainsail Clew to the Outhaul
The clew (aft lower corner) of the mainsail is secured to the aft end of the boom, usually using a line called the outhaul that can be adjusted to tension the foot of the sail.
The sail’s foot (the bottom edge) itself may or may not be secured directly to the boom. On some boats, a rope sewn into the foot (called the boltrope) slides into a groove in the boom. The clew enters the groove first, forward by the mast, and is pulled back in the groove until the whole sail’s foot is held to the boom in this groove.
The boat shown here uses a “loose-footed” mainsail. This means the sail is not inserted into the boom groove. But the clew is held at the end of the boom in the same way by the outhaul. Thus both ends of the sail’s foot are firmly attached to the sail and drawn tight -- making the sail work the same as if the whole foot was also in the groove.
A loose-footed mainsail allows for more sail shaping, but the sail cannot be flattened quite as much.
With the clew secured and outhaul tightened, the mainsail luff can now be secured to the mast and the sail raised to go sailing.
Insert the Mainsail Slugs in the Mast
The mainsail’s luff (forward edge) is attached to the mast, as the jib’s luff is to the forestay – but with a different mechanism.
On the aft side of the mast is a groove for the mainsail. Some sails have a boltrope on the luff that slides upward in this groove, while others have sail “slugs” mounted every foot or so on the luff. The sail slugs, as you can see in this photo just forward of the sailor’s right hand, are small plastic slides inserted into the mast groove where it widens out into a sort of gate.
Again, first inspect the whole sail to make sure it’s not twisted anywhere. Hold the main halyard in one hand during this process – you will be gradually raising the mainsail as you insert the slugs into the mast groove.
Begin with the sail slug at the head. Insert it into the groove, pull the halyard to raise the sail a little, and then insert the next slug.
Before completing this process, be sure you’re ready to go sailing soon after the mainsail is up.
Continue Raising the Mainsail
Continue raising the mainsail with the halyard as you insert one slug after another into the groove.
Note that this sail already has its battens in place. A batten is a long, thin, flexible strip of wood or fiberglass that helps the sail keep its proper shape. They are positioned in pockets sewn into the sail in a generally horizontal direction. In this photo, you can see a batten near the top of the blue section of the mainsail over the sailor’s head.
If the battens were removed from the sail, you would insert them back into their pockets either before beginning to rig the boat or now, as you raise the mainsail in stages.
Cleat the Main Halyard
When the mainsail is all the way up, pull hard on the halyard to tension the luff. Then tie the halyard to the cleat on the mast, using a cleat hitch.
Notice that the mainsail when fully raised holds the boom up.
Now you’re almost ready to go sailing. This is a good time to lower the centerboard down into the water if you haven’t done so already. Note that not all small sailboats have centerboards. Others have keels that are fixed in place. Both serve similar purposes: to prevent the boat from skating sideways in the wind and to stabilize the boat. Larger keels also help lift the boat to windward
Now you should raise the jib. Simply pull down on the jib halyard and cleat it on the other side of the mast.
Start Moving
With both sails raised, you’re ready to start sailing . One of the first steps to getting underway will be to tighten the mainsheet and one jibsheet to adjust the sails so you can get moving forward.
You may also need to turn the boat so that the wind fills the sails from one side. A boat on a mooring, such as shown here, will naturally be blown back such that the bow faces directly into the wind – the one direction you can’t sail! Being stalled facing the wind is called being "in irons."
To turn the boat out of irons, simply push the boom out to one side. This pushes the back of the mainsail into the wind (called "backing" the sail) -- and the wind pushing against the sail will start the boat rotating. Just be sure you’re ready to take off!
Learn the Parts of a Sailboat and How to Communicate Them
Buying a Sailboat: Sloop vs. Ketch
Learn How to Sail a Small Sailboat
The 9 Best Beach Chairs of 2024, Tested and Reviewed
The Various Types of Sailboats and Rigs
Owner's Review of the MacGregor 26 Sailboat Models
West Wight Potter 19 Sailboat Review
The 11 Best Two-Person Tents of 2024, Tested and Reviewed
The 12 Best Inflatable Stand-Up Paddleboards of 2024, Tested and Reviewed
The 8 Best Men’s Ski Pants of 2024, Tested and Reviewed
12 Best Things to Do in Juneau During an Alaska Cruise
Carnival Magic - Cruise Ship Photo Tour and Profile
A Beginner's Guide to Sailing a Sailboat
I Sailed on the World's Largest Cruise Ship. Here's What It Was Like
The Best Staycation in Every State
Beaches in Long Beach, CA
COMMENTS
Install the block on the boom eye strap, the fairlead cleat on the side of the boom, and reave the line as shown in the picture below. Simpler 2:1 outhaul is also shorter. In this system, the line runs through the clew grommet itself. The line isn't as easy to trim as with multiple blocks, but it's still easy enough.
The outhaul on a sailboat is one of the controls, part of the boat's running rigging. The outhaul is a line that connects to the clew of the mainsail (the ring in the lower aft corner) and pulls the sail back toward the end of the boom. On most boats, this line or wire cable passes around a block (pulley) down into the boom, as shown in this ...
What sail control gets forgotten more than any others? The outhaul line, attached to the clew of your mainsail, helps shape the lower half of the sail for ma...
The outhaul controls and shapes the mainsail. Ease the outhaul to increase draft and power up the sail. Tighten the outhaul to flatten the sail and reduce drag and heel in heavy air. Typical boat length: Small Boat: 22' - 28' (6.7 - 8.5 m)
The outhaul line in a J/109 sailboat has a block and tackle concealed inside the boom to provide mechanical advantage when adjusting tension on the foot of t...
In this video Sunfish Sailor Lee Montes shows sunfish sailors how to install the Outhaul and Cunningham on their Sunfish Sailboat. These Sail Controls allow...
With a loose-footed main, the outhaul has more work to do. The Sabre 30 is the first boat I've owned with a loose-footed main, and I didn't understand what the rig was. The rope that attached to the clew car was not the same rope as emerged from an exit plate forward on the boom.
Keeping too much tension on the outhaul will drag the foil aft in the mast, bending it and causing the sail to rub against the inside of the mast, creating friction. Once you've taken the slack out of the sail, ease the outhaul and take in on the furling line again. Try not to let the sail flog as this also bends the foil and causes more ...
Step 1. Clew Block. The first part of the Outhaul System is going to be the clew block and hook. There are lots of different ways that people rig this. We will do it per the instructions you receive with a new boat. Take one of the 18mm blocks, the clew hook and one length of the 3mm race rope. Tie a stopper knot in one end of the line and ...
5. Secure the mast using the appropriate rigging and fasteners. Attach the standing rigging, such as shrouds and stays, to the mast and the boat's hull. Fact: The mast of a sailboat is designed to withstand wind resistance and the tension of the rigging for stability and safe sailing. 2.
For a 'normal' outhaul system where the end of the thin primary line is luggage tagged to the blue plastic eye on the end of the boom, one simple way to adapt a radial/standard rig outhaul is to use a short extender strop luggage tagged to the 4.7 sail.
December 8, 2015 Quantum Expert Answer. You should have enough purchase on your outhaul system that by the time it gets to the final line you pull on there shouldn't be enough load on line to make a big difference on what line you use. You don't want any stretch in the system and you want it to run as smooth as possible.
Run the line (wire end) through the boom (from the mast) and over a boom end sheave, into the block which is attached to the slide at the clue of the sail, and terminate the end of the wire (which you had made with an eye) to the end of the boom. Make sure that your sheave at the end of your boom can handle a wire-line.
Sailing Instructional Video. Discuss this video and anything sailing on my forum www.anything-sailing.com . A video on main sail outhaul adjustment and prin...
Tie off the last corner tie to the clew of the sail. 5. Rigging the Outhaul: 1. Locate the outhaul line. Tie a stopper knot in one end. Lead the free end of the line through the port hole in the boom end cap (fi gure 17). 2. Continue the line through the clew grommet and back
Mainsheet rigging refers to the setup and configuration of the line system used to control the mainsail on a sailboat. It typically involves a combination of blocks, lines, and hardware that allow for efficient adjustment of the mainsail's angle and tension. The rigging is crucial for proper sail trim and performance during sailing maneuvers.
3 The outhaul line is led down to a turning block on the deck and back through a jamming cleat by the cockpit. It can be loosened to allow a fuller sail shape when sailing downwind. ... Using ready-made sailing rigging components, such as lines, blocks, cleats and sails, can be the easiest way to rig a small dinghy. Alternatively, if you are ...
For example, a sloop rig has fewer lines than a ketch, which has multiple masts and requires a separate halyard, outhaul, and sheet for its mizzen sail. Similarly, a cutter rig needs another halyard and extra sheets for its additional headsail. You can dive deeper and read more about Sloop rigs, Ketch Rigs, Cutter rigs, and many others here ...
How to rig the Clay Allen Laser Outhaul from Colie Sails. Purchase here: http://coliesail.com/boats/laser/clay-allen-laser-outhaul.html
One of the 3/16" x 40" lines is the outhaul. Tie the clew (aft corner) of the sail to the boom. Pull just tight enough to remove large wrinkles in sail. You will adjust the outhaul tighter for higher winds, looser for light air. If you have the adjustable outhaul with the cleat on the boom, run the outhaul line OUTSIDE of the sail sock.
Interesting the rigging diagram is silent on the outhaul that is attached to the clew of the mainsail (the ring in the lower aft corner at shackle E) and pulls the sail back toward the end of the boom, through the boom, out the boom, down the mast and either cleated off on the mast or routed back to the cockpit through the rope clutch.
Attach the jib halyard shackle to this corner, making sure the shackle is closed and secure. Then follow the front edge of the sail (called the "luff") down to the next corner. The luff of the jib of a small sailboat can be identified by the hanks every foot or so that attach this edge to the forestay.
PLEASE NOTE: THIS VIDEO HAS BEEN UPDATED WITH ENHANCED GRAPHICS AND IMPROVED SOUND. CHECK IT OUT HERE https://youtu.be/tRgWtPaCQQcA beginners guide to sailbo...