The global authority in superyachting
- NEWSLETTERS
- Yachts Home
- The Superyacht Directory
- Yacht Reports
- Brokerage News
- The largest yachts in the world
- The Register
- Yacht Advice
- Yacht Design
- 12m to 24m yachts
- Monaco Yacht Show
- Builder Directory
- Designer Directory
- Interior Design Directory
- Naval Architect Directory
- Yachts for sale home
- Motor yachts
- Sailing yachts
- Explorer yachts
- Classic yachts
- Sale Broker Directory
- Charter Home
- Yachts for Charter
- Charter Destinations
- Charter Broker Directory
- Destinations Home
- Mediterranean
- South Pacific
- Rest of the World
- Boat Life Home
- Owners' Experiences
- Interiors Suppliers
- Owners' Club
- Captains' Club
- BOAT Showcase
- Boat Presents
- Events Home
- World Superyacht Awards
- Superyacht Design Festival
- Design and Innovation Awards
- Young Designer of the Year Award
- Artistry and Craft Awards
- Explorer Yachts Summit
- Ocean Talks
- The Ocean Awards
- BOAT Connect
- Between the bays
- Golf Invitational
- Boat Pro Home
- Pricing Plan
- Superyacht Insight
- Product Features
- Premium Content
- Testimonials
- Global Order Book
- Tenders & Equipment
.jpg/r%5Bwidth%5D=320/c01b08f0-3198-11ec-b3da-5dc06521023f-Black%20Pearl%20-%20Tom%20Van%20Oossanen%20(3).webp "yacht rigging explained")

The definitive guide to sailing yacht rigging
Related articles, superyacht directory.
Do you know your Bermudan rig from your DynaRig or wingsails? And which is best? BOAT explains it all...
Take a look at a modern racing yacht from above, beating to windward and heeled to the breeze, and you can see at a glance why Bermudan rigs have stood the test of time. With its fore and aft sails bladed into efficient aerodynamic shapes, a modern yacht can slice close to the wind and be driven hard. Such a sight would have been outlandish a century ago. Then, a typical trading barquentine could set 18 sails to catch light airs, but it needed a large crew to battle with canvas far out on the yards. In a modern miracle as incredible in its way as flight, today’s racing yachts can sail faster than the speed of the wind – in some cases several times faster.
A mainsail set on a single spar is an age-old concept but only in the 19th century was it adapted as the Bermudan or Marconi rig. A one-piece mainsail set on a mast without a gaff, hoisted with one halyard and controlled by one sheet, was simpler and more efficient. This revolution became the power train of pleasure yachting and racing.
But perhaps the time is coming for a re-evaluation of simpler rigs requiring fewer crew – alternatives with lower loads operated by automated systems. In an era of reduced carbon consumption, could more radical sailplans even herald a revival in sail power?
The evergreen Bermudan rig
The Bermudan rig is the all-rounder, able to perform well at all angles of sail. It is efficient upwind, while downwind the sail area can be significantly boosted with a big gennaker or spinnaker. For good reasons, it is the first choice for nearly every modern sailing yacht up to around 60 to 65 metres for cruising and regatta racing alike. At larger sizes, however, things start to become trickier, and the trade-offs get interesting.
Over the last decade, sail handling technology has steadily advanced to allow sloop rigs to grow larger and larger. “But with that comes a highly loaded rig, many tonnes of compression from tension in the rigging, and you have to build structure in the boat to accept that,” explains Paul MacDonald, founder and superyacht sales manager of Southern Spars.
“You have to have a lot of deck gear and captive winches below decks and the machinery for that. But over the years, boom furling systems and MPS [Multi Purpose Sails for downwind angles] stored on a drum, for example, have made sail handling safer.
Bill Tripp is the designer behind the 86-metre Aquijo , which broke new ground in 2015 as the world’s largest Bermudan ketch. Tripp prefers to call the rig a "sketch", a portmanteau word for a rig that is neither a sloop nor a ketch “because the main and mizzen are identical”. Even though the sailplan is divided over two masts, each spar is still a towering 90 metres above the water. Aquijo perfectly illustrates the issues involved with a Bermudan rig when scaled up.
“The sloop is great but I prefer the ‘sketch’ for sailing around the world under full control due to the desirability of a two-masted rig for reaching ability, which dominates passages, and the safety of controllable loads when sailing in all kinds of conditions miles from nowhere,” he says.
Upwind, Aquijo sets a jib, staysail, mainsail and mizzen, all in North Sails 3Di, totalling 3,821 square metres. A furling Code sail for reaching and downwind angles increases that to a vast 5,051 square metres.
While Aquijo has a crew retinue of 17, it can be controlled under sail by six or seven people. With custom winches to handle halyards and sheets, the sails can be hoisted astonishingly quickly for such a large rig. “It takes five minutes to put the main up, on average, and the main and mizzen can go up at the same time,” Tripp says. Aquijo has now sailed 100,000 nautical miles around the world and the owner is planning another circumnavigation through the Northwest Passage.
Tripp is not convinced of the wisdom of a much larger single-masted sloop rig. “If you are day sailing in the Med, a sloop would be awesome, but I am not sure if you had fewer sails you would be able to [reduce canvas] well enough. Also the mast is a windage problem when the keel is up and you are beam-to. If you are on anchor, that’s no problem but you’d have to be able to cope with being on the docks in 70 knots. The windage at 120 metres is not only more but the centre of effort is so much higher, and so the heeling loads all go up.”
However, British designer Malcolm McKeon , the name behind the high-performance, sloop-rigged carbon composite superyachts Missy and Ribelle , is pushing the sloop rig to new heights. His 85-metre design concept Apex, developed with Royal Huisman , would be the largest sloop-rigged yacht in the world. “The loads are enormous,” he admits, “but it is all scalable.”
“The big disadvantage is sail handling. The downwind sails are pretty complicated once you start hoisting and retrieving, even with drum and reel systems. It is not straightforward.” But, he adds, “I think we know the advantages of a sloop: if you want all-round performance you can’t beat it, even at the top end.”
Advantages of a clipper rig
The DynaRig has been around as a concept since the 1960s when German engineer Wilhelm Prölss devised these free-standing, rotating rigs as a fuel-saving solution for large commercial vessels. The idea was ahead of its time, so much so that its first realisation came nearly 40 years later when American owner Tom Perkins bought the residual technology and commissioned Dykstra Naval Architects to create a three-masted DynaRig for Maltese Falcon , his 88-metre Perini Navi.
The DynaRig is not as efficient upwind as the Bermudan rig, and is probably not the best solution for a yacht smaller than around 65 metres, suggests Jeroen de Vos of Dykstra. “We wouldn’t advise putting a DynaRig on a small yacht because there are other ways to manage sail handling. But on a larger yacht the DynaRig becomes an alternative because there is no rigging, no highly loaded sheets, low-tech [small] sails and no big winches.”
The beauty of the DynaRig is that its automatic systems can be handled by one or two people and, notes de Vos, “you don’t have to get out of your chair to go sailing. Maltese Falcon can sail on and off the anchor and can set 2,400 square metres of sail in six minutes. On other boats it takes six minutes to get the sail cover off.”
Damon Roberts of Magma Structures, which built the rigs for Maltese Falcon and the only other DynaRig yacht to date, the 106-metre Black Pearl , says: “You can do any manoeuvre easily; it’s like sailing a dinghy. There are no highly loaded sheets or ropes or flogging lines. You can luff up, bear away, tack and gybe at any time and really enjoy sailing the boat without any apparent fuss.”
So with all these advantages, why has the DynaRig been chosen for only two sailing superyachts? For some designers, such as Malcolm McKeon, it is partly to do with compromises imposed by the large mast tubes and bearing diameters on the internal structure and layout, “particularly in the cockpit area,” he says. He also points out that the clipper ship look is not to every owner’s taste. “Sloops are more conventional looking,” he says.
Damon Roberts says there is still development work to be done. He has teamed up with Southern Spars and, with their additional resources, expects evolution with several new projects. “These include two at the moment that are twin-masted DynaRigs,” he says. “We did quite a lot of wind tunnel work early on as we felt that was really the sweet spot for it, and people will be stunned at how efficient these are.”
The future of the wingsail
Wingsails have been around for decades too, but with their adoption by the last two America’s Cups and the confluence with foiling technology, they have undergone rapid and revolutionary development.
To date, there is no proven solution for reefing a wing that would be suitable for offshore cruising or ocean passages. As the pronounced aerodynamic “nose” at the leading edge of a wing can develop force in strong winds, they could potentially make a large yacht uncontrollable in port as well.
“How do you get rid of sail and how does [a boat] handle when caught out in heavy wind conditions – which you will be? How do you keep the angle of attack all the way up the rig and how do you handle squalls?” Roberts asks. “A mechanism to reduce sail might be easy to sketch out but it is difficult to engineer.”
Jeroen de Vos says: “The wingsails are more developed towards performance and I wouldn’t say that they are as practical as soft sails or would ever make handling easier. But if somebody wants that, why not? Reefable soft sails, wings that are inflated, hoisted panels, possibly these are applicable. The development of this area is happening very rapidly.”
Paul MacDonald of Southern Spars agrees that the time is not here yet but thinks it will come. “In reality we are in the early days of wings. For the America’s Cup, they are the most efficient way of sailing by a long shot, but with them comes handling issues, which the industry hasn’t resolved yet. But I am sure they will be in 10 years’ time. Designers such as VPLP are starting to [work on concepts] and we are going to see something that is usable and efficient and suitable for ocean work eventually,” he says. “And whatever the solution is, you imagine that it will scale.”
Looking to the future
A drive for greener superyachts could present an opportunity for sail, but perhaps it needs to be less daunting.
“There is this intimidation of sheets and backstays, and sailing is a language you don’t learn in a year,” Tripp says. “But we have a project we are doing now with a yard with some new rig technology and some soft wings that we think is going to be viable.
“We can uncomplicate sailing more. If we can win people over from motorboats it will help, but we are only winning these battles one or two at a time. We need [more] projects like Sailing Yacht A , which are something really different, and do more things better with less energy. We as architects need to elicit change.”
McKeon also sees change coming. “People are more and more concerned about keeping their image green and sails are the way to do that,” he says. “Simpler sailing systems are needed. The current generation is used to Bermudan sloops. In years to come, the traditionalists will all be gone, and maybe new people will be more accepting of [different ideas]. I think in the future we will certainly have wings.”
More about this yacht
Yachts for sale, similar yachts for sale, yachts for charter, more stories, most popular, from our partners, sponsored listings.
- BOAT OF THE YEAR
- Newsletters
- Sailboat Reviews
- Boating Safety
- Sailing Totem
- Charter Resources
- Destinations
- Galley Recipes
- Living Aboard
- Sails and Rigging
- Maintenance
- Best Marine Electronics & Technology
Understanding Running Rigging
- By Ralph Naranjo
- Updated: January 22, 2020
Regardless of whether you sail a modern, fractional-rigged sloop or a wishbone-rigged staysail schooner, it’s the running rigging that sets, trims, reefs and furls the sails. In the bad old days, decks were full of wobbly, sheaved high-friction blocks and essentially one kind of cordage. Today, running rigging has attained full-system status, with its primary goal being friction abatement.
Various types of synthetic- fiber cordage, with specific strength, stretch and creep characteristics, run through ultraslippery blocks and fairleads. Each line is aimed at the exact spot a team of ergonomics experts determined it should go. Even the halyard hardware that attaches the line to the head of a sail has been computer-modeled and scrutinized with finite element analysis. Soft shackles and strops, made from Dyneema fiber rope, are showing up in high-load locations. In short, we are in the midst of a running-rigging revolution, and much of the new stuff offers real value to the cruising sailor.
What’s My Line?
Just as pistons and cylinders play a primary role in a diesel auxiliary, rope and blocks are the guts of every sail-handling system. A few decades ago, Dacron (polyester cordage) ruled the roost. It remains a key player, but stronger, lighter, and less-stretchy options are gaining ground. Racers have embraced Dyneema, Vectran, Torlon, Zylon and a growing list of other odd-sounding esoteric fibers. The old enemy stretch has been tamed, but the big remaining question is whether a running-rigging makeover is worth the expense. It takes a little cost-benefit analysis to answer that question.
There’s consensus among sailors, riggers and yacht designers that there are cost-effective crossover points, where performance and value intersect. Take, for example, a mainsail halyard upgrade. Polyester has proved to be too stretchy, but PBO (Zylon) cored rope, sometimes called liquid crystal, is way too costly. But for cruisers, a midrange medium-tech upgrade makes a lot of sense. The line of choice is often a double braid with a high-modulus Dyneema core and a conventional polyester cover. This midrange combo results in a halyard with much lower stretch and good handling characteristics, plus it retains a chafe- and ultraviolet-resistant cover.
Going higher-tech in fiber selection for sheets on a cruising boat might not be as desirable. This is because a good-quality double-braid polyester remains a sensible solution, at least on cruising boats under 40 or so feet. Its stretchy nature might even add a little shock-absorber effect, lessening the fatigue cycle on mast, boom and line. However, higher-modulus (less-stretchy) line is a superior halyard material, and it also makes sense for use in running backstays, topping lifts, tack and head pennants, and boom-vang tackles.
When choosing the right high-modulus line, make sure it’s rated for tight turns around small-radius blocks and masthead sheaves. In the early days of synthetic fibers, many ultra-low-stretch lines stiffened with time, making line handling more like wrapping a tree branch around a winch drum. Today, Samson, Yale, New England Ropes and others have tamed this problem, and offer a wide range of products that meet the needs of cruisers and racers. Do some research, talk with a local rigger, and pick the right rope for your boat and your specific sailing requirements.
Around the Blocks
Every ball- and roller-bearing block spins like a roulette wheel when there’s no load on the sheave. But when you add hundreds, even thousands, of pounds of tension to a halyard or sheet, it’s only the better-built blocks that hold friction at bay. Usually these blocks have well-engineered frames and bearing races that resist deformation under heavy loads.
Ironically, cruisers don’t need the highest-tech line, but we certainly do benefit from the best-built blocks. These not only run smoothly under load, but they also continue to do so despite the test of time.
Over the years, as ingested salt spray is baked into grit by the unrelenting sun, bearing abrasion becomes a big problem. Keep in mind that if you can see the high-molecular-weight Delrin, Torlon or other plastic bearings, so can the sun, and this means that UV degradation will become an issue.
It’s also important to recognize that choosing the smallest, lightest block for a given line size makes little sense. A better approach is to pick a one-size-larger block that’s still appropriate for the given line diameter. It will deliver a higher safe working load, and therefore, the normal load will be a smaller percentage of the SWL. Such blocks will also have a larger bearing surface and will operate with less friction. Add to this the fact that lower loading also equates to longer hardware life, and you have another good reason to opt for a size uptick.
Power to the Winches
I think that the hand-crank winch is one of sailing’s most elegant inventions. And the good news is this piece of hardware continues to evolve. New designs come packed with better bearings, improved self-tailers and multiple gear ratios, making them even better muscle-power multipliers.
Modern winches are more ergonomic, and there’s even a model that lets you trim in and ease out via opposite rotations of the winch handle. The shorthanded cruiser has more trimming tools from which to choose—even a push-button electric winch that eliminates the old question: “Where’s the winch handle?”
However, when it comes to power winching, it’s important to rethink the way you handle a sheet or halyard. With the old hand-cranking approach, arm and shoulder strength provided both torque and feedback. Unfortunately, this feedback loop is absent when using an electric winch. As the tension increases, the button doesn’t get any harder to push. Therefore, we need to look more closely at the luff and head of the sail to make sure the halyard or sheet is not being overtensioned.
In the early days of power winches, I watched the crew of a 60-foot sloop set sail with the aid of electric winches. As the mainsail was being unfurled, the furling line hung up, causing the tension on the outhaul to reach full force in the matter of a second or two. A loud bang announced the separation of the clew from the mainsail. It was an attention-grabbing demonstration of the brute force delivered by a power winch—and a costly lesson in how high-modulus, low-stretch materials endure minimal elongation prior to failure. The takeaway from this episode was that careful attention must be paid to the line being tensioned and what’s happening to the sail. Beware of dodgers and Biminis that hide the sails from view and leave the person operating a power winch without any direct visual feedback.
Clutch Plays
Some see the self-tailing winch as the ultimate answer to handling a line under load. But there are other opinions that continue to hold sway. The oldest belongs to traditionalists who swear by horn cleats, just the way Nat Herreshoff intended. It’s a functional approach, especially if the deck is festooned with non-self-tailing winches that remain in good working order.
But we are in a rope-clutch revolution that’s realigned deck layouts and changed the approach to line handling. These lever-operated, clamplike devices allow one winch to cope with several lines, but not all at once. With badgerlike jaws, rope clutches lock lines in place, immobilizing the line under full load. Some clutches allow a sailor to release the fully tensioned line, but lines under load behave more sedately if, prior to releasing, they are wrapped on the winch and re-tensioned prior to releasing the clutch. The line is then eased from the winch drum.
There’s a fine art to making the right rope-clutch commitment. The “too much of a good thing” rule once again prevails, and surrounding a winch with four or five clutched lines can cause more problems than it solves. This is especially true if two or more heavily loaded lines are involved in the same sail-handling evolution. I’ve sailed on boats where a main halyard and mainsheet are clutched off at the same winch. The assumption is that once the sail is set, the halyard will remain locked in the clutch and the winch can be used to handle the sheet. All is copacetic up until it’s time to reef, and the mainsheet and halyard have to be handled with only one winch. Add darkness, a significant seaway and a crew just rousted from a deep sleep, and the value of an extra winch, rather than too many rope clutches, becomes very clear.
Furling systems are center stage aboard modern cruising sailboats. They make sail handling easier and safer because the majority of maneuvers can take place in the cockpit.
Headstay-mounted headsail furlers adorn almost every sailboat seen at in-water boat shows. They come in two distinct generic designs. Both types are comprised of a slotted alloy extrusion that fits over the headstay. A jib or genoa is initially hoisted via a rope halyard, then torque to wind in the sail is provided by a drum affixed to the bottom end of the foil. The difference between the two systems is that one relies on a mast-mounted sheave that leads a jib halyard to a sliding swivel that rides up and down the foil. The other system, usually found on smaller boats, has a sheave assembly affixed to the top foil section and the halyard(s) is not run to the mast. Owners with the latter system often continually fight the stretchiness of the small-diameter polyester line used for the halyard. Switching to a higher-modulus (less-stretchy) line lessens the stretch and is worth the investment.
Both systems rely on a spooled line to deliver the furling and reefing torque. This “in-haul” line endures years of UV and chafe damage, but at some point, failure becomes inevitable. It’s more likely to occur when the sail is reefed and the inhaul line is under significant load. For some reason, such failures seem to occur on a dark, rainy night at about 0300. And when a reefing line parts, the deeply reefed jib becomes a full genoa flogging like a flag in the breeze. Even worse, the line to haul it in is no longer usable. That’s why it makes sense to check for chafe and grow skeptical of a furling line that has been exposed to sunlight for more than a decade.
Endless or continuous line furlers are designed to tame large drifter/reachers and nylon asymmetric spinnakers. There are bottom-up and top-down versions, and each is designated by where the sail first begins to furl. Bottom-up furlers are used for light air, lightweight genoa-like sails (codes and reaching sails). Instead of furling with a fishing-reel-like drum arrangement, these endless line furlers rely on a continuous loop. Line tension turns into torque at the disk-shaped drum that holds only a partial turn of line. The twin leads of the elongated loop can be led aft to the cockpit via multiple sets of double blocks mounted on lifeline stanchions.
Asymmetric spinnakers utilize a top-down furling rotation that is telegraphed from the drum to the head of the sail using a torsion line. The splices on these endless-loop furling lines should be regularly checked, and so should the points where the torsion rope enters the hardware.
Cordage—like the hardware that leads and locks running rigging in place—has been vastly improved, and it makes sense for sailors to tap into what it has to offer. This can be done in a full-scale makeover or in a bit-at-a-time tuneup. With the latter, start with halyards, add some new blocks, and check or replace the mast sheaves. If winches and clutches are part of the redo, make sure the deck structure can handle the load, or have some extra reinforcement added.
Whatever the scale of the rigging refit, keep in mind that on a cruising boat, saving ounces isn’t the issue. Our goal is to add efficiency and reliability, and that involves picking hardware and cordage with the right specs, and using them in a layout that keeps the rigging running as friction-free as possible.
Technical expert Ralph Naranjo is a veteran circumnavigator and ocean racer, and author of The Art of Seamanship .
- More: hardware , How To , print 2020 winter , rigging
- More How To
How to Protect Your Spars from Corrosion
Sailing totem refit series: the forward head makeover, fatty goodlander: dealing with chafe while cruising, how to rig everything in your favor, route planning in the face of climate change.
- Digital Edition
- Customer Service
- Privacy Policy
- Email Newsletters
- Cruising World
- Sailing World
- Salt Water Sportsman
- Sport Fishing
- Wakeboarding
- Boat Rigging: Setting Sail for Success
In the world of sailing, boat rigging plays a crucial role in ensuring the safety, efficiency, and performance of your vessel. From standing rigging to sail rigging types, it's essential to understand the intricacies of rigging a yacht to embark on smooth sailing adventures. In this comprehensive guide, we'll dive into the nuances of boat rigging, helping you navigate the open waters with confidence.
Boat Rigging Basics
Before we delve into the details, let's start with the fundamentals of boat rigging. Understanding the key components and their functions is essential for any sailor, whether you're a novice or a seasoned pro.
Standing Rigging
Standing rigging refers to the fixed support structure of a boat's mast, including wires, cables, and rods. It plays a critical role in maintaining the mast's vertical position and overall stability.
Sail Rigging Types
Sail rigging is not a one-size-fits-all concept, but rather a diverse world with various types and configurations to suit different sailing needs. Understanding these rigging types is essential for any sailor looking to optimize their boat's performance and safety.
Ship Riggings
Ship riggings have played a pivotal role in shaping the history of seafaring and maritime exploration. These complex systems of ropes, wires, and sails have been integral to the functionality and success of various vessels throughout the ages.Explore the significance of ship riggings, their evolution, and their influence on modern-day boat rigging.
Materials Matter
The choice of materials for your boat rigging is a decision that can't be taken lightly. Two popular options, Dyneema and Kevlar, offer distinct advantages.
Dyneema Rigging
Dyneema rigging represents a breakthrough in the world of sailboat rigging. This cutting-edge material, known for its remarkable strength and low stretch properties, has revolutionized the way sailors experience the open water. Often referred to as the ultimate innovation in the world of sailing, Dyneema rigging offers a myriad of advantages:
- Exceptional Strength: Dyneema rigging boasts remarkable strength-to-weight ratio, making it incredibly robust and reliable even in demanding conditions.
- Low Stretch: Dyneema has minimal stretch, which translates to improved sail control and responsiveness, ensuring better performance.
- Lightweight: It's significantly lighter than traditional rigging materials like steel, reducing the overall weight of your vessel and enhancing speed and maneuverability.
- Low Maintenance: Dyneema rigging requires minimal maintenance, offering sailors peace of mind and more time on the water.
- Resistance to Corrosion: Unlike metal rigging, Dyneema is not susceptible to corrosion, ensuring a longer lifespan and durability.
- UV Resistance: Dyneema is highly resistant to UV rays, making it ideal for prolonged exposure to sunlight.
- Easy Handling: Its flexibility and ease of handling simplify rigging installation and adjustments.
- Enhanced Safety: Dyneema's strength and reliability contribute to safer sailing experiences, reducing the risk of rigging failure.
- Versatility: It's suitable for a wide range of applications, from standing rigging to halyards, making it a versatile choice for sailors.
- Eco-Friendly: Dyneema is an environmentally friendly option as it doesn't release harmful substances into the water, contributing to a cleaner marine ecosystem.
Dyneema vs. Kevlar
Weigh the pros and cons of Dyneema and Kevlar to determine which suits your sailing needs best:
Dyneema Rigging:
- Exceptional Strength: Dyneema boasts impressive strength, making it highly reliable for rigging purposes.
- Low Stretch: It has minimal stretch, enhancing sail control and overall performance.
- Lightweight: Dyneema is significantly lighter than traditional materials, reducing the vessel's weight.
- Low Maintenance: Requires minimal upkeep, saving time and effort.
- Corrosion Resistance: Dyneema is not susceptible to corrosion, ensuring durability.
- UV Resistance: It's highly resistant to UV rays, making it suitable for extended exposure to sunlight.
- Safety: Dyneema's strength and reliability contribute to safer sailing experiences.
- Versatility: Suitable for various rigging applications, from standing rigging to halyards.
- Cost: Dyneema can be more expensive than some traditional materials, initially.
- Abrasion Resistance: It may be less resistant to abrasion compared to Kevlar.
Kevlar Rigging:
- Excellent Abrasion Resistance: Kevlar is highly resistant to wear and tear, ensuring longevity.
- High Tensile Strength: It offers impressive tensile strength, making it suitable for demanding applications.
- Stiffness: Kevlar is stiffer than Dyneema, which can be advantageous for some rigging configurations.
- Heavy: Kevlar is heavier than Dyneema, potentially impacting vessel performance.
- Low UV Resistance: It is less resistant to UV radiation, which can affect its durability over time.
- Higher Stretch: Kevlar tends to stretch more than Dyneema, which can impact sail control.
- Prone to Corrosion: Unlike Dyneema, Kevlar can be susceptible to corrosion.
- Cost: It can be expensive, and the initial investment may be higher than other materials.
Choosing between Dyneema and Kevlar depends on your specific sailing needs and priorities. Dyneema is favored for its strength, low stretch, and light weight, while Kevlar excels in abrasion resistance and tensile strength. Consider these factors when making your rigging material selection.
Stainless Steel Yacht Rigging
When it comes to yacht rigging, durability is paramount, and stainless steel rigging wires stand out as a top choice. Their robust nature, coupled with an unmistakable touch of elegance, makes them an ideal option for discerning sailors. Stainless steel yacht rigging is highly resistant to corrosion, even in the harsh marine environment. This resistance not only ensures a longer lifespan but also reduces maintenance efforts, allowing you to spend more time on the water. Additionally, the sleek appearance of stainless steel adds a touch of sophistication to your vessel. Whether you're cruising the open seas or participating in regattas, stainless steel yacht rigging combines style and substance to offer a premium sailing experience.
Spectra Standing Rigging
Spectra standing rigging is a game-changer for sailors seeking top-tier performance and durability. This advanced material, known for its incredible strength and low stretch properties, has revolutionized the way we approach standing rigging. Spectra rigging offers advantages that are hard to beat – it enhances the stability and safety of your vessel while providing exceptional responsiveness. The minimal stretch ensures precise sail control, making it the go-to choice for those who demand the utmost from their rigging. If you're looking to take your sailing experience to the next level, Spectra standing rigging is a choice that can't be ignored.
Read our top notch articles on topics such as sailing, sailing tips and destinations in our Magazine.
Rigging a Yacht: A Step-By-Step Guide
Now that you've grasped the basics and material options, let's dive into the practical aspect of rigging a yacht. Follow these steps to ensure a smooth and safe sailing experience.
Planning and Preparation
Rigging a yacht is a meticulous process that requires careful planning and thorough preparation. Before embarking on your sailing adventure, it's crucial to ensure that every aspect of your yacht's rigging is in top-notch condition. The advantages of this step-by-step guide are manifold. It guarantees the safety of both the vessel and its passengers, reduces the risk of mid-sail complications, and ultimately enhances your overall sailing experience. By meticulously inspecting your rigging and addressing any issues during the planning and preparation phase, you can set sail with confidence, knowing that your yacht is ready to navigate the open waters seamlessly.
Inspecting Your Rigging
Rigging a yacht is a meticulous process that demands careful attention to detail. One crucial aspect is inspecting your rigging. This step ensures the safety and efficiency of your sailing adventure. Regular inspections , even before you set sail, can identify potential issues and help prevent mishaps on the water . Inspecting your rigging is not only a safety measure but also a way to guarantee that your yacht performs at its best, allowing you to enjoy smooth and stress-free sailing experiences.
Rigging Replacement
When it comes to maintaining your yacht's rigging, the necessity of rigging replacement cannot be overstated. Whether due to wear and tear or a desire to upgrade to modern materials, knowing when and how to replace your rigging is crucial.
Specialized Rigs for Small Sailboats
For small sailboat enthusiasts , specialized rigs can enhance your sailing experience. Explore the options available for these nimble vessels.
Ship Rigging Terms
Sailboat rigging comes with its unique terminology. Get acquainted with the essential terms:
- Mast: The vertical spar or structure that supports sails and rigging.
- Boom: A horizontal spar that extends from the mast to support the bottom of a sail.
- Shroud: Rigging wires that support the mast from the sides.
- Stay: Rigging wires that support the mast from the front or back.
- Halyard: Lines used to raise and lower sails.
- Sheet: Lines used to control the angle of the sails with respect to the wind.
- Jib: A triangular foresail set in front of the mast.
- Tack: The lower forward corner of a sail.
- Clew: The lower after corner of a sail.
- Topping Lift: A line that supports the boom when the sail is not in use.
Understanding these ship rigging terms is essential for efficient and safe sailing, allowing you to communicate effectively with your crew and navigate the open waters with confidence.
Sailboat Stays and Shrouds
Sailboat rigging comprises various components, and among the most critical are sailboat stays and shrouds. Stays are the fixed support cables or wires that keep the mast upright, while shrouds add lateral support, preventing the mast from swaying. These components work together to maintain the mast's stability and ensure safe and efficient sailing. The proper tension and alignment of stays and shrouds are crucial for the overall performance and safety of a sailboat. Regular inspections and maintenance of these rigging elements are essential to prevent wear and tear, making sure they remain reliable on your sailing adventures. Understanding the role of sailboat stays and shrouds is fundamental for any sailor, whether you're navigating coastal waters or crossing the open sea.
In conclusion, boat rigging is a multifaceted subject that greatly influences your sailing experience. Understanding the fundamentals, material choices, and the process of rigging a yacht is essential for a successful voyage.
So what are you waiting for? Take a look at our range of charter boats and head to some of our favourite
sailing destinations .
Sail Rigs And Types - The Only Guide You Need

Last Updated by
Daniel Wade
June 15, 2022
A well-designed sailboat is a thing of pure beauty. Whether you're a proud owner of one, a guest on one, or a shore-side admirer, you'll fall in love with the gliding sails, the excitement of a race, and the eco-friendly nature of these sophisticated yet magnificent vessels. With good sails, great design, and regular maintenance, sails and rigs are an important part of a sailboat.
If you’re thinking about going sailing, one of the first things you have to understand is the variety of modern sail plans. Unlike old sailboats, modern sailboats don't need huge, overlapping headsails and multiple masts just to get moving. In the past, when sailboats were heavy, keels were long, the only way to get the boat moving was with a massive relative sail area. You needed as much square footage as you could just to get your sailboat moving. But with the invention of fiberglass hulls, aluminum or composite masts, high-tensile but low diameter lines and stats, and more efficient sails, sailboats no longer need to plan for such large sail plans.. Still, there are various rig styles, from the common sloop, to the comfortable cat-rig, to the dual masted ketch and schooner, there are various sail types and rigs to choose from. The most important thing is to know the different types of sails and rigs and how they can make your sailing even more enjoyable.
There are different types of sails and rigs. Most sailboats have one mainsail and one headsail. The mainsail is generally fore-and-aft rigged and is triangular shaped. Various conditions and courses require adjustments to the sails on the boats, and, other than the mainsail, most boats can switch out their secondary sail depending on various conditions.. Do you want to sail upwind or go downwind? You cannot hoist just any sail and use it. It's, therefore, of great importance to understand how and when to use each sail type.
In this in-depth article, we'll look at various sail types and rigs, and how to use them to make your sailing more enjoyable.
Table of contents
Different Sail Types
It is perhaps worth noting that a sailboat is only as good as its sails. The very heart of sailing comes in capturing the wind using artfully trimmed sails and turning that into motion. . Ask any good sailor and he'll tell you that knowing how and when to trim the sails efficiently will not only improve the overall performance of your boat but will elevate your sailing experience. In short, sails are the driving force of sailboats.
As such, it's only natural that you should know the different types of sails and how they work. Let's first highlight different sail types before going into the details.
- Jib - triangular staysail
- Spinnaker - huge balloon-shaped downwind sail for light airs
- Genoa - huge jib that overlaps the mainsail
- Gennaker - a combination of a spinnaker and genoa
- Code zero - reaching genoa for light air
- Windseeker - tall, narrow, high-clewed, and lightweight jib
- Drifter - versatile light air genoa made from particularly lightweight cloth
- Storm jib - a smaller jib meant for stormy conditions
- Trysail - This is a smaller front-and-aft sail for heavy weather
The mainsail is the principal sail on a boat. It's generally set aft of the mainmast. Working together with the jib, the mainsail is designed to create the lift that drives the sailboat windward. That being said, the mainsail is a very powerful component that must always be kept under control.
As the largest sail, and the geometric center of effort on the boat, the mainsail is tasked with capturing the bulk of the wind that's required to propel the sailboat. The foot, the term for the bottom of any sail, secures to the boom, which allows you to trim the sail to your heading. The luff, the leading edge of the sail, is attached to the mast. An idealized mainsail would be able to swing through trim range of 180°, the full semi-circle aft of the mast, though in reality, most larger boats don’t support this full range of motion, as a fully eased sail can occasionally be unstable in heavy breeze.
. As fully controlling the shape of the mainsail is crucial to sailing performance, there are many different basic mainsail configurations. For instance, you can get a full-batten mainsail, a regular mainsail with short battens, or a two-plus-two mainsail with two full-length battens. Hyper-high performance boats have even begun experimenting with winged sails which are essentially trimmable airplane wings! Moreover, there are numerous sail controls that change the shape by pulling at different points on the sail, boom, or mast. Reefing, for instance, allows you to shorten the sail vertically, reducing the amount of sail area when the boat is overpowered.
Features of a Mainsail
Several features will affect how a particular sail works and performs. Some features will, of course, affect the cost of the sail while others may affect its longevity. All in all, it's essential to decide the type of mainsail that's right for you and your sailing application.
Sail Battens, the Roach, and the Leech
The most difficult part of the sail to control, but also the most important, are the areas we refer to as the leech and the roach. The roach is the part of the sail that extends backwards past the shortest line between the clew, at the end of the boom, and the top of the mast. It makes up roughly the back third of the sail. The leech is the trailing edge of the sail, the backmost curve of the roach. Together, these two components control the flow of the air off the back of the sail, which greatly affects the overall sail performance. If the air stalls off the backside of the sail, you will find a great loss in performance. Many sail controls, including the boom vang, backstay, main halyard, and even the cunningham, to name a few, focus on keeping this curve perfect.
As for parts of the sail itself, battens control the overall horizontal shape of the sail. Battens are typically made from fiberglass or wood and are built into batten pockets. They're meant to offer support and tension to maintain the sail shape Depending on the sail technology you want to use, you may find that full battens, which extend from luff to leech, or short battens, just on the trailing edge, are the way to go. Fully battened sails tend to be more expensive, but also higher performance.
Fully Battened Mainsails
They're generally popular on racing multihulls as they give you a nice solid sail shape which is crucial at high speeds. In cruising sailboats , fully battened mainsails have a few benefits such as:
- They prevent the mainsail from ragging. This extends the life of the sail, and makes maneuvers and trimming easier for the crew.
- It provides shape and lift in light-air conditions where short-battened mainsails would collapse.
On the other hand, fully-battened mainsails are often heavier, made out of thicker material, and can chafe against the standing rigging with more force when sailing off the wind.
Short Battens
On the other hand, you can choose a mainsail design that relies mostly on short battens, towards the leech of the sail. This tends to work for lighter cloth sails, as the breeze, the headsail, and the rigging help to shape the sail simply by the tension of the rig and the flow of the wind. The battens on the leech help to preserve the shape of the sail in the crucial area where the air is flowing off the back of the sail, keeping you from stalling out the entire rig.
The only potential downside is that these short battens deal with a little bit of chafe and tension in their pockets, and the sail cloth around these areas ought to be reinforced. If your sails do not have sufficient reinforcement here, or you run into any issues related to batten chafe, a good sail maker should be able to help you extend the life of your sails for much less than the price of a new set.
How to Hoist the Mainsail
Here's how to hoist the mainsail, assuming that it relies on a slab reefing system and lazy jacks and doesn't have an in-mast or in-boom furling system.
- Maintain enough speed for steeragewhile heading up into the wind
- Slacken the mainsheet, boom vang, and cunningham
- Make sure that the lazy jacks do not catch the ends on the battens by pulling the lazy jacks forward.
- Ensure that the reefing runs are free to run and the proper reefs are set if necessary.
- Raise the halyard as far as you can depending on pre-set reefs.
- Tension the halyard to a point where a crease begins to form along the front edge
- Re-set the lazy jacks
- Trim the mainsail properly while heading off to your desired course
So what's Right for You?
Your mainsail will depend on how you like sailing your boat and what you expect in terms of convenience and performance. That being said, first consult the options that the boatbuilder or sailmakers suggest for your rig. When choosing among the various options, consider what you want from the sail, how you like to sail, and how much you're willing to spend on the mainsail.
The headsail is principally the front sail in a fore-and-aft rig. They're commonly triangular and are attached to or serve as the boat’s forestay. They include a jib and a genoa.
A jib is a triangular sail that is set ahead of the foremost sail. For large boats, the roto-furling jib has become a common and convenient way to rig and store the jib. Often working in shifts with spinnakers, jibs are the main type of headsails on modern sailboats. Jibs take advantage of Bournoulli’s Principle to break the incoming breeze for the mainsail, greatly increasing the speed and point of any boat. By breaking the incoming wind and channeling it through what we call the ‘slot,’ the horizontal gap between the leech of the jib and the luff of the mainsail, the jib drastically increases the efficiency of your mainsail. It additionally balances the helm on your rudder by pulling the bow down, as the mainsail tends to pull the stern down. .
The main aim of the jib is to increase the sail area for a given mast size. It improves the aerodynamics of the mainsails so that your sailboat can catch more wind and thereby sail faster, especially in light air
Using Jibs on Modern Sailboats
In the modern contexts, jib’s mainly serve increase the performance and overall stability of the mainsail. The jib can also reduce the turbulence of the mainsail on the leeward side.
On Traditional Vessels
Traditional vessels such as schooners have about three jibs. The topmast carried a jib topsail, the main foresail is called the jib, while the innermost jib is known as the staysail. The first two were employed almost exclusively by clipper ships.
How to Rig the Jibs
There are three basic ways to rig the jib.
Track Sheets - A relatively modern approach to the self-tacking jib, this entails placing all the trimming hardware on a sliding track forward of the mast. This means that on each tack, the hardware slides from one side of the boat to the other. This alleviates the need to switch sheets and preserves the trim angle on both sides, though it can be finnicky and introduce friction.
Sheet up the Mast - This is a very popular approach and for a good reason. Hoist the jib sheet up the mast high enough to ensure that there's the right tension through the tack. Whether internally or externally, the sheet returnsto the deck and then back to the cockpit just like the rest of the mast baselines. The fact the hardware doesn't move through the tacks is essential in reducing friction.
Sheet Forward - This method revolves around ensuring that the jib sheet stays under constant pressure so that it does not move through the blocks in the tacks. This is possible if the through-deck block is extremely close to the jib tack. Your only challenge will only be to return the sheet to the cockpit. This is, however, quite challenging and can cause significant friction.
Dual Sheeting - The traditional method, especially on smaller dinghies, though it is not self-tacking. This requires a two ended or two separate sheet system, where one sheet runs to a block on starboard, and the other to port. Whenever you tack or gybe, this means you have to switch which sheet is active and which is slack, which is ok for well crewed boats, but a potential issue on under-crewed boats.
Another important headsail, a genoa is essentially a large jib that usually overlaps the mainsail or extends past the mast, especially when viewed from the other side. In the past, a genoa was known as the overlapping jib and is technically used on twin-mast boats and single-mast sloops such as ketches and yawls. A genoa has a large surface area, which is integral in increasing the speed of the vessel both in moderate and light winds.
Genoas are generally characterized by the percentage they cover. In most cases, sail racing classes stipulate the limit of a genoa size. In other words, genoas are usually classified by coverage.
Top-quality genoa trim is of great importance, especially if the wind is forward of the beam. This is because the wind will first pass over the genoa before the mainsail. As such, a wrongly sheeted genoa can erroneously direct the wind over the mainsail,spelling doom to your sailing escapades. While you can perfectly adjust the shape of a genoa using the mast rake, halyard tension, sheet tension, genoa car positioning, and backstay tension, furling and unfurling a genoa can be very challenging, especially in higher winds.
That being said, here are the crucial steps to always keep in mind.
- Unload and ease the loaded genoa sheet by going to a broad reach
- Do not use the winch; just pull on the furling line
- Keep a very small amount of pressure or tension on the loaded genoa sheet
- Secure the furling line and tighten the genoa sheets
- Get on the proper point of sail
- Have the crew help you and release the lazy genoa sheets
- Maintain a small tension while easing out the furling line
- Pull-on a loaded genoa sheet
- Close or cleat off the rope clutch when the genoa is unfurled
- Trim the genoa
To this end, it's important to note that genoas are popular in some racing classes. This is because they only categorize genoas based on the fore-triangle area covered, which essentially allows a genoa to significantly increase the actual sail area. On the contrary, keep in mind that tacking a genoa is quite a bit harder than a jib, as the overlapping area can get tangled with the mast and shrouds. It's, therefore, important to make sure that the genoa is carefully tended, particularly when tacking.
Downwind Sails
Modern sailboats are a lot easier to maneuver thanks to the fore-and-aft rig. Unfortunately, when sailing downwind they catch less wind, and downwind sails are a great way of reducing this problem. They include the spinnaker and the gennaker.
A spinnaker will, without a doubt, increase your sailing enjoyment. But why are they often buried in the cabin of cruising boats? Well, the first few attempts to rig and set a spinnaker can be difficult without enough help and guidance. Provided a solid background, however, spinnakers are quite straightforward and easy to use and handle with teamwork and enough practice. More importantly, spinnakers can bring a light wind passage to life and can save your engine.
Spinnakers are purposely designed for sailing off the wind; they fill with wind and balloon out in front of your sailboat. Structured with a lightweight fabric such as nylon, the spinnaker is also known as a kite or chute, as they look like parachutes both in structure and appearance.
A perfectly designed spinnaker should have taut leading edges when filled. This mitigates the risk of lifting and collapsing. A spinnaker should have a smooth curve when filled and devoid of depressions and bubbles that might be caused by the inconsistent stretching of the fabric. The idea here is that anything other than a smooth curve may reduce the lift and thereby reduce performance.
Types of Spinnakers
There are two main types of spinnakers: symmetric spinnakers and asymmetric spinnakers.
Asymmetric Spinnakers
Flown from a spinnaker pole or bowsprit fitted to the bow of the boat, asymmetric spinnakers resemble large jibs and have been around since the 19th century. The concept of asymmetric spinnaker revolves around attaching the tack of the spinnaker at the bow and pulling it around during a gybe.
Asymmetric spinnakers have two sheets just like a jib., These sheets are attached at the clew and never interact directly with the spinnaker pole. This is because the other corner of the spinnaker is fixed to the bowsprit. The asymmetric spinnaker works when you pull in one sheet while releasing the other. This makes it a lot easier to gybe but is less suited to sailing directly downwind. There is the loophole of having the asymmetric spinnaker gybed to the side opposite of the boom, so that the boat is sailing ‘wing-on-wing,’ though this is a more advanced maneuver, generally reserved for certain conditions and tactical racing situations.
On the contrary, the asymmetric spinnaker is perfect for fast planing dinghies. This is because such vessels have speeds that generate apparent wind forward. Because asymmetrics, by nature, prefer to sail shallower downwind angles, this apparent wind at high speeds makes the boat think that it is sailing higher than it really is, allowing you to drive a little lower off the breeze than normal. . In essence, the asymmetric spinnaker is vital if you're looking for easy handling.
Symmetric Spinnakers
Symmetric spinnakers are a classic sail type that has been used for centuries for controlling boats by lines known as a guy and a sheet. The guy, which is a windward line, is attached to the tack of the sail and stabilized by a spinnaker pole. The sheet, which is the leeward line, is attached to the clew of the spinnaker and is essential in controlling the shape of the spinnaker sail.
When set correctly, the leading edges of the symmetric spinnaker should be almost parallel to the wind. This is to ensure that the airflow over the leading edge remains attached. Generally, the spinnaker pole should be at the right angles to the apparent wind and requires a lot of care when packing.
The main disadvantage of this rig is the need to gybe the spinnaker pole whenever you gybe the boat. This is a complicated maneuver, and is one of the most common places for spinnakers to rip or get twisted. If, however, you can master this maneuver, you can sail at almost any angle downwind!
How to Use Spinnaker Effectively
If you decide to include the spinnakers to your sailboat, the sailmaker will want to know the type of boat you have, what kind of sailing you do, and where you sail. As such, the spinnaker that you end up with should be an excellent and all-round sail and should perform effectively off the breeze
The type of boat and where you'll be sailing will hugely influence the weight of your spinnaker cloth. In most cases, cruising spinnakers should be very light, so if you've decided to buy a spinnaker, make sure that it's designed per the type of your sailboat and where you will be sailing. Again, you can choose to go for something lighter and easier to set if you'll be sailing alone or with kids who are too young to help.
Setting up Spinnakers
One of the main reasons why sailors distrust spinnakers is because they don't know how to set them up. That being said, a perfectly working spinnaker starts with how you set it up and this revolves around how you carefully pack it and properly hook it up. You can do this by running the luff tapes and ensuring that the sails are not twisted when packed into the bag. If you are using large spinnakers, the best thing to do is make sure that they're set in stops to prevent the spinnakers from filling up with air before you even hoist them fully.
But even with that, you cannot fully set the spinnaker while sailing upwind. Make sure to bear away and have your pole ready to go as you turn downwind. You should then bear away to a reach before hoisting. Just don't hoist the spinnakers from the bow as this can move the weight of the crew and equipment forward.
Used when sailing downwind, a gennaker is asymmetric sail somewhere between a genoa and a spinnaker. It sets itself apart because it gennaker is a free-flying asymmetric spinnaker but it is tacked to the bowsprit like the jib.
Let's put it into perspective. Even though the genoa is a great sail for racing and cruising, sailors realized that it was too small to be used in a race or for downwind sail and this is the main reason why the spinnaker was invented. While the spinnakers are large sails that can be used for downwind sail, they are quite difficult to handle especially if you're sailing shorthanded. As such, this is how a gennaker came to be: it gives you the best of both worlds.
Gennakers are stable and easy to fly and will add to your enjoyment and downwind performance.
The Shape of a Gennaker
As we've just noted, the gennaker is asymmetrical. It doesn't attach to the forestay like the genoa but has a permanent fitting from the mast to bow. It is rigged exactly like a spinnaker but its tack is fastened to the bowsprit. This is fundamentally an essential sail if you're looking for something to bridge the gap between a genoa and a spinnaker.
Setting a Gennaker
When cruising, the gennaker is set with the tack line from the bow, a halyard, and a sheet that's led to the aft quarter. Attach the tack to a furling unit and attach it to a fitting on the hull near the very front of the sailboat. You can then attach the halyard that will help in pulling it up to the top of the mast before attaching it to the clew. The halyard can then run back to the winches to make the controlling of the sail shape easier, just like when using the genoa sail.
In essence, a gennaker is a superb sail that will give you the maximum versatility of achieving the best of both a genoa and a spinnaker, especially when sailing downwind. This is particularly of great importance if you're cruising by autopilot or at night.
Light Air Sails
Even though downwind sails can be used as light air sails, not all light air sails can be used for downwind sailing. In other words, there's a level of difference between downwind sails and light air sails. Light air sails include code zero, windseeker, and drifter reacher.
A cross between an asymmetrical spinnaker and a genoa, a code zero is a highly modern sail type that's generally used when sailing close to the wind in light air. Although the initial idea of code zero was to make a larger genoa, it settled on a narrow and flat spinnaker while upholding the shape of a genoa.
Modern boats come with code zero sails that can be used as soon as the sailboat bears off close-hauled even a little bit. It has a nearly straight luff and is designed to be very flat for close reaching. This sail is designed to give your boat extra performance in light winds, especially in boats that do not have overlapping genoas. It also mitigates the problem of loss of power when you are reaching with a non-overlapping headsail. Really, it is closer to a light air jib that sacrifices a little angle for speed.
In many conditions, a code zero sail can go as high as a sailboat with just a jib. By hoisting a code zero, you'll initially have to foot off about 15 degrees to fill it and get the power that you require to heel and move the boat. The boat will not only speed up but will also allow you to put the bow up while also doing the same course as before you set the zero. In essence, code zero can be an efficient way of giving your boat about 30% more speed and this is exactly why it's a vital inventory item in racing sailboats.
When it comes to furling code zero, the best way to do it is through a top-down furling system as this will ensure that you never get a twist in the system.
Generally used when a full size and heavier sail doesn't stay stable or pressurized, a windseeker is a very light sail that's designed for drifting conditions. This is exactly why they're designed with a forgiving cloth to allow them to handle these challenging conditions.
The windseeker should be tacked at the headstay with two sheets on the clew. To help this sail fill in the doldrums, you can heel the boat to whatever the apparent leeward side is and let gravity help you maintain a good sail shape while reaching.The ideal angle of a windseeker should be about 60 degrees.
Though only used in very specific conditions, the windseeker is so good at this one job that it is worth the investment if you plan on a long cruise. Still, you can substitute most off the breeze sails for this in a pinch, with slightly less performance gain, likely with more sacrifices in angle to the breeze.
Drifter Reacher
Many cruising sailors often get intimidated by the idea of setting and trimming a drifter if it's attached to the rig at only three corners or if it's free-flying. But whether or not a drifter is appropriate for your boat will hugely depend on your boat's rig, as well as other specific details such as your crew's ability to furl and unfurl the drifter and, of course, your intended cruising grounds.
But even with that, the drifter remains a time-honored sail that's handy and very versatile. Unlike other light air sails, the drifter perfectly carries on all points of sails as it allows the boat to sail close-hauled and to tack. It is also very easy to control when it's set and struck. In simpler terms, a drifter is principally a genoa that's built of lightweight fabric such as nylon. Regardless of the material, the drifter is a superb sail if you want to sail off a lee shore without using the genoa.
Generally stronger than other regular sails, stormsails are designed to handle winds of over 45 knots and are great when sailing in stormy conditions. They include a storm jib and a trysail.
If you sail long and far enough, chances are you have or will soon be caught in stormy conditions. Under such conditions, storm jibs can be your insurance and you'll be better off if you have a storm jib that has the following features:
- Robustly constructed using heavyweight sailcloth
- Sized suitably for the boat
- Highly visible even in grey and white seas
That's not all; you should never go out there without a storm jib as this, together with the trysail, is the only sails that will be capable of weathering some of nature's most testing situations.
Storm jibs typically have high clews to give you the flexibility of sheet location. You can raise the sail with a spare halyard until its lead position is closed-hauled in the right position. In essence, storm jib is your insurance policy when out there sailing: you should always have it but always hope that you never have to use it.
Also known as a spencer, a trysail is a small, bright orange, veritably bullet-proof, and triangular sail that's designed to save the boat's mainsail from winds over 45 knots and works in the same way as a storm jib. It is designed to enable you to make progress to windward even in strong and stormy winds.
Trysails generally use the same mast track as the mainsail but you have to introduce the slides into the gate from the head of the trysail.
There are two main types of rigs: the fore-and-aft rig and the square rigg.
Fore-and-aft Rig
This is a sailing rig that chiefly has the sails set along the lines of the keel and not perpendicular to it. It can be divided into three categories: Bermuda rig, Gaff rig, and Lateen rig.
Bermuda Rig - Also known as a Marconi rig, this is the typical configuration of most modern sailboats. It has been used since the 17th century and remains one of the most efficient types of rigs. The rig revolves around setting a triangular sail aft of the mast with the head raised to the top of the mast. The luff should run down the mast and be attached to the entire length.
Gaff Rig - This is the most popular fore-and-aft rig on vessels such as the schooner and barquentine. It revolves around having the sail four-cornered and controlled at its peak. In other words, the head of the mainsail is guided by a gaff.
Lateen Rig - This is a triangular fore-and-aft rig whereby a triangular sail is configured on a long yard that's mounted at a given angle of the mast while running in a fore-and-aft direction. Lateen rig is commonly used in the Indian Ocean and the Mediterranean.
Square Rigged
This is a rig whereby the mainsails are arranged in a horizontal spar so that they're square or vertical to the mast and the keel of the boat. The square rig is highly efficient when sailing downwind and was once very popular with ocean-going sailboats.
Unquestionably, sailing is always pleasurable. Imagine turning off the engine of your boat, hoisting the sails, and filling them with air! This is, without a doubt, a priceless moment that will make your boat keel and jump forward!
But being propelled by the noiseless motion of the wind and against the mighty currents and pounding waves of the seas require that you know various sail types and how to use them not just in propelling your boat but also in ensuring that you enjoy sailing and stay safe. Sails are a gorgeous way of getting forward. They remain the main fascination of sailboats and sea cruising. If anything, sails and boats are inseparable and are your true friends when out there on the water. As such, getting to know different types of sails and how to use them properly is of great importance.
All in all, let's wish you calm seas, fine winds, and a sturdy mast!
Related Articles
I've personally had thousands of questions about sailing and sailboats over the years. As I learn and experience sailing, and the community, I share the answers that work and make sense to me, here on Life of Sailing.
by this author
Learn About Sailboats
Sailboat Parts
Most Recent

What Does "Sailing By The Lee" Mean?
October 3, 2023

The Best Sailing Schools And Programs: Reviews & Ratings
September 26, 2023
Important Legal Info
Lifeofsailing.com is a participant in the Amazon Services LLC Associates Program, an affiliate advertising program designed to provide a means for sites to earn advertising fees by advertising and linking to Amazon. This site also participates in other affiliate programs and is compensated for referring traffic and business to these companies.
Similar Posts

Affordable Sailboats You Can Build at Home
September 13, 2023

Best Small Sailboat Ornaments
September 12, 2023

Discover the Magic of Hydrofoil Sailboats
December 11, 2023
Popular Posts

Best Liveaboard Catamaran Sailboats
December 28, 2023

Can a Novice Sail Around the World?
Elizabeth O'Malley

4 Best Electric Outboard Motors

How Long Did It Take The Vikings To Sail To England?

10 Best Sailboat Brands (And Why)
December 20, 2023

7 Best Places To Liveaboard A Sailboat
Get the best sailing content.
Top Rated Posts
Lifeofsailing.com is a participant in the Amazon Services LLC Associates Program, an affiliate advertising program designed to provide a means for sites to earn advertising fees by advertising and linking to Amazon. This site also participates in other affiliate programs and is compensated for referring traffic and business to these companies. (866) 342-SAIL
© 2024 Life of Sailing Email: [email protected] Address: 11816 Inwood Rd #3024 Dallas, TX 75244 Disclaimer Privacy Policy
No products in the cart.
Sailing Ellidah is supported by our readers. Buying through our links may earn us an affiliate commission at no extra cost to you.
The Running Rigging On A Sailboat Explained
The running rigging on a sailboat consists of all the lines used to hoist, lower, and control the sails and sailing equipment. These lines usually have different colors and patterns to easily identify their function and location on the vessel.
Looking at the spaghetti of lines with different colors and patterns might get your head spinning. But don’t worry, it is actually pretty simple. Each line on a sailboat has a function, and you’ll often find labels describing them in the cockpit and on the mast.
In this guide, I’ll walk you through the functions of every component of the running rigging. We’ll also look at the hardware we use to operate it and get up to speed on some of the terminology.
The difference between standing rigging and running rigging
Sometimes things can get confusing as some of our nautical terms are used for multiple items depending on the context. Let me clarify just briefly:
The rig or rigging on a sailboat is a common term for two parts, the standing , and the running rigging.
- The standing rigging consists of wires supporting the mast on a sailboat and reinforcing the spars from the force of the sails when sailing. Check out my guide on standing rigging here!
- The running rigging consists of the halyards, sheets, and lines we use to hoist, lower, operate and control the sails on a sailboat which we will explore in this guide.
The components of the running rigging
Knowing the running rigging is an essential part of sailing, whether you are sailing a cruising boat or crewing on a large yacht. Different types of sailing vessels have different amounts of running rigging.
For example, a sloop rig has fewer lines than a ketch, which has multiple masts and requires a separate halyard, outhaul, and sheet for its mizzen sail. Similarly, a cutter rig needs another halyard and extra sheets for its additional headsail.
You can dive deeper and read more about Sloop rigs, Ketch Rigs, Cutter rigs, and many others here .
Take a look at this sailboat rigging diagram:
Lines are a type of rope with a smooth surface that works well on winches found on sailboats. They come in various styles and sizes and have different stretch capabilities.
Dyneema and other synthetic fibers have ultra-high tensile strength and low stretch. These high-performance lines last a long time, and I highly recommend them as a cruiser using them for my halyards.
A halyard is a line used to raise and lower the sail. It runs from the head of the sail to the masthead through a block and continues down to the deck. Running the halyard back to the cockpit is common, but many prefer to leave it on the mast.
Fun fact: Old traditional sailboats sometimes used a stainless steel wire attached to the head of the sail instead of a line!
Jib, Genoa, and Staysail Halyards
The halyard for the headsail is run through a block in front of the masthead. If your boat has a staysail, it needs a separate halyard. These lines are primarily untouched on vessels with a furling system except when you pack the sail away or back up. Commonly referred to as the jib halyard.
Spinnaker Halyard
A spinnaker halyard is basically the same as the main halyard but used to hoist and lower the spinnaker, gennaker, or parasailor.
The spinnaker halyard is also excellent for climbing up the front of the mast, hoisting the dinghy on deck, lifting the outboard, and many other things.
A sheet is a line you use to control and trim a sail to the angle of the wind . The mainsheet controls the angle of the mainsail and is attached between the boom and the mainsheet traveler . The two headsail sheets are connected to the sail’s clew (lower aft corner) and run back to each side of the cockpit.
These are control lines used to adjust the angle and tension of the sail. It is also the line used to unfurl a headsail on a furling system. Depending on what sail you are referring to, this can be the Genoa sheet , the Jib sheet , the Gennaker sheet , etc.
The outhaul is a line attached to the clew of the mainsail and used to adjust the foot tension. It works runs from the mainsail clew to the end of the boom and back to the mast. In many cases, back to the cockpit. On a boat with in-mast furling , this is the line you use to pull the sail out of the mast.
Topping lift
The topping lift is a line attached to the boom’s end and runs through the masthead and down to the deck or cockpit. It lifts and holds the boom and functions well as a spare main halyard. Some types of sailboat rigging don’t use a topping lift for their boom but a boom vang instead. Others have both!
Topping lifts can also be used to lift other spars.
A downhaul is a line used to lower with and typically used to haul the mainsail down when reefing and lowering the spinnaker and whisker poles. The downhaul can also control the tack of an asymmetrical spinnaker, gennaker, or parasailor.
Tweaker and Barber Haul
A tweaker is a line, often elastic, attached to the sheet of a headsail and used to fine-tune the tension on the sheet.
Barber haul
A barber haul is a line attached to a headsail’s sheet to adjust the sheeting angle to the wind. It is often used to pull the clew further toward the center or outboard than the cars allow.
Boom Preventer
A boom preventer is a line attached to the boom’s end when sailing off the wind. Its function is to hold the spar in place and prevent it from swinging wildly.
If the boat were to get an accidental gybe, it could cause serious damage to the rigging or even harm people on board. It is important for the rigger to be cautious when setting up the boom preventer.
Running Backstay
Running backstays is similar to a normal backstay but uses a line instead of a hydraulic tensioner. Some rigs have additional check stays or runners as well.
Bonus tip: Reefing
The term reefing is used when reducing the effective sailing area exposed to the wind of a given sail. Headsails are usually reefed by partially furling them in, and they often have marks for what we refer to as 1st, 2nd, and 3rd reefs.
The mainsail is reefed similarly with an in-mast furling or in-boom furling system.
On a traditional mast, we use a system called slab reefing. The system has reefing lines running through the boom to reinforced points on the luff and leech, allowing you to pull the sail down to the boom and effectively reduce the sail area.
Having at least two reefing points in the mainsail is normal, but most cruising sailboats have 3. The 3rd is used for the heaviest conditions, giving you only a tiny bit of sail area exposed to the wind.
You want to reef your sails before the wind increases to a point where your boat gets overpowered.
It is essential to practice your reefing technique . You will find yourself in situations with rapidly increasing winds where you need to reduce your sails quickly.
Rule of thumb: If you think setting a reef might be a good idea, do it.
Shaking a reef is the term used when we sail with a reefed sail and want to increase the sail area back to full.
Hardware used for sail handling and the running rigging
Furling system.
Most sailboats have their headsail on a furling system. A furling system is a tube that runs along the forestay from the bottom furler drum to the masthead swivel.
This system allows you to roll the headsail around the forestay, making furling the sail in and out accessible. It is also convenient when reefing the sail when the wind picks up, as you can easily do this from the safety of the cockpit. These furling systems come in manual versions and electric versions.
In-mast furling
In-mast furling is a system that rolls the mainsail in and out of the mast. To unfurl the mainsail, we use the outhaul .
In-boom furling
In-boom furling is a system that rolls the mainsail in and out of the boom. This system has been costly and has mostly been seen on big yachts earlier. They are becoming more affordable and common on smaller boats, though. To unfurl this setup, we use the main halyard.
A Stack pack is also called a Lazy Bag or Lazy Pack. It is a bag with a zip attached to the boom where the mainsail is stored when unused. It protects the mainsail from UV rays from the sun and weather elements. It is a very nice and tidy way to store the mainsail and reefing lines if you don’t have in-mast or in-boom furling.
Lazy Jacks is a system of lines running from the stack pack to the mast. The Lazy Jacks guide the mainsail up and down from the Stack Pack and prevent it from falling down on the deck. It is also possible to rig Lazy Jacks without a Stack Pack.
A block is a pulley with a sheave wheel. Blocks are used to change the direction of a pull on a line or rope and give a mechanical advantage. They have many uses, especially onboard sailboats.
A winch is a metal drum that gives you a mechanical advantage to control and tighten lines. These can be operated by turning a rope around it and pulling manually or by a winch handle to get more force. Most modern winches are self-tailing, which means they lock the line on so you can winch the line without holding on to it. Some boats even have electrical winches operated by a button.
Mainsheet Traveler
The mainsheet traveler is a horizontal track that the mainsheet is attached to through a series of blocks. The traveler enables you to adjust and lock the boom at an angle and also plays a critical part in trimming the mainsail.
Most cruising sailboats have their traveler attached to the top of the coachroof in front of the spray hood. A racing boat typically has the traveler in the cockpit near the helm to give the helmsman better control over the mainsheet.
The cars are basically a pulley or block attached to a track on the port and starboard deck that your headsail sheets run through. Cars are used to control the angle of the sheet between the clew and the deck. The cars are handy when you trim the sail to set the right balance of tension between the foot and leech, depending on your point of sail.
The jammer is used to lock a line in place. Most sailboats use these for locking the halyards, mainsheet, outhaul, reef lines, traveler lines, boom vang lines, etc. You can pull or winch a line through a closed jammer, but it won’t run away if you let go of it unless you open the lock.
As I explained earlier, it is normal to have most or all of the lines led back to the cockpit, and they are usually run through a series of jammers.
The jammers are often labeled with the name of the line it locks, which makes it easier to remember which line goes where.
Spinnaker Pole
A spinnaker pole is a spar used to wing out a headsail when sailing off the wind, particularly the spinnaker. The spinnaker pole should have the same length as the distance between the mast and the forestay measured along the deck. We use a fore and aft guy and the pole’s topping lift to rig a pole correctly.
The rigging varies depending on the layout of the boat, but it usually looks like this:
- One line runs from the bow to the end of the pole.
- An aft line runs from near the stern to the end of the pole.
- A topping lift is used to raise and lower the pole.
Whisker Pole
A whisker pole is similar to the spinnaker pole and is rigged similarly. It is typically built lighter and attached to a track on the mast. These can be found in fixed lengths or adjustable lengths. Ideally, the length should be the same as the foot of the headsail you intend to pole out.
Boom Vang/Rod Kicker
The Boom Vang has a few different names. Rod-kicker, kicking strap, or kicker. It is used to tension the boom downwards. When you are sailing downwind and have the boom far out, the mainsheet won’t pull the boom down as much as inboard, and you can then use the vang to adjust the twist and shape of the mainsail.
Mooring line
A mooring line is a traditional rope lead through a fairlead to the vessel’s cleat and a mooring buoy, key, or pontoon.
Final words
Congratulations! By now, you should have a much better understanding of how the running rig on a sailboat functions. We’ve covered the different lines, their purpose, and the hardware used to operate them. I hope you’ve enjoyed this guide and learned something new.
Now it’s time to take what you’ve learned and put it into practice by getting out on the water, setting sail, and getting hands-on experience with the lines.
Or you can continue to my following guide and learn more about the different types of sails .
Sharing is caring!
Skipper, Electrician and ROV Pilot
Robin is the founder and owner of Sailing Ellidah and has been living on his sailboat since 2019. He is currently on a journey to sail around the world and is passionate about writing his story and helpful content to inspire others who share his interest in sailing.
Leave a Reply Cancel reply
Your email address will not be published. Required fields are marked *
- Types of Sailboats
- Parts of a Sailboat
- Cruising Boats
- Small Sailboats
- Design Basics
- Sailboats under 30'
- Sailboats 30'-35
- Sailboats 35'-40'
- Sailboats 40'-45'
- Sailboats 45'-50'
- Sailboats 50'-55'
- Sailboats over 55'
- Masts & Spars
- Knots, Bends & Hitches
- The 12v Energy Equation
- Electronics & Instrumentation
- Build Your Own Boat
- Buying a Used Boat
- Choosing Accessories
- Living on a Boat
- Cruising Offshore
- Sailing in the Caribbean
- Anchoring Skills
- Sailing Authors & Their Writings
- Mary's Journal
- Nautical Terms
- Cruising Sailboats for Sale
- List your Boat for Sale Here!
- Used Sailing Equipment for Sale
- Sell Your Unwanted Gear
- Sailing eBooks: Download them here!
- Your Sailboats
- Your Sailing Stories
- Your Fishing Stories
- Advertising
- What's New?
- Chartering a Sailboat
Sailboat Rigging: Part 1 - Standing Rigging
When we talk about sailboat rigging, we mean all the wires, ropes and lines that support the rig and control the sails. To be more precise, the highly tensioned stays and shrouds that support the mast are known collectively as standing rigging , whilst the rope halyards, sheets and other control lines come under the heading of running rigging.

Some sailboats with unsupported masts, like the junk rig and catboat rigs have no standing rigging at all.
Bermudan sloops with their single mast and just one headsail will have a relatively simple rigging layout - those with a single set of spreaders especially so.
The most complex rigging of all will be found on staysail ketches and schooners with multi-spreader rigs.

Fairly obviously, the mast on a sailboat is an important bit of kit.
Let's make a start by taking a look at the standing rigging that holds it up...
Standing Rigging
Cruising sailboats will have their mast supported by 1 x 19 stainless steel wire in most cases, but some racing boats may opt for stainless steel rod rigging. Why? Well rod rigging has a stretch coefficient that is some 20% less than wire, but...
- It's more expensive than wire;
- It's more difficult to install and adjust;
- It suffers from metal fatigue, signs of which are difficult to spot;
- It's less flexible and has a much shorter useful life span
So it's 1 x 19 stainless steel wire for us cruising types.

Cap Shrouds
These are the parts of a sailboat's rigging that hold the mast in place athwartship. They're attached at the masthead and via chainplates to the hull.
Lower Shrouds
Further athwartship support is provided by forward and aft lower shrouds, which are connected to the mast just under the first spreader and at the other end to the hull.
The mast is supported fore and aft by stays - the forestay and backstay to be precise.
Cutter rigs require an inner forestay upon which to hang the staysail, which unlike a removable inner forestay, becomes an element of the overall rig structure.
As this stay exerts a forward component of force on the mast, it must be resisted by an equal and opposite force acting aft - either by swept-back spreaders, aft intermediates or running backstays.
Another stay that deserves a mention is the triatic backstay. This is the stay that is found on some ketches, and it's the stay from the top of the mainmast to the top of the mizzen mast.
It's a convenient alternative to a independent forestay for the mizzen. Although it makes a great antenna for an SSB radio , it does ensure that if you lose one mast, you're likely to lose the other.
Multi-Spreader Rigs
With the lower shrouds supporting the mast athwartship at the lower spreaders, intermediate shrouds do the same thing for any other sets of spreaders. These take the form of a diagonal tie between the inner end of one spreader and the outer end of the spreader below it.
Continuous or Discontinuous Sailboat Rigging
The shrouds on all single-spreader rig and some double-spreader rigs are continuous. With three or more spreaders, this arrangement becomes impractical - discontinuous rigging is the way to go. So what's that?
Well, if you consider the mast rigging as a series of panels, ie:~
- Lower Panel ~ From the deck to the first set of spreaders;
- Top panel ~ From top set of spreaders to the masthead;
- Intermediate Panels ~ Between each set of spreaders.
Then discontinuous rigging is when each shroud is terminated at the top and bottom of each panel.
The main benefits of discontinuous sailboat rigging is:~
- The rig can be more accurately set up, and
- Weight aloft is substantially reduced;
- It can be replaced in small doses.
Chainplates, Turnbuckles and Toggles

It's through these vitally important sailboat rigging components the shrouds are attached to the hull.
The chainplate is a metal plate bolted to a strongpoint in the hull, often a reinforced section of a bulkhead.
It must be aligned with angle of the shroud attached to it through a toggle, to avoid all but direct tensile loads.
Whilst cap shrouds will be vertical - or close to it - lower shrouds will be angled in both a fore-and-aft direction and athwartship.

Artwork by Andrew Simpson
Toggles are stainless steel fittings whose sole purpose in life is absorb any non-linear loads between the shrouds and the chainplate.
Consequently, they must be of a design that enables rotation in both the vertical and horizontal planes.
Note the split pin! These are much more secure than split rings which can gradually work their out of clevis pins - with disastrous results.
Turnbuckles, or rigging screws or bottlescrews, are stainless steel devices that enables the shroud tension to be adjusted.
Next: Part 2 - Running Rigging
Read more about Reefing and Sail Handling...

Headsail Roller Reefing Systems Can Jam If Not Set Up Correctly
When headsail roller reefing systems jam there's usually just one reason for it. This is what it is, and here's how to prevent it from happening...

Single Line Reefing; the Simplest Way to Pull a Slab in the Mainsail
Before going to the expense of installing an in-mast or in-boom mainsail roller reefing systems, you should take a look at the simple, dependable and inexpensive single line reefing system

Is Jiffy Reefing the simplest way to reef your boat's mainsail?
Nothing beats the jiffy reefing system for simplicity and reliability. It may have lost some of its popularity due to expensive in mast and in boom reefing systems, but it still works!
Recent Articles
'Cabo Frio', a Catalina Morgan 43 for sale
Apr 01, 24 08:35 AM
Live Aboard Boats For Sale
Mar 30, 24 07:02 PM
A Beneteau Oceanis 43 for Sale
Mar 30, 24 06:01 PM
Here's where to:
- Find Used Sailboats for Sale...
- Find Used Sailing Gear for Sale...
- List your Sailboat for Sale...
- List your Used Sailing Gear...
Our eBooks...

A few of our Most Popular Pages...

Copyright © 2024 Dick McClary Sailboat-Cruising.com
Yachting Monthly
- Digital edition

Rope, rigging & deck gear: how to choose the right rope
- Toby Heppell
- April 12, 2021
Rope continues to develop every year. We take a look at the plethora of options on the market

Rope is one of the most important tools for the cruising sailor
There was a time when selecting the correct boat rope for a specific task was scarcely more complicated than choosing a larger diameter for higher loads.

Choose ropes according to their role to hit the right balance between price and performance
But as new materials have been developed – offering differing characteristics, woven in different ways, with or without a jacket – deciding on which rope is right for you can be something of a minefield.
Typically, the better a rope performs in any number of areas, the higher the price tag, so for most sailors there is something of a cost-benefit analysis to be made when deciding which product to buy.
It is wise to ask yourself what specific improvement you are paying for and whether, ultimately, it is worth the additional expense.
It is also worth noting that, though we tend to equate cheaper with lower performance, that is not always the case.
Sometimes picking up a more expensive rope assuming it will behave better due to the higher price tag can leave you with an inferior product for a specific task.
On the other hand, due to the cost price of the materials they use, manufacturers don’t tend to vary hugely in terms of outright price charged for a given product.
As such, if you manage to find a rope that is significantly cheaper than everyone else online, it is worth being fairly cautious.
Rope is our most important tool and for most cruising sailors, a knowledge of the basic types established half a century ago has been enough to get by.
Traditionally, we’ve accepted what manufacturers or riggers gave us, perhaps made a decision about nylon rather than polyester for the anchor, and that’s been the end of the matter.
But progress in the past decade or so has been meteoric, driven largely by race boats. Some of these developments lie beyond the needs of cruisers, but the critical elements are right up our alley.
What’s changed and why
We’re now relatively used to seeing the term ‘high-modulus’ in reference to ropes.

English Braids’ R5 is made with yarn sourced from recycled plastic
These have been used at the highest end of sailing for well over 20 years, though until relatively recently were only available at eye-watering prices.
The term ‘high-modulus’ refers to Young’s Modulus of Elasticity.
The higher the value of this figure, the less a rope will stretch.
As it happens, most high-modulus ropes are also exceedingly strong – at least equivalent to wire – and can withstand far more load than any ropes previously.
Not only are these ropes unbelievably strong and light, they also repel water, so won’t get heavier when wet.
The same may not apply to the cover, depending on what this is made of.
The essentials remain the same as they have for a generation, though, with the high-modulus option best seen as an important bolt-on.
Polyester three-strand rope
Once the mainstay of yacht ropes, three-strand polyester is now largely used for shorelines.
Stretch is relatively low, price is not too steep and abrasion resistance is reasonable, so if that’s how you like your shorelines, it’ll do nicely.

Octo-plait gives plenty of flexibility
If you prefer more flexibility, try polyester multi-plait or ‘octo-plait.’ It seems to resist chafe better than three-strand, and if one strand does wear through, there are another seven to go.
Polypropylene three-strand rope
This is a cheap and not-too-cheerful option for shorelines.
It chafes easily, is degraded rapidly by sunlight and isn’t as strong as other rope variants.
Where polypropylene excels is in its ability to float.
As long as you have bought the best you can find (the really cheap line won’t coil at all), it will make a great heaving line as it isn’t too heavy to throw and won’t sink into your propeller.
Nylon, whether three-strand or multi-plait, is the strongest of the non-hi-tech ropes and is set aside from the others by its remarkably low elastic modulus.
This means that if it takes a snatch load, it will elongate rather than break, making it the top choice for anchor rodes and snubbers ever since it was invented.
For shorelines, many prefer polyester or really meaty polyprop because, the argument goes, you don’t want them stretching to leave the boat hanging off the dock.

Marlow’s classic braid-on-braid is very popular
However, nylon can be a better option because it soaks up any snatching and, so long as you’ve bought nylon that’s big enough for your boat, stretch won’t be an issue.
Nylon is also a very good option for gybe preventers. The less a preventer stretches, the more likely it is to damage the boom in a crash gybe .
Nylon has long been the default rope for all running rigging in cruising yachts.

Something with a bit of give is ideal for mooring
It might be ‘braid-on-braid’, with similar outer and inner parts, as sold by most manufacturers, or it could be a low-stretch polyester braidline (LSP) with a loosely laid three-strand core, such as Marlowbraid.
The stretch reduction of this can be as much as 40 per cent, which is well worth the extra you’ll pay.
Much of the braid-on-braid now sold is pre-stretched at the factory, which creates rope that’s an improvement on non pre-stretched lines, but it’s not as good as LSP, so is less than ideal for halyards on all but the smallest yachts.
With respectable strength, easy splicing and good price, braid-on-braid is the logical option for working sheets, kicker tackle, pole guys and the like.
It starts off soft to handle, but it can stiffen up over the years until the friction it creates passing round a block becomes so heavy that the boat’s winches are inadequate.
It also chafes relatively easily and it stretches a lot compared with more modern alternatives.
Buy Marlow Rope’s doublebraid rope on Amazon (UK)
Buy Kingfisher Braid on braid from Force 4
Buy Liros braid on braid from Force 4
Note: We may make a small commission on purchases made via the links on this feature. In no way does that affect our editorial independence.
Cores and modern rope.
Modern ropes are made of two components – a core that accounts for up to 95% of the rope’s strength, plus a protective outer cover (or jacket) that provides abrasion resistance, protection from sunlight and, where appropriate, improved holding in a clutch, jammer or cleat.
The cover can also be designed for better handling comfort.

Without a protective outer layer, modern rope will deteriorate in UV light
On racing boats this will usually be sacrificed in favour of a performance benefit, be it holding capability or resistance, but for the cruising sailor, striking a balance between performance and comfort is a key concern.
Broadly speaking, when talking about modern ropes, there are four or five major fibres involved – primarily Dyneema, Technora, Kevlar and polyester.
Until recently, Vectran was also used frequently, but its low resistance to ultra-violet light means there are now better fibres on the market.
These materials are blended together in different ways to produce both cores and covers that are optimised for each function on the boat.
Dyneema focus
Dyneema is perhaps the most important fibre currently used to manufacture ropes and is a proprietary brand name of DSM, which developed and sells it.
As such, brands selling Dyneema products will almost always feature the Dyneema name and/or trademark.
Dyneema is not the be all and end all of ropes but it does cover most areas and is a reliable purchase thanks to the above reasons.
All of the ‘big four’ manufacturers working in the UK – English Braids, Kingfisher, Liros, and Marlow – feature Dyneema in their performance products.

Dyneema comes in a variety of types and strengths
Dyneema lines come in different types too.
So simply specifying a Dyneema line of an appropriate size is not sufficient. Dyneema sells four different types of fibre for the marine sector: SK75, 78, 90 and 99.
SK75 has been around a while and combines strength with lightweight.
SK78 is a higher-end product with lower creep (permanent long-term elongation that arises from extended periods under load), while Dyneema SK90 has more strength, but with slightly more creep.
Continues below…

How to tie a soft shackle
Soft shackles can be used almost anywhere you currently use a conventional shackle. Look on any boat and you will…

How to make a Brummel Lock Splice for low-friction rings
Low friction rings are a robust and cost-effective addition to your boat. Graham Snook explains how to make a Brummel…

Why you should regularly check your deck fittings
What’s really going on under your deck fittings? Ben Sutcliffe-Davies investigates the hidden weaknesses

Spinnaker masterclass: tailored downwind sailing
There’s more than one way to rig, hoist, set and drop your spinnaker. Choosing the right setup and skills is…
In recent years Dyneema SK99 has been making significant inroads into the racing world and is now used by all major manufacturers.
SK99 has become one of the class leaders in the rope rigging field and offers a breaking load of almost a tonne in 3mm rope!
For most cruising sailors, however, the latter would be overkill, says Nigel Saddington of Kingfisher Rope.
‘I would say that 78 has superseded 75 and 99 has superseded 90 right now. But even then, to be honest, for most sailors and in most circumstances, I would say 78 is sufficient for almost all needs.’
Buy Marlow Excel Fusion Rope – SK75 Dyneema core – from Force 4
Buy Liros Magic Edge Rope – SK75 Dyneema – from Force 4
Effect on deck fittings
Nigel points to some concerns he has with the very top end of the Dyneema ropes being produced.
He notes that as a commercial product, its strength and stiffness are the qualities that make it a good rope but also make it a rope to be used with care.
This is because the loads that can be carried, even in a relatively small-diameter line, are high enough to warrant extra consideration with regards to which clutches and sails it is being used with.

Though super-strong modern ropes are ideal on race boats, their deck gear is set up to handle loads it will be working under
This is a theme that seems to pop-up time and again in recent years; as modern materials become stronger, so the rest of the kit on board needs to be up-spec’d in order to keep up.
Though it is impressive how much load can be carried by the highest-performing ropes, in relatively small diameters you still need something wide enough for your clutch to hold, and you will also want to ensure that your deck gear is rated high enough to deal with the loads.
Saving a halyard at the cost of losing a clutch might not be such a good idea.
That basic core of modern ropes isn’t the only area where there have been developments, however.
Here, a Dyneema mix is a popular option which has the benefit of being extremely light and, perhaps because it floats, is as resistant to water as the Dyneema inside – great for lightweight spinnaker sheets that stay light even after they’ve been dunked a few times.
The downside is that it doesn’t last very long because of the vulnerability of polypropylene to UV degradation.
The ‘entry-level’ coat is polyester of similar specification to the standard braid-on-braid most of us use.
This is relatively loosely woven, making for easy splicing.
Although the resulting rope’s performance is streets ahead of its braid-on-braid equivalent, it is prone to chafe and is more likely to slip around the core.
In other words, the clutch catches the cover but the core can slide through until equilibrium is reached.

Many modern fibres do not melt, making them fray easily when cut
Next up the scale comes Technora, a para-aramid fibre woven far more tightly.
A coat of this is a little more expensive than a basic polyester cover, but the improvement in performance and chafe-resistance is huge.
If your halyards are wearing through and need replacing, it’s a no-brainer.
Finally, if you want to see your ropes in the dark, you can specify a cover that has a light-positive strand.
This works on the same principle as those garden lights that soak up power by day then illuminate when it’s dark.
The rope won’t dazzle you, but you’ll certainly appreciate being able to see it so easily at night.
What ropes to use in running rigging
On most cruisers, sheets and other ropes that are constantly adjusted and not under tremendous load can sensibly be braid-on-braid for economy, ease of splicing and soft feel.
Lines that are set up tightly then left are a different story, however.
On a boat with pretensions to performance, high-modulus ropes can make a dramatic difference.

A clutch needs to be closely matched with a rope’s breaking strain and diameter
Reef pennants are a case in point.
A Dyneema pennant can be a size or two smaller than the standard braidline item, yet will be just as strong and will stay tight once set up.
Main halyards should definitely be made out of some variety of Dyneema, ideally with a Technora coat or its equivalent.
Wire halyards are a thing of the past now, particularly when rope can cope with almost the same loads for its size, with few of the drawbacks.
Headsail halyards should also ideally be top-quality rope, but on roller forestays it can be easier to maintain luff tension than on a mainsail.
So, if funds are tight, upgrade the main halyard first and see how you get on.
Creep stretch and elasticity definitions
Initial loading will result in elastic extension.
This happens upon loading and is immediately recoverable upon release of the load (elastic contraction).
After the elastic extension of the initial loading, the rope will experience what is known as viscoelastic extension.
This is further extension over time and is fairly limited.

It’s not a question of ‘best’ or ‘cheapest’, but buying rope with the right properties for the task
Unlike elastic stretch, viscoelastic stretch will only recover slowly over time once the load is released.
Finally there is creep, which is permanent, non-recoverable and time-dependent.
Creep occurs at the yarn molecular level when the rope is under constant load.
Once the load is released and elastic and viscoelastic extension recovered, the rope will ultimately have experienced an element of permanent extension.
This is a factor of both creep and ‘bedding in’, which is when individual fibre components in the rope and/or splice settle into their preferred position when under load.
Enjoyed reading Rope, rigging & deck gear: how to choose the right rope?
A subscription to Yachting Monthly magazine costs around 40% less than the cover price .
Print and digital editions are available through Magazines Direct – where you can also find the latest deals .
YM is packed with information to help you get the most from your time on the water.
- Take your seamanship to the next level with tips, advice and skills from our experts
- Impartial in-depth reviews of the latest yachts and equipment
- Cruising guides to help you reach those dream destinations
Follow us on Facebook , Twitter and Instagram.

Hints & Advice
Sailutions have an experienced team available to help you with any questions you may have about how to rig your yacht. Please feel free to contact us for help and advice .
Yacht Rigging Guides
Below are some helpful guides covering rig tuning and tension, common rigging formulas and calculators for specifying rig fittings and hardware, as well as specific information for many of the Seldén, Furlex, and Rutgerson products we supply.
- The Seldén Rig Tuning and Tension Guide
- Righting Moment (RM) calculator
- Furlex calculator
- Mainsheet calculator
- Genoa car calculator
- Bowsprit calculator
- Crossbeam bowsprit calculator
Measurement & Order Forms
- Seldén Rig Measurement Form
- Seldén Bowsprit Measurement Form
Installation & Assembly Instructions
- Furlex Installation Video
- Seldén Gennaker Pole Kit Assembly Instructions
- Seldén Loop & Support Kit Assembly Instructions
- Manual Selde n GX Furlers
Product Information
- Seldén Backstay Flicker Info
- Furlex 50S Brochure
- Furlex 104S-404S
- Seldén Gennaker Bowsprit Brochure
- Seldén CX & GX Furler Brochures
- Seldén Spare Parts List
- Rutgerson Sail Cars
- Seldén Sailmakers Guide
- Anchoring & Mooring
- Boat Anatomy
- Boat Culture
- Boat Equipment
- Boat Safety
- Sailing Techniques
Sailboat Running Rigging Explained
Running rigging refers to the essential lines, ropes, and hardware responsible for controlling, adjusting, and managing the sails on a sailboat. They directly impact a sailboat’s performance, maneuverability, and overall safety.
As a result, understanding different running rigging components and their functions can help us optimize our boat’s performance and make informed decisions in various sailing situations. This comprehensive guide delves deep into the world of rigging by examining its essential components and various aspects, including materials, maintenance, advancements, troubleshooting, knots, and splices.
Key Takeaways
- Running rigging consists of movable components like halyards, sheets, and control lines that control, adjust, and handle the sails.
- Synthetic materials like Dyneema, Spectra, and Vectran have revolutionized running rigging due to their superior strength-to-weight ratio, low stretch and abrasion resistance, and increased lifespan.
- Troubleshooting common running rigging problems involves untangling or untwisting lines, resolving jammed or stuck hardware, and ensuring lines hold tension correctly.
- Knowing how to tie knots and splice lines is crucial in connecting running rigging components, securing lines, and adjusting sails.
- To achieve the best performance, the boat's rigging should be tailored to specific sailing needs, either racing or cruising.
- Different sailboat types and configurations require specific running rigging setups.
Difference between running and standing rigging
Before diving into the components, it’s essential to understand the difference between standing and running rigging. Standing rigging consists of the fixed lines, cables, and rods responsible for supporting a sailboat’s mast(s) and maintaining stability. Examples of standing rigging include shrouds, stays, and spreaders.
Running rigging, on the other hand, comprises the movable components needed to control, adjust, and handle the sails. These elements allow us to raise, lower, and trim the sails according to wind conditions and the boat’s course. Understanding the distinction between the two types of rigging is vital in operating a sailboat safely and efficiently.
Components of Running Rigging on a Sailboat
Responsible for raising, lowering, and holding sails in their deployed position. The primary types include the main halyard (for the mainsail), jib halyard (for jibs or genoas), and spinnaker halyard (for spinnakers). They typically run from the head of the sail down to mast-mounted winches or lead back to the cockpit for easy adjustment.
Control the angle of a sail relative to the wind. They connect the clew to the deck or another part of the rigging (e.g., tack), allowing adjustments and fine-tuning of sail trim . The two main types of sheets are mainsheets (for mainsails) and jib/genoa sheets (for headsails).
Control Lines
Essential for adjusting the tension and shape of sails. Examples include outhauls (for foot tension), cunninghams (for luff tension), and reef lines (for reducing the area under high wind conditions). Proper use of these lines allows sailors to optimize sail shape, improve efficiency, and manage their boats in various wind conditions.
Maintenance and Care
Regular inspection.
Routine inspection of your rigging is essential to identify wear, damage, or issues before they escalate into severe problems. Conduct a thorough examination at least once a season or more frequently if you sail extensively. When inspecting, check for signs of chafe, abrasion, corrosion, frayed, or damaged rope sections. Address these issues promptly to prevent further complications.
Cleaning and maintaining
Proper cleaning and maintenance of your rigging will improve its lifespan and maintain its performance. Rinse ropes and cordage with fresh water and mild detergent, if necessary. Lubricate and clean hardware components using marine-grade products, following the manufacturer’s guidelines.
When to replace
Advantages and impact of advanced synthetic materials , advantages of synthetic materials.
- Higher strength-to-weight ratio: Advanced materials like Dyneema, Spectra, and Vectran provide impressive strength while remaining lightweight, ensuring a secure connection and control in an easy-to-handle braid
- Low-stretch and abrasion resistance: These materials are incredibly resistant to stretching, providing improved control and accurate responsiveness. They also maintain their integrity and durability in wear, abrasion, and weathering.
- Increased lifespan: Synthetic materials can endure harsh conditions and resist UV damage.
Impact on Sailing Experience
The use of advanced materials like Dyneema, Spectra, and Vectran has had a profound effect on the sailing experience, with benefits including:
- Improved sail control and responsiveness: These low-stretch materials allow precise, user-friendly, and efficient sail handling and adjustments, leading to better overall performance.
- Enhanced durability and reduced maintenance: High-performance materials resist wear and weathering more effectively, increasing the lifespan of rigging and lowering the frequency of maintenance or replacement.
- Greater performance potential: Advanced materials’ increased strength and lightness improve boat performance to higher levels, especially in competitive racing scenarios.
Troubleshooting Common Problems
- Tangled or twisted lines: angled lines can impede adjustments and create hazardous situations, like tangled jib sheets , which can cause control issues with your headsail. Always coil and store lines properly when not in use to solve this issue. Regularly inspect your lines for twists or tangles, and address them before they become problematic.
- Jammed or stuck hardware: Dirt, corrosion, or damage can cause hardware components like blocks or winches to jam or stick, making it difficult to control the lines. Clean and lubricate your hardware according to the manufacturer’s guidelines to fix this issue. Replace any damaged or worn-out components to ensure smooth operation.
- Lines slipping or not holding tension: Runners may sometimes slip from cleats or winches, causing the sail to lose its desired shape or position. To overcome this issue, ensure you use the proper cleating or winching techniques, and double-check the compatibility of your line materials with your hardware.
When to call a professional
Although boat owners can resolve many rigging issues, there are situations where the expertise of a professional rigger may become necessary. Consider consulting a professional when:
- You feel uncertain about your ability to diagnose or fix a problem safely and effectively
- You need to replace or install new running rigging components that require specialized knowledge or skills
- You have encountered complex issues that may require advanced troubleshooting techniques
The Art of Knots and Splices
Importance of knots and splices.
Knots and splices connect rigging components, secure lines, and adjust sails. Proper knowledge and execution of these techniques allow us to:
- Effectively connect lines and hardware
- Quickly and safely secure or adjust lines under various conditions
- Reduce the risk of lines slipping or coming undone while sailing
- Maintain the integrity and strength of our rigging
Commonly used knots and their uses
Numerous knots are available for various purposes within the rigging. Some of the most common and versatile knots include:
- Bowline: This popular and secure knot is used for creating a fixed loop at the end of a line, often employed for attaching sheets to sails or halyards to shackles.
- Cleat hitch: A handy knot that quickly and securely fasten lines to cleats; widely used for halyards, sheets, and dock lines.
- Figure eight: A practical stopper knot prevents lines from slipping through hardware, such as blocks or clutches.
Techniques for splicing lines
Splicing is joining two lines or creating a loop within a single line by weaving rope fibers together. Splicing often results in stronger, more secure connections than tying knots and can improve the overall aesthetic of your rigging. Some techniques include:
- Eye splice: This technique creates a fixed loop at the end of a line, ideal for attaching hardware, such as thimbles, shackles, or blocks.
- Short splice: This method joins two lines by interweaving their ends, resulting in a strong connection suitable for halyards or sheets.
- End-to-end splice: An effective way to join two lines end-to-end, maintaining the line’s integrity and minimizing chafe or bulk.
Safety Practices When Handling Running Rigging
Basic safety rules.
- Be aware of your surroundings: Before making any adjustments to your sails or lines, evaluate the environment, and pay attention to potential hazards, such as nearby boats, obstacles, or changing wind conditions.
- Communicate clearly: When making adjustments or performing maneuvers, communicate your intentions with your crew to prevent confusion and ensure necessary steps are started promptly and coordinated.
- Use appropriate gear: Wear gloves to protect your hands from rope burns, and always have a knife or multi-tool nearby to handle unexpected situations, such as cutting tangled or jammed lines.
Risk and injury prevention
While handling rigging, take precautions to prevent accidents or injuries:
- Maintain proper body positioning: When working with lines or winches, position yourself securely to avoid sudden slips or loss of balance that could result in injuries.
- Keep fingers clear: Be cautious when handling lines around winches or cleats to prevent pinched fingers or rope burns.
- Avoid standing in a “line of fire”: Be mindful of potential line snap-backs or sudden movements when tension is released from sails or hardware.
Emergency procedures related to rigging
Being prepared for emergencies is crucial. Familiarize yourself with procedures such as:
- Man Overboard Recovery: Practice techniques to quickly stop the boat and retrieve someone who has fallen overboard.
- Rapid sail reduction or deployment: In extreme weather or urgent situations, know how to quickly reef, furl, or set sails to maintain control and stability.
Tips and Techniques for Better Performance
Tips for optimizing performance.
- Regular inspection and maintenance: Ensuring your lines, hardware, and sails are in good condition and correctly cared for is crucial for performance optimization on the water.
- Tailor your rigging: Customize your rigging according to your specific requirements, whether racing or cruising, as this can affect your boat’s overall performance.
Techniques for Smoother Sailing
- Match line materials and diameters to their purpose: Select the proper line material and diameter for each rigging component, such as the mainsheet, to ensure better sail control, reduced friction, and smooth operation.
- Stay organized and avoid line clutter: Keep lines and hardware tidy using organizers and storage solutions to prevent tangles and confusion, leading to inefficiency or unsafe situations on the water.
Additional Sailboat Rigging Components and Techniques
- Guys: These lines, in conjunction with spinnaker sheets, offer lateral control of the spinnaker pole and consequently allow better management of the spinnaker shape as they help balance the tension between forestay and backstay , maximizing its efficiency in downwind sailing.
- Vangs (or boom vang or kicking strap): While controlling the boom’s angle to maintain shape, vangs also help prevent accidental gybes, increasing safety on board.
- Outhauls: By managing foot tension and the sail hoist, outhauls aid in achieving optimal sail shape according to the wind conditions and point of sail . Loosening the outhaul creates a deeper shape for light winds, while tightening it flattens the sail for heavier conditions.
Equipment Organization and Storage
- Line bags or organizers: Store coiled lines for different sails, like staysail, and keep aft rolling furling lines neatly organized to minimize tangles and clutter.
- Clutches or labeled cleats: Label the appropriate hardware for each line to prevent confusion when adjusting sails.
- Winch handle holders: Ensure winch handles are secured in a designated holder when not in use, reducing the risk of accidents or loss overboard.
Different Rigging Setups
- Sloop Rig vs. Cutter Rig: A sloop rig typically has one headsail, like a genoa, while a cutter rig features two or more, requiring additional rigging components like adding extra backstays for support, extra halyards, sheets, and control lines for the cutter rig.
- In-Mast vs. In-Boom Furling Systems: These systems allow easy reefing and sail deployment. Running rigging for furling systems will include additional lines and hardware to manage furling and unfurling processes from the cockpit.
- Racing Boats vs. Cruising: Racing boats may require specialized configurations, such as high-performance lines and lightweight hardware, while cruising sailboats may prioritize more versatile, durable, and easy-to-maintain rigging components.
Final Thoughts
Understanding and effectively managing running rigging is critical to sailing, directly affecting the boat’s performance, maneuverability, and safety. This comprehensive guide offers a detailed breakdown of rigging components, their care and maintenance, troubleshooting, and the essential knots and splices. It also explores the revolutionary impact of synthetic materials, provides safety practices, and highlights the importance of customizing your running rigging according to your sailing needs.
Standing rigging refers to the fixed lines, cables, and rods that support the sailboat’s mast and maintain stability. Running rigging refers to the movable components that control, adjust, and handle the sails.
Critical components of running rigging include halyards, sheets, and control lines. Additional components can consist of guys, vangs, and outhauls.
Synthetic materials like Dyneema, Spectra, and Vectran offer superior strength-to-weight ratio, low stretch and abrasion resistance, and an increased lifespan, resulting in better control and durability of running rigging components.
Ideally, if you sail extensively, you should inspect your running rigging at least once a season or more frequently if you sail extensively. Regular cleaning, lubrication, and replacement of worn-out components should be part of your maintenance routine.
Different sailboat types and sail configurations may require specific running rigging setups. For example, a sloop rig and cutter rig have additional requirements for headsails, thus requiring various running rigging components. Similarly, racing boats and cruising sailboats may require different running rigging setups to cater to their needs.
The Importance of the Sailboat Comfort Ratio
What is an impeller on a boat, related posts, whisker pole sailing rig: techniques and tips, reefing a sail: a comprehensive guide, sail trim: speed, stability, and performance, leave a reply cancel reply.
Your email address will not be published. Required fields are marked *
- Cookie Policy
- Privacy Statement
© 2023 TIGERLILY GROUP LTD, 27 Old Gloucester Street, London, WC1N 3AX, UK. Registered Company in England & Wales. Company No. 14743614
Welcome Back!
Login to your account below
Remember Me
Retrieve your password
Please enter your username or email address to reset your password.
Add New Playlist
- Select Visibility - Public Private
Sailboat Stays and Shrouds: Essential Rigging Components Explained
by Emma Sullivan | Aug 21, 2023 | Sailboat Maintenance

Short answer: Sailboat stays and shrouds
Sailboat stays and shrouds are essential components of the rigging system that provide support and stability to the mast. Stays run from the masthead to various points on the boat, preventing forward and backward movement, while shrouds connect the mast laterally to maintain side-to-side stability. Together, they help distribute the forces acting on the mast and ensure safe sailing .
Understanding Sailboat Stays and Shrouds: A Comprehensive Guide
Introduction: Sailing is an exhilarating experience, but it requires a deep understanding of the various components that make up a sailboat . One crucial aspect that every sailor should grasp is the concept of stays and shrouds. These vital elements not only provide support and stability to the mast but also play a significant role in determining the overall performance of the sailboat. In this comprehensive guide, we will explore everything you need to know about sailboat stays and shrouds.
What are Stays and Shrouds? Stays and shrouds are essential rigging components that hold the mast in place and control its movements during sailing. They primarily serve two distinct purposes – providing support for the mast against excessive sideways forces (known as lateral or side-to-side loads) while allowing controlled flexing, and keeping the mast aligned with respect to both pitch (fore-aft) and roll (side-to-side) axes.
The Difference between Stays and Shrouds: Although often used interchangeably, stays and shrouds have specific functions on a sailboat rigging system. Stays usually refer to those wires or cables that run forward from the head of the mast, attaching it to various points on the bow or foredeck. They help resist fore-and-aft loads placed upon the mast, such as when sailing upwind, preventing it from bending too much under pressure.
On the other hand, shrouds typically refer to rigging lines connecting laterally from both sides of the masthead down towards deck level or chainplates located on either side of the boat’s cabin top or hull. Unlike stays, they primarily counteract side-to-side forces acting on the mast due to wind pressure exerted against sails during different points of sail.
Types of Stays: A typical sailboat may consist of different types of stays based on their location on the mast. Some of the common types include:
1. Forestay: The forestay is a prominent stay that runs from the top of the mast to the bow or stemhead fitting at the boat’s front . It is responsible for supporting most of the fore-and-aft loads acting upon a sailboat rigging system, keeping the mast in position while under tension from sails .
2. Backstay: The backstay runs from the top of the mast to either stern or transom fittings at the aft end of a sailboat. It acts as an opposing force to counteract forward bending moments occurring on larger boats when sailing into a headwind or during heavy gusts.
3. Inner Stays: Found on some rigs with multiple masts or taller sailboats, inner stays run parallel to and inside other stays (such as forestay and backstay). These provide additional support and rigidity when deploying smaller headsails closer to centerline during specific wind conditions.
Types of Shrouds: Similar to stays, shrouds can vary based on their positioning on each side of the masthead and hull structure. Some commonly used shroud types are:
1. Upper Shrouds: These are positioned higher up on a sailboat mast , connecting near its upper section down towards deck level or chainplates for lateral stability against the force exerted by sailing sails.
2. Lower Shrouds: Positioned lower down on a sailboat’s mast , these connect near its midpoint and extend towards lower deck sections or chainplates. They serve mainly as reinforcing elements against lateral forces experienced while sailing in strong winds .
3. Jumpers/Checkstays: Jumpers (or checkstays) are typically temporary shroud additions used when depowering or controlling mast bend in certain wind conditions or point of sail, especially during racing events where fine-tuning sail shape is critical.
Conclusion: Sailboat stays and shrouds are essential components that provide critical support, stability, and control to the mast. Understanding their purpose and types is crucial for every sailor looking to optimize their vessel’s performance while ensuring safe sailing. By comprehensively knowing the role of stays and shrouds, you can confidently navigate the waters while harnessing the power of wind in pursuit of your sailing adventures.
Step-by-Step Instructions for Proper Installation of Sailboat Stays and Shrouds
Installing sailboat stays and shrouds may seem like a daunting task, but with the right knowledge and proper instructions, it can be accomplished smoothly. Stays and shrouds are crucial components of a sailboat’s rigging system that provide support and stability to the mast. In this step-by-step guide, we will walk you through the process of installing these vital elements for safe and efficient sailing.
Step 1: Prepare your Equipment
Before beginning any installation, ensure that you have all the necessary tools and materials at hand. This includes stay wires, turnbuckles, cotter pins, wire cutters, measuring tape, swage fittings (if applicable), wrenches appropriate for your boat’s hardware sizes, and a well-organized workspace. Having everything prepared ahead of time allows for smoother progress throughout the installation procedure.
Step 2: Measure & Cut Stay Wires
Accurate measurements are crucial when it comes to stays and shrouds installation. Using a measuring tape, determine the required length for each stay wire by taking precise measurements from their designated attachment points on deck to the masthead or other relevant attachment points. It is important to leave room for tension adjustment using turnbuckles later on.
After obtaining accurate measurements, use wire cutters to trim each stay wire accordingly. Be sure to trim them slightly longer than measured lengths initially indicated because precision can only be achieved once all connections are made.
Step 3: Attach Wires to Mast Fittings
Now that you have your measured and cut stay wires ready, it’s time to attach them securely to the appropriate mast fittings . Depending on your boat’s design and specific rigging details, this step can vary slightly. Look for pre-existing attachment points designed specifically for stays or fittings specifically configured for thread-on stays if applicable.
Ensure each connection is secure by threading or whatever means necessary as per your boat’s requirements . Double-check that there is no unwanted slack while leaving space for later tension adjustments.
Step 4: Deck Attachment Points
Move on to attaching the stay wires to their designated deck attachment points. These points are usually found near the bow area, and there may be specific fittings designed just for this purpose. Follow your operational manual or consult experienced sailors if you are unsure about the correct attachment points.
Again, double-check that all connections are securely fastened, without any excess slack. It is always better to have a slight bit of extra wire length here than have inadequate length at this stage.
Step 5: Install Turnbuckles
With the stays securely connected at both ends, it’s time to insert turnbuckles. Turnbuckles are essential tools for adjusting the tension in stay wires. Attach these devices to each stay wire by screwing them into the corresponding threaded fitting on either end of the stays. Ensure they are tightened securely but not over-tightened at this stage; you still need room for adjustments and tuning.
Step 6: Secure with Cotter Pins or Locking Nuts
To prevent accidental loosening of turnbuckles due to vibrations or rough sail conditions, make sure to secure them using cotter pins or locking nuts provided by your boat’s manufacturer. Place a cotter pin through the hole located in one side of the turnbuckle and bend it back upon itself, ensuring that it does not interfere with adjacent rigging components or sails.
Alternatively, locking nuts can be used by tightening them against each side of the turnbuckle threads once adjusted correctly –This provides an additional layer of security against unexpected loosening during sailing adventures !
Step 7: Inspect & Adjust Tension
Before hitting the water and setting sail , take a moment to inspect all connections thoroughly. Verify that each wire is properly aligned and does not show signs of damage like frays or kinks—Pay attention to potential chafe points where movement can wear against another object or surface.
To adjust tension, gradually tighten or loosen the turnbuckles as necessary. Be cautious and make small adjustments while periodically checking for an evenly balanced mast, ensuring that it remains straight and true.
By following these step-by-step instructions meticulously, you can ensure a proper installation of sailboat stays and shrouds. Remember to take your time, double-check all connections, and consult with professionals or experienced sailors if any doubts arise. With a meticulous approach and attention to detail, your sailboat rigging will be safe, stable, and ready for smooth sailing adventures!
Frequently Asked Questions about Sailboat Stays and Shrouds: Everything You Need to Know
Have you ever found yourself marveling at the majesty of a sailboat, wondering how it is able to harness the power of the wind and navigate through vast oceans? If you are a sailing enthusiast or considering embarking on a sailing adventure, understanding the intricacies of sailboat stays and shrouds is paramount. In this comprehensive blog post, we will address frequently asked questions about sailboat stays and shrouds, equipping you with everything you need to know.
1. What are Sailboat Stays and Shrouds?
Sailboat stays and shrouds are vital components of a boat’s standing rigging system that help support the mast while ensuring stability during sailing. Simply put, they prevent the mast from toppling over under excessive pressure from the sails or adverse weather conditions. While these terms may sound interchangeable to novices, there are important distinctions between them.
Stays: Stays are tensioned cables or wires attached to various points on the mast and radiate outwards in multiple directions supporting it against fore-and-aft movement. The most common types include forestays (located at the bow), backstays (attached to the stern), side stays (running sideways along both port and starboard sides), and inner forestays.
Shrouds: On the other hand, shrouds provide lateral support to counteract sideways forces acting on the mast. They run diagonally from their connection points on deck-level chainplates outwards towards optimized positions along the spreaders near midway up the mast.
2. What materials are used for Sailboat Stays and Shrouds?
Traditionally, steel wire was predominantly used for both stays and shrouds due to its strength and durability. However, modern advancements have introduced alternative materials such as synthetic fibers like Dyneema or carbon fiber composites. These lightweight alternatives possess remarkable tensile strength while offering corrosion resistance advantages over traditional wire options.
3. How tight should Sailboat Stays and Shrouds be?
Maintaining the appropriate tension in your sailboat’s stays and shrouds is crucial for maintaining integrity and overall sailing performance. Correct tension ensures that the mast remains properly aligned while allowing it to flex as required, absorbing dynamic forces from wind gusts.
To determine optimal tension, consult your sailboat’s manufacturer guidelines or consult with a professional rigging specialist. Adjustments may also vary depending on sea state or anticipated weather conditions . Proper tuning necessitates periodic evaluation to ensure the stays and shrouds’ tension remains within specifications.
4. How do Sailboat Stays and Shrouds affect sailing performance ?
The correct alignment, tautness, and positioning of sailboat stays and shrouds significantly impact sailing performance due to their influence on mast bend characteristics. Adjusting stay tension can control how much a mast bends under load: tightened stays flatten the mainsail’s profile for increased pointing ability in light winds, while looser tensions promote fuller profiles for enhanced power in heavier winds .
Shroud positions also dictate sideways motion of the mast; fine-tuning their tension governs how efficiently a boat can maintain a desired course when encountering various wind strengths and angles.
5. What are some common signs of wear or damage in Sailboat Stays and Shrouds?
As essential as they are, sailboat stays and shrouds are subjected to immense loads that can lead to wear over time. Routine inspection is vital to identify any potential issues before they escalate into major rigging failures.
Signs of wear or damage may include rust or corrosion on metal components, cracked insulation around terminals, broken strands on wire rigging, visible rigging deformation or elongation under load, unusual vibrations onboard while sailing, or creaking noises originating from the mast during maneuvers.
In such instances, swift action should be taken by replacing affected parts immediately or seeking assistance from experienced rigging professionals.
By familiarizing yourself with the essentials of sailboat stays and shrouds, you empower yourself to enjoy a safer and more rewarding sailing experience. Remember to conduct regular inspections, adhere to manufacturer recommendations, and consult professionals when necessary. Now, set sail with confidence as you venture into the salty unknown!
Exploring the Importance of Sailboat Stays and Shrouds in Ensuring Safety at Sea
When it comes to sailing, safety should always be the number one priority. The open waters of the sea can be unpredictable and unforgiving, making it crucial for sailors to have a thorough understanding of their sailboat ‘s rigging system. One vital component of this system is sailboat stays and shrouds, which play a significant role in ensuring safety onboard.
Sailboat stays and shrouds are specialized cables or wires that support the mast, providing stability and preventing it from collapsing under the pressure of wind forces. These essential rigging elements act as a lifeline for the entire vessel, keeping everything intact during even the toughest conditions at sea.
The primary purpose of stays and shrouds is to distribute the load evenly throughout the mast structure. By doing so, they prevent excessive stress on specific areas and reduce the risk of structural failure. This balance is especially critical when sailboats encounter strong winds or rough seas that can exert immense pressure on the mast.
Imagine cruising along peacefully when suddenly you encounter strong gusts of wind. Without properly tensioned stays and shrouds, your mast could bend or break under these intense forces, compromising your safety and potentially causing severe damage to your vessel. Well-maintained stays and shrouds ensure that your mast remains stable even in adverse weather conditions by withstanding these forces without deformation.
However, ensuring that your sailboat’s rigging is reliable isn’t just about maintaining functionality—it demands meticulous attention to detail as well. Stays and shrouds need periodic inspection to identify any signs of wear or corrosion that may weaken their integrity over time. A frayed cable or rusty hardware might not seem like much at first glance, but they could lead to catastrophic failures when put under stress.
Safety at sea also requires understanding how different types of stays and shrouds work together to optimize performance in varying sailing conditions. While staying safe is crucial, performance matters too! Different sailboat designs accommodate different rigging configurations, and knowledgeable sailors carefully select the right combinations to enhance their vessel’s maneuverability. The strategic placement of stays and shrouds aids in controlling the shape and orientation of sails, enabling efficient sailing even in challenging weather.
In this era of advanced technologies, some sailors may wonder if traditional stays and shrouds are still essential with other innovations available. However, it’s crucial to remember that age-old methods often endure for a reason: their reliability. Modern alternatives might offer convenience or weight-saving benefits, but they seldom match the robustness and simplicity of time-tested techniques.
The exploration of the importance of sailboat stays and shrouds ultimately emphasizes the significance of investing time and resources into proper knowledge, maintenance, and selection. As a sailor, prioritizing safety by ensuring the integrity of these critical components can mean all the difference between a pleasurable voyage adrift on calm seas versus surviving treacherous storms.
So, before embarking on any maritime adventure, take a moment to appreciate the unsung heroes that uphold your mast—the sailboat stays and shrouds—and make sure they are ready to bear any challenges that await you on your journey to ensure both safe passage and endless memories at sea.
How Sailboat Stays and Shrouds Impact Performance: Tips for Maximizing Efficiency
Sailboats are fascinating vessels that harness the power of the wind to propel through the water. While many factors contribute to a sailboat’s performance, one often overlooked aspect is the impact that stays and shrouds have on its efficiency. In this blog post, we will dive into the intricacies of sailboat stays and shrouds, exploring how they affect performance and providing valuable tips for maximizing efficiency.
To understand the significance of stays and shrouds, let’s first clarify their definitions. Stays are essentially wires or ropes that provide support to keep a mast in place, preventing excessive bending or swaying. Shrouds, on the other hand, refer specifically to those stays that extend from either side of the boat to stabilize the mast laterally.
While seemingly simple components, stays and shrouds play a crucial role in determining a sailboat’s overall performance. Here’s how:
1. Structural stability: Sailboat stays act as primary supports for the mast, ensuring it remains upright against powerful winds . Without adequately tensioned stays and shrouds, masts can buckle or sway excessively under load, compromising sailing performance and even risking structural damage.
2. Sail shape control: Proper tensioning of stays and shrouds directly influences the shape of your sails while underway. By adjusting their tension appropriately, you can manipulate how your sails fill with wind , optimizing their aerodynamic profile for maximum efficiency. Expert sailors effectively use this control mechanism to fine-tune their boat ‘s speed and responsiveness.
3. Windward performance: Efficiently rigged sailboat stays help maintain proper alignment between mast and sails when sailing upwind (also known as pointing). Tensioned shrouds ensure that minimal lateral movement occurs during tacking or jibing maneuvers when changing direction against the wind. This prevention of excess mast movement translates into less energy lost due to unnecessary drag – ultimately improving windward efficiency .
Now that we’ve established the importance of sailboat stays and shrouds let’s delve into some tips for optimizing their performance:
1. Regular inspections: Routine visual inspections are essential to identify any signs of wear, corrosion, or fatigue on your stays and shrouds. Replace frayed ropes or wires promptly, ensuring that all components remain robust and reliable.
2. Correct tensioning: Achieving the optimal tension in your stays and shrouds is vital. Too loose, and you risk mast instability; too tight, and excessive stress loads are placed on the rigging components. Aim for a tension that allows slight flexibility while maintaining structural integrity – seeking advice from an experienced rigger can help find the sweet spot.
3. Invest in quality materials: The quality of your rigging directly impacts its longevity and performance . Opt for high-quality stainless steel wires, synthetic fibers like Dyneema, or carbon fiber alternatives when replacing old rigging components, as these materials offer superior strength-to-weight ratios.
4. Tuning adjustments: To maximize sail shape control, experiment with adjusting the tension of your stays and shrouds during different weather conditions or sailing angles. Fine-tuning these tensions can lead to significant improvements in both speed and responsiveness while ensuring optimum aerodynamic performance at all times.
5. Seek professional advice: Don’t hesitate to reach out to experts in yacht rigging or naval architects for specialist input regarding optimizing your sailboat’s rigging setup. Their expertise can guide you towards refined techniques tailored to suit specific vessel designs or sailing goals.
In conclusion, understanding how sailboat stays and shrouds impact performance is crucial for any sailor aiming to maximize efficiency on the water. By recognizing their significance as key structural supports influencing sail shape control and windward performance, you can optimize your vessel’s potential while enjoying more thrilling voyages than ever before! So make sure to prioritize regular inspections, correct tensioning methods, high-quality materials, tuning adjustments, and professional guidance to unlock the true potential of your sailboat.
Essential Maintenance Tips for Maintaining the Integrity of Sailboat Stays and Shrouds
Sailboat owners and enthusiasts know the importance of regular maintenance to keep their vessels in top condition. Among the vital components that require particular attention are the stays and shrouds – key structural elements that ensure the integrity of a sailboat’s mast and rigging system.
Stays and shrouds are essentially wires or cables that provide crucial support to the mast, allowing it to properly withstand wind pressures and maintain stability during sailing. As they play such a pivotal role in your sailboat’s performance and safety, it is essential to implement regular maintenance practices to ensure their longevity and functionality.
To help you maintain the integrity of your sailboat’s stays and shrouds, we have compiled some essential tips that will not only enhance their lifespan but also contribute to your overall sailing experience:
1. Visual Inspection: Regularly conduct visual inspections of all stays and shrouds with an eagle eye for any signs of wear or damage. Look for frayed or broken strands, corrosion, stretched areas, or loose fittings. It is better to address minor issues early on rather than waiting for them to become major problems.
2. Tension Monitoring: Check the tension of your stays regularly using a suitable tension gauge or by following manufacturer guidelines. Proper tension ensures optimal performance while avoiding excessive strain on both mast and rigging components.
3. Corrosion Control: Saltwater exposure can accelerate corrosion on metal components like turnbuckles, shackles, or terminals. Routinely clean these parts using freshwater after each outing while inspecting them for signs of rust. Applying protective coatings like anti-corrosion sprays can also significantly extend their lifespan.
4. Lubrication: Maintaining a smooth operation within turnbuckles is crucial for proper tension adjustment as well as preventing corrosion seizing between threaded components (e.g., adjusters). Apply marine-grade lubricants periodically, ensuring even distribution across all moving parts.
5. Regular Rig Tuning: Appreciate the importance of proper rig tuning to optimize sail shape and overall stability. Work with a professional rigger to adjust the tension on your sails and shrouds, correcting any sag or excessive flex.
6. Replacing Components: If you notice any signs of wear that cannot be resolved through cleaning, lubrication, or tension adjustment, consider replacing the affected components immediately with high-quality replacements. Neglecting worn stays or shrouds can compromise your sailboat ‘s safety and performance.
7. Professional Rig Inspection: Schedule a professional rig inspection at least once every two years, especially if you engage in more frequent or rigorous sailing activities. Rigging experts have the experience and knowledge to detect potential weaknesses that may not be readily evident to an untrained eye, helping you avoid costly breakdowns during crucial moments.
Remember, maintaining the integrity of sailboat stays and shrouds should be an ongoing priority for all passionate sailors. By following these essential maintenance tips and providing regular care to these vital elements, you can ensure your vessel is ready to conquer waves with reliability and grace. So set sail with confidence knowing that your rigging system is in optimal condition!
Recent Posts

- Sailboat Gear and Equipment
- Sailboat Lifestyle
- Sailboat Maintenance
- Sailboat Racing
- Sailboat Tips and Tricks
- Sailboat Types
- Sailing Adventures
- Sailing Destinations
- Sailing Safety
- Sailing Techniques
Rigging Explained
Its time for rigging.
Let us take you to the world of rigging , smoothly and clearly to understand , the needs of your boat better .
There two big categories in rigging . The standing rigging and the running rigging .
We explain both , so you can have a full understanding of your vessel and we can understand better of you needs
Click on each picture to the right for each category
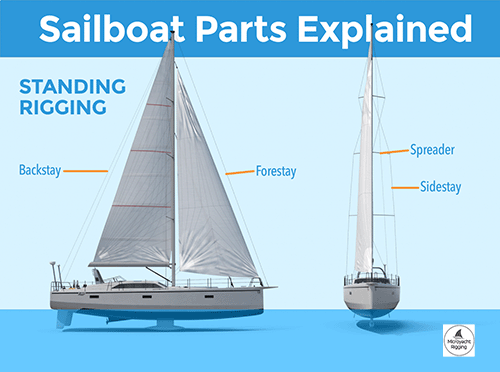
Standing Rigging Explained
Standing rigging.
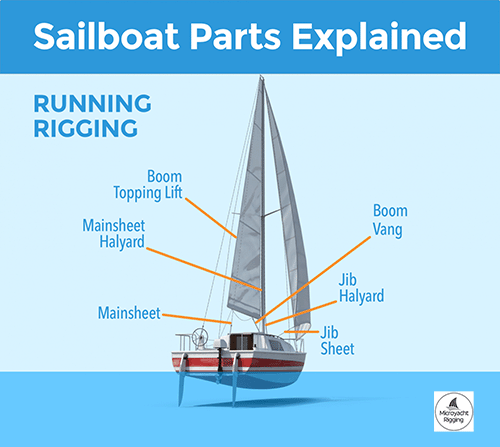
Running Rigging Explained
Running rigging.
Click to know more about the terms of rigging so we can understand each other , when you explain us what is you want to change or repair .
Why Choose Us
A short description of the benefit.
Client Testimonials

Meet our excellent team and stay reassured
With a technical background of 22 years your rigging is safe with us . Let us know , what are the details of your rigging status and what needs to be changed .
© 2022 All Rights Reserved. Designed and hosted by Inspireweb
© 2020-2023 All Rights Reserved. Designed and hosted by Inspireweb
Information.
- Spare parts
- Boatyard Map
Contact Us.
- Support (existing works)
- Office (new requests)
Last modified on Friday, March 10, 23
Reset password
- Ελληνικά ( Greek )
By continuing to use this website, you consent to the use of cookies in accordance with our Cookie Policy.
How To Rig, Set Up & Hoist a Spinnaker: Full Guide
It's a beautiful, sunny day. You're sailing upwind, and all around you colorful spinnakers fill and flutter as boats sail the other way. Wouldn't it be nice to break that sail out of the bag for the ride back down wind?
How do you rig, set up and hoist a spinnaker?
- Prepare the kite by finding the corner and making sure the sail isn't twisted
- Run your spinnaker sheets and guys before attaching to tack and clew
- Attach the halyard to the head, make sure it is outside the headstay
- Set the pole by putting the sheets and guys in the pole's jaws
- Hoist the pole
- Hoist the spinnaker
It seems daunting, but the principles of setting a symmetrical spinnaker are the same whether you're on a 420 dinghy or a fifty foot racer. You may have a few more lines, but the general process is: prep the spinnaker, connect the lines to the sail, hoist the pole on the windward side, then hoist and trim the sail.
There's a little more to it (of course), and each step has a few things to get right. But we've got you covered.

On this page:
Spinnaker basics, steps to set it, setting problems, the bear-away set, asymmetrical differences.
Spinnaker come in two types: symmetrical and asymmetrical. The symmetry refers to the length of the sides of the sails. An asymmetrical spinnaker has a tack and a distinct leech . A symmetrical spinnaker has both sides the same length and requires a pole to position. The tack and leech of a symmetrical sail depends on which side the pole is on - the pole side is the tack. Symmetrical sails aresailed deeper downwind with the poles, whereas asymmetrical spinnakers are better at reaching and sailing at higher angles, and are simpler to set and handle.
In this article, we'll focus mainly on symmetrical spinnakers.
Spinnaker Controls and Lines
A spinnaker connects the boat with a halyard at the head of the sail to hoist it, a sheet on the leeward side, and a guy on the windward side. While the guy is a pole control, some boats use dedicated sheets and guys, while some use a single line that switches function between sheet and guy as the sail jibes from side to side. In either case, the guy connects to the sail, not the pole, and runs through the jaws of the pole. The sheet is used to trim the sail as we adjust the pole with the guy.
When the sail is set, the lines not under load are the lazy guy or sheet. The sheet on the windward side and the guy on the leeward side will be the lazy sheet and lazy guy . Not all boats use separate sheets and guys, so there may not be a lazy guy/sheet.
Pole Controls
The spinnaker guy is used to control the position of the pole, and the angle of attack of the sail to the wind. Trim to keep the pole at a right angle to the wind. Most poles have a pole topping lift and a downhaul (also called a foreguy ). On the mast, there will be a pole car or ring with an attachment point which sets the inboard height of the pole. The topping lift and foreguy keep the pole in a level position, perpendicular to the water, and can be adjusted to match the car position. The pole is trimmed lower in lighter air, though a detailed spinnaker trimming guide is outside the scope of this post.
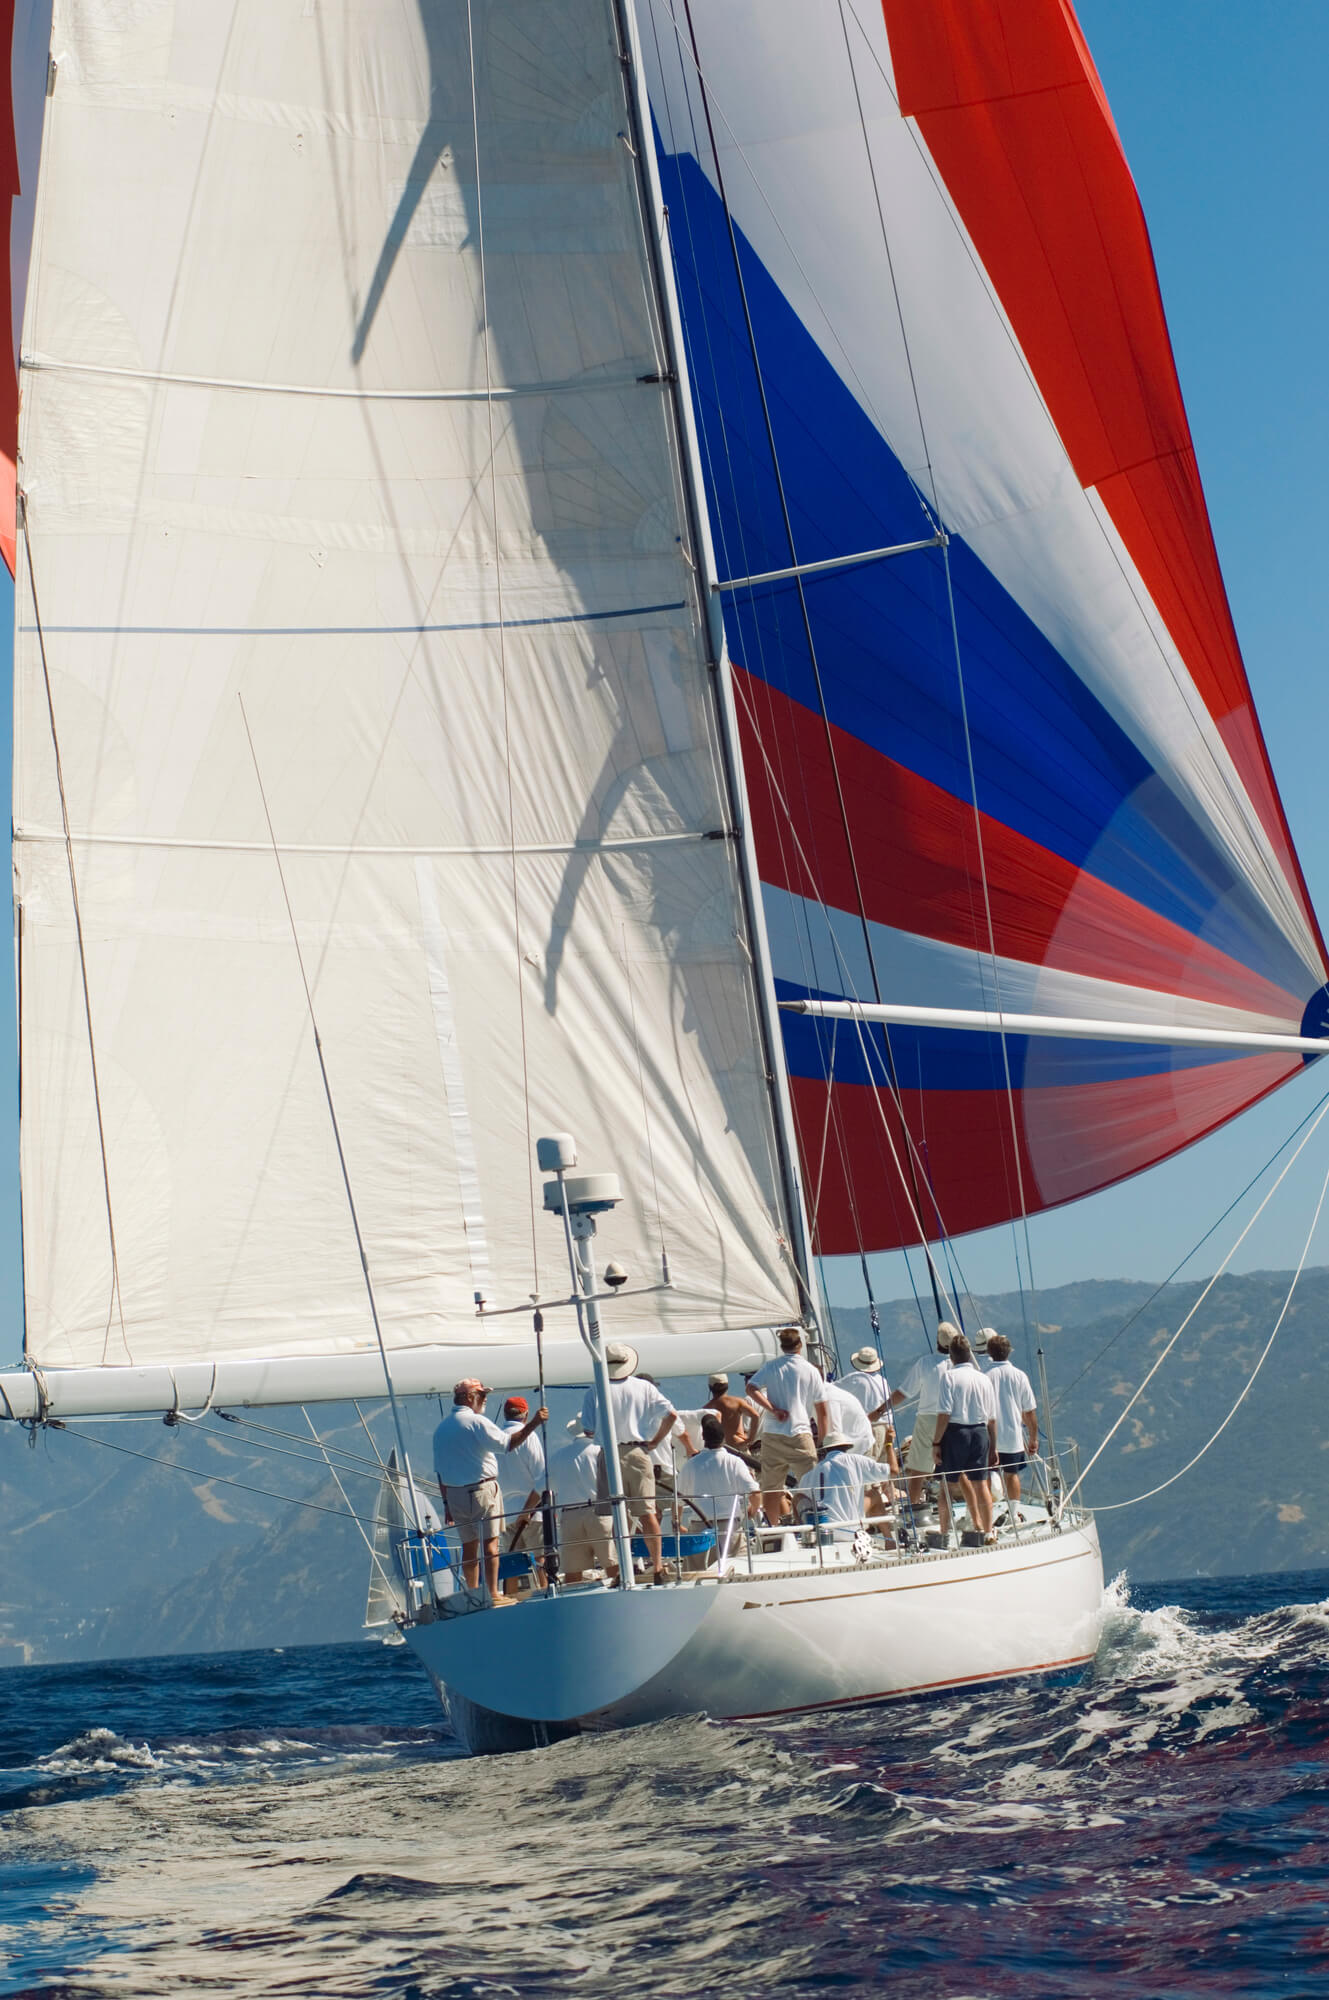
For simplicity, we'll assume you’re out for a simple sail, not racing. The jib is down, and you're ready to turn the boat down wind. Racers do things a little differently, but you will need to master a basic bareheaded set before you get too fancy.
Step 1 - Prepping the Kite
("kite" or "chute" are common nicknames for a spinnaker)
To launch a spinnaker from a bag without twists, someone needs to run the tapes when the spinnaker is packed. Find the head of the sail, run it between your fingers down one edge of the sail (or the tape , referring to the thicker reinforcement on the edge), making sure there are no twists or loops. Continue until you reach the next corner. If you find any twists or loops, work then out. Leave that corner outside the bag, then start again at the head and run the other tape. Leave the head and two clews out. This step can be done at the dock before leaving, or any time, as long as someone knows it has been properly packed . Do not assume.
You can bring the spinnaker bag up on deck for this, or leave it in the v-berth if there is a hatch suitable for pulling it through. This is more common when racing.
Step 2 - Plugging in the Spinnaker
Spinnaker sheets and guys should be run before connecting to the spinnaker. Most sheets and guys go through a fairlead or turning block at the stern of the boat before running forward to the spinnaker.
When you run the lines, take care they are free and outside of all lifelines, jib sheets and other obstructions before connecting to them to the tack and clew of the sail. Take the halyard and connect it to the head, making sure it is outside the headstay and any pole control lines or other entanglements.
Step 3 - Setting the Pole
If the pole isn’t normally stored on the mast, one end will need to connected. Attach the topping lift and down haul, and put the sheets and guys in the jaws now.
Whether the jaws go up or down is a personal preference, and some boats work better than others in different positions. Some argue that spinnaker forces pull up, so that jaws-down holds them from flying out when it's opened. Others maintain it's easier and more natural to slap a non-loaded sheet and guy into a jaws-up pole, with gravity to hold it there. This is a question of comfort and experience.
Hoist the pole to the proper height for the breeze.
Step 4 - Hoist!
When the boat is turned off the wind to the angle you want to sail, you are ready to hoist the sail.
With the pole set forward, hoist the sail up quickly with the halyard, then trim the sail and pole once it is at full hoist.
- You won't be able to trim the pole until the spinnaker is mostly up, but move it back when you can. It will help it fill and stay under control.
- To get the sail up more quickly, you can have someone at the mast to "bump" the halyard by pulling it at the mast while some else takes up the slack.
- If launching from a bag, attach the bag to the boat or you might launch it into the air with the sail. Most bags have Velcro straps or clips on them for connecting to lifelines or other boat hardware.
There are a few problems to watch for when setting. Twists, hourglasses, and forestay wraps are the most common, and can even happen with a properly packed spinnaker with no twists, though that is the most common cause of hour-glassing and wraps.
Avoid pulling too hard or panicking when these things happen, it just wraps things tighter. You can worked twists out if you stop the hoist and pull down from the center of the foot and the clew. If it's too bad, lower the sail, untwist it, rerun tapes, and re-pack the sail.
When racing, it's slow to run "bare headed" without a jib. Racers will do a "bear-away" set, which is like the set described above, except on a few points. It's easier and faster, but it takes more people and a little preparation since a quick set is the goal.
- The jib is left up, so the spinnaker halyard runs outside the jib when the spinnaker is connected.
- The spinnaker can be hoisted earlier as the jib will blanket it.
- The pole can be trimmed back when the sail is out and filling.
- The jib is "blown" - quickly released and gathered on the deck for the down wind leg.
Since there is no pole, an asymmetrical spinnaker is far easier to rig, set, and hoist. There are only two sheets, and no pole controls.
- Most boats will have a short pole on the bow for attaching the tack. There may be an adjustable tack line to set the tack height for different conditions. The pole may also have adjustments.
- The lazy sheet should run around the outside headstay.
- Many asymmetrical spinnakers have a dousing sock or turtle , which makes launching easier. The sail is hoisted inside this cover, then the sock pulled down to let the sail fill.
- Some asymmetrical spinnakers can be rigged on a detachable, lightweight furler.
- Asymmetrical spinnakers can not sail as deep down wind as a symmetrical sail with a pole. However, they can be carried at higher angles of reaching and can make up for the lack of down wind capability with more reaching speed.
You stated for symmetrical spinnaker that the pole is kept “perpendicular to the water - wrong - it should be perpendicular to the wind
Bill Wheary
The pole is kept perpendicular to the MAST to that the luff of the spinnaker is as far as possible from the mast and luff of the main.
Although the pole is usually set as close to perpendicular to the wind, in most cases the pole is adjusted so as to position the the CORD between the spinnaker tack and clew perpendicular to the wind.
Leave a comment
Own your first boat within a year on any budget.
A sailboat doesn't have to be expensive if you know what you're doing. If you want to learn how to make your sailing dream reality within a year, leave your email and I'll send you free updates . I don't like spam - I will only send helpful content.
Ready to Own Your First Boat?
Just tell us the best email address to send your tips to:
IMAGES
VIDEO
COMMENTS
Gaff ketch - two-masted (mizzen), two mainsails, staysails, fore-and-aft rigged. Full-rigged ship or tall ship - three or more masts, mainsail on each mast, staysails, square-rigged. The first word is the shape and rigging of the mainsail. So this is the way the sail is attached to the mast.
Credit: Bill Tripp Design. The Bermudan rig is the all-rounder, able to perform well at all angles of sail. It is efficient upwind, while downwind the sail area can be significantly boosted with a big gennaker or spinnaker. For good reasons, it is the first choice for nearly every modern sailing yacht up to around 60 to 65 metres for cruising ...
PLEASE NOTE: THIS VIDEO HAS BEEN UPDATED WITH ENHANCED GRAPHICS AND IMPROVED SOUND. CHECK IT OUT HERE https://youtu.be/tRgWtPaCQQcA beginners guide to sailbo...
Standing rigging is the collective term for the system of wires (or rods) that supports the mast, both fore-and-aft and laterally. Lateral stays are known as shrouds and each has its own name (see diagram). The "shroud angle" is the angle between the mast and the cap shroud, typically never less than 12 degrees.
A beginners guide to sailboat rigging, including standing rigging and running rigging. This animated tutorial is the first in a series and covers sails, line...
Standing rigging keeps the mast in place, but it's the running rigging that handles all the action aboard a boat under sail. The many components in a modern running rigging system—sheets, outhauls, vang control, halyards—work in conjunction with wide range of blocks to keep friction to a minimum. Ralph Naranjo.
10. 2023. In the world of sailing, boat rigging plays a crucial role in ensuring the safety, efficiency, and performance of your vessel. From standing rigging to sail rigging types, it's essential to understand the intricacies of rigging a yacht to embark on smooth sailing adventures. In this comprehensive guide, we'll dive into the nuances of ...
In part 3 of our series on sailboat parts, we dive into two types of rigging: standing rigging and running rigging. I use a 3D model and some diagrams to giv...
Bermuda Rig - Also known as a Marconi rig, this is the typical configuration of most modern sailboats. It has been used since the 17th century and remains one of the most efficient types of rigs. The rig revolves around setting a triangular sail aft of the mast with the head raised to the top of the mast.
Yacht rigging: your essential pre-season rig check guide. Few things are more important during the spring fit-out than a thorough yacht rigging and spar inspection. Duncan Kent runs through the priorities. During the spring fit-out we often appear to lavish far more attention on the engine and electrical systems than we do on the rig, despite ...
By Robin Iversen January 12, 2024. The running rigging on a sailboat consists of all the lines used to hoist, lower, and control the sails and sailing equipment. These lines usually have different colors and patterns to easily identify their function and location on the vessel. Looking at the spaghetti of lines with different colors and ...
Turnbuckles, or rigging screws or bottlescrews, are stainless steel devices that enables the shroud tension to be adjusted. Next: Part 2 - Running Rigging. It can all be a bit baffling at first, sailboat rigging. Cap shrouds, intermediates, aft and forward lowers, sheets, halyards, topping lifts, downhauls, outhauls, kicking straps, reefing ...
Nylon has long been the default rope for all running rigging in cruising yachts. Something with a bit of give is ideal for mooring. It might be 'braid-on-braid', with similar outer and inner . parts, as sold by most manufacturers, . or it could be a low-stretch polyester braidline (LSP) with a loosely laid .
Guide to Rigging Component Identification and Terminology. From Fractional or Masthead Sloops to Gaffs, Ketches and Schooners, there is tremendous variety in yacht rig design. For each rig category, there are also a myriad of variations to allow for yacht size and specific sailing demands. Happily, there is a relatively small range of wire ...
Sailboats are powered by sails using the force of the wind. They are also referred to as sailing dinghies, boats, and yachts, depending on their size. Sailboats range in size, from lightweight dinghies like the Optimist dinghy (7'9") all the way up to mega yachts over 200 feet long. The length is often abbreviated as LOA (length overall), which ...
Yacht Rigging Guides. Below are some helpful guides covering rig tuning and tension, common rigging formulas and calculators for specifying rig fittings and hardware, as well as specific information for many of the Seldén, Furlex, and Rutgerson products we supply.
Running rigging, on the other hand, comprises the movable components needed to control, adjust, and handle the sails. These elements allow us to raise, lower, and trim the sails according to wind conditions and the boat's course. Understanding the distinction between the two types of rigging is vital in operating a sailboat safely and ...
Short answer: Sailboat stays and shrouds Sailboat stays and shrouds are essential components of the rigging system that provide support and stability to the mast. Stays run from the masthead to various points on the boat, preventing forward and backward movement, while shrouds connect the mast laterally to maintain side-to-side stability. Together, they help distribute
Let us take you to the world of rigging , smoothly and clearly to understand , the needs of your boat better . There two big categories in rigging . The standing rigging and the running rigging . We explain both , so you can have a full understanding of your vessel and we can understand better of you needs
Tuning your rig - left adding turns, right measuring the tension using a vernier guage. To check the adjustment of your rig start by sailing close-hauled with the boat nicely powered up at around 20 degrees of heel - ideally with full sail in flat water and around 10-14 knots of wind, depending on the vessel. Start by observing the cap ...
Prepare the kite by finding the corner and making sure the sail isn't twisted. Run your spinnaker sheets and guys before attaching to tack and clew. Attach the halyard to the head, make sure it is outside the headstay. Set the pole by putting the sheets and guys in the pole's jaws. Hoist the pole. Hoist the spinnaker.