- PRO Courses Guides New Tech Help Pro Expert Videos About wikiHow Pro Upgrade Sign In
- EDIT Edit this Article
- EXPLORE Tech Help Pro About Us Random Article Quizzes Request a New Article Community Dashboard This Or That Game Popular Categories Arts and Entertainment Artwork Books Movies Computers and Electronics Computers Phone Skills Technology Hacks Health Men's Health Mental Health Women's Health Relationships Dating Love Relationship Issues Hobbies and Crafts Crafts Drawing Games Education & Communication Communication Skills Personal Development Studying Personal Care and Style Fashion Hair Care Personal Hygiene Youth Personal Care School Stuff Dating All Categories Arts and Entertainment Finance and Business Home and Garden Relationship Quizzes Cars & Other Vehicles Food and Entertaining Personal Care and Style Sports and Fitness Computers and Electronics Health Pets and Animals Travel Education & Communication Hobbies and Crafts Philosophy and Religion Work World Family Life Holidays and Traditions Relationships Youth
- Browse Articles
- Learn Something New
- Quizzes Hot
- This Or That Game New
- Train Your Brain
- Explore More
- Support wikiHow
- About wikiHow
- Log in / Sign up
- Hobbies and Crafts
- Paper Craft

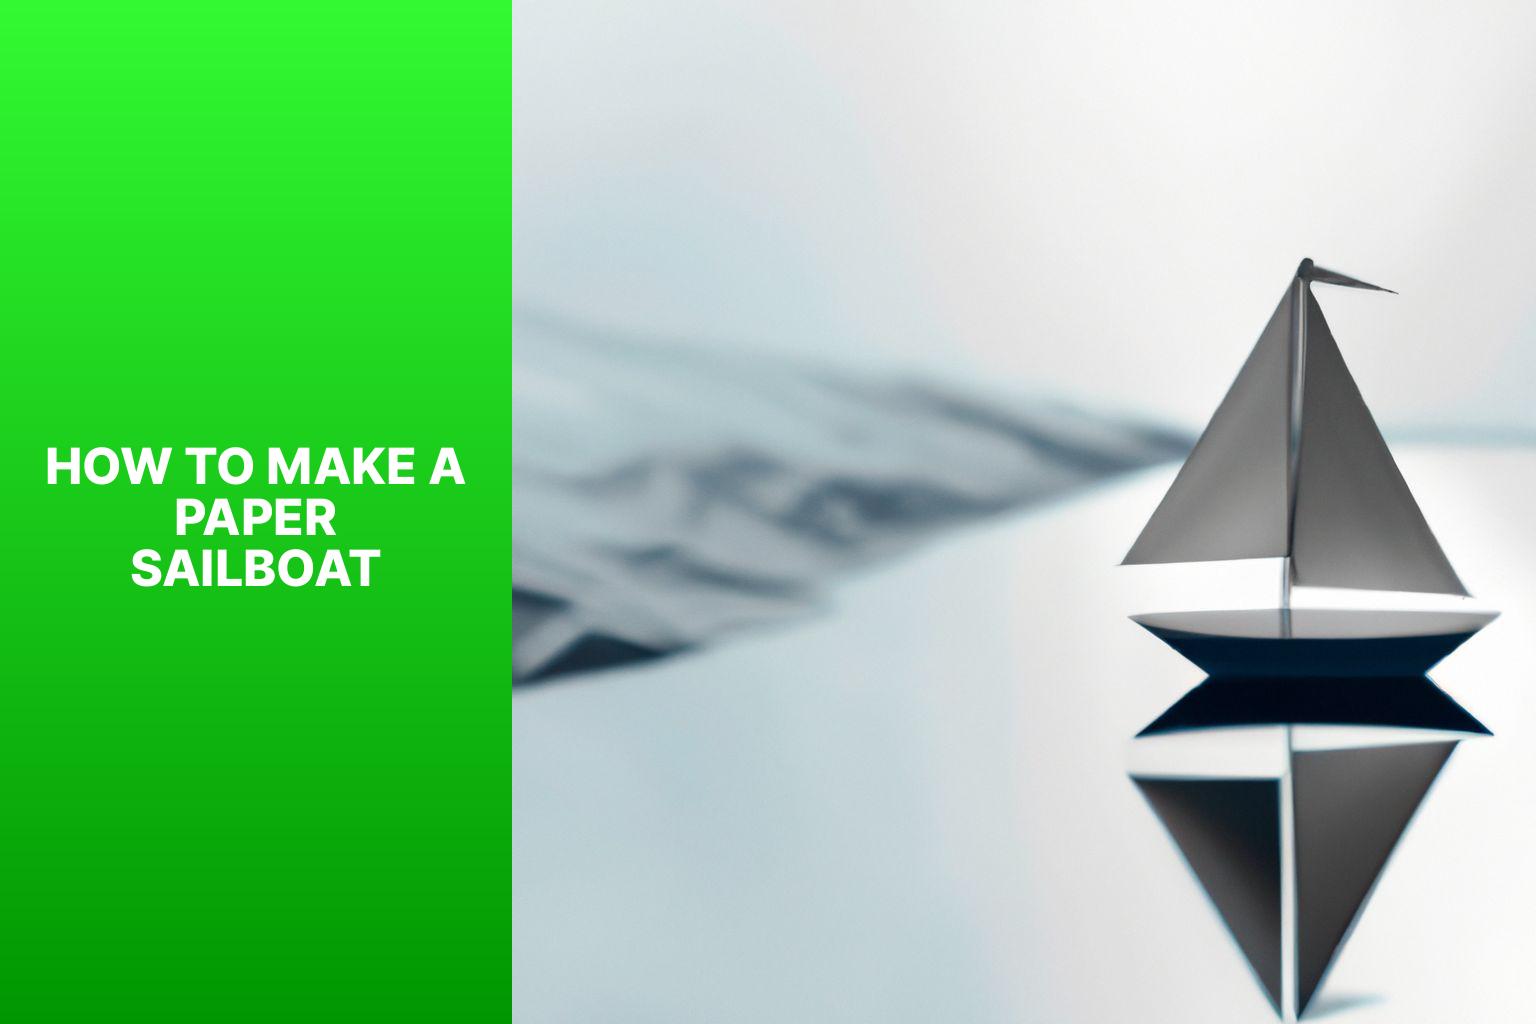
How to Make a Paper Boat
Last Updated: November 10, 2023 Fact Checked
This article was co-authored by Robert Homayoon . Robert Homayoon is an Origami Expert known for his engaging YouTube videos and accessible instructions. He has been teaching origami on YouTube since 2009. His channel has a following of over 676,000 subscribers, and his videos have garnered over 211 million views. Robert uses his channel to highlight his passion for teaching people origami, crafts, and how to solve puzzles. He graduated from SUNY Albany in 2007 and earned his D.M.D degree from Temple University Dental School in 2013. There are 7 references cited in this article, which can be found at the bottom of the page. This article has been fact-checked, ensuring the accuracy of any cited facts and confirming the authority of its sources. This article has been viewed 4,460,111 times.
Making an origami paper boat is a great activity that’s easy to finish and doesn’t require a lot of materials. The beauty of making a paper boat is that you only need one piece of printer paper to complete the task! By folding the paper with sharp creases and shaping it carefully, you can make a great-looking origami boat in minutes. We'll walk you through folding your own paper boat with our complete step-by-step instructions.
Creating the Initial Folds

- To strengthen the crease, run your finger down the fold 3-4 more times.
- You should now have 2 creases along both centers (x-axis and y-axis) of the page.
- Use the crease you made before to help line up the folds coming in from the corners.
- The 2 folds should line up with each other.
Tip : When you go to fold the second side, use the first fold as a reference point.
- The flaps closest to you should be folded in front of the back flaps, not over them. If you fold over the back flaps, you won’t be able to fold the back flaps themselves.
Making the Final Folds
- Crease the paper along its edges so that it stays in the square shape.
- The bottom of the diamond should be the part of the paper with extra folds.
- The bottom corners will line up to become the bottom point of a square diamond.
- You may need to pull up the triangle inside the diamond while pulling apart the two sides. Try to keep the triangle inside the diamond sticking straight up as this will be your boat's "mast."
- You can reinforce the corners with clear tape and tape around the bottom to keep your boat dry.
Tip : Waterproof your boat! Use a waxed paper from an art store to make your boat last longer, or color one side of the paper completely with a crayon. You can also try to make your boat out of aluminum foil.
Expert Q&A

- If you are floating your boat on a large body of water, like a pond, you can tape string onto one end of the boat. Hold on to the other end of the string so that it doesn't float away! Thanks Helpful 311 Not Helpful 146
- Try to get the edges of the paper to line up. An evenly made boat means less chances of tipping over. Thanks Helpful 58 Not Helpful 32
- If you are making a tiny boat, don’t float it on a big body of water. You may lose it! Thanks Helpful 16 Not Helpful 11
Tips from our Readers
- If you don't have specialty supplies like wax paper or crayons, no need to fret. You likely already have the tools to waterproof your delicate paper boat right at home. Simply construct two separate boats out of ordinary printer or construction paper. Then, gently place one inside the other, nesting them together into a double-walled vessel. This should reinforce them to better withstand water without getting too soggy. Though, test float gently, as the extra weight could cause sinking if the little boat gets overburdened.
- Missing wax paper for true waterproofing? Simply equip your artist's toolkit by raiding the crayon bin! Thoroughly color one whole side of the boat with thick crayon before setting it afloat in a pool, pond or puddle. The waxy buildup should act as a shield against light water exposure. Though if embarking on choppier seas, extra reinforcements may still be needed, matey!
- Forego the plain printer paper and opt for fun vibrant colors and patterns! Tissue paper can make for a festively hued sail, but be extra delicate as it shreds easily, especially once wet. For best durability, stick to construction paper or card stock to give your boat more sturdiness as you launch it into the open water.

- Make sure you don't have any holes, as one little hole can turn into a huge rip. This could be good in a procedural text. Thanks Helpful 13 Not Helpful 3
You Might Also Like

Expert Interview

Thanks for reading our article! If you’d like to learn more about origami, check out our in-depth interview with Robert Homayoon .
- ↑ https://ussconstitutionmuseum.org/wp-content/uploads/2018/09/Make-a-Paper-Boat-Hard.pdf
- ↑ https://www.youtube.com/watch?v=b3QZpBL8-Tg#t=1m20s
- ↑ https://www.origamiway.com/origami-boat.shtml
- ↑ https://kids.nationalgeographic.com/nature/article/make-a-paper-boat
- ↑ https://www.origamiway.com/origami-boat-2.shtml
- ↑ https://www.youtube.com/watch?v=b3QZpBL8-Tg#t=2m54s
- ↑ https://kids.nationalgeographic.com/explore/nature/make-a-paper-boat/
About This Article

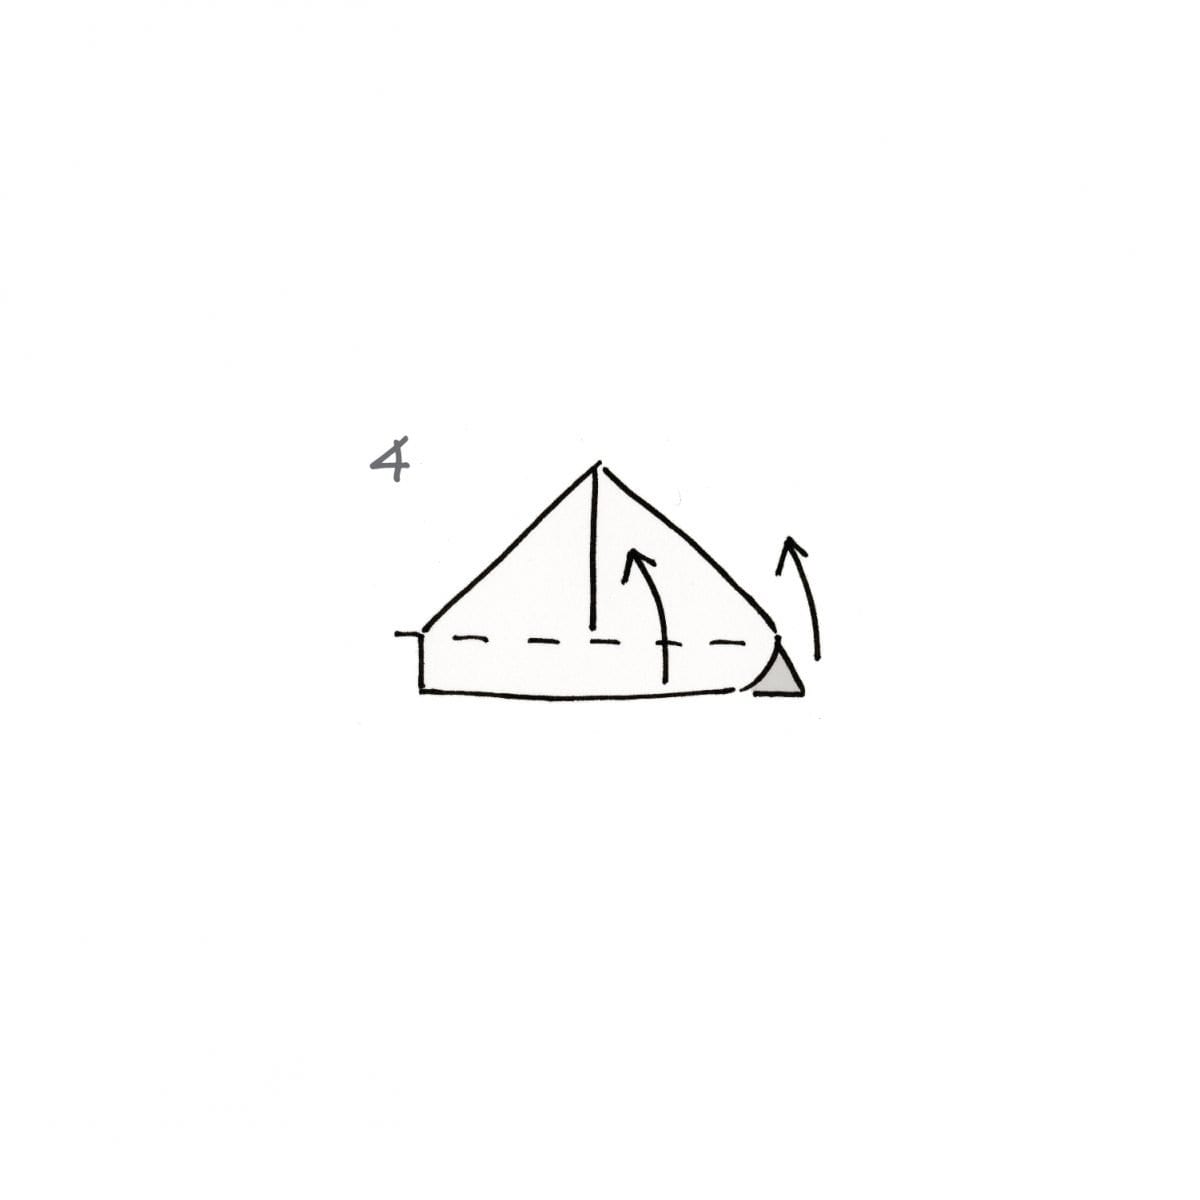
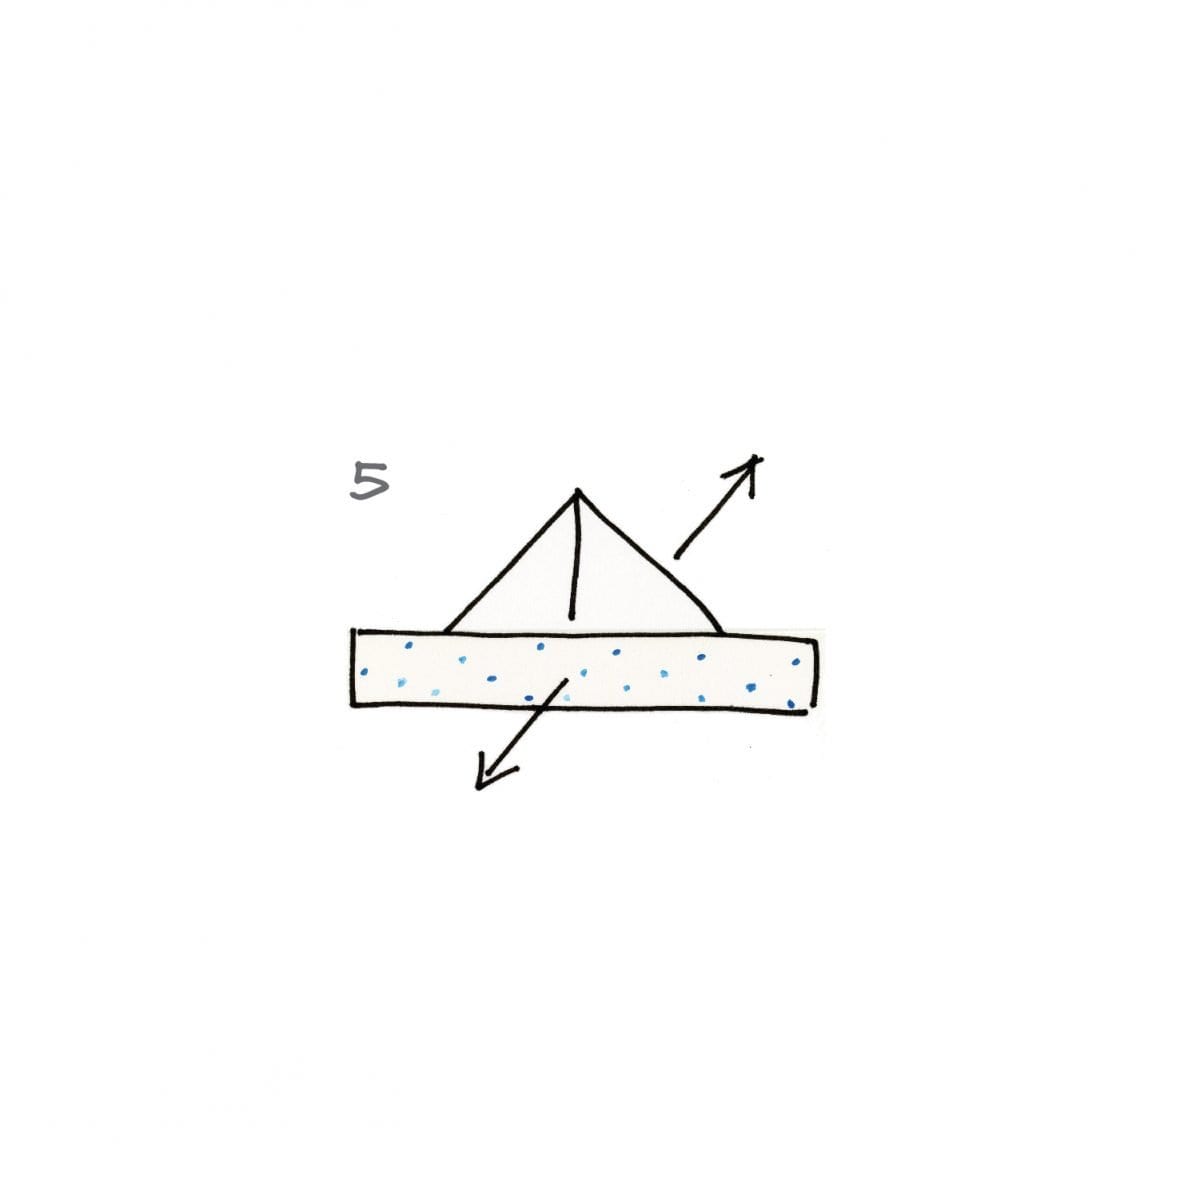
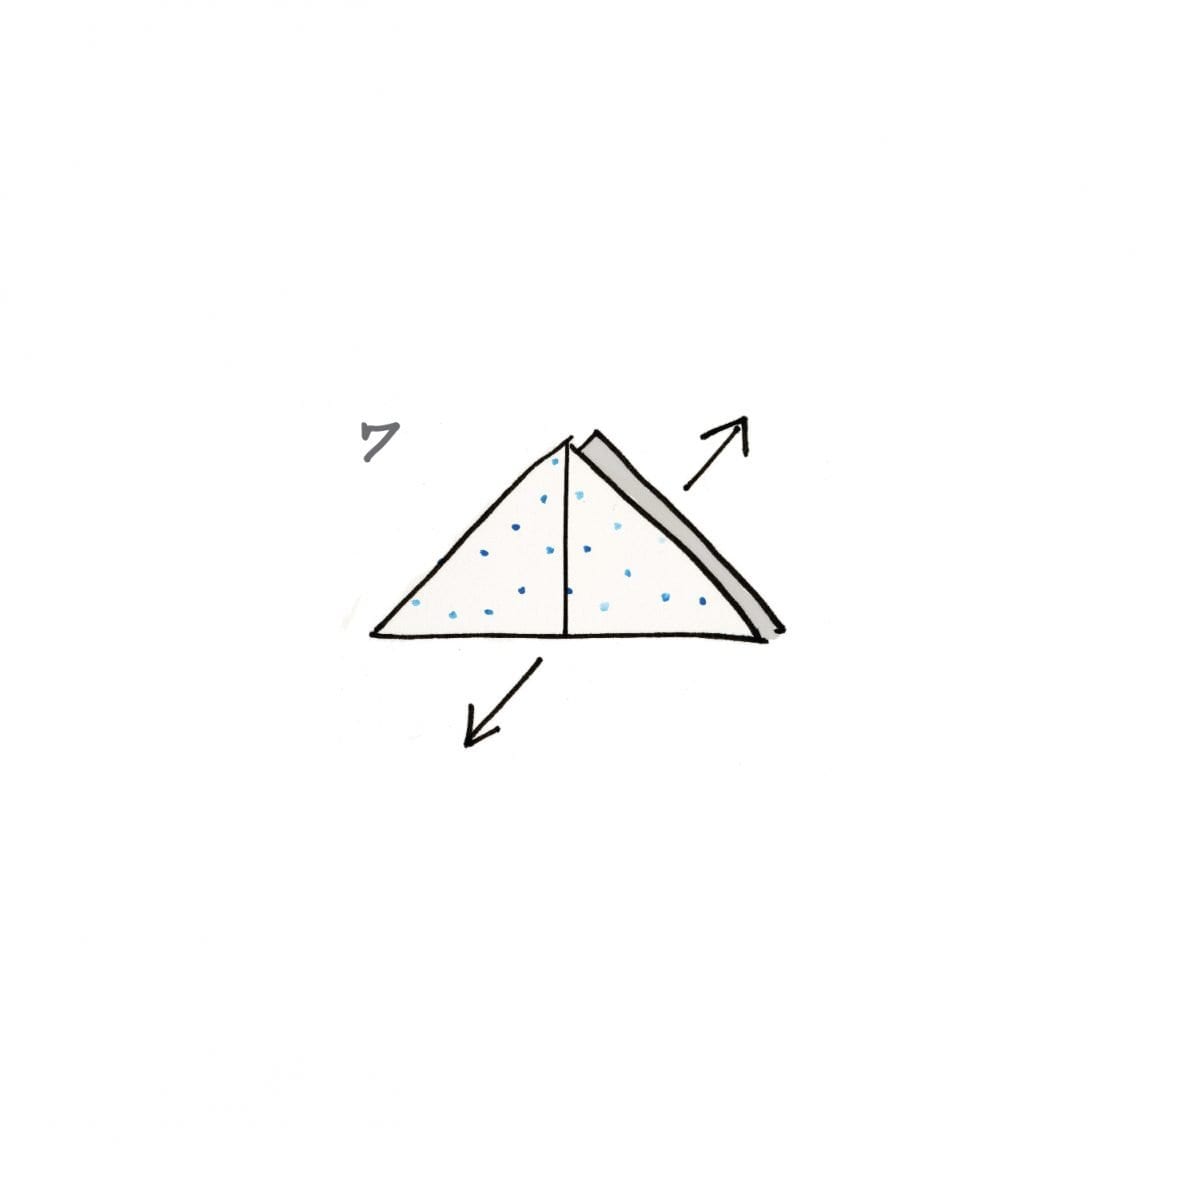
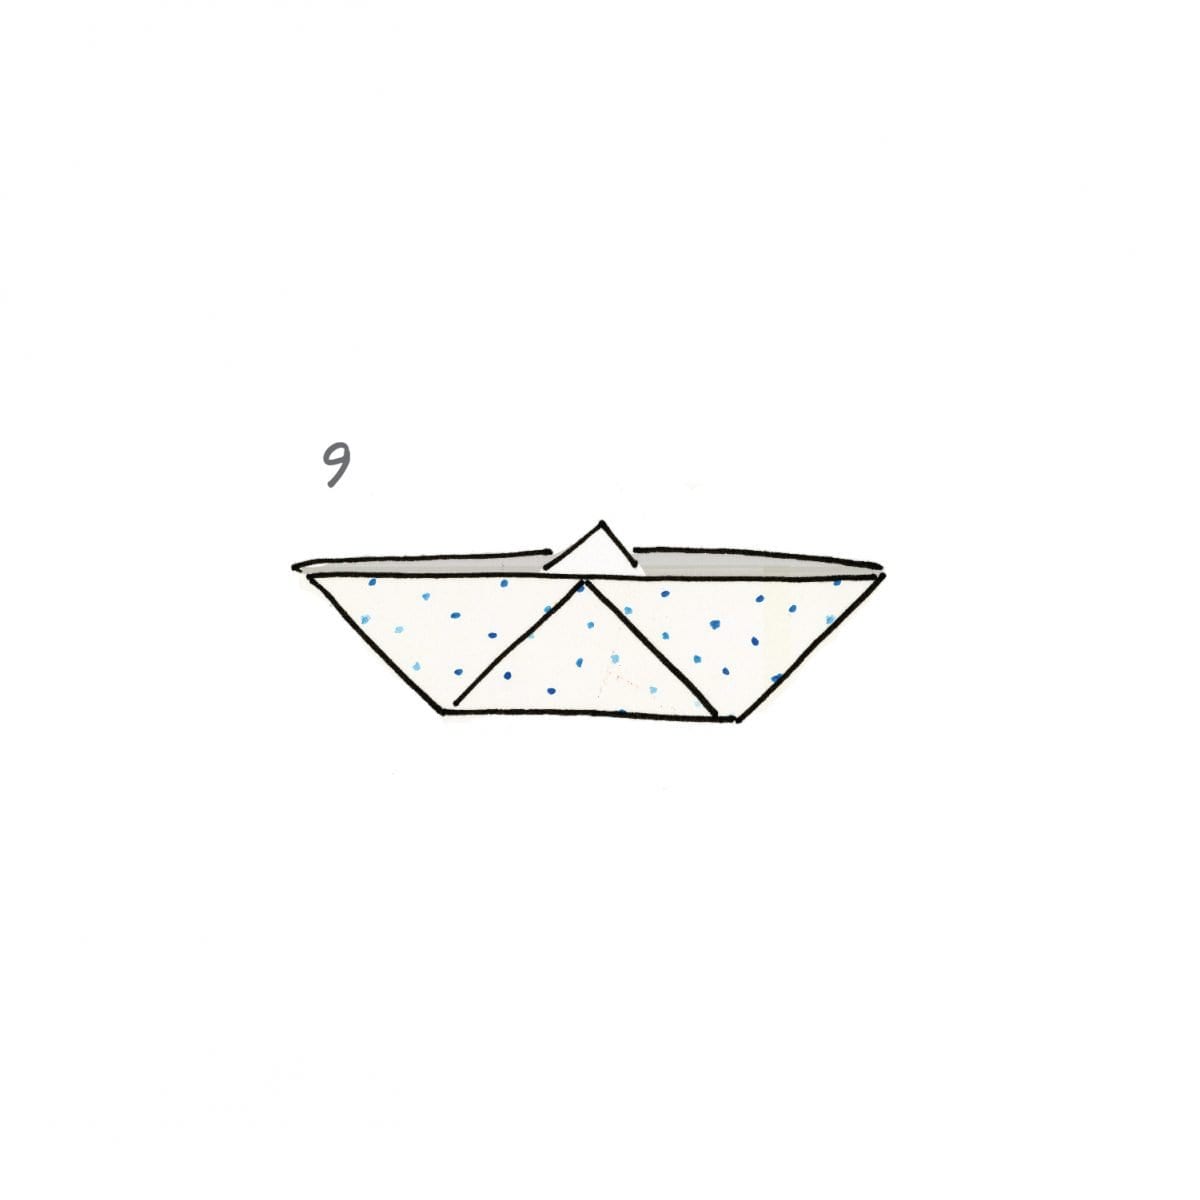
If you want to make a paper boat, fold a piece of paper in half from top to bottom. Then, fold it again from side to side and unfold so you have a crease in the center. Fold the top right corner down towards the center. Next, flip the paper over and fold the other corner down on the other side. Fold each of the bottom edges of the paper up and outwards to make a paper hat shape. Then, open the hat and flatten it horizontally to create a diamond. Fold the bottom edge of the diamond upwards towards the top. Then, turn the paper over and repeat on the other side. Pull the paper apart again and smooth it out to create a boat shape. Did this summary help you? Yes No
- Send fan mail to authors
Reader Success Stories
Emily Rehak
Jul 9, 2016
Did this article help you?
Ken Cunningham
Apr 4, 2016
Desmond Hodges
Jul 1, 2019
Georgiana Lings
Nov 9, 2016
Matthew Griffin
Mar 29, 2022

Featured Articles

Trending Articles

Watch Articles

- Terms of Use
- Privacy Policy
- Do Not Sell or Share My Info
- Not Selling Info
Don’t miss out! Sign up for
wikiHow’s newsletter
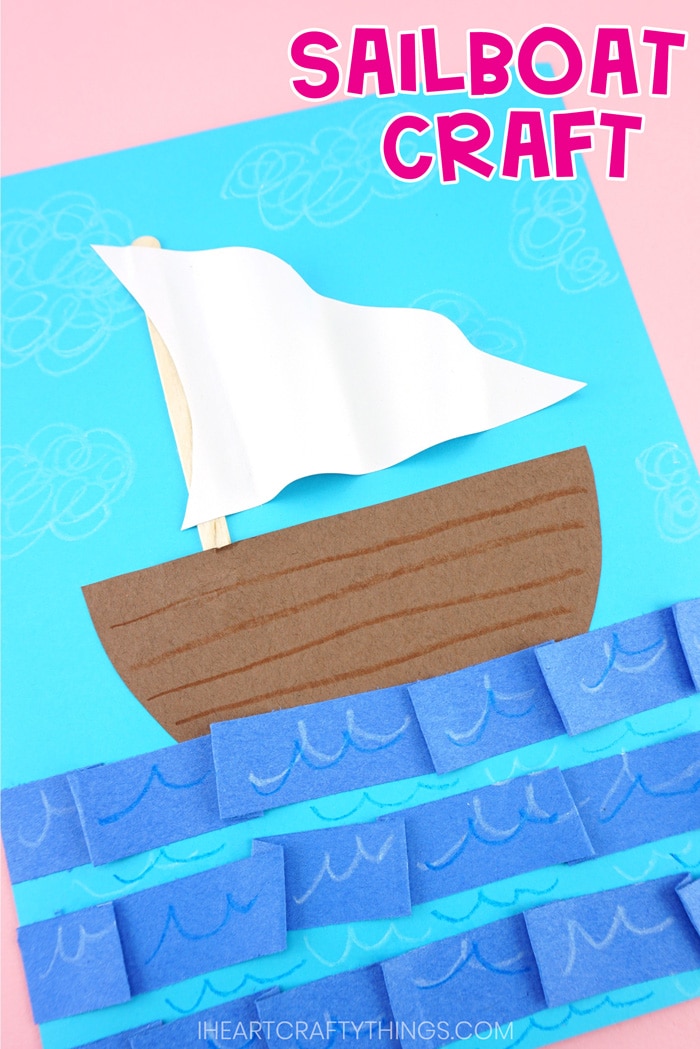
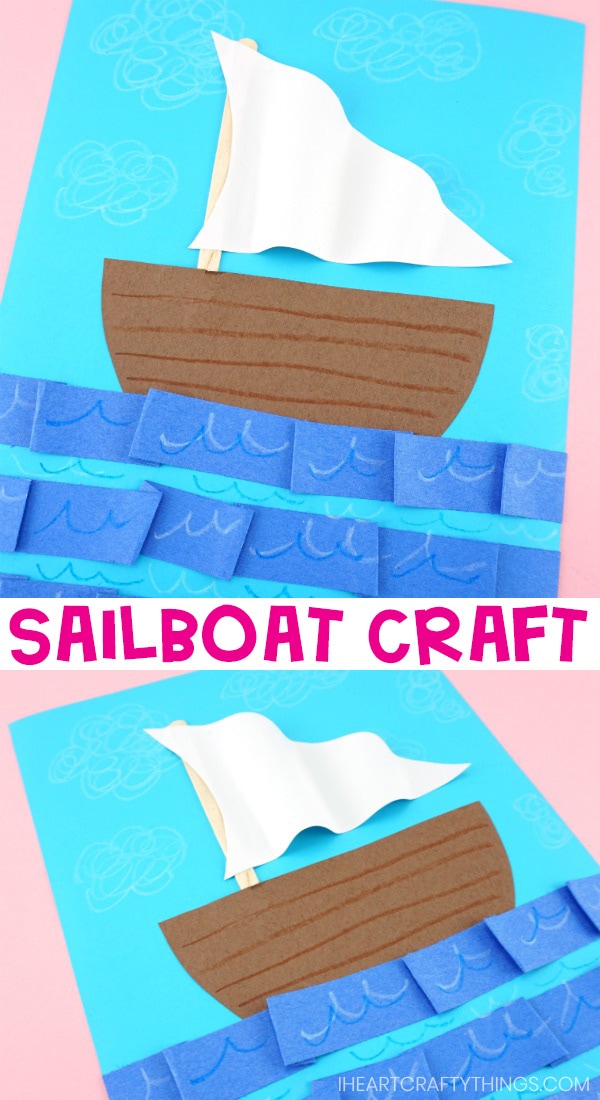
Making an Easy Origami Boat
:max_bytes(150000):strip_icc():format(webp)/chrissy-pk01-56a6d65e3df78cf772907c07.png "paper yacht craft")
The Spruce Crafts / Chrissy Pk
- Total Time: 10 mins
Origami comes from the Japanese. The word means the art of folding paper. " Ori " means "folding," and kami means "paper." In modern usage, the word "origami" is used as an inclusive term for all folding practices. The goal is to transform a flat square sheet of paper into a finished sculpture through folding and sculpting techniques.
Learn how to make the most well-known origami boat with this quick and easy step-by-step tutorial. This origami boat can also float in water .
Watch Now: How to Make an Origami Boat
This origami boat is a great model to teach kids. It is similar to the origami hat that you make with newspaper. Also, origami can be a great math-related activity for kids as your child creates using geometry.
What You'll Need
- 1 Rectangular sheet of paper
Instructions
Make the first folds.
Start with your rectangular paper, orient it vertically, with the long edges going up and down. Fold the bottom half up to the top.Fold the bottom right corner over to the left corner and make a small pinch, just enough to crease the paper. Open it back up.
Create a Triangle Shape
Using the crease as a guide, fold the left and right bottom corners up and to the middle. Flatten the folded pieces down. Rotate the paper. Fold one layer from the bottom up along the bottom of the front flaps.
A Boat Begins to Take Shape
Flip the paper over to the other side. Fold the bottom edge up in the same way. Unfold, and then fold the bottom right corner in along the crease you made. Repeat on the bottom left flap.
Form the Bottom of the Boat
Re-fold the bottom edge back up. Open the bottom of the model. Look at the corners. Flatten and then insert the overlapping flap on the left underneath the right section.
Continue Folding
Fold one layer up to the top. Repeat on the back. Open the bottom of the model.
Finalize the Folds
Pull apart the left and right flaps. Flatten it out, in the shape of a boat. Open it slightly. The triangle in the middle resembles a sail.
More from The Spruce Crafts
- How to Make a Cute Origami Sail Boat!
- How to Make an Easy Origami Dollar Shirt
- Origami Star Box Tutorial
- How to Fold an Origami Heart Bookmark
- Traditional Origami Lily Flower Instructions
- Fold a Square Paper Into Fifths
- Easy Origami Envelope Instructions
- How to Fold a Horizontal Pull Tab Note
- How to Make Cute Origami Fish
- Folding a Traditional Origami Crane
- Easy Origami Bow Tie Tutorial
- Origami Envelope Box Tutorial
- Easy Rectangle Origami Box Instructions
- How to Make an Origami Corner Bookmark
- Making an Origami Kusudama Flower
- How to Make an Easy Origami Rose
Creating Your Own Origami Boat: A Step-by-Step Guide
Origami boats, often referred to as paper boats or origami paper boats, are a delightful and easy craft to create, making them an ideal activity for kids and adults alike. The art of folding paper into intricate shapes has captivated people for centuries, and making an origami boat is a perfect introduction to this ancient craft. With a few simple folds and a bit of patience, you can make your very own paper boat that can float and sail just like the real thing. In this guide, we will walk you through the steps to create your very own origami boat.
video courtesy of White Origami
Materials You'll Need
Before we dive into the origami boat instructions, gather the materials you'll need. All you require is a sheet of origami paper or printer paper, a flat surface to work on, and a pair of hands ready for some fun folding!
Step 1: Preparing the Paper
Begin with a square piece of origami paper. If you're using printer paper, you can easily transform it into a square by following these steps:
Start with a rectangular piece of paper.
Fold one corner diagonally to the opposite edge to create a triangle shape.
Trim off the excess paper along the bottom edge, leaving a triangle.
Unfold the triangle, and you now have a square piece of paper.
Step 2: Creating the Initial Folds
Place the square piece of paper in front of you with one corner pointing upwards. Follow these steps to create the initial folds:
Fold the paper in half diagonally to form a triangle shape.
Unfold the triangle and then fold it in half diagonally the other way. You should have a crease forming an "X" on the paper.
Unfold the triangle again to return to the square shape.
Step 3: Forming the Boat Shape
With the square origami paper in front of you, follow these steps to create the boat shape:
Fold the bottom edge of the paper up to the top edge, creating a rectangle.
Rotate the paper so that the open edge is facing towards you.
Fold the bottom edge of the paper up to the top edge once more, creating a narrower rectangle.
Unfold the paper completely.
Step 4: Making the Bottom Folds
In this step, you'll create the folds that will form the bottom of the origami boat:
Fold the bottom corners of the paper up to the top point, aligning them with the center crease.
You'll notice that the paper now has a boat shape forming, with triangular flaps at the bottom corners.
Step 5: Folding Up the Boat Sides
Create the sides of the origami boat by following these instructions:
Take the bottom right corner of the paper and fold it up to the center crease, aligning the bottom edge with the crease. Repeat this step for the bottom left corner.
Turn the paper over and repeat the previous step on the other side. You should now have a boat shape with a pointed top and folded sides.
Step 6: Forming the Boat's Bottom
To complete the boat's structure, follow these steps to form the bottom:
Fold the bottom edge of the boat shape up towards the top point, creating a triangular flap.
Gently pull the triangular flap away from the boat and open it up.
Flatten the flap down to create the bottom of the boat.
Step 7: Creating the Boat's Sail
Origami boats can have sails to add a playful touch. Here's how to create a simple sail for your origami boat:
Take a rectangular piece of paper (you can use origami paper, foil paper, waxed paper, greaseproof paper, or even aluminum foil).
Fold the paper in half lengthwise to create a crease in the center.
Unfold the paper and then fold the top corners down towards the center crease, forming a triangle shape.
Fold the bottom edge of the paper up to the crease you made in the previous step.
Flip the paper over and fold the bottom corners of the triangle towards the center line, creating a smaller triangle at the top.
Insert the triangular sail into the open flap on your origami boat, and voila, your boat has a sail!
Step 8: Final Touches
Your origami boat is now complete and ready to set sail! Make any necessary adjustments to ensure the boat's stability and balance. If you're planning to float your origami boat in water, consider using waxed paper or greaseproof paper for added durability. You can also experiment with different paper sizes and colors to create a fleet of origami boats.
Creating an origami boat is a rewarding and enjoyable craft that can be enjoyed by people of all ages. With a few simple folds, you can transform a flat square sheet of paper into a charming boat that can float and sail on water. Origami boats are a perfect activity for kids, offering a blend of creativity and hands-on learning. So, gather your materials, follow the easy origami boat instructions, and have fun creating your very own fleet of paper boats. Whether you're a seasoned origami enthusiast or new to the world of paper folding, making an origami boat is a delightful and fulfilling experience that brings joy and creativity to the craft table.
- Recent Posts

- Cricut Hat Press: A Comprehensive Guide on Usage - August 13, 2023
- Unlocking Creativity with the Cricut Joy: A Comprehensive Guide - August 12, 2023
- The Ultimate Guide to the Cricut Maker Bundle - August 11, 2023
Related Posts:

- Paper boats: Unveiling the art of origami sailing
The world of paper boats is a captivating blend of art, creativity, and hands-on craftsmanship. Origami, the ancient Japanese art of paper folding, takes on a maritime twist as enthusiasts delve into the intricate world of crafting delicate paper boats. Whether you're a seasoned origami artist or just starting on your paper-folding journey, the art of making paper boats offers a delightful and imaginative experience.
The basics of boat origami
Origami, derived from the Japanese words "ori" (folding) and "kami" (paper), is an age-old tradition that has evolved into a contemporary art form. Boat origami, a subcategory of this craft, allows you to transform a simple sheet of paper into a charming vessel that captures the essence of sailing. It's a creative process that requires precision, patience, and a touch of artistic flair.
Read our top notch articles on topics such as sailing, sailing tips and destinations in our Magazine .
How to make a paper boat: Step-by-step guide
Creating a paper boat is a joyful journey that starts with a single sheet of paper and ends with a miniature masterpiece. Follow these step-by-step instructions to craft your very own paper boat:
- Begin with a square piece of paper, colored or plain.
- Fold the paper diagonally to create a triangle.
- Unfold the triangle and lay it flat.
- Fold the two bottom corners upward to meet at the center crease.
- Rotate the paper so that the pointed end is facing away from you.
- Fold the bottom edge of the paper up to meet the top edge, creating a rectangle.
- Unfold the rectangle and return to the triangle shape.
- Gently lift the top layer of the triangle's pointed end and fold it downward.
- Flip the paper over and repeat the fold on the other side.
- Carefully open the flaps on the bottom of the triangle to form the boat's hull.
- Press the sides of the hull to create a flat bottom.
- Your paper boat is now ready to set sail!
Paper boat.
Navigating origami: Tips and techniques
As you embark on your paper-folding adventure, consider these valuable tips to enhance your origami boat-making experience:
- Choose the right paper: Select a paper that is neither too thick nor too thin. Origami paper, often square in shape, is an ideal choice due to its lightweight and versatility.
- Precision is key: Accurate folding is crucial for successful origami. Take your time to ensure clean, crisp creases.
- Practice patience: Origami requires patience and attention to detail. Don't rush the folding process; take your time to achieve the best results.
- Experiment with sizes: Try making boats of different sizes to explore variations in folding techniques and artistic expression.
- Personalize your creations: Once you've mastered the basics, let your creativity flourish by adding your own unique touches to your paper boats.
Setting sail with paper: Creating origami boats
Crafting origami boats is more than just folding paper; it's about bringing a vision to life and celebrating the magic of creation. With each fold, you breathe life into a simple piece of paper, transforming it into a vessel of imagination that can inspire wonder and joy.
Crafting a paper boat: Instructions and materials
Before you dive into the world of origami boats, gather the following materials:
- Square origami paper or any square paper cut to size
- A flat, clean surface for folding
- Patience and a sense of adventure
Folding waves: Different styles of origami boats
Origami boats come in various styles, each with its own folding techniques and distinctive look. Explore these popular types of origami boats:
- Classic paper boat: The timeless design that captures the essence of childhood play and creativity.
- Sailboat: With the addition of a paper sail, this boat is ready to explore imaginary seas.
- Canoe: A sleek and elegant boat shape, perfect for creating a serene atmosphere.
From fold to float: Ensuring your paper boat sails
Making a paper boat that floats is a rewarding achievement. To enhance the floatability of your origami boat, consider these tips:
- Use lightweight paper: Opt for thinner paper to ensure that your boat is buoyant and able to float on water.
- Seal the edges: Apply a small amount of glue along the edges of your boat to prevent water from seeping in.
- Balancing act: Distribute the weight evenly within the boat to achieve better stability on water.
The magic of paper folding: Origami yachts
For those seeking a more intricate origami challenge, creating an origami yacht adds an extra layer of sophistication to your paper-folding journey. With careful folding and attention to detail, you can transform a single sheet of paper into a stunning yacht that showcases your creativity.
Unraveling complexity: Origami sailboat instructions
As you delve deeper into the world of origami sailboats, embrace the challenge of more complex designs. Follow detailed instructions and diagrams to fold intricate sailboat models that capture the intricate beauty of sailing vessels.
So what are you waiting for? Take a look at our range of charter boats and head to some of our favourite sailing destinations .
FAQs about origami
- Skip to primary navigation
- Skip to main content
- Skip to primary sidebar

Easy Paper Plate Boat Craft For Kids

Embark on a creative journey with a delightful Paper Plate Boat craft for kids. Easy and enjoyable activity that encourages imaginative play. Set sail today!

This paper plate boat is a fun summer craft that will row row row the fun throughout the Summer!
Summer holidays and boating - what a fun combination! But today, it's not about splashing waves out in the sea. It's about getting crafty and creative at home. Yes, I have another one of my super summer crafts for you - making a paper plate boat!
It's super easy, and it doesn't take much to make one. The best part? It's for kids of all ages. If you have toddlers, you can take over the cutting duty and let them do all the coloring and pasting. If you have grown-ups, well, they won't let you do much anyway. Ready to sail your paper plate boat? Let's get started.

Want to save this project?
Enter your email below, and then we'll send it straight to your inbox. Plus get awesome new projects from us each week.
Are Paper Plate Crafts Good for Learning?
Crafting, in general, is an amazing pastime. It fires the brain cells to think, be creative and come up with solutions. Plus, you'll be creating a learning environment without the children realizing it. Win-win!
As for paper plate crafts, they are fun and easy. There isn't much material required, which means little to no mess.
Besides the fun part, handling paper plates teaches kids to be careful and use their fine motor skills. It's like doing puzzles - only in arts and crafts form!
There's also a little scissor work involved, like cutting paper strips. It'll enhance the hand-eye coordination of your kids.

Simple Popsicle Stick Crafts
In addition to the paper plate, you will need a popsicle stick for this sweet sailboat craft. Popsicle sticks are one of our favorite simple supplies for crafting. They are super inexpensive and can create so many wonderful things with them.
These materials make it easy for children to create their little boats, inspiring their imagination to set sail on exciting adventures. Let their creativity flow as they transform basic items into a fun crafting experience. Perfect for an afternoon of family fun and creative playtime!
Don't miss our full list of Popsicle Stick Crafts

How to Decorate the Paper Plate Boats?
This paper plate boat craft for kids is as versatile as it gets. Your little ones can open the doors to their deep sea and pirate ship adventure imaginations. You can vary the decoration items you use. Pom poms, wiggly eyes, crayons, markers, and glitter glue - it's all up to you!
Since the idea is to unleash creativity, let the children do what they like. Give them fish stickers and watch their faces light up with joy. Kids love stickers!
If you're trying to teach them different colors, use a theme for the boat decoration and make sure each part of it is painted in a different hue. For instance, use blue paint for the bottom of the boat and yellow paint for the front sails.
You can also introduce different textures and materials here. Use a popsicle stick for the helm and attach a paper flag flying in the wind.
We also have a fun Juice Box Boat Craft , Sailboat Drawing , Ship Craft , and Origami Boat too!

How to Use This Sailboat Craft?
Are the paper plate sea boats ready? Great. Now let's bring them to use. Here are a few ways to use this great craft:
- Make personalized cards for birthdays or special occasions.
- Use the boats as centerpieces on the kids' table during a beach-themed party.
- Create a floating boat train by adding some string and attaching several vessels together.
- Make word and math association games with the boats.

Variations of the Paper Plate Boat
If you want to take the paper plate boat craft a step further, here are some variations for you:
- Use light cardboard instead of paper plates.
- Give the boat a 3D element with clay or pipe cleaners.
- Make the sailboat out of recycled materials.
Making a paper plate boat is the perfect way to combine a simple craft with learning activities. Your little boat lover will love to play with this new fun toy! As for you, it's a great stress-buster and quality time spent together.
So, get your supplies ready and set sail with this fun craft.
Check Out These Other Paper Plate Crafts !

Rainbow Fish Craft

Bunny Craft

Shark Craft

Pumpkin Pie Craft

Paper Boat Supplies
- Paper Plate
- Colorful Craft Paper
- Paintbrushes
- Craft Stick
How To Make a Boat Out of Paper Plate

Start with one plain paper plate.

Cut your paper plate in half.

Paint your paper plate boat. We started with a fun stripe along the top of the boat.

Finish painting your boat. We went with simple stripes.

Print out the sailboat template from the bottom of the page and then cut each template out.
*There are two sizes of sails. There is a smaller sail for small paper plate boats and one for general size. Use the size that fits your boat craft best.

We cut each sail out of a different piece of construction paper as well as the small circles.

Glue the tips of the larger sail to the top of the craft stick.

Next, glue the smaller sail to the back of the craft stick.

Glue the three blue paper circles in the middle of the boat.

Glue the bottom of the popsicle stick to the back side of the paper plate.

Viola, you have a sweet boat craft!
We highlighted this Paper Plate Craft along with some other fun kid's crafts in our Summer Crafts along with our 101+ Easy Kids Crafts .
You also do not want to miss our 101+ Printable Coloring Pages For Kids and 101+ Printables For Kids full of Crafts and Coloring Pages.

Other Fun Summer Ocean Crafts
- Paper Plate Crab
- Paper Plate Jellyfish
- Shark Color By Number
- Under The Sea Coloring Page
- Octopus Coloring Page

Download Boat Sails Free Templates
Enter your name and email address in the form below and you'll be taken directly to the free sailboat template pdf file.
*For personal use only
Paper Plate Boat Craft

- Craft Paint
- Sailboat Template
Instructions
CONNECT WITH MADE WITH HAPPY!
Be sure to follow me on social media, so you never miss a post!
Facebook | Twitter | Youtube | Pinterest | Instagram
Looking for crafts to keep your child busy? Sign up for my 5 Ridiculous HAPPY Activities in under 30 minutes for your kids delivered directly to your inbox!
Find and shop my favorite products on my Amazon storefront here!
PAPER PLATE BOAT
Pin it to your diy board on pinterest.
FOLLOW MADE WITH HAPPY ON PINTEREST FOR ALL THINGS HAPPY!

More Kids Crafts

Discover a world of creativity and joy with Alli Ward, the creative mind behind Made with Happy. From DIY crafts to delicious recipes, Alli brings happiness to every project!
Simple Paper Boat Craft
We have another fun project that pops! This 3D simple paper boat craft is a fun piece of crafty creativity that you can proudly display on the wall!

Row, row, row your boat gently down the stream… We have another construction paper craft idea to share with you, and as we love to do, we made it a bit of a 3D.
This boat craft is perfect to do in the classroom, as each of the students can make their own ship, decorate it however they see fit and then they can be put together into a magnificent display on the wall. Just imagine the fleet of these ships!
Ready to make this paper craft? Let’s do it!

How to Make a Simple Paper Boat Craft
What you need
- a sheet of white construction paper
- sheet of brown construction paper
- a sheet of blue construction paper
- red construction paper
- beige construction paper
Naturally these are the colors we used, you can go with any color combination you want.
You will also need;
Watch the Simple Paper Boat Craft Video Tutorial
Follow these step by step simple paper boat craft instructions.
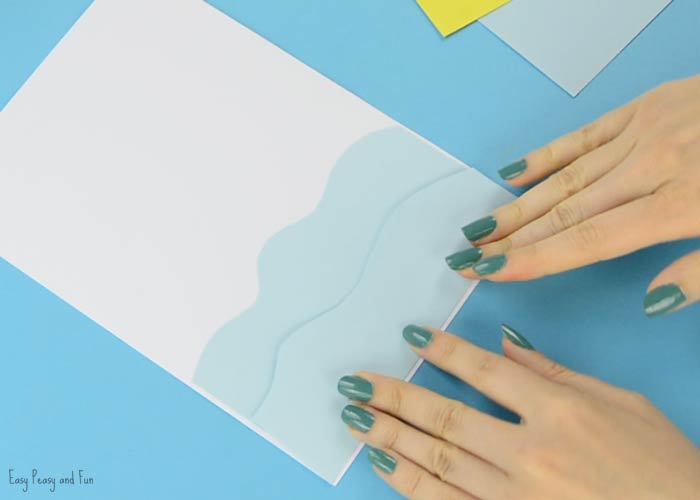
Let’s make some waves out of blue paper. If you have two shades of blue paper this will look even better.
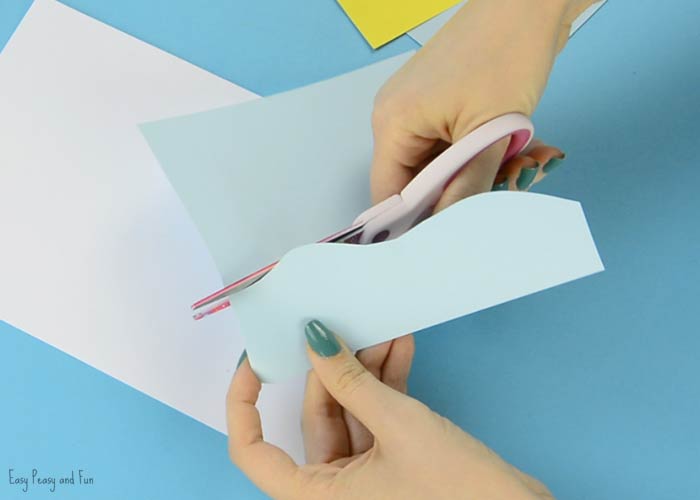
Glue the waves at the bottom of your white sheet of paper.
Cut a half circle out of brown construction paper.
Glue it on the waves.

Cut a thin but long strip out of brown paper. Stick it on your card.
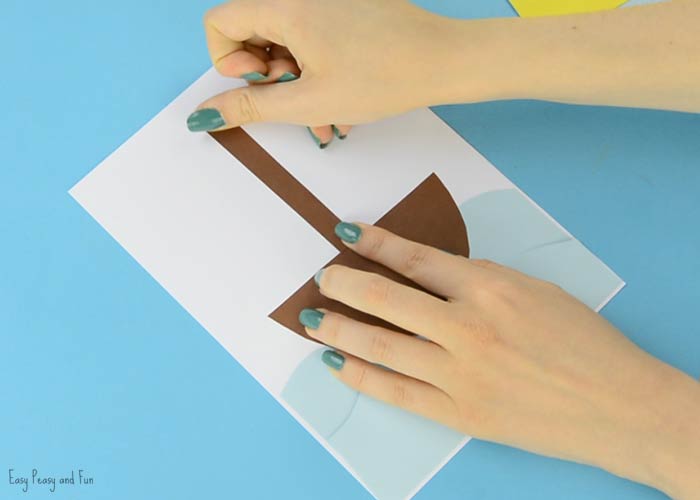
Let’s make a small flag out of red paper and glue it on the top of the strip.

Now comes the 3D part. Cut the sail.
Fold it at the top and bottom.
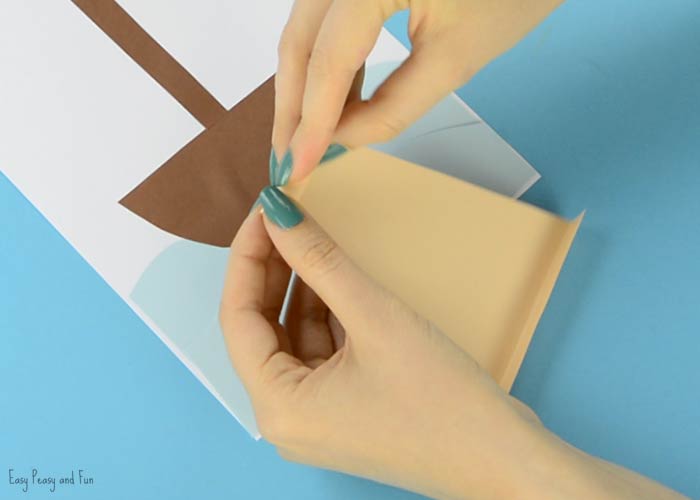
Apply glue on the folded flaps and press down on the boat.
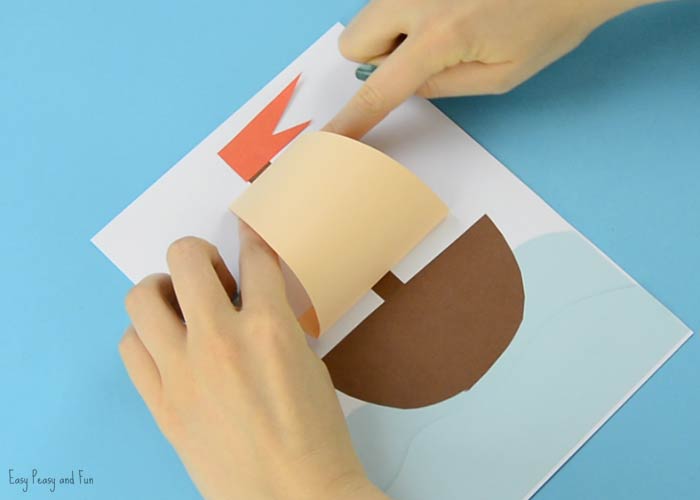
You just made a super duper simple paper boat craft!

Want instant access to all of our printable crafts, activities, and resources?

With thousands of crafts, activities, worksheets, coloring pages, and drawing tutorials to print, you will always have just the resource you need at your disposal. Perfect for parents and teachers alike!
Sign Up Now and Start Printing!
Related posts.

Nothing beats simple (and cute) crafts, and this ladybug paper craft we're sharing today certainly…

We got the simplest reindeer paper craft idea to share with you today, so grab…
Got a few red paper cups laying around and no idea what to do with…

It's turkey time! We have a super simple paper turkey craft tutorial to share with…

We love it when crafts are quick and fun and that's why this paper pumpkin…

It's been a while since we shared a paper plate craft, so it was about…
1 thought on “Simple Paper Boat Craft”
This boat looks cute, I think I can make a card then decorate this boat. Thanks for sharing it.
Comments are closed.
Trending post: Easy Cupcake Liner Flower Tutorial
How To Make An Easy Paper Boat
- Pinterest 34
Quick and easy to make a paper boat, step-by-step tutorial with pictures. It is a simple origami project from just a piece of paper and lots of fun!
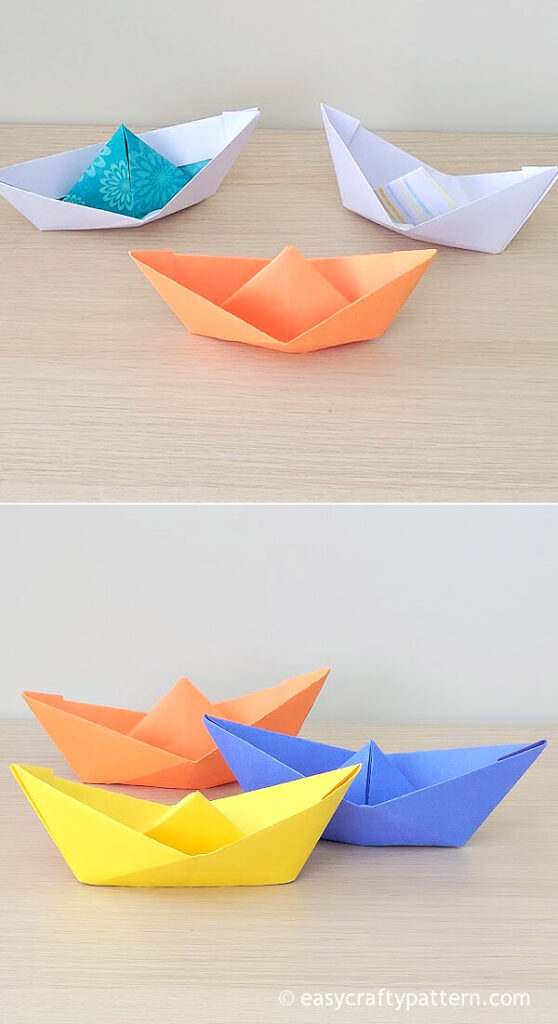
Origami Paper Boat
One of the simplest origami you can make to bring back memory and fun times. All you need to do is fold some paper a few times, add a few decorations or doodles you like, and your paper boat is ready in no time.

This paper boat is the exact one I used to make and play with when I was little. It is fun to make paper boats with various paper colours, and you can make them in different sizes too.
How To Make An Origami Boat
The only material you need to make a paper boat is print-size A4 paper. The colourful crafting paper is also fantastic for this project.
You can use stickers, pencil colour, or marker to add decoration or doodles.
The paper size should be rectangular. If you use a square shape like the paper specifically for origami, cut it into a rectangle for this project.

- Prepare the paper you like. First, fold the paper half downward or lengthwise. Next, fold it again in half, then open it up.
- Fold two corners on the top to the middle so both corners will meet up in the center along the folded line and resemble a triangle.

- Fold up both rectangle shapes under the triangle. Put your thumb on the opening right in the centre by the folded line.

Pull both corners in the opposite direction. Now the paper resembles a diamond shape folded paper.
- Press the paper flat. Fold the lower side upward, align it with the top, and do the same for the opposite side.

Put your thumb on the opening right in the centre by the folded line. Then pull both center lines in the opposite direction so you will have diamond shape paper.
- Slowly pull both of the top parts outward in opposite directions. Adjust the paper boat to smoothen up the fold if needed.
- Your paper boat is ready.
How To Play With The Paper Boat
A paper boat is floating in the water. That’s how I used to play with it. I had so much fun racing the paper boat on the bucket of water.

Because it is made of paper, it will float, but it is not waterproof. However, you can add clear tape or Mod Podge to seal the bottom of the boat to last longer.
Put the paper boat in a shoebox-sized plastic container with some small figurines. That sure will provide hours of fun.
If they like, let them decorate or doodle on their paper boat before putting it in the water.
More Easy Origami
- Paper Frog Puppet
Easy Step-by-Step Origami Paper Boat Tutorial

- A4 paper size or colourful crafting paper
- Pencil or marker (optional)
Instructions
- Pull both thumbs in the opposite direction. Now the paper resembles a diamond shape folded paper.
- Again, put your thumb on the opening right in the centre by the folded line. Then pull both center line in the opposite direction so you will have diamond shape paper.
- See the step-by-step picture tutorial for more detail.
- Use smaller size rectangle paper to make a small size boat.
Leave a Reply Cancel reply
Your email address will not be published. Required fields are marked *
Save my name, email, and website in this browser for the next time I comment.
Paper Boat Craft (Free Template)
Download the free boat craft template and make this transportation activity for preschoolers. find step-by-step instructions and easy paper crafts on craftingjeannie.com.

Check out this Easy Paper Boat craft! Kids will love making it.
Get the Free Boat Craft Template below and you will be able to make enough supplies for a group of 20 kids (or more!) with about 10 minutes of cutting .
Watch the Preschool Boat Craft Video to do this Transportation Craft.
Did you know that there are three ways a boat can move: manpower, wind and motor? Read all about them on Wikipedia.com .
Here’s What You Need
Here’s your ship craft supply list (This post contains affiliate links to the products mentioned. Read my disclosure policy for more information):
- Free Boat Craft Printable <— Get it Here!
- construction paper , colored copy paper , or colored cardstock
- glue sticks
Make this Paper Boat craft for Preschool while reading these Fun Books:

Step 1: Download and Print the Free Boat Printable
Download the Free Boat Craft Template . You will be stapling the template to sheets of colored paper to cut out the shapes.

Step 2: Staple and Cut Out the Paper Ship Craft Shapes

Once you have the print outs, staple them to construction paper and cut out the shapes you need.
Note: If you want to make this craft with a group of kids, you can staple the template to up to 10 sheets of copy paper, 5 sheets of cardstock or 5-8 sheets of construction paper.
So, did you know that you can staple together 10 pieces of copy paper and cut out 10 shapes at a time?! That’s my SECRET to fast & easy crafting. Stapling the paper is very important because it makes sure it doesn’t move as you cut. The more staples the better. Cardstock is the thickest so you may only be able to cut 5 sheets at a time.
Tip: While you’re cutting, if you cut off all parts of the pages that have staples, make sure to re-staple the sheets that are left. Whenever you’re cutting multiple sheets at a time, make sure they are always stapled together!
Step 3: How to Assemble

I recommend having a finished boat so the children can see what the final version will look like.
- Glue the wheel house behind the top of the boat.
- Glue the white window onto the wheel house.
- Glue the life preserver ring onto the boat wherever you like.
- Next, glue the colored circle into the center of the li.
- Optional: Glue the white pinstripe rectangle onto the body of the boat.
- Optional: Glue the anywhere you like on your boat.
- Don’t forget to write your name on the back!

Step 1: Glue the wheel house behind the top of the boat.

Step 2: Glue the white window onto the wheel house.

Step 3: Glue the life preserver ring onto the boat wherever you like.

Step 4: Next, glue the colored circle into the center of the life preserver ring

Step 5: Optional: Glue the white pinstripe rectangle onto the body of the boat

Step 6: Optional: Glue the flag anywhere you like on your boat. Don’t forget to write your name on the back.
And you’re finished!
This is a great Transportation activity for preschoolers. It’s also the perfect boat craft just for fun. Make it with your Preschoolers, Kindergarteners, Toddlers, Daycare, or as a craft at home.
More transportation activities for early years.
If you liked this craft, check out some of my other Transportation Crafts for Kids .

- Easy Rocket ship Craft – Make this simple outer space craft with your little ones.
- Easy Race Car Craft – This car craft is super easy and super fun.
- Train Craft – The train lover in your family is going to love this fun train craft
- Preschool School Bus Craft – Get ready for back to school with this simple school bus craft
- Airplane Craft with Free Template – This airplane let’s your little one’s imagination soar.
- Preschool Fire Truck Craft – Talk about community helpers with this fire truck craft.
As always, I try to make my crafts fast, easy & inexpensive. Enjoy!
Download the Free Boat Craft Template
Your Name (required) Your Email (required)
Want to remember this Paper Ship Craft? Post it to your favorite Pinterest board!

Paper Boat Craft with Free Template – Transportation Activity for Preschoolers – Easy Paper Crafts for Kids
Leave a comment cancel reply.
Your email address will not be published. Required fields are marked *
No products in the cart.

How to Make a Fun Origami Paper Boat
Do you like making origami paper boats? Origami is fun, but it can be even more fun if you make the boat out of origami paper! This tutorial will teach you how to make an origami boat with just one piece of paper.
It’s also a great craft for kids , since it requires no cutting or gluing and is very simple to fold. Let’s get started!
Supplies Needed for the Paper Boat Origami
- Coloring Paper
- Crayola Markers
- or Colored Pencils
1. Origami Paper

2. Crayola Markers
3. Colored Pencils

If you love Origami, then click the links below!
- What Is Origami?
- What Does Origami Mean?
- The Wonderful History Of Origami Drawing
- Origami Easy for Kids
- Fun Easy Origami
- Birthday Origami Ideas
- 30 Origami Animals
- 25 Cool Origami
How to make an Origami Paper Boat?
This tutorial is a step-by-step guide on how to make a paper boat for your child to enjoy. It’s a fun activity for all ages, and a perfect rainy day activity.

Take a square sheet of paper, any kind of paper would work.

Fold in half.

Fold in half again.

Then take one of the triangle and fold it upwards.

Flip it and fold the remaining three triangles upwards.

Now you can see a pocket below.

Place your thumbs in it, stretch it and then press.

Take upper corners and stretch out.

That’s It! You have completed the Origami Boat.
Eazy Peezy, Lemon Squeezy!
Wrapping up How to Make a Fun Origami Boat
Origami paper boats are a fun craft that can be made by anyone. We’ve provided you with instructions for making an origami boat, but there are plenty of other designs to explore as well.
This is just one example of the many crafts and projects out there that don’t require any special skills! If you enjoyed this article or want more like it, please comment below so we know what our readers enjoy reading about.
Like and Share!
Similar Posts

Fluff up Your Day With This Easy, Fluffy Slime Recipe!
Are you looking for a fun and unique activity to do with your kids or friends? Look no further than this fluffy slime recipe ! This playful and squishy version of traditional slime has become a favorite among children and adults alike. Its airy texture makes it perfect for molding, stretching, and even sensory play….

Adorable Paper Garland (Holiday Craft)
I love paper garlands. I think they are the perfect way to add a little bit of color and fun to any space, but especially for parties! This project is so simple and quick that you can make many in one sitting. It’s also a great craft for kids because there isn’t much cutting involved…

Create Magical Paper Feathers
These paper feathers are so quick to make and requires only paper and scissors. If you want more of a glam feather then use glitter paper or gold foil cardstock. These feathers looks lovely as a gift topper. Paper Feathers Supplies needed: Paper Scissor Step 1: Take a sheet of paper, the size is completely…

Fun Eye-Catching Tissue Paper Flowers
In this tutorial you will learn these beautiful and unique tissue paper flowers. Tissue Paper Flowers Supplies needed: Tissue Paper (Royal Blue, Yellow and Pink) Wooden Skewers Scissor Glue Step 1 Take two colored rectangle sheets of paper. Place both the papers together and fold in half lengthwise. 3-4. Cut small fringes while leaving one…

How to make a fun Origami Jumping Frog with Free Flip Book
Learn how to make a fun Origami Jumping Frog with these easy step-by-step instructions. Origami is fun for all ages and makes a great activity for family gatherings! Follow the instructions below and learn how to make this simple origami jumping frog. Supplies Needed for the Jumping Frog Origami 1. Free Downloadable Frog Instructions 2….

Easy Christmas Card Craft Ideas
A handmade Easy Christmas Card Craft Ideas is your best option when you want to express your love and thanks. Of course, you could simply send an e-card and be done with it these days, but where’s the joy in that? True emotions cannot be evoked by a digital card. Nothing beats a handcrafted card…
One Comment
- Pingback: Origami Easy for Kids - CraftyThinking
Leave a Reply Cancel reply
Your email address will not be published. Required fields are marked *
Save my name, email, and website in this browser for the next time I comment.

Stimming and Autism: 15 Repetitive Behaviors You Need to Know

25 Best Social Skill Training Exercises for Children with Autism

What is High Functioning Autism? Signs, Symptoms and When to Diagnose.

20 Tips for Dating Someone with Autism Spectrum Disorder

10 Important Autism Traits and Everything You Need to Know About Signs of Autism

Alarming Rise in Autism: Data About the Increase in Autism Rates
Subscribe to our newsletter.
Subscribers get exclusive access to printable resources, special discounts, and early-bird notifications for our workshops.
Let’s keep the spark of creativity alive together! 🎨✨💌
32 Phonics Lessons
Up to 69% off
Teach your child to read.

Easy Paper Boat Craft for kids – Fun Summer Craft idea with Template
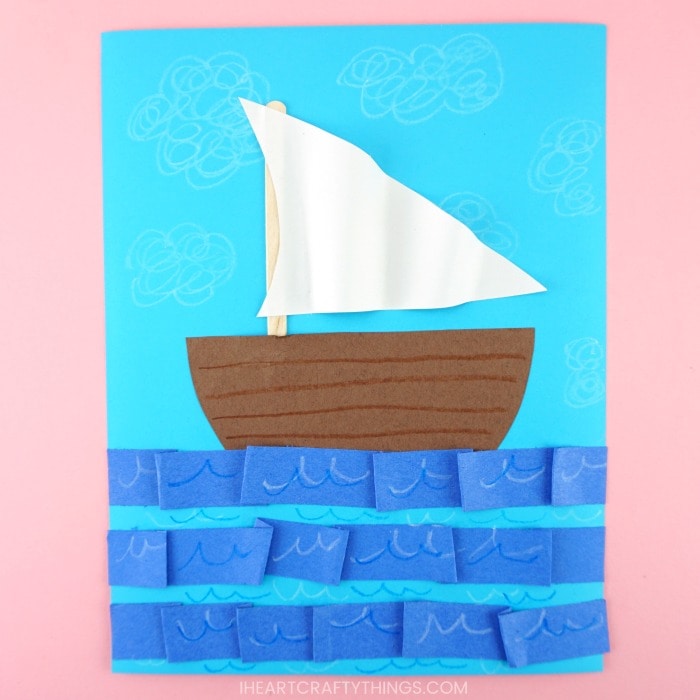
Have an afternoon full of adventure this summer by making this easy paper boat craft . Our printable template makes this sailboat craft super simple for preschoolers and kids of all ages to create.
If you are looking for a fun ocean themed summer crafts for kids to make, you are going to adore making some of these boats this year. The folded ocean waves adds awesome dimension to the paper craft and when mixed with the way the sail pops off the paper with a 3D effect, you are left with a stunning craft kids will love creating and displaying all summer long!

How to Make a Paper Boat Craft
This post contains affiliate links to the products mentioned. Read our disclosure policy for more information.
Supplies needed for making your paper craft
- sailboat craft template <—- Get your printable template here
- blue cardstock
- blue, brown and white construction paper
- craft stick
- extra strength glue stick
- pencil for tracing
Instructions for making this boat craft
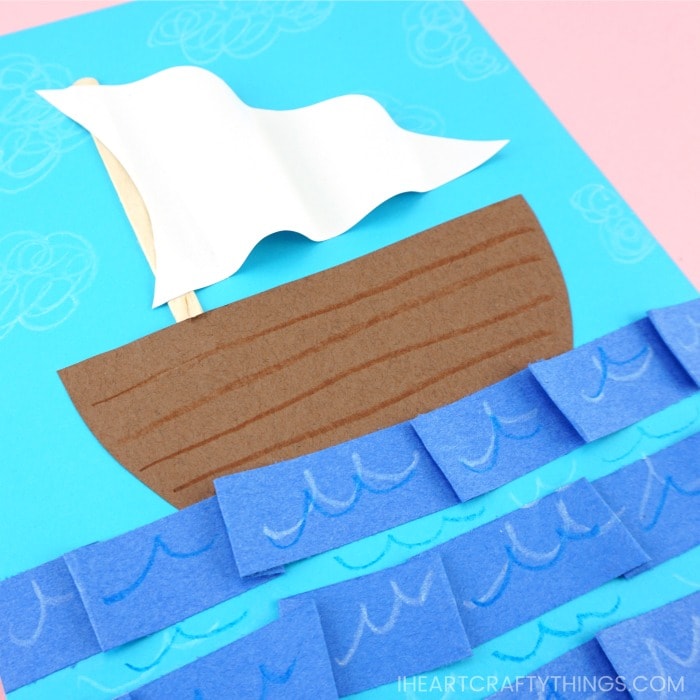
Step 1: Begin by downloading and printing out the sailboa t template . Cut out the two pieces of the template.
Step 2: Using a pencil, trace the sail on white construction paper and the boat on brown construction paper with a pencil. Cut out each of the pieces.
Related: Paper Hot Air Balloon Craft
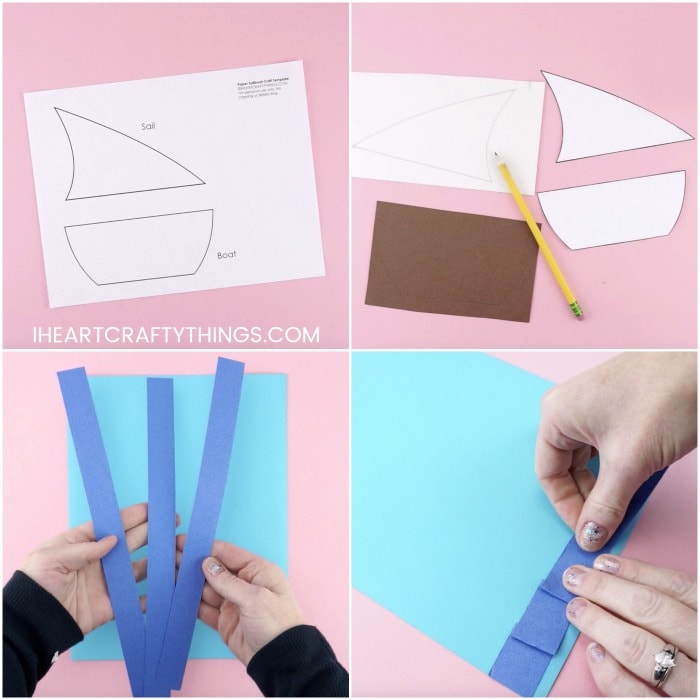
Step 3: Cut three pieces of blue construction paper the length of 1-inch x 12-inch.
Step 4: Add a line of extra strength glue stick near the bottom of your blue cardstock paper, along the entire length of the paper. Place the end of one of your blue construction paper strips at the edge of your paper on the glue. Every 1-2 inches along the construction paper strip, add a small bend in the paper. Continue until you reach the opposite end of your paper.
The folds in the construction paper add great texture and dimension to your paper craft looking like ocean waves.
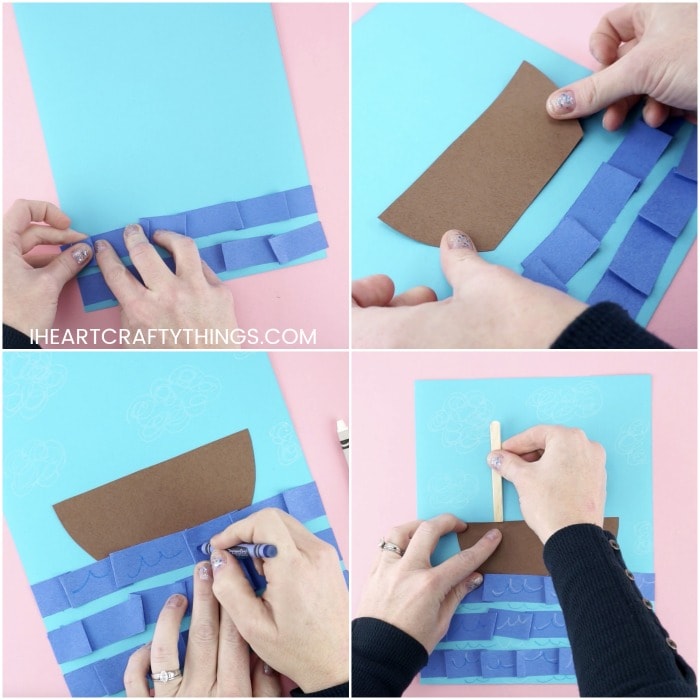
Step 5: Add another line of glue above the blue construction paper strip you just added. Then complete step 4 again with another blue paper strip.
Step 6: Glue the brown boat piece of the template on your blue cardstock, above the second folded strip of construction paper. Then add glue along the bottom of the boat and add your third and final strip of blue construction paper.
Related: Paper Dragonfly Puppets
Step 7: Use a white crayon to color clouds around the top half of your paper craft. Then use a blue and white crayon to draw ocean wave marks along the folded strips of your blue construction paper ocean.
You can also add lines inside your sailboat with a brown crayon at this time.
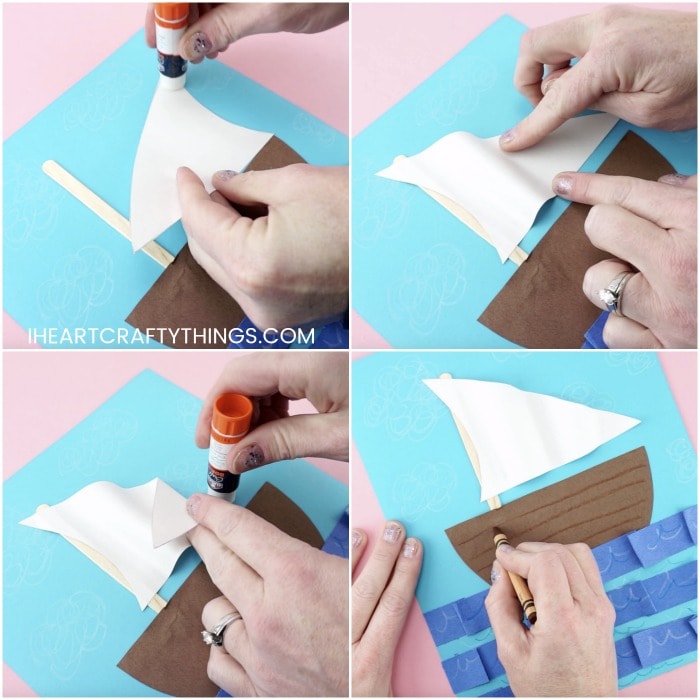
Step 8: Add glue on the back of a wooden craft stick and glue just inside the top of your sailboat. Make sure to position it towards the left side of the boat to leave enough room for your sail. We definitely recommend using an extra strength glue stick for gluing down your craft stick, but as an alternative you can also use a hot glue gun.
Step 9: Add glue on the back of your paper sail, along the curved edge. Glue it onto your craft stick. Then add glue on your blue cardstock paper, behind the center of the sail. Bend the paper sail to create a curve popping off the page and attach the center of the sail down onto your glue.
Repeat step 9 again to create one more section of the sail popping off the page near the end of the sail. This creates a fun 3D effect to your sailboat craft. The texture of the blue construction paper and the 3D effect of the sail makes the craft like your boat has set sail deep in the ocean.
Related: Colorful Paper Birds
Video Tutorial: How to Make a Sailboat Craft
Watch the video below for a step by step guide on how to make this simple paper craft with our template.
Find more easy summer craft ideas, boat crafts for kids and summer activities for kids by browsing the categories at the top menu bar of our website. We are hoping to add some fun cork boats to our summer activities this year.
Check out our amazing list of over 100 fun and easy summer crafts for kids . Animal crafts, ocean crafts, space crafts and so much more…

Paper Hot Air Balloon -Easy, colorful summer kids craft!

Paper Plate Dinosaur Craft for Kids -Three Easy Templates for Dinosaurs
© 2024 iHeartCraftyThings
The Craft Train
Crafty ideas for kids and parents
Boat crafts and activities
July 15, 2023 By Kate Leave a Comment This post may contain affiliate links. I may receive commissions for purchases made through links in this post at no cost to you.
Kids are going to love this collection of boat crafts and activities ! There are STEM crafts, boats that GO, paper boat crafts, boats made from recyclables and nautical-themed art projects.
Whether you’re looking for a preschool boat craft or are crafting with tweens and teens, there’s something for everyone here.
You might also like these Summer crafts and activities

There’s nothing like a homemade boat to add fun to backyard water play. Kids love getting their hands and feet wet and DIY boats are a classic summer activity that everyone—adults included—can enjoy.
So, grab your imaginary sailor hat along with a hot glue gun, skewers, paper and recyclables and let’s dive into 20 DIY boat ideas that are sure to make a splash!
20 boat crafts and activities for kids
Boats made from recycled materials.
Got recycled materials on hand? Turn them into a boat. Plastic bottles, egg cartons, margarine containers and plastic trays all make a great boat base. And don’t forget about cardboard.

- A recycled cardboard box can become a Noah’s Ark for the stuffed animals to sail. Preschoolers will love this idea for imaginary play.
- These margarine tub paddle steamers by Red Ted Art are so cute. Wind them up and watch them go!
- Make a cardboard boat with a snazzy sail and mast, by Barley and Birch. This makes a great Summer decoration.
STEM boats that move and float
Combine the wonders of science, technology, engineering, and math with boat crafts that teach kids about buoyancy, propulsion, and design. Watch their eyes light up as they engineer boats that can move and float.

- Get out the hot glue gun to make straw boats that go with the power of wind.
- This simple DIY paddle boat is a great way to show propulsion in the water, by Little Bins for Little Hands
- Supply basic materials like foil and popsicle sticks and get kids to design their own boats with this Loveboat Engineering Challenge by The Preschool Toolbox
- Use a balloon to propel your boar through the water like we’ve done with our balloon-powered sponge boat
- Here’s another paddle boat design that works using elastic band power and a recycled plastic tray—genius! By Science Sparks
DIY Toy Boats
You guys know I love nothing more than DIY toy crafts—a fun activity that leads to hours of play afterwards. These DIY toy boats are no exception.

- Sponge boats with a waterproof duct tape sail are fun for water play. Perfect for preschoolers and kindergarteners
- How easy do these soap boats look? Love the LEGO man sailor! By Fireflies and Mudpies
- Nature is the key material used in these Rad Rafts from sticks. The leaf sail makes the perfect finishing touch. by Kidminds
- Love this super cute and easy pirate boat made from wine corks, by Red Ted Art
- You can’t go past twigs as a raft-building material! These twig boats with a paper sail are by Easy Peasy & Fun
Paper boat craft ideas
Almost everyone has paper at home! Here are some boats that use paper as the key material.

- Create a paper mosaic sunset boat scene using our printable template.
- This Margarine tub boat has been decorated with paper to make a cute summer decoration, by Crafts By Amanda
- Kids are going to love making a paper boat that rocks like this one from Artsy Craftsy Mom
- This freestanding paper boat is by Kids Love Craft
- Here are some classic origami boats to add a splash of colour to your day, by Easy Peasy & Fun
Arty boat ideas
Here are some nautical ideas for getting arty!

- Love the handprint sails on this Mayflower boat craft , by Simple Everyday Mom
- Make a paper plate boat craft that rocks and have your little artist decorate it, like this one from J Daniel 4’s Mom
- These clay sailboats are super cute and give kids plenty of creative licence
- Use geometric shapes to make a boat . This fun idea is by Mama Smiles
- Learn how to create a silhouette boat scene with this art tutorial by Arty Crafty Kids
I hope you’re feeling inspired to get boat-building! Which idea are you going to try first?
You might also like
- Here are over 50 DIY toys for kids
- Celebrate summer by making one of these Ocean Craft ideas
- Learn about snakes and lizards with these 20 Reptile Crafts
- Keep kids entertained outside with these Outdoor Crafts and Activities

Leave a Reply Cancel reply
Your email address will not be published. Required fields are marked *

I’m basically a big kid who never grew up and still loves to muck around with paint, glitter, glue and toilet rolls. With the crafts shared here on this website I’m hoping to give other parents and carers inspiration to get crafty with their kids at home – make our projects, or use them as a source of inspiration to spark ideas of your own. When it comes to crafting no rules apply!
NEWSLETTER SUBSCRIPTION
- Skip to primary navigation
- Skip to main content
- Skip to primary sidebar
Playtivities
- Educational Activities
- Toddler Art Activities
- Toddler Motor Skills Activities
- Preschooler Art Activities
- Winter activities for kids
- Cooking Activities for Kids
- Traveling With Kids
- Christmas Crafts
- Motherhood Tips
- Acts of Kindness Ideas
- Kid Friendly Recipes
- Things We Love
- Easy Halloween Costume for Kids
- About/Contact
Published: Aug 23, 2022 by Birute Efe · This post may contain affiliate links · 3 Comments
40 Boat Crafts Kids Will Love To Do (Many upcycled crafts)

There are few things kids enjoy doing more than playing in the water, and boats take the fun up a notch. Whether building a boat that floats for the backyard kiddie pool or making one out of paper, boats are a fun part of every kid's summer play.

This summer, we have a great list of boat crafts for you to make with your children! These 40 boat crafts kids will love to do are simple and inexpensive, requiring only materials found around the house!
Kids will have a lot of fun building DIY boats and then seeing if they can keep them afloat on water.
Note: Add a little string to your boats so you can easily retrieve them without harming local wildlife, or avoid having sobbing children who want their boat back!
40 Fun Boat Craft Ideas For Kids
Make a boat from duct tape & sponges, origami paper boat, wax boat craft, pool noodle boats, shampoo bottle sailboat, diy cork sailboats, diy tug boat.
- Let's Build a Pirate Ship
Milk Carton Boat Craft
Walnut boat craft, popsicle stick boat crafts, tin pan boat crafts, mayflower ship, diy basket boat, egg carton boat, cereal box boat, soda bottle boats, bottle lid boats, easter egg boats, twig bundle raft, viking longboat, soap bar boats, balloon boat, happy sailing, me hearties.
Time for our favorite Summer boat crafts your kids will love to create and play with! Children can design their boats, make them, and then watch how well they float!

Kids are always looking for excuses to play in the water. These DIY sponge boats will keep your children entertained for hours. Kids will enjoy racing their boats and try tirelessly to sink them in the water. Making the boat is super easy! You will only need three things-- paper or duct tape for the sail, a kitchen sponge for the boat's base, and a skewer or a straw for the sail mast.
Cut the top two corners of the sponge. Push the skewer in the middle to make the sail mast. Make the sail from paper or duct tape. This boat is perfect for bathtime or outdoor play. Head over to The Craft Train to learn more about how to make these fun little sponge boats and many more summer crafts for kids!

Most paper boats are easy peasy and so much fun to make. You can create one with your toddlers during summer break and watch their eyes light up with joy! This boat craft only requires paper and paper folding skills!
Artsy Craftsy Mom has some great instructions on making paper origami boats and many other fun crafts for kids.

My kids love making wax boat craft . They are so much fun and easy to make! The best thing is they always float on water and never sink. You will need cheese wax, a toothpick, and paper to make the sails.
Sculpt your boat with the cheese wax. You can make little round boats. Stick the toothpick and make a sail out of paper. Your boat is ready to go on long adventurous voyages! Use your imagination and decorate your boat. This is a fun boat craft for younger and older kids.

This is a great boat crafts for kids. You can create your Pool Noodle boats with simple supplies you can easily get at the dollar store. You will need pool noodles, colorful straws, and foam sheets. Follow the fun instructions on making pool noodle boats by Frogs and Snails and Puppy Dog Tails.
Using a knife, cut the pool noodle into small round shapes. Insert the straw on the side of the pool noodle and make the sails out of foam sheets. Your super cool pool noodle boat is ready to float.
Note: Parents can help their little ones by cutting the pool noodle with a knife.

Bring out your creative spirit with these fun kids crafts. Make your own sailboat with a shampoo bottle. All you need is a bottle of shampoo, a straw, a stirrer, a piece of paper, elastic bands, and a wine cork or a piece of the pool noodle (to stick the stirrer in to use as a mast).
Make a hole in the wine cork, stick the stirrer in the middle, and use paper as a mast for the sailboat. Pink Stripey Socks has some great instructions on how to build a shampoo DIYtle sailboat , and you will also find other DIY boat ideas.

Cork sailboats are easy to make and float well on water. This kid-friendly craft is an ideal summer activity. These are the cutest and easiest boats you will ever make! You will find all the different materials you need around the house. You will need some corks, an elastic band, skewers, and paper.
Combine the corks with the elastic band and make a hole in the middle. Stick the skewer and make a pretty sail for your boat.
Go to Happy Hooligans to find out how to make a cork sailboat and other cool summer activities! Make as many as you want. Kids can share it with their best friend. These are great non toy gifts!

This boat craft is great for kids of all ages! Your kids will love building a boat that floats and moves. Make this simple self-propelled tug boat craft with materials around the house. You will need an empty butter box, popsicle sticks, a yoghurt container, and paint.
Place popsicle sticks around the sides of the butter box. Put the yoghurt container on top and tape it down. Paint your boat. Make a paddle out of a piece of plastic. Make slits in the paddle and inset the piece of plastic through them. Wind up your boat, and it's ready to float away!

Cardboard canoes are great entertainment for kids. Children can use the DIY canoes for a sailing role-playing game with friends and siblings. Kids can also load the canoes with their toys during pretend play and fly the canoe around the house.
Simply cut out a cardboard boat and use hot glue to stick the sides of the boat to the bottom piece and ends. Make oars of the boat out of toothpicks and paint your boat. You can add some extra decorations if you like. You can even put action figures inside the boat. Kids can race the boat around the house and have fun!
Let's Build a Pirate Ship

Ahoy, my maties! This is a fun-filled craft for all pirates fans. Sail away with this exciting pirate ship craft this summer. Kids will love making this exciting boat craft. You will need cardboard, masking tape, and a stick to make the ship's mast.
You can download a free pirate ship template from Red Ted Art here and start making your pirate ship today! Enjoy the day pretending to be pirates and explore the seven seas!

This is a fun summer activity for kids of all ages. Kids can engage in imaginative play with this easy-to-make DIY milk carton boat craft . It's cheap to make, and you can easily find what you need at home. Have your child engage in some exciting science facts about buoyancy while they make the boat.
Cut one side of the milk carton and paint it. Use a skewer for the sail mast and a cloth or paper to make the sail. Kids can even use their toy as a pretend sailor while putting it in a pond or a bathtub to make it float.

If you live near an area where walnuts grow, you're lucky! We have the perfect walnut boat craft for you. You can use this natural crafting material to create cute walnut boats with your friends. They are simple to make and will almost always float on water.
The fun thing is you can make two boats from one walnut! Divide a walnut into two and fill both with hot glue. Place a pipe cleaner in each to create a sail mast. Stick googly eyes to the sail and draw a smiley face with a marker. It's as simple as that! Your cute little walnut boat is ready!

Stay cool this summer with this fun popsicle stick boat craft. As a kid, I remember making these boats with rainbow-colored popsicle sticks. I now continue the same tradition with my children-- they really enjoy making popsicle stick boats.
Layer the popsicle sticks and glue them together. Stack popsicle sticks around the boat and use one as a sail mast. Throw your popsicle stick boats on a water table and have a boat race with all your friends!

Create a boat you will love floating in the river. This is a really easy boat craft that even toddlers can make without help from their parents. Don't worry about the mess kids will make. There won't be any!
Kids will only need a tin pan. I gave my kids one of my leftover baking tin pans, which was lying around the house. Kids will also need play dough and an ice cream stick for the sail mast.
Put glue inside the tin pan and stick a ball of playdough in it. Put your sail mast inside the play dough, and you are ready to take your tin pan boat out on a sailing trip!

How about a history lesson while you make these fun boat crafts for kids? Make a Mayflower ship , an English ship that brought the first pilgrims to America. Make an exciting little ship from paper plates, wooden dowels, and other materials.
Cut the paper plate in half, join it together, and use wooden dowels as sail mast and paper to make the sail of your Mayflower ship . This is a fun craft to make, and you can hang it in your kid's room.
Note: Parents can help their kids with the scissors to cut the paper plates.

This DIY basket boat is a classic for kids! They can create their basket boat all on their own with their endless imagination. My kids usually take turns sitting inside the boat and giving a push to each other as they sail away on an unknown adventure! Better yet, if you have two or more laundry baskets, kids can have an exciting boat race!
All you need is a small laundry basket and a brown paper bag to make the sail mast. Use party streamers to decorate your boat. Kids love playing with this real-life boat. All the kids can take turns giving each other boat rides.

This is a great idea for kids o,f all ages. Egg carton boats are easy to make, and you will only need a few things you can easily find in the kitchen. Take an egg carton and cut it in half. Insert one or two straws to make the sail mast, and you are done. Paint and decorate your boat.
The fantastic thing is they float effortlessly on the water.

Have a box of Cheerios lying around the house? We have a great boat craft idea and activities for kids that they can make from cereal boxes!
Cut out a rectangular shape from the cereal box and glue it together. Insert a skewer in the center and use newspaper to make the boat sail.
Kids will have a blast playing with their cereal box boats !

Create your soda bottle boat and show it to all your friends. I'm sure they will love it and want one too! Simply cut the bottom part of the bottle, cover it in beautiful wrapping paper, and use a straw or skewer for the sail mast and paper to make the sail.
Kids can make more than one soda bottle boat and race them against each other.

This is another great and simple summer crafts idea for kids. All you need is a bottle lid, playdough, and straw. Put some playdough into the lid and insert a straw. Use a colored sheet to make your sail.
Children will love making these cute little bottle lid boats .
This boat is a fun Easter activity for kids. Grab some plastic eggs, straws, play dough, and colored paper stock. Fill the eggs with play dough and insert the straw in the middle. Make a pretty sail out of bright-colored paper stock.
Kids can sail their easter egg boats on a pond or a tub of water.

Return to nature with these super simple twig bundle raft boat activities for kids. Plan a fun family day at the local park collecting sticks to make your boat. Once the sticks are collected, cut them to the same size, hem them together, and tie them up.
Make your sail out of a leaf and float it on water.

Kids can create their apple boats in seconds! It's super cool and easy to make. Just cut an apple in half, stick a skewer or ice cream stick into it and make a sail. Your apple boat is ready to float on water.
Note: Use clean water to float your apple boats so kids can have a delicious snack later!

Make a fun Viking dragon ship for kids to pretend play. To create your longboat, you will need rectangle and dragon-shaped cardboard cutouts. Glue them all together and make cardboard oars and seats. Decorate your Viking longboat and use it for role-playing with your friends.
Here's a cool idea, make dragon flames out of crepe paper and glue them to the dragon's mouth! Kids can also use their Viking toys as part of pretend play.

Soap bar boats are a great idea for a summer activity for kids. Children can make these easy boats by taking a soap bar, carving it into a boat shape, and inserting a small toothpick in the middle to make the sail mast.
Once your boat is ready, float it in a pond or pool. Head over to Teaching Mama to find out more about how to make awesome soap bar boats !

You can do much more with a balloon than just tying a string around it. To create your balloon boat, you will need a plastic container, balloon, straw, and rubber band. Punch a hole on one side of the plastic container, blow up your balloon and tie it to the straw. Insert the straw in the hole, and your boat is ready to float on water!
Read more about the balloon boat and how to make it on Life with Moore Babies.
Build boats and have fun with these boat craft activities for kids! Your child will have a great time creating and learning more about boats and how they float on water. Boat crafts are fun summer activities the whole family can enjoy!

Reader Interactions
Alyssa fowler says
August 25, 2022 at 4:33 am
Wowww i loved reading this the instructions were so simple. I tried many of these with my kids. Would live to read more posts like this one!!! It was fun and simple!!!! 🤗
Claudette says
October 09, 2023 at 1:20 pm
Great pictures and beautiful, fun projects to do. Thank you.
Csaba Nilgesz says
October 18, 2023 at 12:20 pm
Glad you like it Claudette!
Leave a Reply Cancel reply
Your email address will not be published. Required fields are marked *
Save my name, email, and website in this browser for the next time I comment.
- Bridal Shower
- Baby Shower
- Valentine’s Day
- Mother’s Day
- Father’s Day
- Fourth of July
- Thanksgiving
- New Year’s Eve
- Food & Drink
- Memory Keeping
- From The Studio
- Illustration
- Celebration Expert Experience
Paper Boat Craft
A classic childhood craft the world over, a folded paper boat is a versatile craft that also makes great decor for a summer dinner or a Greek staycation (the paper boat is a popular symbol there). They’re also a lot of fun for kids to fold, decorate—and then play with! They can fold them with any color paper—or print out our stripe, star, and dot templates as shown here—or use white paper and color them in. Once your boat is ready you can:
– Write names on them and float or race them in a boat, pond, pool, sink or bathtub – Use them as place cards or table decor
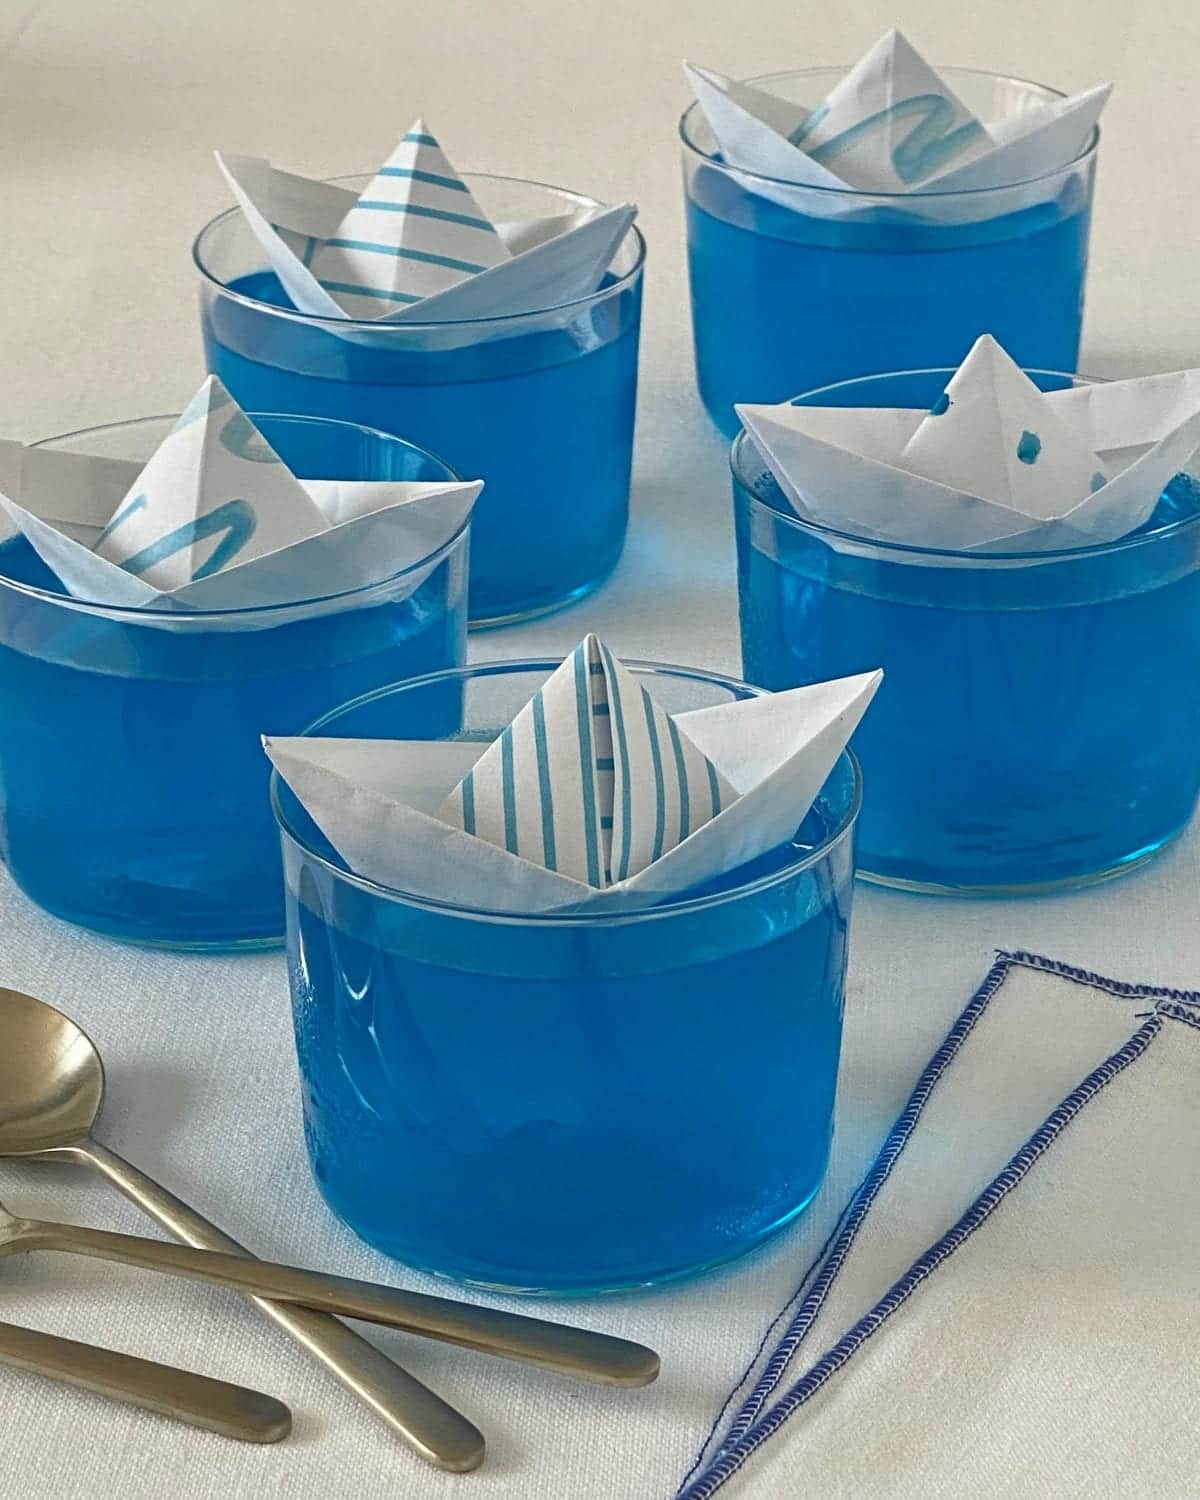
– Make them cake toppers on a cake or cupcakes or even a bowl or cups of sea-blue jell-o – Fold a few and hang them as a mobile or string them as a garland – Write a note before folding and use them as a card for a birthday, Father’s Day, bon voyage, or any occasion
What you need:
- Darcy Miller Designs Boat Pattern templates (stripe, star, and dot)
- 8.5 X 11 white or colored paper
- markers, crayons, or mini flags to decorate (optional)
Step 1: Download Boat Pattern Templates and print out. Step 2: You can work with a whole sheet of paper or cut it in half to make smaller boats. Step 3: Take your piece of paper and fold against a hard surface, following the nine steps in the diagram below:
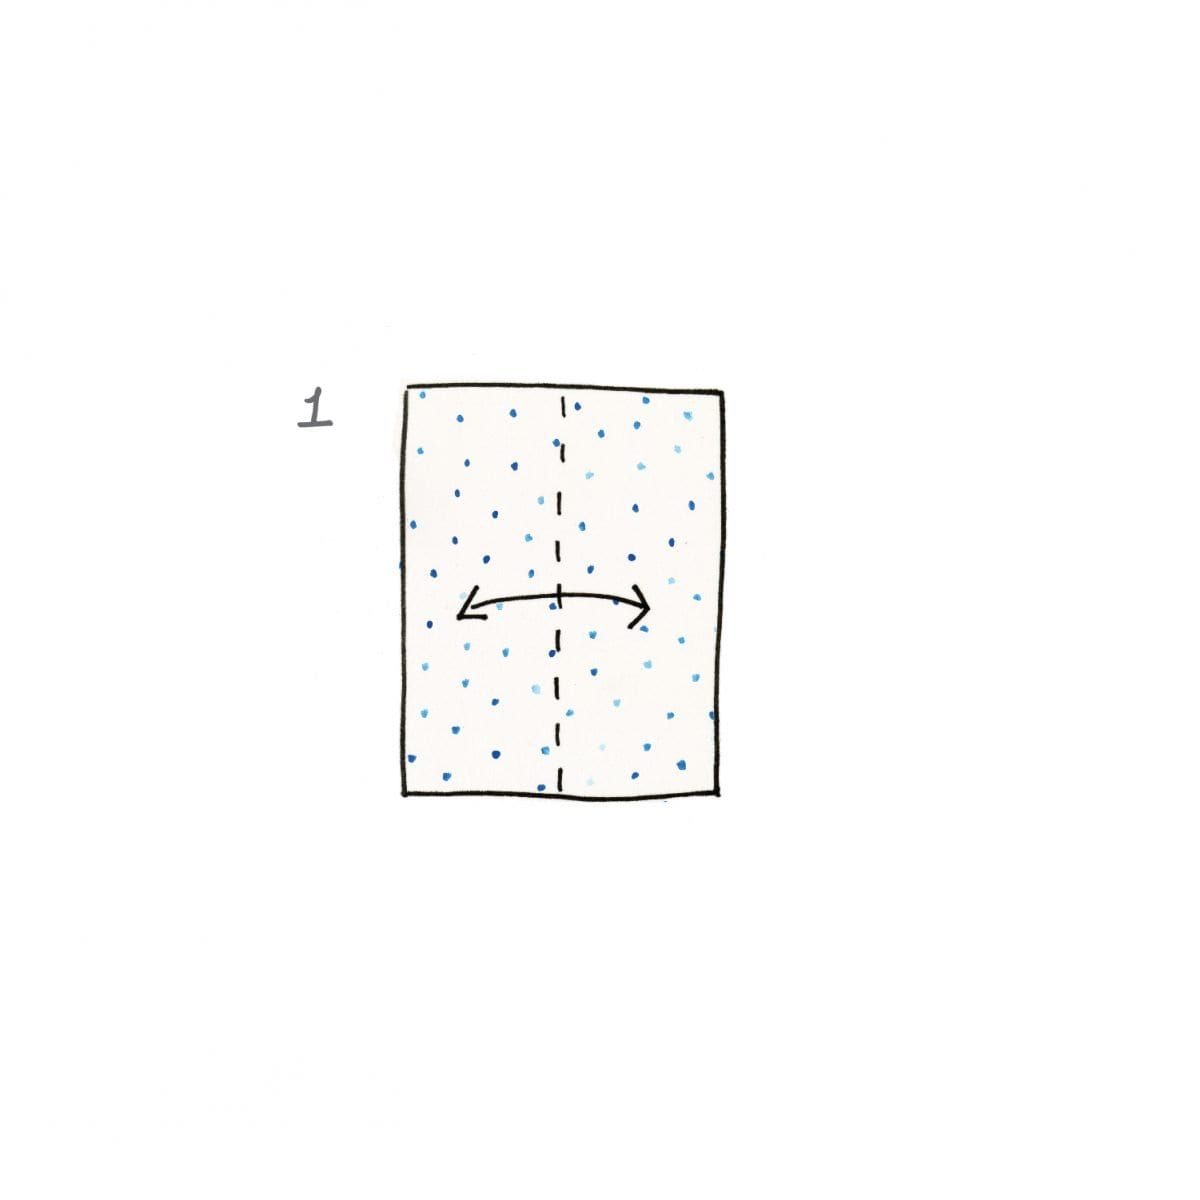
Fold paper in half lengthwise, then unfold.
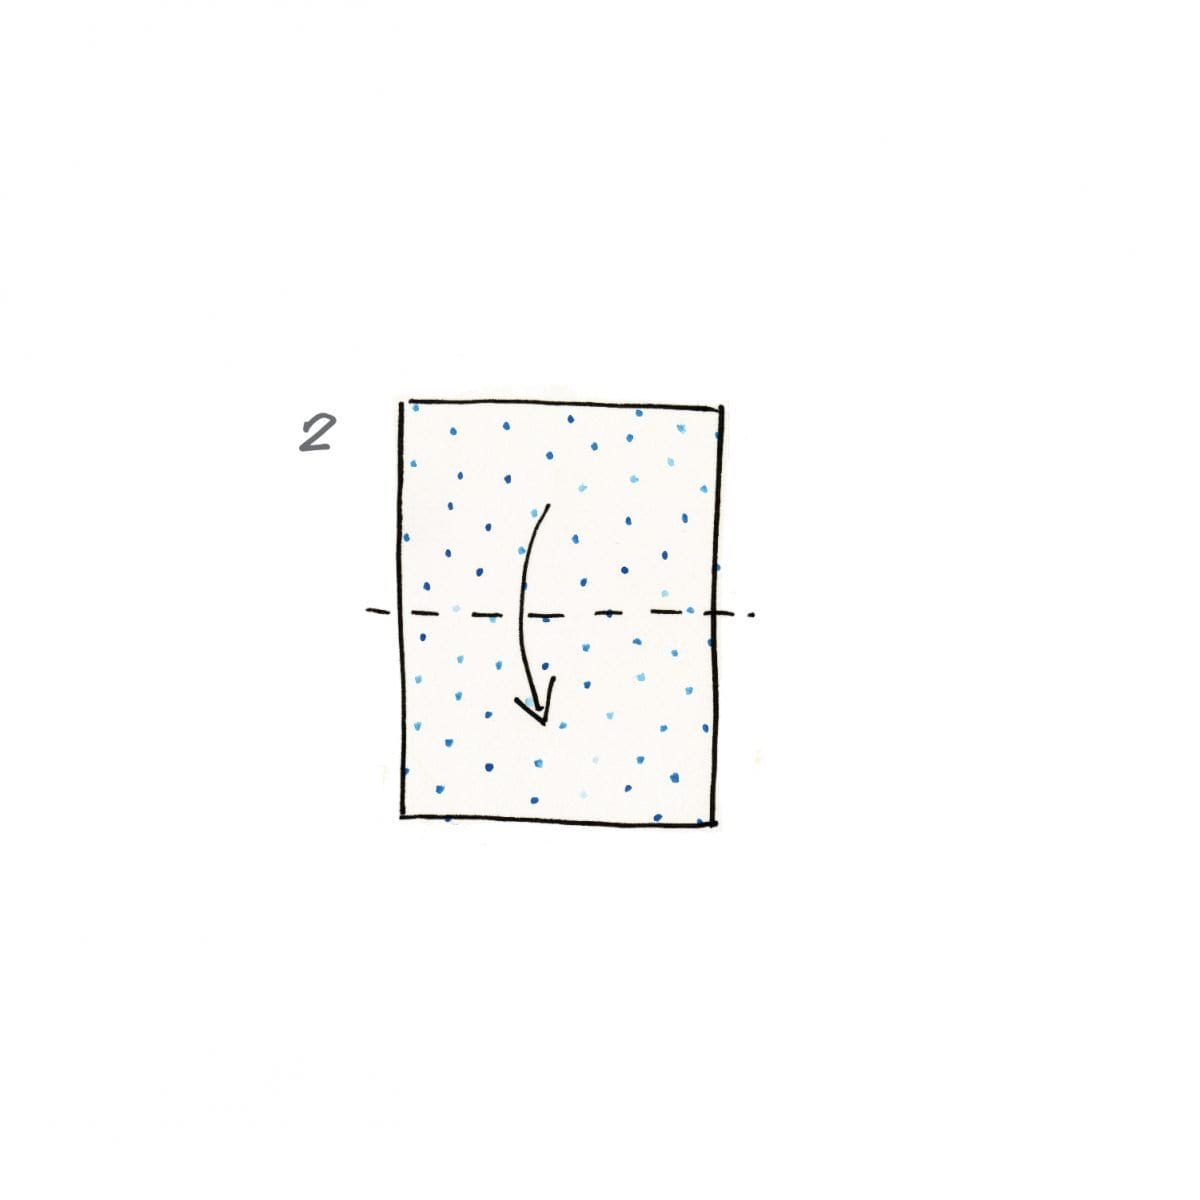
Fold paper in half widthwise.
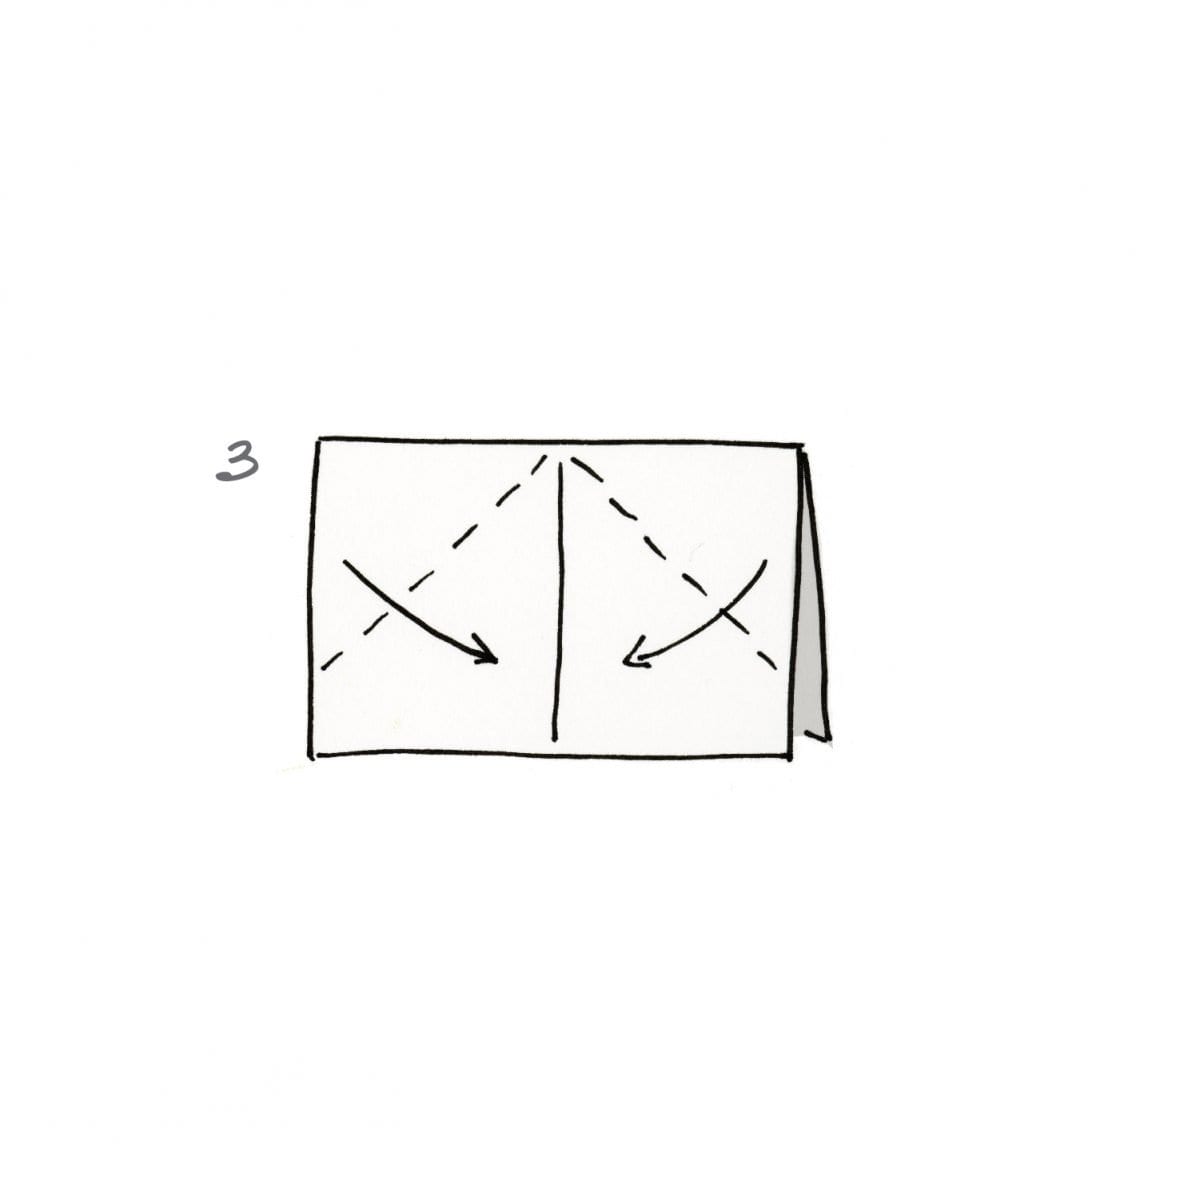
Fold corners inward to center seam, creating an arrowhead shape.
Fold bottom flaps of paper up on each side, to overlap the triangle, as shown above.
Insert your thumbs into the bottom and pull out sides, pulling the paper into a diamond shape as shown above.
Put your fingers inside the bottom of the triangle and pull it open to form the diamond shape above.
Tada! You have your boat shape
Step 4: If desired, decorate your boat, coloring or painting the ship or taping a cocktail flag to the sail. Don’t forget to write a name across the bow!
Now find a pond, pool, sink, or bathtub, and you’re off to the races!
photo credits
A classic childhood craft the world over, a folded paper boat is a versatile craft that also makes great decor for a summer dinner or a Greek staycation (the paper boat is a popular symbol there). They’re also a lot of fun for kids to fold, decorate—and then play with! They can fold them with […]
Related Ideas
Color-Your-Own Easter Egg Hunt
“Hoppy Spring!” Bunny Cupcakes
“Carrot” Napkin
Candy-Filled “Carrot” Napkin

Step-by-Step Guide: How to Make a Paper Sailboat for Endless Fun
Alex Morgan
Introduction to Paper Sailboats
Making a paper sailboat is a fun and creative craft activity that can be enjoyed by all ages. Whether you want to engage in a rainy day activity or simply have some leisurely fun, paper sailboats are a great option. In this article, we will explore the materials needed to make a paper sailboat, provide a step-by-step guide to creating one, and offer tips and tricks for making the perfect paper sailboat. We will explore different variations and designs for paper sailboats, as well as fun activities and games that can be enjoyed with them. Let’s dive into the world of paper sailboats and let our imaginations set sail!
Key takeaway:
- Making paper sailboats is a fun and creative activity: Paper sailboats provide an enjoyable way to explore the art of origami and enhance creativity.
- Using the right materials is crucial: Different types of paper can be used for making paper sailboats, and additional materials like adhesive might be required for certain designs.
- Step-by-step guide simplifies the process: Following a structured guide with clear steps helps in folding the hull, creating a sail, and attaching it to the hull, ensuring a successful paper sailboat creation.
Materials Needed to Make a Paper Sailboat
To create a paper sailboat, you will need the following materials:
- Paper: Ensure you have a square piece of paper. You can fold an 8.5×11-inch sheet into a square shape.
- Scissors: Cut the paper into a square.
- Pencil or pen: Use a pencil or pen to mark the paper for folding lines.
- Ruler: Make use of a ruler to create straight and accurate folds.
- Decorative materials (optional): If desired, you can decorate your sailboat using colored pens, stickers, or markers.
To make your paper sailboat, carefully follow these steps:
- Begin with a square piece of paper.
- Fold the square in half diagonally to form a triangle.
- Unfold the paper and fold it in half again diagonally in the opposite direction.
- Unfold the paper once more and fold each corner into the center, creating a diamond shape.
- Take the top point of the diamond shape and fold it down towards the bottom point, creating a triangle shape.
- Fold the two bottom corners of the triangle up towards the top, forming a smaller triangle with a flat bottom.
- Open the flaps at the bottom of the triangle and fold them outwards to shape the base of the sailboat.
- Use colored pens, stickers, or markers to decorate your sailboat as desired.
- If you used any wet materials for decoration, allow the sailboat to dry.
- Your paper sailboat is now ready to set sail!
By following these steps and gathering the necessary materials, you can easily create a paper sailboat for fun and imaginative play.
What Types of Paper Can be Used?
When making a paper sailboat, it is important to consider what types of paper can be used to ensure sturdiness and flexibility . There are several options to choose from.
One option is origami paper , which is lightweight and easy to fold. It holds its shape well, making it a good choice for creating the structure of the sailboat.
Another option is cardstock , which is thicker and more durable. It provides stability and strength to the sailboat, ensuring that it will hold up well during use.
Construction paper is also a versatile option, offering a wide range of colors. This type of paper can add color and creativity to the design of the sailboat, making it visually appealing.
For those looking for a thicker paper with a variety of designs, scrapbook paper is a great choice. It enhances the visual appeal of the sailboat and adds an extra layer of interest to the design.
Personally, I have made a paper sailboat using origami paper in the past. It was a vibrant and easy-to-fold option, allowing for intricate details on the sailboat. The lightweight nature of the paper also made it glide smoothly on the water. It brought joy to my nephew as he watched it float in a mini pool.
When making your own paper sailboat, it is important to consider the type of paper you choose. The right paper can make a huge difference in the overall experience. So, be sure to choose wisely and enjoy the process of creating your very own paper sailboat!
Additional Materials Required
The construction process of a paper sailboat requires additional materials such as scissors and glue . These materials are essential for improving the sturdiness of the sailboat. Scissors are utilized for precise cutting, resulting in clean edges. Glue plays a crucial role in securing all parts of the sailboat, guaranteeing its integrity during both playtime and display. Incorporating both scissors and glue into the process significantly enhances the quality and durability of the paper sailboat.
Step-by-Step Guide to Making a Paper Sailboat
Get ready to set sail with a step-by-step guide on making a paper sailboat ! We’ll take you through the process of folding the hull , creating the sail , and attaching it to the hull. From the first fold to the final touch, you’ll have all the know-how to create your own miniature vessel . So grab some paper and let’s navigate the seas of creativity together!
Step 1: Folding the Hull
To make the hull of a paper sailboat, follow these steps:
– Step 1: Start with a square piece of paper.
– Step 2: Place the paper in front of you in a diamond shape, with one corner pointing towards you.
– Step 3: Fold the bottom corner up to meet the top corner, creating a triangle.
– Step 4: Unfold the triangle, then fold the left corner to the center of the triangle.
– Step 5: Repeat with the right corner, folding it to the center of the triangle.
– Step 6: Flip the paper over to the other side.
– Step 7: Take the top layer of the left corner and fold it towards the center line.
– Step 8: Repeat with the right corner.
– Step 9: Unfold the left and right corners.
– Step 10: Take the bottom corner and fold it up towards the top point of the triangle.
– Step 11: Flip the paper over to the other side.
– Step 12: Fold the bottom corner up again, leaving a small gap between the fold and the top point.
– Step 13: Unfold the paper completely, and you now have the folded hull of your paper sailboat.
Following these steps will allow you to create a sturdy and functional hull for your paper sailboat. Be precise with your folds to ensure the best results.
Step 2: Creating the Sail
- Select an 8-inch by 8-inch square piece of paper.
- Fold the square in half diagonally to create a triangle.
- Unfold the paper and fold the top two corners down to the center crease to make a smaller triangle.
- Fold the bottom point of the triangle up towards the top point, leaving a small space at the top.
- Fold the two outer edges of the triangle inward to meet at the center crease and create a diamond.
- Flip the diamond over and fold the bottom point up towards the top point, leaving a small space at the top again.
- Fold the right and left corners of the top layer towards the center line of the diamond.
- While still folded, fold the entire diamond in half vertically.
- Unfold the top layer to reveal the sail of your paper sailboat.
- Optional: Use markers, stickers, or other decorations to personalize your paper sailboat.
Origami sailboats , originated in Japan , have a long-standing tradition dating back centuries. These miniature vessels , with their intricate folds and precise techniques, have been passed down through generations, bringing joy to both children and adults. Paper sailboats were commonly used in traditional Japanese celebrations and festivals, symbolizing good luck and prosperous journeys. Today, making paper sailboats remains a popular craft activity, providing a fun and creative way to explore origami .
Step 3: Attaching the Sail to the Hull
- Begin by folding and creating the sail.
- Next , position the sail on top of the hull, making sure to align the bottom edge of the sail with the top edge of the hull.
- To secure the sail in place, use a small amount of glue or adhesive tape.
- Make sure that the sail is straight and centered on the hull.
- Gently press down to create a strong bond between the sail and the hull.
- Before moving or playing with the paper sailboat, allow the glue to dry completely.
Paper sailboats have been a cherished tradition originating in ancient China. Just like origami boats, they were used in various festivities to symbolize good luck and prosperity. Nowadays, both children and adults enjoy making paper sailboats as crafts. These boats not only provide entertainment but also serve as a reminder of the beauty and simplicity of handmade objects. Attaching the sail to the hull is a crucial step in completing the paper sailboat and preparing it for exciting adventures in bathtubs, puddles, or miniature ponds.
Tips and Tricks for Making the Perfect Paper Sailboat
To create the perfect paper sailboat , follow these tips and tricks for making the perfect paper sailboat . Begin by starting with a square piece of paper , as this will ensure balanced proportions and make folding easier. Fold the paper in half diagonally to form a triangle , making sure to press firmly to create a sharp crease . Next, unfold the triangle and fold the bottom edge up to meet the top, creating a smaller triangle shape .
Then, take the right corner of the triangle and bring it towards the center , repeating this step with the left corner . After that, fold the bottom edge of the paper up to meet the top, resulting in a square shape . Fold the sides in towards the center . Flip the paper over and fold the bottom corners up to the top, forming a diamond shape .
Carefully unfold the two sides of the diamond to create the sail . Adjust the angle of the sail by making small folds along the bottom edge . To ensure proper flotation , fold the bottom edges inward to create a small base for balance in the water . Test your boat in a basin of water to ensure it floats correctly.
By following these tips and tricks , you will be able to create a perfect paper sailboat . Enjoy the process of crafting your own miniature boat and have fun sailing it in the water .
Different Variations and Designs for Paper Sailboats
If you’re ready to embark on a paper crafting adventure, you’ll be amazed at the plethora of different variations and designs available for making paper sailboats . From the simplicity of a basic origami sailboat to the intricate techniques of an advanced cut and fold sailboat , these sub-sections offer a range of possibilities to explore. So grab your paper, fold, cut, and let your creativity set sail !
Simple Origami Sailboat
To create a Simple Origami Sailboat , you just need to follow these steps:
- Start with a square piece of paper.
- Place the paper in front of you with one corner pointing towards you.
- Fold the paper in half diagonally, bringing the opposite corners together.
- Unfold and repeat step 3, folding it in half diagonally in the opposite direction.
- Rotate the paper so that one of the folded corners is facing towards you.
- Fold the two outer corners of the paper towards the center, forming a triangle shape .
- Flip the paper over and fold the bottom edge upwards to create the sailboat’s hull.
- Open up the bottom of the hull to make a flat base.
- Create the sail by folding a small rectangle of paper in half diagonally.
- Tuck one corner of the triangle sail into the opening at the top of the hull.
You can experiment with different sizes and colors of paper to make a fleet of simple origami sailboats .
Advanced Cut and Fold Sailboat
To create an Advanced Cut and Fold Sailboat , follow these steps:
1. Choose sturdy paper, like cardstock or construction paper , for support.
2. Start with a rectangular piece of paper, preferably 8.5 x 11 inches .
3. Fold the paper in half lengthwise to create a center crease .
4. Unfold the paper and fold the top edges towards the center crease , creating diagonal folds meeting at the top.
5. Flip the paper over and fold the bottom corners up towards the center crease , following the previous diagonal folds .
6. Fold the bottom edge of the paper up to meet the top edge , aligning the sides and creating a triangle shape at the bottom.
7. Flip the paper over, keeping the triangle shape at the bottom. Fold the bottom corners inwards towards the center crease , creating 45-degree angles .
8. Unfold the previous step and carefully cut along the creases , starting from the bottom and stopping before reaching the top.
9. Fold the paper back into its original shape, tucking the triangles created in step 7 into the slits made in step 8.
10. Create a sail by cutting a small rectangle from a different colored paper. Attach the sail to the back of the sailboat, near the top.
11. Your Advanced Cut and Fold Sailboat is now complete! It is ready to set sail in the imagination of your paper fleet.
Fun Activities and Games with Paper Sailboats
Looking for some fun activities and games with paper sailboats? Here are some ideas to get you started:
1. Racing: Set up a racecourse in a pool or a bathtub and have a friendly competition to see whose paper sailboat reaches the finish line first.
2. Obstacle Course: Create an obstacle course using household objects like pillows, books, or small toys. Test your skills by navigating your paper sailboat through the course without touching any obstacles.
3. Float and Sink: Test the stability of your paper sailboat by adding different objects one by one. See how many objects it can hold before sinking.
4. Design Challenge: Have a design contest with your friends or family. Each person creates their own unique paper sailboat design using colorful paper, markers, and craft materials. Then float them in water and see whose design performs the best.
5. Treasure Hunt: Hide small objects around the house or yard and use the paper sailboats as vessels for finding treasure. Sail them to discover hidden treasures and collect them along the way.
These activities and games with paper sailboats are not only fun but also great for enhancing creativity and problem-solving skills. So get ready to set sail and embark on some exciting adventures with your paper sailboats!
Some Facts About How To Make A Paper Sailboat:
- ✅ Making a paper sailboat is a fun and easy craft project that introduces the art of origami. (Source: One Little Project)
- ✅ All you need is a piece of printer paper to create a paper sailboat. (Source: One Little Project)
- ✅ The process involves folding the paper in half lengthwise and width-wise, and then folding the top corners downwards to align with the center fold. (Source: One Little Project)
- ✅ After folding the bottom flaps and creating a square shape, the paper sailboat is ready to be floated on water. (Source: WikiHow)
- ✅ Adding tape to the corners and bottom of the paper sailboat can help make it waterproof and prevent water from seeping in. (Source: WikiHow)
Frequently Asked Questions
How do i make a paper sailboat with printer paper.
Step 1: Start by folding a piece of letter-sized printer paper in half lengthwise and then width-wise.
Step 2: Rotate the paper and fold the top corners downwards to line up with the center fold.
Step 3: Fold one layer of the bottom flap upwards and flip the paper over to fold the little flaps behind the triangle shape.
Step 4: Fold the remaining bottom flap upwards.
Step 5: Pick up the folded paper and pull your thumbs apart to flatten it.
Step 6: Fold the bottom point up to meet the top point and flip the paper over to repeat the fold.
Step 7: Run your fingers along the folds to ensure they are flat and all edges are folded.
Step 8: Pull apart the sides of the folded paper at the top point to create a boat shape. Pinch along the bottom edges to make folds on each side and your paper boat is complete.
Can I make a paper sailboat with origami paper?
Yes, you can make a paper sailboat with origami paper. Follow the same steps mentioned earlier, but remember to use proper cutting techniques if needed.
How long will the paper sailboat float in water?
The paper sailboat will float in water for at least 10 minutes before becoming waterlogged. To make it last longer, you can add a layer of tape to the bottom for better waterproofing.
What kind of paper should I use to make a paper sailboat?
You can use regular printer paper or construction paper to make a paper sailboat. If you have origami paper, that can also be used with proper cutting techniques.
Can I put things in the paper sailboat?
Yes, you can put lightweight items in the paper sailboat. If you are placing the boat in water, make sure to only put lightweight items to prevent the boat from tipping over.
How long does it take to make a paper sailboat?
Making a paper sailboat with regular printer paper typically takes about five minutes. It is a quick and easy craft project that can be enjoyed by kids.
About the author

Leave a Reply Cancel reply
Your email address will not be published. Required fields are marked *
Save my name, email, and website in this browser for the next time I comment.
Latest posts

The history of sailing – from ancient times to modern adventures
History of Sailing Sailing is a time-honored tradition that has evolved over millennia, from its humble beginnings as a means of transportation to a beloved modern-day recreational activity. The history of sailing is a fascinating journey that spans cultures and centuries, rich in innovation and adventure. In this article, we’ll explore the remarkable evolution of…

Sailing Solo: Adventures and Challenges of Single-Handed Sailing
Solo Sailing Sailing has always been a pursuit of freedom, adventure, and self-discovery. While sailing with a crew is a fantastic experience, there’s a unique allure to sailing solo – just you, the wind, and the open sea. Single-handed sailing, as it’s often called, is a journey of self-reliance, resilience, and the ultimate test of…

Sustainable Sailing: Eco-Friendly Practices on the boat
Eco Friendly Sailing Sailing is an exhilarating and timeless way to explore the beauty of the open water, but it’s important to remember that our oceans and environment need our protection. Sustainable sailing, which involves eco-friendly practices and mindful decision-making, allows sailors to enjoy their adventures while minimizing their impact on the environment. In this…

Rocking Paper Plate Boat
Paper Plate crafts are the best for preschoolers and kindergarteners. There are SO many cute things you can make. We particularly love our series of paper plate rocking crafts. Today we have a rocking Paper Plate boat – a simple craft that is super fun to interact with.

Ahhhh I do love it, when YOU the reader tag me in Instagram or better still email me with photos. Where possible, I will add them to my blogposts or put them on my Pinterest Reader’s Gallery… or on occassion.. write a new Blog Post ALL about YOUR interpretation of my craft!
So yes, today, I have the lovely Nicola from Williamson Art Gallery & Museum , who was inspired by our Paper Plate Rocking Submarines and create their very own Rocking Paper Plate Boat or Yacht! Not just that she kindly ask the parents for permission to share these photos today! A big thank you!! This really is a lovely paper plate boat craft for preschoolers!

I love how to you can see that these little Preschoolers (or 2 and 3yrs olds) really got stuck in with their fine motor skills – from cutting out triangles to colouring in their Paper Plate Ships! A great craft for a group enviroment. And those little Star Hole Punches? Just too sweet.. take me away on a magical journey across the sea!!! Who doesn’t love a lovely Boat Craft for kids ?!
Other Rocking Paper Plate Crafts you may love:
I feel our paper plate boat craft is very much a SUMMER themed craft for preschoolers. Though we have a collection of designs for you, the two you may like most this time of o

Rocking Submarine Craft

Rocking Mermaid Craft (with free templates) – you can see these in the video tutorial on autoplay
Now.. onwards and let’s learn how to make a boat with paper plates, a sheet of paper for the sails and a mast from popsicle sticks.
Rocking Paper Plate Boat – Materials
- per rocking boat, you will need one paper plate
- paper for the sail (you may want to draw a triangle for the children ahead of time – use any paper – old art projects, construction paper or even origami paper)
- crafting sticks (you can use coffee stirrers or wooden skewers with the sharp bits cut off)
- star hole punch (optional)
- coloring pens
Get all your supplies ready on the crafting table and lets get making!
How to make Rocking Paper Plate Boat
The construction method relaly is super easy for these paper boats!

Fold your paper plates in half and decorate.. if the children wish, the “rim” of the paper plate can be the “sea” and the centre of the plate can be the “boat”… but it really doesn’t matter! It is totally up to them. The kids can also draw little fish “In the sea” or use “fish stickers” to add details (if they wish). You can really make this activity as simple or complicated as you wish.
Cut out your triangular Yacht Sail and again decorate – use pens, paint, tape and hole punches!!!! As much or as little as you like. You can also experiment with color paper, origami paper and construction paper. Just work with what you have!

Now tape your yacht craft sail to the wooden sticks… you may want to use two – one down the centre of the sail and another along the bottom of the sail to give it a little structure. You can also add a little wimple to your sail if you wish! Totally your call.
Next, you can either tape the “stem” of the sail to the back of your boat.. or you can make a small hole in the paper playe crease, feed the stick through and tape it to the inside of your board.
SNAGGING: If your boat doesn’t stay upright fully, you can add a little glue/ or rolled up tape to the inside of the paper plate halves to keep them together and really turn this into a fabulous rocking paper plate craft for kids!!!
Your Rocking Paper Plate Boat Craft is finished!

I want to make a boat craft that floats?
Unfortunately these paper boats/ paper plate yachts will not float (but they do ROCK!!). If you are lookng for some boart crafts that float, you can have a go at our Origami Boats (fantastic!) as well as these Magarine Tub Boats (complete with rubber band propellers!). Enjoy! Or maybe older kids will also enjoy this simple origami boat !

More great Boat Crafts for Kids :
More great Ocean Paper Plate Crafts for Kids :

Enjoy your paper plate boat craft for preschoolers!!!
IMAGES
VIDEO
COMMENTS
For the full instructions visit: https://onelittleproject.com/how-to-make-a-paper-boat/These paper boats are SO FUN and they're so simple to make! All you ne...
Press along the edge to make a fold. Pick up the folded paper and place your thumbs into the opening at the bottom. Again, slowly pull your thumbs apart from one another, pulling apart the paper as you go. When you finish pulling, the paper should be flat again, as shown in the photo below. Once again, run your fingers along all of the folds ...
1. Make the triangle into a square. Pick up the triangle, rotate it 45 degrees, then use your fingers to open up the bottom of the triangle. Pull the paper apart gently until it pops into a square shape. Make sure the bottom corners of the triangle fold over each other and become the bottom corner of a diamond.
Finalize the Folds. Pull apart the left and right flaps. Flatten it out, in the shape of a boat. Open it slightly. The triangle in the middle resembles a sail. Make the most well-known origami boat at home. This paper boat can float in water and is a perfect project for kids.
Easy Origami Yacht - How To Make an Easy Paper Yacht - Paper Folding - Paper Craft || DIYSUBSCRIBE HERE : https://bit.ly/34TRzN2STAY WITH ME : https://twitte...
This video will show you how to make a mini luxury yacht with paper. An easy diy craft for home decor or gift ideas.DIY paper boat ⛵️. How to make paper boat...
Start off with a sheet of paper and fold it in half downwards. Fold in half again as shown on the second image (you don't need to make the crease from top to bottom - you just need to mark the center). Bring corners to the center so that you get a triangle shape with a rectangle under it. Fold the rectangle part under the triangle upwards ...
Origami boats, often referred to as paper boats or origami paper boats, are a delightful and easy craft to create, making them an ideal activity for kids and adults alike. The art of folding paper into intricate shapes has captivated people for centuries, and making an origami boat is a perfect introduction to this ancient craft. With a few simple folds and a bit of patience, you can make your ...
How to make a paper boat: Step-by-step guide. Creating a paper boat is a joyful journey that starts with a single sheet of paper and ends with a miniature masterpiece. Follow these step-by-step instructions to craft your very own paper boat: Begin with a square piece of paper, colored or plain. Fold the paper diagonally to create a triangle.
Variations of the Paper Plate Boat. If you want to take the paper plate boat craft a step further, here are some variations for you: Use light cardboard instead of paper plates. Give the boat a 3D element with clay or pipe cleaners. Make the sailboat out of recycled materials. Making a paper plate boat is the perfect way to combine a simple ...
Glue it on the waves. Cut a thin but long strip out of brown paper. Stick it on your card. Let's make a small flag out of red paper and glue it on the top of the strip. Now comes the 3D part. Cut the sail. Fold it at the top and bottom. Apply glue on the folded flaps and press down on the boat. You just made a super duper simple paper boat craft!
Prepare the paper you like. First, fold the paper half downward or lengthwise. Next, fold it again in half, then open it up. Fold two corners on the top to the middle so both corners will meet up in the center along the folded line and resemble a triangle. Fold up both rectangle shapes under the triangle.
Download the Free Boat Craft Template. You will be stapling the template to sheets of colored paper to cut out the shapes. The Boat Craft Printable has everything you need to make this Fire Safety craft. Step 2: Staple and Cut Out the Paper Ship Craft Shapes Print the Boat Template and staple the pieces to multiple sheets of paper before cutting.
Origami is fun, but it can be even more fun if you make the boat out of origami paper! This tutorial will teach you how to make an origami boat with just one piece of paper. It's also a great craft for kids, since it requires no cutting or gluing and is very simple to fold. Let's get started! Supplies Needed for the Paper Boat Origami ...
Instructions for making this boat craft. Step 1: Begin by downloading and printing out the sailboat template. Cut out the two pieces of the template. Step 2: Using a pencil, trace the sail on white construction paper and the boat on brown construction paper with a pencil. Cut out each of the pieces.
These twig boats with a paper sail are by Easy Peasy & Fun; Paper boat craft ideas. Almost everyone has paper at home! Here are some boats that use paper as the key material. Create a paper mosaic sunset boat scene using our printable template. This Margarine tub boat has been decorated with paper to make a cute summer decoration, by Crafts By ...
Check out the step by step tutorial to fold a paper boat yacht. It is one of the easiest origami and papercraft.
Making the boat is super easy! You will only need three things-- paper or duct tape for the sail, a kitchen sponge for the boat's base, and a skewer or a straw for the sail mast. Cut the top two corners of the sponge. Push the skewer in the middle to make the sail mast. Make the sail from paper or duct tape.
8.5 X 11 white or colored paper; markers, crayons, or mini flags to decorate (optional) Step 1: Download Boat Pattern Templates and print out. Step 2: You can work with a whole sheet of paper or cut it in half to make smaller boats. Step 3: Take your piece of paper and fold against a hard surface, following the nine steps in the diagram below:
Step 1: Folding the Hull. To make the hull of a paper sailboat, follow these steps: - Step 1: Start with a square piece of paper. - Step 2: Place the paper in front of you in a diamond shape, with one corner pointing towards you. - Step 3: Fold the bottom corner up to meet the top corner, creating a triangle.
117 likes, 0 comments - paper.crafts.in on March 18, 2024: "Title: " Awning Boat Folding by Little Man" Hashtag: #DIYCrafts #ChildhoodMemories #AwningBoat #Handmade #Crafts"
per rocking boat, you will need one paper plate. paper for the sail (you may want to draw a triangle for the children ahead of time - use any paper - old art projects, construction paper or even origami paper) crafting sticks (you can use coffee stirrers or wooden skewers with the sharp bits cut off) star hole punch (optional) coloring pens.
See other industries within the Manufacturing sector: Aerospace Product and Parts Manufacturing , Agriculture, Construction, and Mining Machinery Manufacturing , Alumina and Aluminum Production and Processing , Animal Food Manufacturing , Animal Slaughtering and Processing , Apparel Accessories and Other Apparel Manufacturing , Apparel Knitting ...
Dun & Bradstreet gathers Pulp, Paper, and Paperboard Mills business information from trusted sources to help you understand company performance, growth potential, and competitive pressures. View 3 Pulp, Paper, and Paperboard Mills company profiles below. NAICS CODES: 3221. Showing 1-3 of 3 . LOCATION.