- New Sailboats
- Sailboats 21-30ft
- Sailboats 31-35ft
- Sailboats 36-40ft
- Sailboats Over 40ft
- Sailboats Under 21feet
- used_sailboats
- Apps and Computer Programs
- Communications
- Fishfinders
- Handheld Electronics
- Plotters MFDS Rradar
- Wind, Speed & Depth Instruments
- Anchoring Mooring
- Running Rigging
- Sails Canvas
- Standing Rigging
- Diesel Engines
- Off Grid Energy
- Cleaning Waxing
- DIY Projects
- Repair, Tools & Materials
- Spare Parts
- Tools & Gadgets
- Cabin Comfort
- Ventilation
- Footwear Apparel
- Foul Weather Gear
- Mailport & PS Advisor
- Inside Practical Sailor Blog
- Activate My Web Access
- Reset Password
- Pay My Bill
- Customer Service

- Free Newsletter
- Give a Gift

How to Sell Your Boat

Cal 2-46: A Venerable Lapworth Design Brought Up to Date

Rhumb Lines: Show Highlights from Annapolis

Open Transom Pros and Cons

Leaping Into Lithium

The Importance of Sea State in Weather Planning

Do-it-yourself Electrical System Survey and Inspection

Install a Standalone Sounder Without Drilling

When Should We Retire Dyneema Stays and Running Rigging?

Rethinking MOB Prevention

Top-notch Wind Indicators

The Everlasting Multihull Trampoline

Check Your Shorepower System for Hidden Dangers

How Dangerous is Your Shore Power?

DIY survey of boat solar and wind turbine systems

What’s Involved in Setting Up a Lithium Battery System?

The Scraper-only Approach to Bottom Paint Removal

Can You Recoat Dyneema?

Gonytia Hot Knife Proves its Mettle

How to Handle the Head

The Day Sailor’s First-Aid Kit

Choosing and Securing Seat Cushions

Cockpit Drains on Race Boats

Re-sealing the Seams on Waterproof Fabrics

Safer Sailing: Add Leg Loops to Your Harness

Waxing and Polishing Your Boat

Reducing Engine Room Noise

Tricks and Tips to Forming Do-it-yourself Rigging Terminals

Marine Toilet Maintenance Tips

Learning to Live with Plastic Boat Bits
- Inside Practical Sailor
Repairing Plastic Water Tanks

Plastic holding tanks and water tanks have the advantage of not corroding, but they are hardly failure proof. Plastic holding tanks can crack and fail under extreme vacuum pressure if the vent is clogged. An errant drill or saw used to make adjacent repairs can puncture a tank. Or a poorly secured tank can be hurled across a cabin and crack.
In our recent report on polyethylene (PE) tank repairs , we explored several different methods of repair, including heat-welding using commonly available welding kits. As that article points out, the manufacturers of these tanks do not recommend such repairs. However, our long-term tests of reinforced water and holding tank repairs (not fuel!) have so far been very promising.
Heres a generic look at the repair procedure using one of two plastic repair kits we tested. We also had limited success using epoxy and polyurethane adhesive, and these repair procedures are outlined in the main article, which appears in the December 2018 issue.
The first step for all cracks is to drill a stop hole (3/16-inch is usually adequate) at each end of the crack to prevent it from spreading. If your hole is more than superficial, you’ll usually need a filler strip.
One source suggested trying a milk jug for filler, as it had been used by others. Although the milk jug approach might work in some cases, in our experience, the thin strips tend to fall down through the crack instead of building a bridge. The repeated heating required to lay down enough material often made the crack wider.
It was easier to work with the thicker strips that came with the supplied repair kits. We used these for our test.
Prep work. Clean and prepare the area around the crack with 60-grit sandpaper. If the hole or crack is very small, use the plastic welding iron to melt plastic around the hole and fill it in, being careful not to melt through the tank. Melt only a thin layer and work it into the crack.
Heating. Next, use the welding iron to soften the area around the repair to insure good adhesion, soften one side of the filler strips, and stick them on, apply 1-2 layers, building up until you match the thickness of the tank material, tapering for five tank thicknesses wide on every side (at least 5/8-inch past the crack).
Blending. Smooth the layers of plastic together, but do not linger too long in one area, or the heated plastic will begin to sag into the tank. Keep in mind that your aim is not a true fusion weld, as in steel welding when the filler and base material are well mixed. This simply does not work. If you tried to apply enough heat to fully liquefy the PE, it would shrink away from the crack, and fall into the tank before you finish. In addition, the melting points of the filler and the base material, even if both PE, are probably somewhat different.
Reinforcing . Incorporating reinforcing material makes the repair stronger and tougher. We recommend this for both adhesive and welded repair, but the materials are different. We tried using fiberglass cloth with melted polyethylene, but it was hard to keep in place during welding.
We settled on stainless steel mesh. This is included in welding kits, and you can also get small pieces in the plumbing department, sold as lint screens. Cut a piece about 1-inch wide and 1-inch longer than the crack. Soften the tank surface with the welding iron and then press the mesh into the plastic. Do not press too hard; wait for the plastic to get soft and it will settle right in.
If the surface is curved, cover a small area, let it harden, and then work the mesh into the plastic in stages, bit by bit, as if fitting a replacement plank or bending a steel hull plate. Once the mesh is set, lay filler material on top of it. Pre-soften one side of the filler material with the iron, press it onto the screen, and use the iron to melt and smooth it down. Cover the mesh with several layers of filler, continue building up to about 1/8-inch. There is an excellent how-to video by Polyvance, the makers of one of the tested kits.
Sanding. After the filler and tank cools, you can sand it smooth if you have added enough filler material. The sanding will leave it dull and fuzzy, but a light flaming with a torch, similar to how you prepped the area, will restore some of the gloss. If you need to match color, use strips of matching PE. The color worked well with our kayak repair, but for a tank repair you can skip these cosmetic steps.
Practice. It is possible to make things worse. If you watch enough You Tube repair videos, you will see people make small cracks into big holes by applying too much heat or using filler material with too high a melting point. We made the same mistakes during practice, before making the welds we used for testing. A 5-gallon bucket, a kids playhouse, or a food storage container makes for a good test bed. Try to find something similar in thickness to your tank.
RELATED ARTICLES MORE FROM AUTHOR
I would like to order
Is there any reason a P-tex ski base repair stick would not work? I’ve repaired garbage pails with it. You light the stick on fire, drip and/or roll molten plastic onto the cracked area. I’ve got a tiny failure in the junction between the female NPT fitting and the body of the tank.
LEAVE A REPLY Cancel reply
Log in to leave a comment
Latest Videos

40-Footer Boat Tours – With Some Big Surprises! | Boat Tour

Electrical Do’s and Don’ts

Bahamas Travel Advisory: Cause for Concern?

Island Packet 370: What You Should Know | Boat Review
- Privacy Policy
- Do Not Sell My Personal Information
- Online Account Activation
- Privacy Manager
- BOAT OF THE YEAR
- Newsletters
- Sailboat Reviews
- Boating Safety
- Sailing Totem
- Charter Resources
- Destinations
- Galley Recipes
- Living Aboard
- Sails and Rigging
- Maintenance
- Best Marine Electronics & Technology
How to Refurbish Water Tanks
- By Eian Mathieson
- Updated: January 17, 2018

My 25-year-old Hunter 42 has aluminum tanks, which was very common across the boat and RV industries from the 1950s until well into the 1990s. Fortunately, the fuel tank is in great condition. This was recently confirmed after I added two inspection ports and cleaned that tank for the first time in 25 years — but that’s a separate story!
I have two aluminum water tanks: an 85-gallon one amidships and a 65-gallon one forward. Both, as one should expect, had some corrosion. My forward tank had been leaking very slightly, so I knew that needed replacement. However, replacing that tank would be a huge undertaking, requiring the removal (read: major deconstruction) of the entire guest bed and drawers, plus removal of the door and frame in the forward cabin. And then, after all that, the aluminum tank would need to be cut into two pieces in order to remove it from the boat. Obviously, this also means that the replacement plastic tank would need to be a little smaller capacity to be able to get it into the boat. I know well from sailboat owners forums online that this is a very common conundrum for many boat owners, so I set out to research if a refurbishment was both possible and practical. The main problem I had was to find a coating or sealant that was certified as food safe, or suitable for potable water. I finally came across a Norwegian specialist coatings firm called Jotun. Initially, my internet search had found “Jotun Tankguard DW,” but unfortunately, it was not certified for use on aluminum. This is where the technical guys at Jotun were very helpful. They researched their archives and found that another product called Jotacote 605 was indeed suitable for application onto aluminum and had been laboratory tested and certified as food safe by the NATA (Australian government certifiers) — therefore, perfect for my water tank.
Step 1 — First, I had to cut a new access hole in the base of the V-berth in order to uncover the forward section of the tank (Figure 1). The tank has two full-width baffles, so I needed to cut two inspection ports in order to have enough access to the entire tank for preparation and coating (Figure 2).
Step 2 — I did a general inspection of the tank, and aside from some corrosion, it was in reasonable overall shape (Figure 3).

Step 3 — Next, I thoroughly cleaned all corrosion from all tank surfaces in order to assess the real condition (Figure 4). I was advised by the original tank manufacturer to use white vinegar to neutralize the corrosion.
Step 4 — After I decided that it was well worth a shot at refurbishing the tank, I started the prep work (Figure 5). Jotun advises that all surfaces must be rubbed with coarse-grit sandpaper to provide a good grip for proper adhesion of the Jotacote 605.
Step 5 — I found seven actual holes in my tank, ranging from pinholes to about 4 mm in diameter. I filled these with J-B WaterWeld epoxy putty (Figure 6). To do this, I pushed the WaterWeld well into each hole and in the deeper corrosion spots, then smoothed the top side.
Step 6 — Jotacote 605 is a two-part epoxy-based surface coating that can be mixed in various colors. I have blue because it was available off the shelf. I initially went over all the J-B WaterWeld patches and all welded seams throughout the tank with an initial Jotacote 605 coat. I let this dry and then applied a full surface coat throughout the entire tank (Figure 7). I left it well ventilated for 24 hours and then went back to do a second coat. After another 24 hours and a close inspection of all internal surfaces to ensure I was getting even coverage, I applied the third coat. (I utilized my iPhone to take pictures of all surfaces, which makes it simple to see all nooks and crannies.) By now, I had a beautiful, even and thick Jotacote 605 surface throughout. It really does look great.

Step 7 — I made inspection panels to cover and seal the two 51⁄2-by-12-inch access holes I had cut into the top of the tank (Figure 8). I used 10 mm clear polycarbonate for the panels due to its absolute strength, and I used M6 stainless-steel bolts at 30 mm centers to secure them. I did this because the aluminum is only about 3 mm thick and was a little warped due to the new access holes, so I needed to be sure it would pull straight and form a tight seal. Because the tank material was too thin to tap a thread into, I had to come up with an alternative. For the new forward inspection panel, due to it straddling the front baffle, I used 5⁄8-inch-wide-by-1⁄8-inch-thick aluminum strips as backing plates, into which I drilled and tapped holes in line with the holes in my tank top and polycarbonate cover plate. This allowed me to put these strips with bolts inserted into the tank and then poke the bolts back up through pre-drilled holes in the tank. I could then use a thin rubber band strung between the first and last bolts to hold this in place. Next, I applied a thin bead of silicone as a gasket and lowered the polycarbonate cover plate down onto it, then secured with nuts and both flat and spring washers.
For the aft inspection panel, I added a screw-type deck plate manufactured by Beckson Marine as an access port (I happened to have a spare one). This allowed me to simply pass the bolts down through the Beckson and up through the pre-drilled holes from inside the tank to secure the polycarbonate cover plate with the same bead of silicone as a gasket. I filled the tank and left it for one week to confirm that there were no leaks. I then drained the tank to ensure that any residual taste from the Jotacote 605 was removed before refilling the tank with lovely fresh Australian water!
I invested about 12 hours of labor into this project. The total cost of the tank refurbishment was less than $200 all up, not including my labor, so I consider this a very successful endeavor. With a custom-made plastic replacement tank costing around $1,000, this was a no-brainer — not to mention actually a whole lot faster and much easier. In fact, I would now thoroughly recommend anyone with aluminum tanks to perform this project as a preventive measure, rather than wait until you have problems.
Eian Mathieson lives in Sydney, Australia, where he sails his Hunter Passage 42, Bellringer. This article first appeared in the January/February 2018 issue of Cruising World under the title “Tank Tending.”
- More: How To , projects
- More How To

How to Rig Everything in Your Favor

Is There a Doctor Aboard?

3 Clutch Sails For Peak Performance

It’s Time to Rethink Your Ditch Kit

Cruising the Northwest Passage

Balance 442 “Lasai” Set to Debut

A Legendary Sail

10 Best Sailing Movies of All Time
- Digital Edition
- Customer Service
- Privacy Policy
- Email Newsletters
- Cruising World
- Sailing World
- Salt Water Sportsman
- Sport Fishing
- Wakeboarding

- Forum Listing
- Marketplace
- Advanced Search
- About The Boat
- Gear & Maintenance
- SailNet is a forum community dedicated to Sailing enthusiasts. Come join the discussion about sailing, modifications, classifieds, troubleshooting, repairs, reviews, maintenance, and more!
Ever repaired a stainless water tank?
- Add to quote
I just bought a '79 Alajuela 33 with a leaky stainless fresh water tank. I've read (D. Casey, N. Calder) that linear poly has many advantages over stainless. I've pulled the old approx. 70-gal. tank, planning to replace it with a couple of molded poly tanks. I still miight. But now I'm wondering if it's feasable to get the welded seams ground out and re-welded with the correct wire or rod and have a tank that will last another decade or two. I'd get it done by a professional weldor who routinely works with that material. The SS tank was made to optimize the available space within the keel, and so holds a much bigger water supply. Re-using it will also avoid having to build in supports for a couple rectangular poly tanks. And 2 poly tanks would have 6 potentially leaky fittings between them. I'd appreciate hearing your experiences or insights. John V.

Don't know where you're located, but there's a couple of fabricators in the San Diego area that repair SS tanks, so I bet there's someone in your area. Fitted SS tanks are hard to beat when you looking for optimal volume vs space.
Stainless is a perfectly good material for tanks. A good welder should be able to look at the tank and tell you whether it is worth repairing. If you have an air source, you could pressurize the tank on your own and put a soapy liquid on the seams to see pinhole leaks. If there are lots of pinholes, it will be better to replace the tank but if there is only one problem area, it can certainly be ground and rewelded. My own experience has been that stainless tanks go something like 40 years before needing major work. Tanks under pressure tend to develop pinhole leaks in welds earlier.

I agree, get it welded and maybe you'll get another 30 years out of it.

As long as the SS is in good condition I don't see why you couldn't do what you are proposing but you would need to talk to a fabricator to price out the difference between fixing and making new to see which makes the most sense. Grinding out all the welds and re-doing them is a lot of time/work.
Thanks for the replies. I'll track down a good local stainless steel weldor and have him take a look. Klem's point is well taken. If one pinhole is leaking, there are others that will eventually start to. Hence my thinking to re-weld all the seams. Getting the tank out requires removing the plywood sole and cutting up the floor pan, so I want some confidence in the tank. John V.

RichH-you obviously have more knowledge of the subject than I do. How do you account for so many crappy SS tanks lasting 20-30 years or more, like on my boat? Thanks.
Several reasons .... a 'quality' tank was installed, one that welded up by an 'artist' who did 'full penetration' weld (very difficult in thin metal) without overheating the base metal, didnt have many weld laps, slag, etc. in the weld. The welder may have also passivated the tank when the welding was completed ... most ss tanks for boats arent passivated. The pin holes are usually IN the weld area, especially where the weld is not 'smooth' and the corrosion propagates into the 'irregularities' from substandard welding. Other may be that you are in an area that has a newer municipal water system that has its source of 'clean' source water with relatively low 'bio-burden' that requires very little chlorine concentration (.25-.5ppm) to keep it 'sanitary' ... instead of some areas that require heavy dosage (1-3+ppm), etc. ... or you may be using 'well water'. ;-)

- ?
- 173.8K members
Top Contributors this Month

- Forums New posts Unanswered threads Register Top Posts Email
- What's new New posts New Posts (legacy) Latest activity New media
- Media New media New comments
- Boat Info Downloads Weekly Quiz Topic FAQ 10000boatnames.com
- Classifieds Sell Your Boat Used Gear for Sale
- Parts General Marine Parts Hunter Beneteau Catalina MacGregor Oday
- Help Terms of Use Monday Mail Subscribe Monday Mail Unsubscribe
rotomold tank repair?
- Thread starter Bob J.
- Start date Oct 6, 2011
- Forums for All Owners
- Ask All Sailors

Can a rotomolded tank that has a crack in it be repaired by a competent welder?

Peggie Hall HeadMistress
Bob Jennings said: Can a rotomolded tank that has a crack in it be repaired by a competent welder? Click to expand
I was hoping you'd chime in Peggie. The crack is at the outlet so I think doing dock side pumps out caused the crack due to excessive vacuum/blocked vent. I had read an article that discussed tank repairs by gas welding & your comment on "heat welded" just confirmed that. I'm going to give it a shot, got nothing to lose. Thanks!

Yes it is possible to repair rotomolded. Some tank builders who specialize in industrial Poly tanks can weld the crack using a fiberglass 'scrim' to polyethylene 'overlay' ... and affect a 'patch' (similar to a ski shop who can repair torn ski bottoms). Such repairs usually can only be performed on tank sections that are not 'fully stressed'. So, if you live in an area that has a high population of 'chemical plants', pharmaceutical, etc. plants then seek out one of these 'builders' ... but its not going to be 'inexpensive'. FWIW - I 'believe' that 3M has recently developed an adhesive/glue suitable for 'minor' repairs on polyethylene. You might want to do a websearch of 'industrial suppliers' - Grainger, etc.. examples: http://solutions.3m.com/wps/portal/...JJ60IS8FSO6Q3GD3_nid=P1LTGPF01Gbe7ZMZSJBQRHgl ,,,, and ... http://solutions.3m.com/wps/portal/...E3E02LECFTDQGLE0_nid=NSSR7S8QPKbeW8LNFLFN3Xgl
Old Skool Neil
A tip I was taught many years ago was to drill a small hole at the ends of the crack before attempting the repair. The intent was to prevent the crack from migrating further.
All of y'all are overlooking one thing: There may be tank fabricators who'll work on a USED waste holding tank, but in more than 25 years, I've yet to find one. UPS may not even accept it for shipping. Only two things can crack the female threaded "collar" in the tank... 1. over-tightening the thread-barb fitting. They're self sealing and should only be tightened ONE turn past hand tight, even if most of the threads are still showing. 2. Using a straight thread-barb fitting where a 90 is needed. The hose pulls on one side of the fitting, putting enough stress on the spinweld till it breaks the weld. Closing up that fitting and installing a new one won't work 'cuz there's no way to seal up the cracked fitting other than knocking it out and spin welding a new one in. You're actually seriously considering trying to mend a cracked DISCHARGE fitting in a waste holding tank? Surely, not one that's at the bottom of the tank...??? Do you have the tool to heat weld poly? 'Cuz it's not the same thing as just dribbling P-tex into a ski bottom. A heat welder simultaneously melts the edges of the crack while also injecting new melted poly, so that it all runs together to become a single mass. And you'll need a clamp to keep 'em together till they cool and harden. But then you'll no longer have a threaded fitting, so how ya gonna get a thread-barb fitting back into the tank? IMO the only good answer is: bite the bullet and replace the tank. Ronco Plastics is your best source Ronco Plastics They make TOP quality tanks for a very reasonable price (which is even more reasonable if you order it through the online store at this site) and have more than 400 shapes/sizes, including over 100 non-rectangular...and they install fittings in the sizes and locations specified by the customer when they make the tank.
I did a small crack patch (windshield washer and a Jeep radiator expansion tank) using a soldering gun. I cut a deep 1/8 inch "V" along the crack and carefully melt the filler material into the "V" gap. I melt extra material on top of the gap to strengthen the area. It held even under nominal 15-20psi pressure. Didn't try higher pressure. Again, you have nothing to loose.

Plus One for RONCO Bob, When I replaced our original Ronco holding tank with a larger one, I had them change the fittings so that all were on top. The original tank had separate bottom threaded outlets for deck pump out and thruhull pump out (in legal areas). I did not like the idea of any fitting that might potentially leak out, and the rep at Ronco told me that they spin-weld in those fittings either way and some customers want bottom and some top. The top-type uses a tube that goes down to the bottom with a angle-cut for the end. Very solidly engineered. I had them put in two of these "dip tubes" and the one entry fitting, plus a threaded clean out. It's a thick wall tank and should out last all of us. (Heck, I later cleaned up and sold the original tank to another boater for a few bucks.) They are a good company. When you fax or email your new tank diagram to them, be sure to accurately indicate where the fittings and the all-important clean out port goes. LB

Dave Groshong
We offer Ronco tanks at a discount here, give me a call 9-5 Pacific if you end up needing a new one
Hey Dave, Peggie had mentioned that once before so after I play w/ this tank repair, bottom line is I'll be contacting you for a couple of new tanks. Even if we are able to fix the holding tank, after 31 years in the boat & sitting outdoors all summer it still has a lovely aroma that would make a pig farmer blush.
Bob: Here is the Ronco catalogue so you can find a tank that is suitable for your application. Ronco will place the fitting where ever you need them. I have found that SBO has equal or better prices on most item and their service is great. http://ronco-plastics.com/
Replace your Ronco bookmark, Steve... That one hasn't worked for years...the one that I posted above is right one and goes directly to their marine tanks catalog: Ronco Plastics Bob, plastic tanks don't permeate...all that lovely aroma is actually coming from INSIDE the tank. Clean it off and put threaded plugs in all the fittings and it'll cease to be any competition to the local pig farmer. However, hoses DO permeate...we haven't discussed those yet. I'm 90% certain that Kracor made your existing tank. You can get a replacement from them, but only for an outrageous price (about $500 I think), with NO choice as to fittings sizes and locations. So let's try hard to find a Ronco tank that'll fit. Btw...are you on the sabre email list? If not, you should be 'cuz they're a really great group!
Thanks for the links, had downloaded the Ronco catalog awhile back. The tank in the boat is a 20 gallon Kracor & less shipping it's $525.00 An equivelent Ronco tank with the diminsions that fit in the space is 18 gallons & can be had for around $250.00 I'm on the Sabre email list, lot's of good info. Have a great weekend everyone!
Well here's the story on attempting to do the tank repair. We were able to fix the crack & replace the fitting. It wasn't too difficult but I wasn't the one on the stinger. We air test the tank at the shop, we're good to go. So, I get the tank home decided to fill it up with water & a little bleach to really sanitize it before putting it back in the boat. The tank is standing on end, our dog sees the tank, starts barking like hell, vaults off the porch, tackles the tank which falls over with a thud & the side of the tank opposite the repair blows out in 2 pieces. After that I decided to sanitize myself & pour another Jack Daniels.... LOL
Dogs are pretty smart. Maybe he knew something and was doing you a favor by forcing the issue.
Give that dog a T-Bone!

3 M makes a polyethylene "weld" compound that works very well. We repaired the poly tank (for water) that had a pressure crack, It's not had a problem in 3 years. The crack was caused from pressure build due to a blocked vent tube. http://www.shop3m.com/62449526318.html This is what we used http://www.shop3m.com/3m-scotch-weld-plastic-adhesive-dp8010-xdqktrgpf1.html

If you scorch the surface of the polyethylene with a propane torch then you may be able to get epoxy to stick to it.
- This site uses cookies to help personalise content, tailor your experience and to keep you logged in if you register. By continuing to use this site, you are consenting to our use of cookies. Accept Learn more…
- Electronic Water Descalers
- Water Ionizers
- Ozone Water Treatment
- Reverse Osmosis
- Water Purification Tablets
- UV Water Purifiers
- Filtered Water Bottles
- Emergency Water Filters
- Water Filter Pitchers
- RV Water Filters
- Electric Kettles
- Tiger Water Boilers
- Zojirushi Water Boilers
- Best Kettle Brands
- Stainless Steel Tea Kettles
- Stovetop Kettles
- Water Boilers
- Water Brands
- Collapsible Water Bottles
- Glass Water Bottles
- Insulated Water Bottles
- Reusable Water Bottles
- Smart Water Bottles
- Copper Water Contamination
- Fluoride Water Contamination
- Iron Water Contamination
- Lead Water Contamination
- Plastic Water Contamination
- 5 Gallon Water Dispensers
- Water Dispenser Stands
- Water Machines
- Water Coolers
- Water Delivery Services
- Hot Water Dispensers
- Countertop filters
- Faucet Filters
- Inline Filters
- Refrigerator Filters
- Under-sink Filters
- Whole House Filters
- Shower Filters
- Water Filter Brands
- Water Testing
- The Best Drinking Water
- Potable Water
- Dual Tank Water Softeners
- Outdoor Water Softeners
- Portable Water Softeners
- Water Softener Providers
- Salt-free Water Softeners
- Alkaline Water
- Canned Water
- Distilled Water
- Heavy Water
- Mineral Water
- Purified Water
- Sparkling Water
- Spring Water
- Water Storage
- Find Your Cities Water Provider
- Filtration & Treatments Everything you need to know about water filtration & treatments.
- Portable Filters Everything you need to know about portable water filters.
- Water Boilers & Kettles Best Water Boilers and Warmers – Buyer’s Guide and Reviews
- Water Bottles Everything you need to know about water bottles and water brands.
- Water Contamination Information and resources about water contamination.
- Water Dispensers Everything you need to know about water coolers and dispensers.
- Water Filters Resources and information about the various types of water filtration methods.
- Water Quality Your guide to drinking water quality.
- Water Softeners Everything you need to know about water softeners.
- Water Types & Sources Information about drinking water types and sources.
- Water Filters
- Water Quality
- Filtration & Treatments
- City of Moscow Water Department
- Pay Your Bill
- Start or Stop Service
- News & Resources

Moscow Drinking Water Quality
Consumer confidence water quality reports.
Under the authority of the Safe Drinking Water Act, the EPA requires Moscow Water Department to assess local water quality each year and distribute a Consumer Confidence Water Quality Report. At WaterZen, we review these reports and make the information available, in a concise, straightforward, and easy-to-understand way.
Lead Report (2018)
Waterzen rating click here to learn more about our data and methodology.">.
Lead levels in the drinking water of some cities across the United States are too high, potentially creating public-health issues for the people living in those areas.
What about City of Moscow Water Department? How much lead is in your drinking water? And how do those levels compare to other cities in the state? We examined data from hundreds of cities across the nation to understand and grade your water quality.
As you can see, City of Moscow Water Department received an above-average grade because the amounts of contaminants found in the water supply were lower than most other water providers we've analyzed.
- Lead Levels in the Water
- State & National Comparisons
In this report:
Contact moscow water department customer service, have a question, issue or comment.
Main Customer Service Physical Address: 201 North Main Street Moscow, Idaho 83843 208-882-3122 [email protected]
Emergency (24 hours - broken water main or pipeline, etc.) 208-882-3122
Pay Your City of Moscow Water Department Bill
Already have an account.
If you already have an account, you just need to login to the City of Moscow Water Department site. City of Moscow Water Department accepts credit cards, debit, and direct deposit. Click here to login .
Want to create a new account?
You can create a new account on the City of Moscow Water Department website. Once you create the account, you can setup payment with credit, debit, or direct deposit. Click here to create an account .
Want to pay without an account?
You can make a one-time payment without creating an account. You will need to have your credit or debit card in order to make the one time payment. Click here to make a one time payment .
How to Start Moscow Water Service
Starting your service.
When you move to a new home in Moscow, you'll most likely already have running water, but you'll still need to set up water service with the City of Moscow Water Department. Luckily, Moscow has made it pretty simple with the following online form. Starting service generally takes just two business days.
Click here to fill out a Start Service Form .
Stopping Your Service
When you move out of a home in Moscow, you'll need to stop your water service with the City of Moscow Water Department, so you don't keep getting billed. Simply fill out the following online form. Stopping service normally takes just two business days.
Click here to fill out a Stop Service Form .
Brio Moderna Water Dispenser
Brio Moderna Water Dispenser is a stainless steel water cooler.
Pohl Schmitt Electric Kettle
Venoly whistling tea kettle, susteas whistling tea kettle, r.w.flame water dispenser.
This R.W.FLAME Water Cooler Dispenser has a built-in ice maker.
Secura Milk Frother
Lxuemlu tds meter, owala freesip water bottle.
Owala FreeSip Clear Water Bottle has a capacity of 25 oz and has a wide-mouth opening.
ICOOKPOT Electric Kettle
Home labs water dispenser.
This Home Labs Water Dispenser is a bottom-loading water dispenser that can hold a 5-gallon water bottle.
More Water Providers in Idaho
- Avondale Irrigation District
- Capitol Water
- City Of Ammon Water
- City Of Blackfoot Utilities
- City Of Burley Utilities
- City Of Caldwell Water
- City Of Chubbuck Water Department
- City Of Jerome Water
- City Of Kuna Water
- City Of Lewiston Water And Sewer
- City Of Nampa Water
- City Of Payette Water
- City Of Pocatello Water
- City Of Rathdrum Water
- City Of Sandpoint Utilities
- City Of Weiser Utilities
- Coeur d'Alene Water Department
- Eagle Water
- East Greenacres Irrigation District
- Emmett Utilities
- Falls Water
- Fruitland Water
- Garden City Water Department
- Hailey Water
- Hayden Lake Irrigation District
- Idaho Falls Utilities
- Lewiston Orchards Irrigation District
- Meridian Water Department
- Middleton Water Department
- Mountain Home Water Department
- Post Falls Water
- Preston Water Department
- Rexburg Water
- Rupert Water Department
- Star Sewer And Water District
- SUEZ Water – Idaho
- Twin Falls Water
Popular Water Providers
- Tucson Water
- Gwinnett County Water
- Greenville Water
- City of Houston Water
- Cobb County Water
- Louisville Water
- Phoenix Water
- Glendale Water
- Cleveland water
- Salt Lake City Water
- Tacoma Water
- Saint Paul Water
- Alameda County Water
- Corpus Christi Water
- Santa Ana Water
- Minneapolis Water
- Toledo Water
- Irvine Water
- Arlington Water
- Tulsa Water
- Virginia Beach Water
- Pittsburgh Water
- Newport News Water
- Anaheim Water
- Long Beach Water
- Monroe County Water
- Fresno Water
- Baton Rouge Water
- Palm Beach Water
- Albuquerque Water
- Oklahoma City Water (OKC Water)
- Nashville Water
- Orlando water utility
- Portland Water
- East Bay MUD Water
- Las Vegas Water
- San Diego Water
- Dallas Water
- St Louis Water
- Denver Water
- Charlotte Water
- San Jose Water
- Seattle Water
- Citizens Water
- Cincinnati Water
- Forth Worth Water
- Jacksonville Water
- Detroit Water
- Atlanta Water
- Milwaukee Water
- El Paso Water
- Raleigh Water
- Kansas City Water
- Manatee County Water
- Eastern Municipal Water District
- Dekalb County Water
- Austin Water
Tanksdriving

- See all photos

Most Recent: Reviews ordered by most recent publish date in descending order.
Detailed Reviews: Reviews ordered by recency and descriptiveness of user-identified themes such as wait time, length of visit, general tips, and location information.
Tanksdriving - All You Need to Know BEFORE You Go (2024)
- Vessel Reviews
- Passenger Vessel World
- Offshore World
- Tug and Salvage World
- Maritime Security World
- Specialised Fields
- Marine Projects World
- Small Craft World
- Tanker World
- Dry Cargo World
- Boxship World
- Aquaculture World
- Trawling World
- Longlining World
- Seining World
- Potting World
- Other Fishing Methods
- Regulation & Enforcement
- Feature Weeks
- Classifieds
- Book Reviews
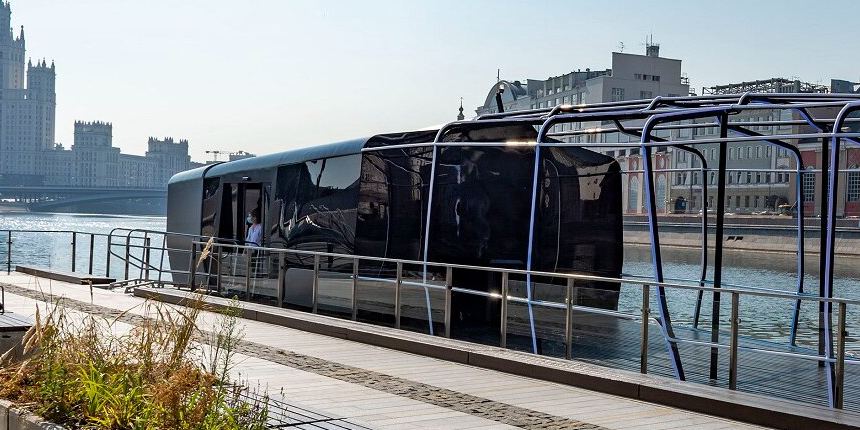
VESSEL REVIEW | Sinichka – Electric commuter boats designed for Russia’s Moskva River

A series of three new electric monohull commuter ferries have already begun operational sailings on the Moskva River in the Russian capital Moscow.
Built by Russian shipyard Emperium, sister vessels Sinichka , Filka , and Presnya – all named after rivers in Moscow – are being operated by the Moscow Department of Transport and Road Infrastructure Development (Moscow Deptrans). They are the first units of a planned fleet of 20 vessels that will serve the capital city and other nearby communities. The new ferry system will be the water transport system to be operated on the Moskva River in 16 years.
Each vessel has a welded aluminium hull, an LOA of 21 metres, a beam of 6.2 metres, a draught of only 1.4 metres, a displacement of 40 tonnes, and capacity for 80 passengers plus two crewmembers. Seating is available for 42 passengers on each ferry, and the main cabins are also fitted with USB charging ports, wifi connectivity, tables, toilets, and space for bicycles and scooters. The cabin layout can be rearranged to allow the operator to adjust the distances between the seats and to install armrests of varying widths.
An open upper deck is also accessible to passengers and is the only area on each ferry where smoking is allowed.
The ferries are all of modular construction with each ferry’s wheelhouse, main cabin, and other structural elements being built as complete, separate components. This enables the ferries to be easily dismantled for transport to anywhere in Russia by rail and then quickly re-assembled within seven days.
The ferries are also ice-capable. Recently completed operational trials on the Moskva showed that the vessels can also easily navigate under mild winter conditions with broken surface ice, though year-round operations are planned for the entire fleet.
The ferries are each fitted with 500kWh lithium iron phosphate battery packs that supply power to two 134kW motors. This configuration can deliver a maximum speed of 11.8 knots, a cruising speed of just under 10 knots, and a range of 150 kilometres.
Emperium said the transfer of rotation of electric motors to the propeller is carried out by direct drive. As a propulsion installation, a pulling rotary propeller-steering column with double screws is used. The installation of double pulling screws, with similar power, allows an operator to increase the efficiency of the propulsion system to deliver a slightly higher speed or to reduce energy consumption. This arrangement also provides the ferries with enhanced manoeuvrability necessary for navigating in close quarters.
The batteries themselves have projected service lives of 10 to 12 years and are fitted with safety features such as built-in fire extinguishers and gas vents. Quick-disconnect features allow the batteries to be easily removed for replacement or maintenance.
Some of our readers have expressed disquiet at our publication of reviews and articles describing new vessels from Russia. We at Baird Maritime can understand and sympathise with those views. However, despite the behaviour of the country’s leaders, we believe that the maritime world needs to learn of the latest developments in vessel design and construction there.
Click here to read other news stories, features, opinion articles, and vessel reviews as part of this month’s Passenger Vessel Week.
Related Posts

Baird Maritime
Tags: Emperium Filka Moscow Moscow Department of Transport and Road Infrastructure Development Moskva River Presnya Russia Sinichka WBW newbuild
- Previous VESSEL REVIEW | Ferry Rokko – Second 194m Ro-Pax for Miyazaki Car Ferry
- Next Brighton man to be charged for illegal abalone haul
Baird Maritime , launched in 1978, is one of the world's premier maritime publishing houses.
The company produces the leading maritime new portal BairdMaritime.com , home of the world famous Work Boat World, Fishing Boat World, Ship World, Ausmarine, and Commercial Mariner sub-sites, and the industry-leading ship brokerage platforms WorkBoatWorld.com and ShipWorld.com .
Contact us: [email protected]
© Copyright - Baird Maritime
- Terms & Conditions
- Advertise with Baird Maritime
- Submit News/Leads
IMAGES
VIDEO
COMMENTS
Sailboat Water Tank Repair, Chain Locker modification, and Head Maintenance! All DIY + Final Details of Sailboat Tour Valiant 40 - the Details with Blue wat...
Plastic holding tanks and water tanks have the advantage of not corroding, but they are hardly failure proof. Plastic holding tanks can crack and fail under extreme vacuum pressure if the vent is clogged. An errant drill or saw used to make adjacent repairs can puncture a tank. Or a poorly secured tank can be hurled across a cabin and crack.
However, with the nylon hose tees you'll also need six stainless steel hose clips at a cost of $1.99 each, bumping the total price tag for the "low-cost" solution up to $33.21. West Marine lists Whale's 15mm tubing at $1.49 per foot (blue), compared to food-grade reinforced 5/8in PVC hose at $1.79 per foot.
Prep work. Clean and prepare the area around the crack with 60-grit sandpaper. If the hole or crack is very small, use the plastic welding iron to melt plastic around the hole and fill it in, being careful not to melt through the tank. Melt only a thin layer and work it into the crack. Heating.
Step 1 — First, I had to cut a new access hole in the base of the V-berth in order to uncover the forward section of the tank (Figure 1). The tank has two full-width baffles, so I needed to cut two inspection ports in order to have enough access to the entire tank for preparation and coating (Figure 2). Advertisement.
As usual, it sounds like it is really the half measure that is the biggest waste of time and money. The brewcoat is a reasonable approach for potable water, as it is FDA approved for brewery tanks and potable water tanks. Sounds like I should have a big tank replacement party and do the fuel and water tanks at the same time.
Boat water tanks that are made of stainless steel are CRAP and are easily subject to corrosion unless the following (expensive) steps are taken: the internal surfaces must be free of 'weld irregularities' and the wleld should be ground flush and smooth, the internal surface finish (including the weld areas) should be sanded and a high mechanical mirror polish (to ~5 micro inches) followed by ...
Know-how: Modify a Blackwater System. David Popken. Nov 15, 2019. The V-berth holding tank re-plumbed with rigid PVC pipe and the manual discharge pump in the foreground. My dissatisfaction with the head and holding tank plumbing arrangement on our 1987 Sabre 38 had grown as we cruised the boat away from the comforts of a marina for longer ...
Boat: Island Packet 32 Keel/CB. Posts: 995. Re: Repairing a Leaking Aluminum Water Tank. If you can access the area from the outside, clean the area around the leak (SS wire brush, coarse sand paper), use a small drill to clean out the hole. Mix up some West G Flex Epoxy and spread it in and around the repair.
Posts: 96. Repair of stainless steel water tank. I have a leak in one of the stainless water tanks on my Liberty 49 which is some 27 years old. Although I know that the proper solution is to re-weld what I suspect is a leaking seam or perhaps to replace the tank, removal of the tank is well nigh impossible as it's under the saloon floor (remove ...
In this vlog, I repair the water tank aboard our Endeavour sailboat. After hurricane Irma, I noticed flakes of weird stuff are floating in our drinking water...
Have a small leak in my H34 port water tank - at the seam where the top and side join. Tempo and Todd (make water tanks) have no solutions for polyethylene, neither does 3M. Any ideas? Help. [email protected]
So, I get the tank home decided to fill it up with water & a little bleach to really sanitize it before putting it back in the boat. The tank is standing on end, our dog sees the tank, starts barking like hell, vaults off the porch, tackles the tank which falls over with a thud & the side of the tank opposite the repair blows out in 2 pieces.
Amazon Affiliate Link To Resin Kit: https://amzn.to/2M8JOxDPlease click like, please subscribe. click on my name under the video for all my other how-to vide...
The Moscow Water Department Water provides water for about 24,499 residents living in the Moscow area, Idaho. Established in 1887, the Moscow Water Department Water collects supply from a groundwater source: five wells which draw water from two underground aquifers; the shallow aquifer known as the Wanapum, and a deeper aquifer called the Grand Ronde.
About. "Tanks driving" is a real opportunity to variegate your everyday life, brighten up holidays or just get a bunch of emotions, a surge of adrenaline and unspeakable feel of extreme! We offer you, along with your friends, family members, colleagues or new acquaintances, to pay a visit to our tank training ground and for several hours to ...
About Us. Baird Maritime, launched in 1978, is one of the world's premier maritime publishing houses.. The company produces the leading maritime new portal BairdMaritime.com, home of the world famous Work Boat World, Fishing Boat World, Ship World, Ausmarine, and Commercial Mariner sub-sites, and the industry-leading ship brokerage platforms WorkBoatWorld.com and ShipWorld.com.
On this map you can see the details of the longest and most classic of the Flotilla Radisson boat tours: 2. Companies that do boat tours on the Moskva River. There are many companies that do cruises on the Moskva River, but the 4 main ones are: Capital River Boat Tour Company (CCK) Mosflot. Flotilla Radisson.