SV Belle and Beast


Building a Sailboat Trailer
Since Belle did not come with a trailer, much of why she was so inexpensive, we had to source a trailer to put under her to make her useful to us. Buying a custom trailer was going to be in the $3000 range, 10X what we paid for Belle. Adapting a used trailer was going to be the only affordable. So this is how we set about building a sailboat trailer.
So how does one go about building a sailboat trailer? The easy way is to start with an existing trailer. We need some fairly detailed knowledge about the boat we intend to trailer. We need a trailer that is long enough and strong enough to support the load so we need to know where the center of gravity of the boat is, how far forward and aft the bow and stern are from this point, how much the boat weighs, how far from centerline the reasonably flat/horizontal hull areas extend, and how far these areas are vertically from the bottom of the keel.

Measure It Up
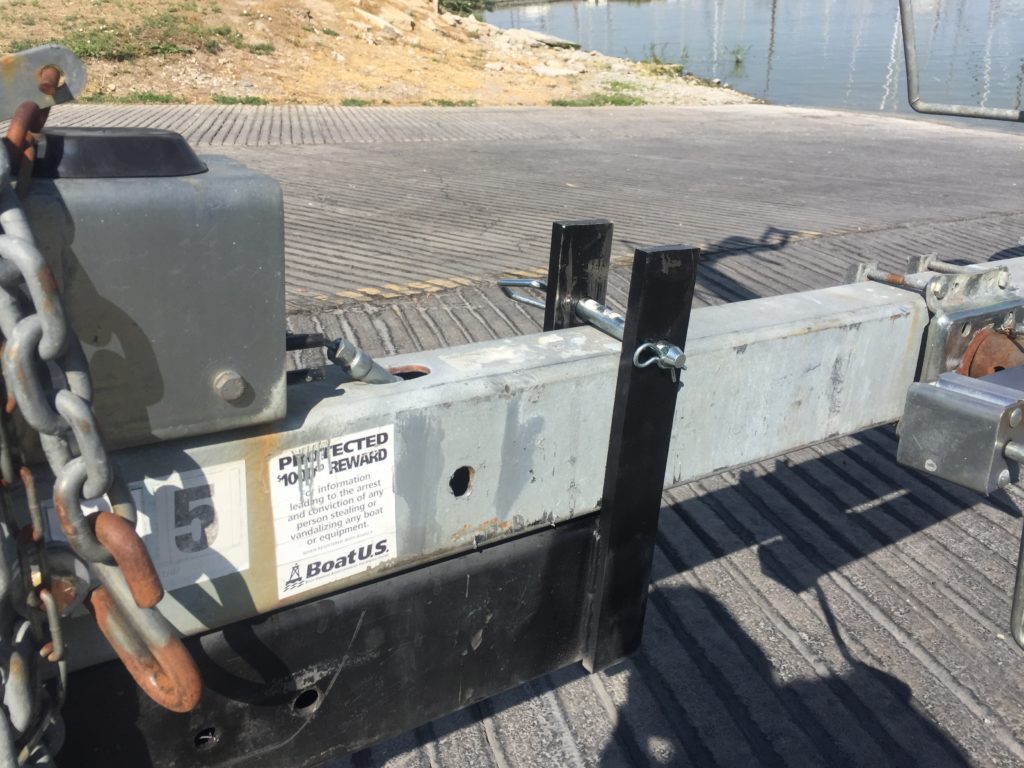
When building a trailer for a sailboat, getting sizes and dimensions right is crucial. I took some critical dimensions during my survey of the boat (yes, I felt comfortable doing my own survey) and while shopping for the trailer. You can see those above. I used these to source my parts for the trailer refit. Our sailboat, an O’Day 23-2 comes in at a max displacement of about 3500lbs. That is equal to the maximum weight of the boat. So I knew I had to find a trailer that could hold 3500lbs. I also knew the shoal keel was going to cause the boat to trailer rather high off the ground and from my father’s experiences I knew I wanted the boat as low as possible and as long a tongue as possible to give us the most flexibility in launch ramp choices. The higher your boat sits on the trailer, the deeper and steeper the ramp you are going to need to launch and recover the boat.

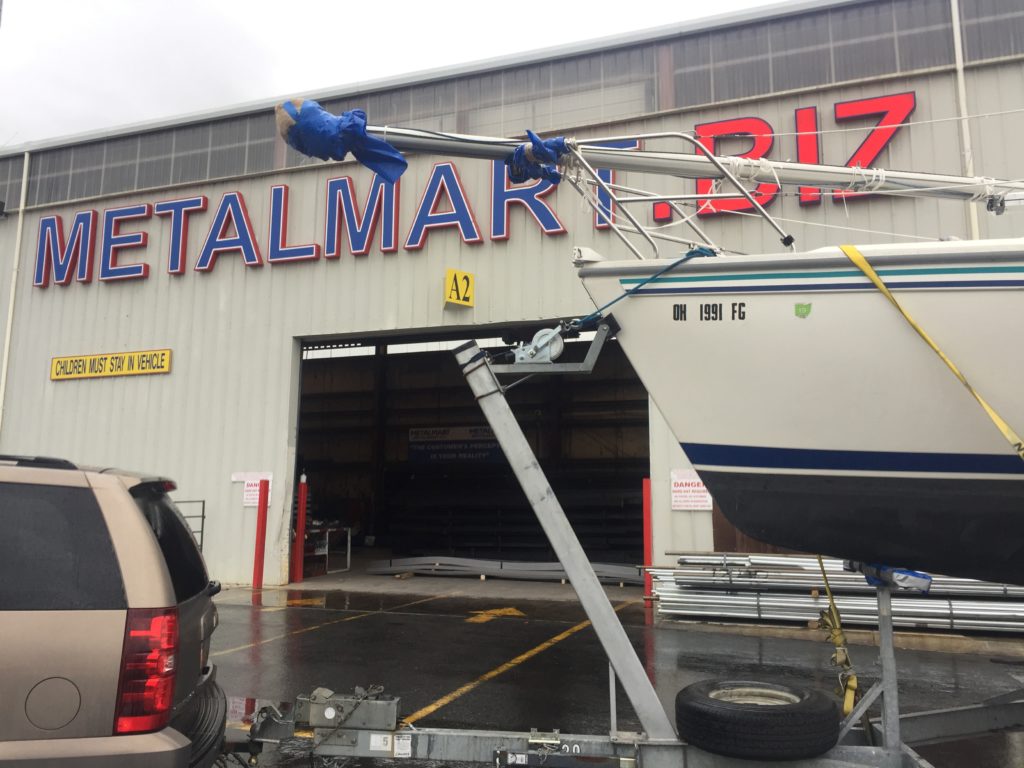
We located our trailer at KM Boat Salvage in Plaistow, NH. Keith had about 30 trailers to choose from. While there were some tandem axle trailers suitable, I decided to go with a heavy single axle Escort brand trailer for a few reasons.
- A single axle is more maneuverable, less tire drag in tight turns.
- This trailer was all galvanized and had hydraulic surge brakes (working or not?)
- The price was half that of the tandem axle trailers ($650)
Looking at the wheels/hubs, I could see they were 6 lugs with 2.5″ caps. And counting the leaf springs, I could see there were 5 leaves. This suggests fairly clearly that the trailer has a ~5000lb class axle. That gives us plenty of room for the weight of the trailer itself once we subtract the weight of the boat. (1500lbs allowance for the weight of the trailer).

Tear It Down, Start With Lights
Once we had the trailer home, we stripped the old bunks and brackets off and removed the broken/old lights. We also removed the bow rest and winch post as they would need to be reconfigured to support the mich higher bow than what the trailer had been set up for.

I made up some new light brackets as the old ones had rusted too much. I found some galvanized tie plates at Lowesdepot and bent them at 90 degrees in my bench vise. I then enlarged two of the holes that lined up with the mounting posts from the trailer lights I bought. These brackets are then secured to the frame by pinching them behind the u-bolts for the rearmost bunk brackets.

The old wiring was stripped off the trailer and the new wiring from the new light kit was strung out on the frame. Rather than use the wire nuts that came with the kit, I preferred to make the connections more permanent and reliable by soldering the wires together and covering the joints with shrink wrap. You can also dab some dielectric grease over the solder joint before you slide the shrink wrap down for even more protection but its the steel in the cheap nuts that rots rather than the copper wire.

The ground wire that comes with these kits is always pathetically short. I’ve never had a vehicle with the trailer plug close enough to the tongue to use such a short wire. So, I harvested some white wire from the “car side” harness and soldered it to the trailer harness. I then used some dielectric grease in an attempt to protect the trailer frame from salt (fool’s errand) and a stainless self -drilling screw to bond it.
New Bunks and Brackets for the Trailer
Using the measurements I had taken and the construction of our new trailer, I set about trying to find bunk brackets for adapting the trailer to the sailboat. The dropped axle of the trailer is ideal letting the keel go as low as possible. Measuring up from the keel I needed bunk brackets in the 20-24″ range given we have a 4″ tube section. This tube section, and the lack of horizontal cross members severely limited our choices for off-the-shelf bracketry. Most brackets are designed for 3″X3″ tube cross members. The cross members on the Escort are “L” channel and not suitable for u-bolts. I also refuse to drill new holes in the galvanized trailer frame as these would expose bare steel and rust quickly.
Eastern Marine Trailer Parts Super Store had only one solution for our trailer situation. And I could find no solution elsewhere. The Tiedown 24″ bunk bolster brackets would have to do. However, these are set up to have a swivel top bracket bolted directly to the top with a short bolt. If the brackets were attached to cross members, this would be fine as they would allow the bunks to pivot to the slope of the hull. However, we had to attach to the longitudinal frame members so the bunks would want to pivot forward and back rather than side to side. The solution I came up with was to use bunk stiffening bracket weldments that had a tab welded to a tube. By bolting this to the bunk bracket and using two swivel top brackets to either side of the weldment I could change the pivot direction by 90 degrees.

We then had to set about the bunk boards. I had seen a lot of boat trailers with long bunk boards strung between the brackets. It seems to me most of the board area in these cases does nothing but prohibit you from servicing the hull while on the trailer and rubbing bottom paint off. No weight is being carried more than a few inches from the brackets as the boards will simply bend away. I had also seen many trailers using round or square bunks atop the brackets and this seemed more ideal, I originally ordered only four brackets to save money, but once in hand, I realize we had too little margin for error and ordered another two.

I had to replace the wood on the engine mount as well, so I bought a sheet of 3/4″ hardwood plywood. Did not splurge for marine plywood ($$$$) so it has lots of voids in it. I also wanted to reduce the chances of point contact with the hull. The bunk carpet will only disperse a minute amount of load. I chose to cut 1/8″ luan into “inverse circles” to raise the edges of the bunk pads in hopes that they would spread the load more effectively to the edges of the bunk boards. I laminated two layers of 3/4″ plywood and then the 1/8″ luan, sanded edges round, waterproofed with deck and fence sealer (two wet coats) and then Diana stapled bunk carpet to the bunks with stainless steel staples.
Time to Get the Boat on the Trailer

With the bunks fitted to the trailer casually, we were ready to go fetch the boat as they would have to be adjusted for height and angle while setting the boat on the trailer in order to complete building a sailboat trailer. Check out the next post to see the process we came up with for transferring the boat from the jack stands to the new trailer!

Leave a Reply Cancel reply
Your email address will not be published. Required fields are marked *
Save my name, email, and website in this browser for the next time I comment.
- Forums New posts Unanswered threads Register Top Posts Email
- What's new New posts New Posts (legacy) Latest activity New media
- Media New media New comments
- Boat Info Downloads Weekly Quiz Topic FAQ 10000boatnames.com
- Classifieds Sell Your Boat Used Gear for Sale
- Parts General Marine Parts Hunter Beneteau Catalina MacGregor Oday
- Help Terms of Use Monday Mail Subscribe Monday Mail Unsubscribe
Looking to build a trailer
- Thread starter mcurcio1989
- Start date Sep 13, 2010
- Forums for All Owners
- Trailer Sailors
mcurcio1989
I have a 1970 Coronado 25. I got it last year for the right price (next to nothing). I like the boat but I really do not want to pay for storage over the winter. I put it for sale but no one wants to buy a 25 foot sailboat with no trailer or rack in the the fall (obviously). Unfortunately the marina turned the old rack into firewood. I have a good amount of experience behind a welder and I have some friends who build frames for hot rods and such. It would seem that I could find an old dual axle powerboat trailer and convert it over to use on this boat at a reasonable price. You can find them around here for free or very cheap and I can get my hands on good quality scrap steel that would be good for modifying for free or next to free. This boat is a fixed keel so that complicates things in that, from what I understand the boat will have to be lifted out at a marina. That's not a big problem but it would be nice if that wasn't the case. I have a decent amount of questions on this and their seems to be little information about it. I can find info on people who have done it but not on what their design considerations were. Things I am considering. -Supporting the keel: how much should the keel be supported? -Bunks: I have seen front to back and side to side bunks as well as the pads used for sail boats. What should determine which ones I should use. If pads, how many? Also this will be used to store the boat on over the winter. -How does the weight need to be balanced over the axles. I would assume we want basically the keel centered over the axles maybe a little forward to give it some tongue weight. That seems to be the norm of the ones I have looked at. -Where exactly should i locate the supports. . .is their any exact procedure to follow as far as the locations. To my knowledge sailboats do not have stringers like powerboats so its not like I can shoot for that. -What would my best plan of attack be for the height of the pads to account for the keel height and curve of the hull. It is in the water so measurements will be difficult. . . .let me know of other things I should link into. I am new to this forum and I don't know how much this topic has been discussed so If anyone has good information, links, or knowledge from tackling something like this let me know. I think the trailer is the best option because I have free storage for anything on wheel and It will make the boat more sell-able when that time comes.

Charlie13958
google coronado25 you will get some pics and ideas. Here is a mast raising on a 25 on a trailer. http://www.youtube.com/watch?v=5shZq7yIhxM

Google Road King Trailers and link to the sailboat trailer area of the site. That should give you some ideas on what you might need to do to modify a trailer. I have one for my Com-Pac 23 and it's great. Mine has a guide for the shoal keel and bunks on the sides to support the boat. I think you should stay away from rollers as they don't provide the support that bunk board do and could possibly damage the boat. Also, note the tongue extension. This is a must for ramp launching. I actually only need the rear half of my trailer submerged and I can crank the boat all the way onto the trailer with the winch. As for the keel, it should take most of the weight on the trailer, just like it would if the boat was placed on jackstands in a boat yard. My entire keel sits on the bottom support and is centerd by the keel guides.
I modded a bass boat trailer, it works fine. If you don't have to go far I would build a cradle for the trailer from wood to get it home then support the boat with slings or blocks to get it positioned right and get to work. Need help? I could use a working vacation!

Barnacle Bill
Trailer building or modification I have built trailers from scratch and have modified powerboat trailers to accommodate sailboat hulls. First, make sure the powerboat trailer you get has the capacity required to accommodate your boat, with water and fuel in the tanks, outboard and gear. The tires have to be rated accordingly too. Most PB trailers do not have an appropriate keel bed, so that is where you would start. you can weld angle iron in a rectangular pattern on to the thwart members of the trailer down the centerline to that it accommodates a 2x6 or 8 or 10 - whatever seems a good width. The best thing to do would be to lower the boat in slings on to this keel support after you have installed it so that you can determine exactly the location and height of each upright. If you don't have that luxury, or a marina to help, then you have to carefull measure. If you had the old cradle then you could use that as a locator for your fore and aft pads. But, since that ended up in someone's fire place, you either have to find another or start from scratch. Usually your uprights will be welded to the fore and aft members of the trailer, or, perhaps just inside of them attached to a thwart cross member. The location of the cross members will have something to do with the location of the uprights. You can use long boards on each side port and starboard to support the hull, or pads, as you suggested. Pads, if they have threaded rods, like a Brownell boat stand, are adjustable and you can insert them into a square or round tube slightly larger than the threaded rod. Make your tube short enough so you have 6 to 8 inches (whatever works) of adjustment. Depending on the location of the cross members, I would think you would, of course use at least 4 (two in the front and two in the back on each side) as a minimum and maybe 6 if you have a spot to put one in the middle. You can even go 4 on each side, but that might be getting too much for the size boat. With these adjustable pads you have some breathing room if your measurements are suffering some. If you are going to use a board (cheaper approach), then you need to have at least 4 total uprights and possibly 6 or 8. If you can get a perfect measurement (like when the boat is lowered with slings onto the trailer, then you can weld in uprights that are exactly the length you need. Otherwise it might be wise to us an inner and outer tube, whether square or round to adjust. If you are a welder you can drill a hole in the side of the outer tube and weld in a nut to accommodate a bolt which can be used to tighten the inner tube in place. A couple of these nut and bolt arrangements per upright would be better than one. You also need to attach the board with a method that lets it rotate to the right position to sit flat against your hull. You can easily do this by welding a plate with a hole it in to the upper/inner tube so that the plane of that plate runs thwartwise. Then attach an angle iron piece to that with holes in it so that you can screw or bolt it into the board, and also put a bolt through the welded on plate to allow the board to swivel in or out to get the correct angle. The next thing you need to do is probably raise the bow support. The powerboat one will have too short a one and so you have to get creative and add more material (butt weld it in) to raise it so that the winch is in a good place to attach to a bow eye on your stem. The last thing I would consider is keel guides. If you ever were to launch and retrieve your boat - especially retrieve - out of the water, then you want to make sure your keel goes right in the center of the trailer for exact and carefree retrieving. The location of the winch in regards to the bow eye is important to pull the boat up to the perfect towing position. Hope this helps.
^That is basically exactly what I have been planning in my head so far. Wow great information guys. I wasn't sure how much support their would be for a diy trailer but this seems to be fairly common. I am really excited to get started now. I am definitely going to go with a double axle trailer because they tow so much better and just about any reasonably sized double axle trailer should support the 4,500lbs this boat weighs. I think the bunks are where I am going to go with this. It seems that it will be more cost efficient, provide better support, more capable of being reinforced, and would be easier for use at a ramp. I like the idea of using the bolts threaded in to adjust height and I also like the idea of swiveling bunks. I was basically planning exactly what you described as far as the keel and using guides etc. My dad has big sheets of the plastic that is used on toilet partitions so that would work great to put on above the wood to help the keel slide on easily. This boat doesn't have a bow eye so I am going to have to figure something out with that. Either install one or use kleets. For the measurements I think I will try the coronado forum to ask those guys what their measurements are. My other option is to bring it up to the very lightly sloped shore just until the keel touches at 3.5 feet and the take measurements from the boat to the river bottom. You guys that are using these trailers to launch from a shore, how much draft do you require? With this boat requiring 3.5 feet I will need at least 4.5 feet of depth at the ramp. I am going to get some measurements from the ramps in my area. I'm hoping that it will be doable to ramp this and not have to take it to the marina. Those guys are hurting and they are making prices ridiculous instead of making them less. With this boat being 25 feet long I will basically have 13 feet from right in between the two axles to where the front of the boat will be on the trailer. With that said and taking my depth into consideration where about would a good range be for the length of the tongue. Ie from the front of the boat forward what range of feet should I look for. Just trying to get a feel for what is commonly done. Thanks for all the help so far I think I am getting a pretty good grasp on this!

Before you get to ambitious put together a mterials list including Iron, springs, wheels, tires, bearing buddies, hubs, winch, bunks, etcs. Compare what the raw materials will run as to what factory stock trailer made to fit your boat will cost. You might be surprised as I was when considering building a trailer. I think Coronado was bought out by Catalina? Fair Winds...
Well I'm not actually building the trailer. I am going to modify a powerboat trailer to fit this boat. Anyone have any experience pulling out a boat with a 3.5 foot draft at a ramp? I went down their yesterday and took some measurements. Based off what I have found, provided I have a long enough trailer, this ramp could definitely accommodate this. It is fairly steep, very deep and has concrete 30 feet out on a low day. I found a section view of the coronado hull/keel and scaled it up with a sketch of the measurements of this ramp. I was having a hard time visualizing the different dimension i would need to account for. based off of this it looks like if i can find a trailer with 18 feet from the hitch to in between the axles and 1 foot of ground clearance to the cross members this will surely work!
My Com-Pac has only 27 inches of draft and it sits about 15 inches above ground on the trailer so I know it's a bit less than your Coronado. As i stated before, you don't necessarily need the entire trailer submerged in order to get your boat fully on the trailer. The stern will float the whole time and allow you to winch the boat up. As long as the rear end of the bunks or the rear stand pads are submerged enough you should have no problems. If you have thirty feet of ramp at low water you should have no problem. Steep and deep are good too. I have a tongue extension that adds 4 feet of length to the trailer. I have seen some extensions that add more. If you are modifying a trailer this should be one area that you should focus on. It makes launching and retrieving dramatically easier.
^Thats some good info for me. I was sort of unsure about the dynamics of loading the boat on the trailer, as far as how much of the trailer would need submerged. Like I said earlier I ended up making a cross sectional view of the ramp I use on some graph paper then scaled a cross section of my boat and cut that out. So I was moving the boat around and measuring the clearances out. I had a 17 foot tongue with the hitch a foot from the water and the keel sitting one foot off the road. With those dimensions I was able to get the front of the bunks in the water. Based off what you are saying that should be more than enough clearance. That is great news because the 1 foot of clearance would be a little tricky and I would rather not have to have the rear tires of the tow vehicle in the water. I am focusing on finding something with a low v in the middle and around 18 feet of distance from the tongue to in between the axles. based off what your saying I should have plenty off wiggle room for loading if I can get close to those dimensions. Thanks that is really what I was looking for as I have never seen a sail boat loaded on the ramp before. I've done plenty of power boats just not sailboats.
I have a retractable tongue, shutup with the comments, on my V25 trailer because in some places you nee to sink the trailer to get the boat off. It slide in and out of the socket with varying positions to lock it in place. Fair winds...
Look For My Post Under Ask All Sailors About Launching A Sailboat. It's A True Story. Fair Winds...

Here's a few before/after pics to wet your appetite for a major DIY project. This was a CB boat so yours will be a couple feet taller. Make no mistake it'll take far more time, effort, brain power and cash than you are figuring but it can be done. If I wasn't hauling it far it'd be best to locate screw jacks at the lift zones and a bow roller with a stop and a stout bow eye/hook. Otherwise build bunks to saddle the curves exactly so you don't have hot spots wearing away while you truck it down the road. You're sure the boat is worth the effort, right? Good luck. Mike
Attachments

Keel guides are definitely a good idea (as per the centerboard boat trailer photos). Rollers are easier than bunks for launch / retrieval, but apply more force to the hull. Keep the structure of the boat in mind when locating rollers / bunk supports so that the bulkheads take the load as much as possible. Be sure to have a platform under the keel as for a keelboat the keel will take most of the weight.
You don't want to use cleats for a couple of reasons. First you most likely will tear them out of your deck and secondly they will be in the wrong location. A properly placed bow eye will put the boat right where you want it when retrieving the vessel out with the use of the winch.
soling42 said: Here's a few pics to wet your appetite for a major DIY project. This was a CB boat so yours will be a couple feet taller. Make no mistake it'll take far more time, effort, brain power and cash than you are figuring but it can be done. If I wasn't hauling it far it'd be best to locate screw jacks at the lift zones and a bow roller with a stop and a stout bow eye/hook. Otherwise build bunks to saddle the curves exactly so you don't have hot spots wearing away while you truck it down the road. You're sure the boat is worth the effort, right? Good luck. Mike Click to expand
I'd cut my loss and donate it to the local youth sailing group immediately. You'll feel better about helping an enthusiastic group with deeper pockets and plenty of volunteer help. Your time is worth something, added to your cash outlay it sounds like a break even trial to still end up with a boat that you'll inevitably have to deal with next spring again. Let it go...life is too short to mess with a beater boat you don't absolutely love. Mike
I bought a trailer yesterday. I really couldn't find any tandem axle trailers for under 400. The single axles are everywhere and crazy cheap but bigger tandems start getting expensive! I ended up heading over to a marine salvage yard 30 min from my house to see what they had. With 500 junk boats their they had a very good selection of old trailers for cheap. I made a deposit on a tandem axle trailer that has a 24 foot powerboat on it. If anything this will be to big. . .not a problem! From in between the axles to the tongue is 21 feet so it will easily launch the boat from the ramp. He is charging me $400 for it which i thought was a good deal. They just have to scrap and move the boat that is on it before I can go pick it up. I should be starting this project pretty soon! I have about $700 into this and I will have about $1200 once it is on the trailer. I am sure I can get it sold in the spring and not lose anything. I don;t have to pay anything for storage and I can keep it their as long as I want so It is not costing me any money to not sell it. I would think I have deeper pockets than any local sailing organization I just want to be able to get out what I have in the boat. I love fabricating so I will enjoy this project and hopefully I will be able to sell this boat in the spring. Plus after spring I will have some very fat checks heading my way so I will be more likely to buy another sailboat that I can actually keep at my dock.
So i got the trailer built this weekend and gave it a test. I'll summarize To modify the trailer I used a section of old scaffold which basically emulated to the t what the boat jacks do. same material and everything. Tripod with a vertical tube and adjustable pads. For the keel support i got a set of pallet rack cross members which were rated at 5k lbs. everything was very solid. So we pulled the boat out. Ramp worked out great and the truck had no problem. The boat practically floated on. We pulled it out and had to adjust the pads a couple times. Once we got it pulled out we then realized that it was sitting a good two feet to far back. negative tongue weight and the trailer was deflecting as a result. So We were going to back it in and re adjust but my dad and i had a mutual feeling of terror looking at that huge boat up in the air like that. It was getting late so we backed the boat back in and called it quits. I am really scared of trailering that thing it is just so big and high. There were some things with the design that I don't like. I separated my pads by about 11 feet centered over the axles.I just put them on the cross members. That was to far and I think the load would be more steady if i move those closer to the axles. I am a little concerned with the weight. The trailer had a 24 foot powerboat on it so i think weight would be comparable. However with my boat on their the suspension seemed to be bottomed out. The tires are good for 6k lbs though. Is this crazy? I am starting to contemplate just taking this to a marina and using my trailer as a rack. It just seems so terrifying to trailer a sail boat of that size on the road the boat is so tall. Just looking up and seeing the rub rail way up at the top of my reach is scary. I try to tell myself that the weight is all way down low on the keel but it still seems creepy. I am not concerned with my supports and welds. That is all very capable of supporting the applied loads. What scares me is the trailer itself failing at some point. with a 25 foot trailer and that much weight an uneven load can cause some crazy bending moments.
- This site uses cookies to help personalise content, tailor your experience and to keep you logged in if you register. By continuing to use this site, you are consenting to our use of cookies. Accept Learn more…
This page is currently unavailable

How to build a sailboat trailer extension

This is the remarkable true story about how I built a sturdy trailer extension and got 27 stitches in the process. I recommend the former, though I included instructions on how I got the latter just in case you’re interested.
The previous owner of my Catalina 270 took her in and out of the water with a crane. Unfortunately on my lake, there are no cranes, so we have to launch the boat by backing the trailer into the lake. When the lake is low or the ramps shallow, it is necessary to extend the trailer out further into the water than the tow vehicle can go. One way to accomplish this task is by building an extension to go between the trailer and tow vehicle, which allows the trailer to be let down further out into the water.
On my prior boat, I used a strap and rolling wheel on the front of the trailer to lower the boat in. The problem with the strap (or rope, or cable) method is that you can’t push the trailer further into the water. Often times there are large ruts or pits in the dirt beneath the ramp caused by power boaters gunning their engines to push boats on and off trailers. To pass over these ruts using a strap, you have to let the boat back quickly down the ramp to build up enough momentum to roll through the ruts, and I always worried that a deep rut on one side or the other would tip the trailer to the side. It never did, but I always imagined it happening.
So this time I wanted more control over the boat, and decided to build a solid bar extension. I looked at several designs on various websites and decided I wanted one that was heavy duty enough to support the weight without needing a dolly wheel under the front of the trailer. I wanted about 15 feet of extension, and it needed to be easily installed, removed, and stowed on the trailer.
First, off to the local metal shop, where I purchased 15 feet of galvanized steel, in the same dimension as the steel on the trailer’s tongue (3″x5″). I think it’s possible to go with something smaller, but not knowing how it would handle the load I decided to stay with the original dimensions.
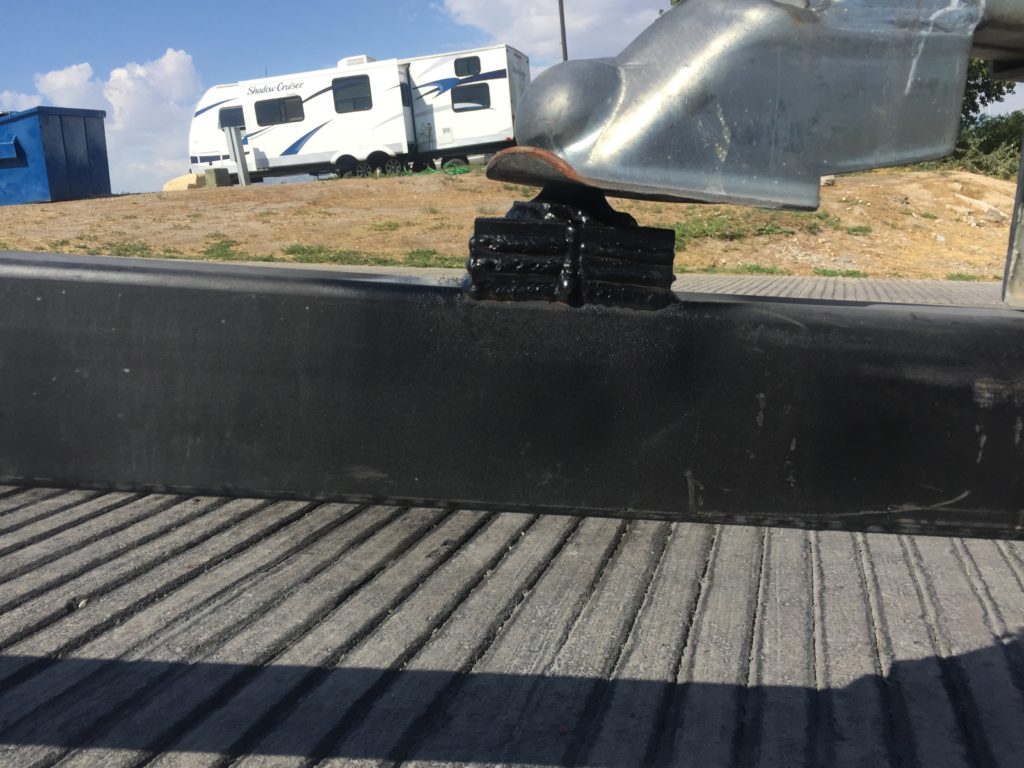
Next, I ordered a 2-5/8″ hitch coupler from Amazon on the front of the hitch extension, which would connect to the tow vehicle’s ball without having to switch ball sizes.
Then, I had the terrible idea of simply bolting the hitch extension alongside the trailer’s tongue. Two large bolts, spaced about 2 feet apart, seemed like they would do the trick. However, the weight of the trailer bent the bolts and the extension sagged to about 2 inches off the ground. It was enough to launch it the first year, but I knew I’d need a sturdier connection between extension bar and trailer by the time we hauled out in fall.
I ordered a 2- 5/8″ trailer ball to mount on the top of the extension bar. This ball would lock into the trailer hitch. At the back end of the bar, I planned to have two bars welded on that would hug the sides of the trailer tongue and be secured on top with a hitch pin.
The bars I chose were half inch thick steel. This is how I ended up with 27 stitches. My battery powered drill would never make it through, so I ran to the hardware store to pick up a corded drill. The drill I’d planned to buy was good, but when I got there I found a higher amperage drill on sale for less. More power for less money? Yes, please. So I walked out of the store with a 9 amp Hitachi drill.
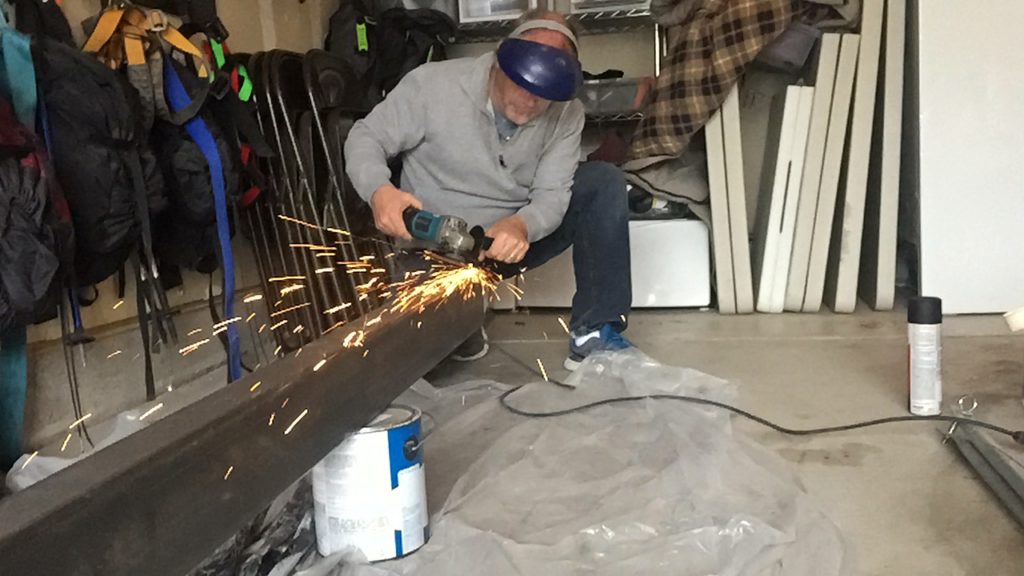
I lifted my 25 lbs vice off the workbench and set it on the garage floor for safety. I locked the steel in the vice and started drilling, stopping every 30 seconds or so to add some oil into the hole. The whole operation felt pretty safe until the drillbit punched through the back side of the steel. That’s when the full fury of all 9 amps was unleashed. That monster drill grabbed the steel bar and 25 pound vice and spun them in circles so fast that by the time I let go of the trigger it had spun around 2 full times. I felt something had hit the back of my leg, and glancing down, realized I was in trouble. The half inch bar traveling at 9 amps had laid open the back of my calf. It was going to need stitches. And not a few, because as it turns out, half inch steel is not a very precise cutting implement.
On the drive over to the hospital, I used Intermountain Healthcare’s “ConnectCare” telehealth app on my phone. It was amazing, I could actually show the doctor a video of the wound from the car so she could tell me if I needed to go straight to the emergency department, or just a clinic. One emergency department visit and 27 stitches later, I was good to go. And I only had one more bar to drill through. It took me two weeks to get the courage to do it.
But the end result was a great trailer extension. It’s very sturdy, able to hold the front of the trailer at the same height over the full length of the bar. It also has enough ground clearance that I can attach it on flat pavement and drive it over the edge of the road onto the ramp without bottoming out. This makes work on the ramp much safer, because the trailer is never unhitched from the tow vehicle while on the incline. I also have an impressive scar on the back of my leg which I refer to proudly as “a sailing injury.”
Recent Posts
Key Lime Sailing Day 5 - After Thoughts
Checkout was simple. I asked what we needed to do, and was told "Just leave us a good review if we earned it!" And yes, they did. A few observations for a next trip here: It's a quick trip from...
Key Lime Sailing Day 4 - Key West
We got up early this morning and headed down to Islamorada for a dive. It was a successful trip, seeing moray eels, nurse sharks, and some lionfish. Then off for the drive to Key West. It's...
DIY Boat Building Plans
How to Build a Boat Trailer
Download over 500 Boat Plans. Click on the link below.
-->click here<--.
Table of Contents
Key Takeaways – How to Build a Boat Trailer
⛵ Building a boat trailer allows for customization of size, shape, material, color, and features.
🔧 Building a boat trailer can save money, and using recycled materials can further reduce costs.
🛠 Building a boat trailer is an opportunity to learn new skills such as design, welding, woodworking, and more.
😄 Building a boat trailer can be a fun and enjoyable hobby that allows for creative expression.
🤔 Consider factors like time, space, skills, and resources before deciding to build a boat trailer.
🧰 Essential tools for building a boat trailer include saws, drills, sanders, hammers, wrenches, pliers, welders, multimeters, levels, and tape measures.
🌲 Common materials for boat trailers include wood, metal, and plastic, and you can mix and match them as needed.
⚙️ Safety tips include wearing protective gear, working in a well-ventilated area, using proper tools , following instructions, securing workpieces, keeping the work area clean, being cautious with electricity, and seeking help when needed.
📐 Design your boat trailer by determining size and weight capacity, selecting materials, and creating a plan.
✂️ Preparing materials involves cutting them to size using appropriate tools for wood, metal, or plastic.
🪚 Sanding materials smooth is necessary to remove rough edges and achieve an even finish, with different tools for wood, metal, and plastic.
🚢 Assemble the Boat Trailer Frame involves joining wood, metal, or plastic parts using various tools and methods like screws, bolts, nails, rivets, and welds.
📏 When assembling the frame, follow your plan carefully, check measurements, use a level for squareness, and secure connections with washers and lock nuts for stability and safety.
👷 Wear protective gear such as gloves, goggles, and masks to prevent injuries while assembling the boat trailer frame.
🪚 Assemble different types of frames based on the material used (wood, metal, or plastic) with corresponding fasteners.
🚤 Finish your boat trailer by attaching the axle, wheels, tires, hitch, and other features.
✅ When finishing, follow your plan, check measurements, use a level for stability, and secure connections firmly.
⚙️ Attach the axle, wheels, tires, hitch, and any additional features to make your boat trailer functional and safe.
🏋️♂️ Make sure your boat trailer is strong enough by choosing the right materials, fasteners, and joints.
🌧️ To watertight your boat trailer, seal any gaps, cracks, or holes in the frame, and protect materials and parts from water exposure and moisture.
🛠️ Maintain your boat trailer by cleaning, lubricating, inspecting, and storing it properly.
🚢 Choose the material for your boat trailer (wood, metal, or plastic) based on your budget, preference, availability, and purpose.
🎨 Building a custom boat trailer: Define its purpose, get inspired, be creative with materials and design, and thoroughly test it.
🏁 Building a boat trailer is a rewarding DIY project, offering cost savings, customization, and skill development. Enjoy the process!
Do you love boating but hate the hassle of renting or buying a boat trailer? Do you want to save money and customize your own boat trailer to suit your needs? Do you enjoy DIY projects and learning new skills? If you answered yes to any of these questions, then this article is for you.
In this article, we will show you how to build a boat trailer from scratch. We will cover everything you need to know, from the tools and materials you need, to the step-by-step instructions on how to design, assemble, and finish your boat trailer. We will also answer some frequently asked questions and provide some resources for getting help with your boat trailer building project.
By the end of this article, you will have a clear idea of how to build a boat trailer that is strong, durable, and safe. You will also have the satisfaction of creating something with your own hands and saving money on the cost of a new trailer. So, let’s get started!
What is a Boat Trailer?
A boat trailer is a vehicle that is used to transport a boat from one place to another. It consists of a frame that supports the boat, an axle that connects the wheels and tires, a hitch that attaches the trailer to the towing vehicle, and other features such as a winch, a lighting system, and a storage compartment.
A boat trailer can be either single-axle or tandem-axle, depending on the size and weight of the boat. A single-axle trailer has one axle and two wheels, while a tandem-axle trailer has two axles and four wheels. A tandem-axle trailer can carry heavier loads and provide more stability, but it is also more expensive and harder to maneuver.
A boat trailer can also be either open or enclosed, depending on the type of boat and the level of protection required. An open trailer has no roof or walls, while an enclosed trailer has a roof and walls that protect the boat from the weather and theft. An enclosed trailer can also offer more storage space and comfort, but it is also more costly and heavier.
Why Build a Boat Trailer?
Building a boat trailer can be a rewarding and fun project for anyone who loves boating and DIY. There are many reasons why you might want to build your own boat trailer instead of buying or renting one. Here are some of the benefits of building a boat trailer:
- Save money . Building a boat trailer can be much cheaper than buying or renting one. Depending on the size and quality of the trailer, you can save hundreds or even thousands of dollars by building your own. You can also use recycled or salvaged materials to reduce the cost even further.
- Customize . Building a boat trailer allows you to customize it to your specific needs and preferences. You can choose the size, shape, material, color, and features of your trailer according to your boat and your personal taste. You can also add or modify any features as you go along or as your needs change.
- Learn . Building a boat trailer can help you learn new skills and improve your existing ones. You can learn how to design, measure, cut, drill, sand, paint, weld, bolt, wire, and more. You can also learn about the physics and mechanics of towing, such as weight distribution, balance, alignment, friction, etc.
- Enjoy . Building a boat trailer can be a fun and enjoyable hobby that you can do alone or with your friends or family. You can express your creativity and personality through your trailer design. You can also take pride in your workmanship and show off your finished product to others.
When to Build a Boat Trailer?
Building a boat trailer is not for everyone or for every situation. There are some factors that you need to consider before deciding to build your own boat trailer. Here are some questions that you need to ask yourself:
- Do you have enough time? Building a boat trailer can take anywhere from a few days to several weeks or even months, depending on the complexity of the project. You need to have enough time to plan, prepare, assemble, and finish your trailer without rushing or compromising on quality.
- Do you have enough space? Building a boat trailer requires a large and flat area where you can work safely and comfortably. You need to have enough space to store your tools and materials, lay out your frame and parts, move around freely, and test your trailer.
- Do you have enough skills? Building a boat trailer requires some basic skills in carpentry, metalwork, electrical work, etc. You need to know how to use various tools such as saws, drills, sanders, hammers, wrenches, etc. You also need to know how to read plans and diagrams, follow instructions, measure accurately, etc.
- Do you have enough resources? Building a boat trailer requires some investment in tools and materials. You need to have access to or purchase the essential tools and materials for your project. You also need to have access to or purchase any additional features or accessories that you want to add to your trailer.
If you answered yes to all of these questions, then you are ready to build your own boat trailer. If you answered no to any of these questions, then you might want to reconsider your decision or seek some help from others.
What are the Essential Tools and Materials for Building a Boat Trailer?
The tools and materials that you need for building a boat trailer depend on the size, type, and design of your trailer. However, there are some common tools and materials that you will need for any boat trailer project. Here is a list of the essential tools and materials for building a boat trailer:
- Saw . A saw is used to cut wood, metal, or plastic materials to size. You can use a hand saw, a circular saw, a jigsaw, a hacksaw, or a band saw, depending on the material and the shape that you want to cut.
- Drill . A drill is used to make holes in wood, metal, or plastic materials. You can use a hand drill, a power drill, or a drill press, depending on the size and depth of the hole that you want to make. You also need various drill bits for different materials and diameters.
- Sander . A sander is used to smooth the edges and surfaces of wood, metal, or plastic materials. You can use a hand sander, a belt sander, an orbital sander, or a disc sander, depending on the material and the area that you want to sand.
- Hammer . A hammer is used to drive nails, screws, bolts, or other fasteners into wood, metal, or plastic materials. You can use a claw hammer, a ball-peen hammer, a sledgehammer, or a rubber mallet, depending on the type and size of the fastener that you want to use.
- Wrench . A wrench is used to tighten or loosen nuts, bolts, or other fasteners on wood, metal, or plastic materials. You can use an adjustable wrench, a socket wrench, a combination wrench, or a torque wrench, depending on the type and size of the fastener that you want to adjust.
- Screwdriver . A screwdriver is used to turn screws or other fasteners on wood, metal, or plastic materials. You can use a flathead screwdriver, a Phillips screwdriver, a hex screwdriver, or a star screwdriver, depending on the type and size of the fastener that you want to turn.
- Pliers . Pliers are used to grip, twist, bend, cut, or crimp wires or other materials. You can use needle-nose pliers, slip-joint pliers, wire cutters, wire strippers, or crimping pliers, depending on the type and size of the material that you want to manipulate.
- Welder . A welder is used to join metal parts together by melting and fusing them with an electric arc or a gas flame. You can use a stick welder, a MIG welder, a TIG welder, or a gas welder, depending on the type and thickness of the metal that you want to weld.
- Multimeter . A multimeter is used to measure voltage, current, resistance, or continuity of electrical circuits or components. You can use a digital multimeter or an analog multimeter, depending on the accuracy and readability that you prefer.
- Level . A level is used to check if a surface or an object is horizontal or vertical. You can use a spirit level, a laser level, or a digital level, depending on the precision and convenience that you need.
- Tape measure . A tape measure is used to measure length, width, height, or diameter of objects or materials. You can use a retractable tape measure, a steel tape measure, or a cloth tape measure, depending on the flexibility and durability that you want.
- Square . A square is used to check if an angle is 90 degrees or if two surfaces are perpendicular. You can use a carpenter’s square, a combination square, or a speed square, depending on the versatility and portability that you need.
- Wood . Wood is one of the most common and versatile materials for building a boat trailer. It is easy to work with, relatively cheap, and widely available. You can use various types of wood such as pine, oak, cedar, or plywood , depending on the strength and appearance that you want.
- Metal . Metal is another common and durable material for building a boat trailer. It is strong, rigid, and resistant to corrosion and wear. You can use various types of metal such as steel, aluminum , or galvanized metal, depending on the weight and cost that you want.
- Plastic . Plastic is a lightweight and flexible material for building a boat trailer. It is easy to mold, cut, and join, and it can withstand water and weather exposure. You can use various types of plastic such as PVC pipe, HDPE sheet, or ABS plastic, depending on the shape and function that you want.
- Fasteners . Fasteners are used to join two or more parts together securely. You can use various types of fasteners such as nails, screws, bolts, nuts, washers, rivets, etc., depending on the material and the strength that you need.
- Axle . An axle is a metal rod that connects the wheels and tires of the boat trailer. You can use a straight axle or a torsion axle, depending on the suspension and clearance that you want.
- Wheels and tires . Wheels and tires are the parts that allow the boat trailer to roll on the ground. You can use various sizes and types of wheels and tires, depending on the load and terrain that you expect.
- Hitch . A hitch is a metal device that attaches the boat trailer to the towing vehicle. You can use a ball hitch, a pintle hitch, or a gooseneck hitch, depending on the weight and angle of the trailer.
- Winch . A winch is a mechanical device that helps you load and unload your boat from the trailer. It consists of a cable, a drum, and a handle or a motor. You can use a manual winch or an electric winch, depending on the power and convenience that you want.
- Lighting system . A lighting system is a set of lights that make your boat trailer visible and safe on the road. It includes brake lights, turn signals, tail lights, license plate lights, etc. You can use LED lights or incandescent lights, depending on the brightness and efficiency that you want.
- Storage compartment . A storage compartment is an optional feature that provides extra space for storing tools and supplies on your boat trailer. It can be a box, a bag, a rack, or a basket, depending on the size and shape that you want.
Safety Tips for Building a Boat Trailer
Building a boat trailer can be a fun and rewarding project, but it also involves some risks and hazards. You need to follow some safety tips to avoid injuries and accidents while working on your boat trailer. Here are some safety tips for building a boat trailer:
- Wear protective gear . You should wear gloves, goggles, ear plugs, masks, boots, etc., to protect yourself from cuts, burns, sparks, dust, noise, etc., while using tools and materials.
- Work in a well-ventilated area . You should work in an open or airy space to avoid inhaling fumes, smoke, or dust from welding, cutting, sanding, painting, etc.
- Use proper tools . You should use tools that are suitable for the task and material that you are working on. You should also check if the tools are in good condition and have no defects or damages.
- Follow instructions . You should follow the instructions and guidelines that come with your tools, materials, plans, etc., to ensure that you use them correctly and safely.
- Secure your workpiece . You should clamp or fasten your workpiece to a stable surface or support to prevent it from moving or falling while you work on it.
- Keep your work area clean . You should keep your work area tidy and organized to avoid tripping over wires, cords, hoses, etc., or knocking over tools, materials, parts, etc. You should also dispose of any waste or scrap materials properly and safely.
- Be careful with electricity . You should be careful when working with electrical tools or components, such as welders, drills, multimeters, lighting systems, etc. You should make sure that the power source is off before connecting or disconnecting any wires or cables. You should also avoid touching any exposed wires or metal parts with your bare hands or wet skin.
- Ask for help . You should not hesitate to ask for help from someone who has more experience or knowledge in building a boat trailer. You can also consult online forums, blogs, videos, etc., for tips and advice from other boat trailer builders.
These are some of the safety tips that you need to follow while building a boat trailer. By following these tips, you can reduce the risk of injuries and accidents and enjoy your boat trailer building project.

Building a Boat Trailer Step-by-Step
Now that you have learned the basics of what a boat trailer is, why you might want to build one, and what tools and materials you need, it is time to get to the fun part: building your boat trailer.
In this part, we will show you how to build a boat trailer from scratch, following a simple and effective process. We will divide the process into four main steps:
- Design your boat trailer
- Prepare the materials
- Assemble the boat trailer frame
- Finish the boat trailer
For each step, we will provide detailed instructions, diagrams, tips, and examples to help you complete your boat trailer project successfully. We will also assume that you are building a single-axle open boat trailer made of wood and steel, but you can adjust the steps according to your own preferences and needs.
Let’s begin!
Step 1: Design Your Boat Trailer
The first step in building a boat trailer is to design it. Designing your boat trailer involves determining the size and weight capacity of your trailer, choosing the type of material you want to use, and creating a plan for your trailer.
Determine the Size and Weight Capacity of Your Boat Trailer
The size and weight capacity of your boat trailer depend on the size and weight of your boat. You need to measure the length, width, height, and weight of your boat accurately before designing your trailer. You can use a tape measure, a scale, or a calculator to do this.
The length of your boat trailer should be slightly longer than the length of your boat, to allow some space for the hitch and the winch. The width of your boat trailer should be slightly wider than the width of your boat, to allow some clearance for the wheels and tires. The height of your boat trailer should be as low as possible, to reduce wind resistance and improve stability.
The weight capacity of your boat trailer should be greater than the weight of your boat, plus any additional load that you might carry on your trailer, such as fuel, water, equipment, etc. You can use this formula to calculate the weight capacity of your boat trailer:
WeightCapacity=BoatWeight+AdditionalLoad+SafetyFactor
The safety factor is a percentage that accounts for any possible variations or errors in your measurements or calculations. You can use a safety factor of 10% to 20%, depending on how confident you are in your data.
For example, if your boat weighs 1,000 pounds and you plan to carry 200 pounds of additional load on your trailer, you can use a safety factor of 15% and calculate the weight capacity of your boat trailer as follows:
WeightCapacity=1,000+200+(1,000+200)×0.15
WeightCapacity=1,380pounds
Choose the Type of Material You Want to Use
The type of material you want to use for your boat trailer depends on your budget, preference, and availability. You can use wood, metal, plastic, or a combination of these materials for different parts of your trailer.
Wood is a common and versatile material for building a boat trailer. It is easy to work with, relatively cheap, and widely available. You can use various types of wood such as pine, oak, cedar, or plywood, depending on the strength and appearance that you want. You can use wood for the frame, the deck , or the storage compartment of your boat trailer.
Metal is another common and durable material for building a boat trailer. It is strong, rigid, and resistant to corrosion and wear. You can use various types of metal such as steel, aluminum, or galvanized metal, depending on the weight and cost that you want. You can use metal for the axle, the wheels, the tires, the hitch, or the winch of your boat trailer.
Plastic is a lightweight and flexible material for building a boat trailer. It is easy to mold, cut, and join, and it can withstand water and weather exposure. You can use various types of plastic such as PVC pipe, HDPE sheet, or ABS plastic, depending on the shape and function that you want. You can use plastic for the lighting system or the fenders of your boat trailer.
You can also mix and match different materials for different parts of your boat trailer, as long as they are compatible and secure. For example, you can use a wood frame with a metal axle and wheels, or a metal frame with a plastic deck and lighting system.
Create a Plan for Your Boat Trailer
The final step in designing your boat trailer is to create a plan for it. A plan is a detailed diagram that shows the dimensions, shapes, positions, and connections of all the parts of your boat trailer. A plan helps you visualize your boat trailer design and guides you through the building process.
You can create a plan for your boat trailer using various methods such as sketching on paper, drawing on a computer program, or purchasing a pre-made plan online or offline. You can also modify an existing plan to suit your needs and preferences.
A good plan for your boat trailer should include:
- A scale that shows the ratio between the actual size and the drawn size of your boat trailer
- A legend that explains the symbols, colors, and labels used in your plan
- A front view that shows the length and height of your boat trailer
- A side view that shows the width and height of your boat trailer
- A top view that shows the length and width of your boat trailer
- A cross-section view that shows the internal structure of your boat trailer
- A detail view that shows any specific or complex part of your boat trailer
- A list of materials that shows the type, quantity, size, and cost of each material used in your boat trailer
- A list of tools that shows the type and function of each tool used in your boat trailer
- A list of steps that shows the order and procedure of each task involved in building your boat trailer
This is how you design your boat trailer. By following these steps, you can create a custom boat trailer design that meets your needs and preferences.
Step 2: Prepare the Materials for Building Your Boat Trailer
The second step in building a boat trailer is to prepare the materials. Preparing the materials involves cutting the materials to size, sanding the materials smooth, and marking the materials for assembly.
Cut the Materials to Size
The first task in preparing the materials is to cut them to size. Cutting the materials to size means trimming them according to the dimensions and shapes that you have specified in your plan. You can use various tools such as saws, drills, or welders to cut your materials.
You should follow these tips when cutting your materials:
- Measure twice, cut once . You should measure your materials carefully and accurately before cutting them, to avoid wasting material or making mistakes. You can use a tape measure, a ruler, or a square to measure your materials.
- Use a guide or a template . You should use a guide or a template to help you cut your materials in a straight or curved line, depending on the shape that you want. You can use a piece of wood, metal, or plastic as a guide or a template, or you can draw a line on your material with a pencil or a marker.
- Secure your material . You should secure your material to a stable surface or support, such as a workbench, a table, or a sawhorse, to prevent it from moving or falling while you cut it. You can use clamps, screws, bolts, or nails to secure your material.
- Wear protective gear . You should wear gloves, goggles, ear plugs, masks, boots, etc., to protect yourself from cuts, burns, sparks, dust, noise, etc., while cutting your materials.
Here are some examples of how to cut different types of materials:
- Wood . To cut wood, you can use a hand saw, a circular saw, a jigsaw, or a band saw. You should choose the type of saw that matches the thickness and shape of the wood that you want to cut. For example, you can use a hand saw for thin and straight cuts, a circular saw for thick and straight cuts, a jigsaw for thin and curved cuts, and a band saw for thick and curved cuts.
- Metal . To cut metal, you can use a hacksaw, a metal shear, a plasma cutter, or a welder. You should choose the type of tool that matches the thickness and shape of the metal that you want to cut. For example, you can use a hacksaw for thin and straight cuts, a metal shear for thin and curved cuts, a plasma cutter for thick and straight cuts, and a welder for thick and curved cuts.
- Plastic . To cut plastic, you can use a knife, a scissors, a saw, or a drill. You should choose the type of tool that matches the thickness and shape of the plastic that you want to cut. For example, you can use a knife for thin and straight cuts, a scissors for thin and curved cuts, a saw for thick and straight cuts, and a drill for thick and curved cuts.
These are some examples of how to cut different types of materials for your boat trailer. You should follow your plan and mark your materials before cutting them, to ensure accuracy and consistency.
Sand the Materials Smooth for Building Your Boat Trailer
The second task in preparing the materials is to sand them smooth. Sanding the materials smooth means removing any rough edges, splinters, burrs, or rust from the surfaces of your materials. You can use various tools such as sanders, files, or sandpaper to sand your materials.
You should follow these tips when sanding your materials:
- Choose the right grit . You should choose the right grit of sandpaper or sander for your material and your desired smoothness. The grit is the number that indicates how coarse or fine the abrasive particles are on the sandpaper or sander. The lower the number, the coarser the grit; the higher the number, the finer the grit. You should start with a coarser grit and gradually move to a finer grit, to achieve a smooth and even finish.
- Use a steady motion . You should use a steady and consistent motion when sanding your materials, to avoid creating uneven or scratched surfaces. You should move the sandpaper or sander along the grain of the wood or metal, not against it. You should also apply a moderate pressure, not too hard or too soft, to avoid damaging or burning your material.
- Wear protective gear . You should wear gloves, goggles, masks, etc., to protect yourself from dust, debris, sparks, etc., while sanding your materials.
Here are some examples of how to sand different types of materials:
- Wood . To sand wood, you can use a hand sander, a belt sander, an orbital sander, or a disc sander. You should choose the type of sander that matches the size and shape of the wood that you want to sand. For example, you can use a hand sander for small and detailed areas, a belt sander for large and flat areas, an orbital sander for curved and irregular areas, and a disc sander for round and angled areas.
- Metal . To sand metal, you can use a file, a grinder, or a sandpaper. You should choose the type of tool that matches the size and shape of the metal that you want to sand. For example, you can use a file for small and detailed areas, a grinder for large and rough areas, and a sandpaper for fine and smooth areas.
- Plastic . To sand plastic, you can use a sandpaper or a sander. You should choose the type of sandpaper or sander that matches the thickness and shape of the plastic that you want to sand. For example, you can use a coarse sandpaper for thick and hard plastic, and a fine sandpaper or sander for thin and soft plastic.
These are some examples of how to sand different types of materials for your boat trailer. You should follow your plan and check your materials after sanding them, to ensure smoothness and quality.
Step 3: Assemble the Boat Trailer Frame for Building Your Boat Trailer
The third step in building a boat trailer is to assemble the boat trailer frame. Assembling the boat trailer frame involves joining the wood, metal, or plastic parts together to form the structure of your boat trailer. You can use various tools and methods such as screws, bolts, nails, rivets, welds, etc., to assemble your boat trailer frame.
You should follow these tips when assembling your boat trailer frame:
- Follow your plan . You should follow your plan and instructions carefully and accurately when assembling your boat trailer frame, to ensure that all the parts are in the right place and position. You should also check your measurements and alignments frequently, to avoid any errors or mistakes.
- Use a level . You should use a level to check if your boat trailer frame is square and level, to ensure stability and safety. You should also adjust your boat trailer frame as needed, to make it horizontal or vertical.
- Secure your connections . You should secure your connections firmly and tightly, to ensure strength and durability. You should also use washers, lock nuts, lock washers, or locking compounds, to prevent your connections from loosening or coming apart.
- Wear protective gear . You should wear gloves, goggles, masks, etc., to protect yourself from injuries or accidents while assembling your boat trailer frame.
Here are some examples of how to assemble different types of boat trailer frames:
- Wood . To assemble a wood boat trailer frame, you can use screws, bolts, nails, or wood glue. You should choose the type of fastener or adhesive that matches the thickness and strength of the wood that you are using. For example, you can use screws or bolts for thick and hard wood, nails or wood glue for thin and soft wood.
- Metal . To assemble a metal boat trailer frame, you can use bolts, rivets, or welds. You should choose the type of fastener or joint that matches the thickness and shape of the metal that you are using. For example, you can use bolts or rivets for thin and flat metal, welds for thick and curved metal.
- Plastic . To assemble a plastic boat trailer frame, you can use screws, bolts, or plastic welds. You should choose the type of fastener or joint that matches the thickness and shape of the plastic that you are using. For example, you can use screws or bolts for thick and flat plastic, plastic welds for thin and curved plastic.
These are some examples of how to assemble different types of boat trailer frames. You should follow your plan and check your boat trailer frame after assembling it, to ensure that it is strong and stable.
Step 4: Finish Your Boat Trailer by Attaching the Axle, Wheels, Tires, Hitch, and Other Features
The fourth and final step in building a boat trailer is to finish it by attaching the axle, wheels, tires, hitch, and other features. Finishing your boat trailer involves adding the parts that make your boat trailer functional and safe. You can use various tools and methods such as screws, bolts, nuts, washers, etc., to attach these parts to your boat trailer frame.
You should follow these tips when finishing your boat trailer:
- Follow your plan . You should follow your plan and instructions carefully and accurately when finishing your boat trailer, to ensure that all the parts are in the right place and position. You should also check your measurements and alignments frequently, to avoid any errors or mistakes.
- Use a level . You should use a level to check if your boat trailer is square and level, to ensure stability and safety. You should also adjust your boat trailer as needed, to make it horizontal or vertical.
- Wear protective gear . You should wear gloves, goggles, masks, etc., to protect yourself from injuries or accidents while finishing your boat trailer.
Here are some examples of how to finish different types of boat trailers:
- Attach the axle . To attach the axle to your boat trailer frame, you can use bolts, nuts, washers, and brackets. You should choose the type and size of the axle that matches the weight capacity and clearance of your boat trailer. You should also make sure that the axle is properly aligned and leveled with the frame.
- Attach the wheels and tires . To attach the wheels and tires to your axle, you can use lug nuts, wheel spacers, and valve stems. You should choose the type and size of the wheels and tires that match the load and terrain of your boat trailer. You should also make sure that the wheels and tires are properly balanced and inflated.
- Attach the hitch . To attach the hitch to your boat trailer frame, you can use bolts, nuts, washers, and couplers. You should choose the type and size of the hitch that match the weight and angle of your boat trailer. You should also make sure that the hitch is properly aligned and leveled with the towing vehicle.
- Add any other desired features . To add any other desired features to your boat trailer, such as a winch, a lighting system, or a storage compartment, you can use various tools and methods such as screws, bolts, wires, etc. You should follow the instructions and guidelines that come with your features or accessories, to ensure that they are installed correctly and safely.
- Finish the boat trailer . To finish your boat trailer, you can sand it smooth, apply a sealant or paint to protect it from the elements, and add any decals or stickers to personalize it.
These are some examples of how to finish different types of boat trailers. You should follow your plan and check your boat trailer after finishing it, to ensure that it is functional and safe.
Congratulations! You have successfully built your own boat trailer. Now you can enjoy boating with your own custom-made boat trailer.
FAQs – How to Build a Boat Trailer
In this part, we will answer some frequently asked questions on building a boat trailer. These questions are based on the common queries and issues that boat trailer builders face. We hope that these answers will help you solve your problems and improve your boat trailer building skills.
How do I make sure my boat trailer is strong enough?
One of the most important factors to consider when building a boat trailer is its strength. You want your boat trailer to be able to support the weight of your boat and any additional load without breaking or bending. You also want your boat trailer to be able to withstand the stress and strain of towing, loading, and unloading.
To make sure your boat trailer is strong enough, you need to choose the right materials, fasteners, and joints for your boat trailer frame and parts. You also need to follow the proper design and assembly techniques for your boat trailer.
Here are some tips on how to make sure your boat trailer is strong enough:
- Choose the right materials . You should choose materials that have high tensile strength, compressive strength, and shear strength for your boat trailer. Tensile strength is the ability of a material to resist being pulled apart, compressive strength is the ability of a material to resist being crushed, and shear strength is the ability of a material to resist being cut or sliced. You should also choose materials that have high stiffness, toughness, and ductility for your boat trailer. Stiffness is the resistance of a material to bending or deformation, toughness is the ability of a material to absorb energy without breaking, and ductility is the ability of a material to stretch or bend without cracking.
- Choose the right fasteners . You should choose fasteners that have high tensile strength, shear strength, and torque resistance for your boat trailer. Tensile strength is the ability of a fastener to resist being pulled apart, shear strength is the ability of a fastener to resist being cut or sliced, and torque resistance is the ability of a fastener to resist being twisted or turned. You should also choose fasteners that have high corrosion resistance, wear resistance, and vibration resistance for your boat trailer. Corrosion resistance is the ability of a fastener to resist rusting or deteriorating, wear resistance is the ability of a fastener to resist abrasion or friction, and vibration resistance is the ability of a fastener to resist loosening or coming apart due to movement or shaking.
- Choose the right joints . You should choose joints that have high tensile strength, shear strength, and fatigue resistance for your boat trailer. Tensile strength is the ability of a joint to resist being pulled apart, shear strength is the ability of a joint to resist being cut or sliced, and fatigue resistance is the ability of a joint to resist weakening or failing due to repeated stress or strain. You should also choose joints that have high stiffness, rigidity, and flexibility for your boat trailer. Stiffness is the resistance of a joint to bending or deformation, rigidity is the resistance of a joint to twisting or turning, and flexibility is the ability of a joint to adapt or adjust to changes in load or movement.
- Follow the proper design and assembly techniques . You should follow the proper design and assembly techniques for your boat trailer, to ensure that it is strong and stable. You should use the right size and number of fasteners and joints for each part of your boat trailer. You should also use the right angle and direction for each fastener and joint. You should also use washers, spacers, brackets, or braces to reinforce your connections and prevent stress concentration.
These are some tips on how to make sure your boat trailer is strong enough. You should also test your boat trailer regularly and inspect it for any signs of damage or wear.
How do I watertight my boat trailer?
Another important factor to consider when building a boat trailer is its watertightness. You want your boat trailer to be able to resist water penetration and leakage, especially when you submerge it in water to load or unload your boat. You also want your boat trailer to be able to prevent water damage and corrosion to your materials and parts.
To watertight your boat trailer, you need to seal any gaps, cracks, or holes in your boat trailer frame and parts. You also need to protect your materials and parts from water exposure and moisture.
Here are some tips on how to watertight your boat trailer:
- Seal any gaps, cracks, or holes . You should seal any gaps, cracks, or holes in your boat trailer frame and parts, using various sealants or adhesives such as silicone, epoxy, polyurethane, etc. You should choose the type of sealant or adhesive that matches the material and function of your boat trailer part. For example, you can use silicone for flexible and waterproof seals, epoxy for rigid and durable seals, polyurethane for elastic and abrasion-resistant seals.
- Protect your materials and parts from water exposure and moisture . You should protect your materials and parts from water exposure and moisture, using various coatings or treatments such as paint, varnish, galvanizing, anodizing, etc. You should choose the type of coating or treatment that matches the material and function of your boat trailer part. For example, you can use paint or varnish for wood, galvanizing or anodizing for metal, etc.
These are some tips on how to watertight your boat trailer. You should also check your boat trailer regularly and repair any leaks or damages as soon as possible.
How do I maintain my boat trailer?
The last factor to consider when building a boat trailer is its maintenance. You want your boat trailer to last long and perform well, without requiring too much time or money for repairs or replacements. You also want your boat trailer to be safe and reliable, without causing any problems or accidents.
To maintain your boat trailer, you need to clean it, lubricate it, inspect it, and store it properly. You also need to follow the manufacturer’s recommendations and instructions for your boat trailer parts and accessories.
Here are some tips on how to maintain your boat trailer:
- Clean your boat trailer . You should clean your boat trailer after every use, especially if you use it in saltwater or muddy conditions. You should rinse your boat trailer with fresh water to remove any dirt, salt, sand, or debris from the frame and parts. You should also use a mild soap or detergent to wash your boat trailer with a sponge or a brush. You should avoid using any harsh chemicals or abrasives that might damage your materials or parts. You should also dry your boat trailer thoroughly with a cloth or a towel, or let it air dry in a shaded area.
- Lubricate your boat trailer . You should lubricate your boat trailer regularly, especially the moving parts such as the axle, the wheels, the tires, the hitch, the winch, etc. You should use a suitable lubricant such as grease, oil, or spray for each part of your boat trailer. You should apply the lubricant generously and evenly to prevent friction, wear, rust, or corrosion. You should also wipe off any excess lubricant with a cloth or a paper towel.
- Inspect your boat trailer . You should inspect your boat trailer before and after every use, to check for any signs of damage, wear, or malfunction. You should look for any cracks, dents, bends, or breaks in the frame and parts. You should also check if all the fasteners and joints are tight and secure. You should also test if all the lights, brakes, and signals are working properly. You should also measure if the tire pressure and the hitch height are correct. You should also weigh your boat trailer to make sure it is not overloaded or unbalanced. You should also listen for any unusual noises or vibrations while towing your boat trailer. If you find any problems or issues with your boat trailer, you should fix them as soon as possible or seek professional help.
- Store your boat trailer properly . You should store your boat trailer properly when not in use, to protect it from theft, vandalism, or damage. You should park your boat trailer in a safe and secure location, such as a garage, a shed, or a fenced area. You should also lock your boat trailer with a hitch lock, a wheel lock, or a chain lock. You should also cover your boat trailer with a tarp or a cover to shield it from dust, dirt, sun, rain, snow, etc. You should also lift your boat trailer off the ground with jacks or blocks to prevent flat spots on the tires or rust on the axle.
These are some tips on how to maintain your boat trailer. You should also follow the manufacturer’s recommendations and instructions for your boat trailer parts and accessories.
What is the best type of material to use for a boat trailer?
There is no definitive answer to this question, as different types of materials have different advantages and disadvantages for building a boat trailer. The best type of material to use depends on your budget, preference, availability, and purpose.
However, here are some general guidelines that you can follow when choosing the type of material for your boat trailer:
- Wood . Wood is a good choice for building a boat trailer if you want a cheap, easy, and versatile material. Wood is widely available and can be cut, shaped, and joined in various ways. Wood is also lightweight and can float on water. However, wood is also prone to rotting, warping, cracking, and splintering, especially when exposed to water and weather. Wood also requires regular maintenance and protection, such as sanding, sealing, or painting.
- Metal . Metal is a good choice for building a boat trailer if you want a strong, durable, and rigid material. Metal can withstand heavy loads and resist corrosion and wear. Metal can also be welded, bolted, or riveted in various ways. However, metal is also expensive, heavy, and hard to work with. Metal also requires special tools and skills, such as welding or cutting. Metal also conducts heat and electricity, which can be dangerous or uncomfortable.
- Plastic . Plastic is a good choice for building a boat trailer if you want a lightweight, flexible, and waterproof material. Plastic can be molded, cut, and joined in various ways. Plastic can also withstand water and weather exposure without rusting or rotting. However, plastic is also weak, brittle, and prone to cracking, breaking, or melting, especially when exposed to heat or pressure. Plastic also requires special adhesives or welds to join it securely.
These are some general guidelines that you can follow when choosing the type of material for your boat trailer. You should also consider the availability, cost, and environmental impact of each material before making your final decision.
What are some tips for building a custom boat trailer?
Building a custom boat trailer can be a challenging and rewarding project that allows you to express your creativity and personality. However, building a custom boat trailer also requires some planning, research, and experimentation to achieve the best results. Here are some tips for building a custom boat trailer:
- Define your purpose . You should define the purpose of your custom boat trailer before starting your project. You should consider what type of boat you have, where you want to go, how often you want to use it, and what features or accessories you want to add. This will help you determine the size, shape, design, and functionality of your custom boat trailer.
- Get inspired . You should get inspired by looking at other custom boat trailers that have been built by other people. You can find many examples of custom boat trailers online or offline, such as on websites, blogs, forums, magazines, books, etc. You can also visit local boat shows or clubs to see some custom boat trailers in person. You can use these examples as references or sources of ideas for your own custom boat trailer.
- Be creative . You should be creative and experiment with different materials, colors, shapes, and features for your custom boat trailer. You can use recycled or salvaged materials to reduce the cost and environmental impact of your project. You can also use paint, stickers, decals, or lights to decorate and personalize your custom boat trailer.
- Test your trailer . You should test your custom boat trailer before using it on the road or on the water. You should check if all the parts are working properly and safely, such as the brakes, the lights, the hitch, etc. You should also check if your custom boat trailer meets the legal requirements and regulations of your area, such as the size, weight, license, etc. You should also make any adjustments or improvements as needed, to ensure that your custom boat trailer performs well and meets your expectations.
These are some tips for building a custom boat trailer. You should also have fun and enjoy the process of creating something unique and original.
Conclusion – How to Build a Boat Trailer
To conclude this comprehensive guide on “How to Build a Boat Trailer,” we have taken you through the essential steps and considerations for embarking on this DIY project. Building your own boat trailer is a rewarding endeavor, offering you a chance to save money, customize your trailer to your specific needs, and gain new skills. We’ve covered everything from design and material selection to safety tips and the step-by-step assembly of your boat trailer frame.
By following the guidance provided in this article, you can confidently build a boat trailer that not only transports your boat safely but also reflects your creativity and craftsmanship. Whether you’re a seasoned DIY enthusiast or a beginner looking for a fulfilling project, building a boat trailer can be a gratifying journey.
With a well-designed plan, the right tools, and a commitment to safety, you can achieve the satisfaction of creating a boat trailer with your own hands. So, go ahead and embark on this exciting venture, and soon you’ll be hitting the open water with your newly constructed boat trailer in tow. Happy building!

Written by DIY Boat Building Plans

How to Build a Boat Motor Stand

Fiberglass Boat Maintenance Tips

The Ultimate Guide on How to Build a Sailboat – Step by Step Instructions and Expert Tips
Alex Morgan
Building a sailboat can be a rewarding and fulfilling project for those with a passion for sailing and craftsmanship. Whether you’re an experienced builder or a novice, constructing your own sailboat allows you to customize it to your specific needs and preferences. This comprehensive guide will take you through the step-by-step process of building a sailboat.
To start, gather the necessary tools and materials required for the construction. The specific tools needed may vary depending on the design and complexity of the sailboat. Basic tools such as measuring tape, saws, drills, and sandpaper are commonly used during the building process. specialized tools like a planer, router, and clamps may be required for more intricate details.
In terms of materials, you’ll need various types of wood for the hull, frames, and deck, as well as epoxy resin, fiberglass cloth, and marine-grade plywood. Other materials like stainless steel screws, bolts, and fittings will be needed for assembling and securing the different components of the sailboat.
Choosing the right sailboat design is a crucial step in the building process. Consider factors such as the intended use, sailing conditions, and your own level of experience. Factors like the boat’s size, stability, and performance characteristics should also be taken into account.
Before diving into the construction, it’s important to prepare a suitable building site. This includes having enough space to work on the boat, a clean and organized area, and proper ventilation. A sturdy workbench or support system is necessary for holding the boat’s components during assembly.
The hull of the sailboat is a fundamental part of the construction process. Follow a step-by-step process for constructing the sailboat hull, which involves shaping and assembling the frames, planking the hull with marine-grade plywood, and applying epoxy resin and fiberglass for added strength and durability.
Once the hull is completed, it’s time to install the sails and rigging. Properly attaching and rigging the sails is essential for optimal performance and maneuverability. This includes setting up the mast, boom, and other rigging components in accordance with the sailboat’s design specifications.
Next, focus on essential systems and finishing touches. Install electrical and plumbing systems as per your requirements, ensuring they are safe and efficient. Applying finishes and sealants to the boat’s exterior not only enhances its appearance but also protects it from the elements.
Before launching your sailboat, conduct safety checks to ensure everything is in proper working order. Inspect the hull, rigging, and other components for any potential issues. Once you have done all the necessary checks, follow tips for a successful sailboat launch, ensuring a smooth transition from construction to the open water.
By following this guide, you’ll be well-equipped to embark on the exciting journey of building your own sailboat. With careful planning, attention to detail, and patience, you’ll soon have a vessel that reflects your skills and passion for sailing.
Key takeaway:
- Building a sailboat maximizes creativity and adventure: Constructing your own sailboat allows you to embark on a unique and fulfilling journey while enabling you to express your creativity and personal style.
- Gathering the right tools and materials is crucial: Having the necessary tools and materials is essential for building a sailboat successfully. Ensure you have the appropriate tools and high-quality materials to construct a sturdy and reliable sailboat.
- Choosing the right sailboat design is vital: Consider various factors such as size, intended use, and sailing conditions when selecting a sailboat design. This will ensure you build a sailboat that meets your specific needs and provides optimal performance.
Gathering the Necessary Tools and Materials
In order to build a sailboat, the first step is to gather the necessary tools and materials.
- Start by researching the specific type of sailboat you want to build to determine the required tools and materials.
- Make a list of tools in good working condition, including a saw, hammer, drill, measuring tape, and screwdrivers.
- Create a material list that includes plywood, fiberglass, epoxy resin, screws, and nails . Calculate the quantities based on the sailboat plans.
- Find reliable suppliers and compare prices and quality for the materials.
- Set a budget for the project, taking into account the cost of both tools and materials.
- Plan the layout of your workspace for maximum efficiency and keep the tools and materials easily accessible and organized.
Throughout the building process, it is important to prioritize safety by wearing protective gear and following the guidelines for tool usage. If needed, seek assistance from experts or experienced builders. Building a sailboat may pose challenges but it is also a rewarding experience. So, enjoy the process and take satisfaction in creating something with your own hands.
What Tools Do You Need to Build a Sailboat?
To build a sailboat, you need the following tools:
1. Measuring tools: To accurately measure and mark dimensions, use a tape measure, ruler, and carpenter’s square.
2. Cutting tools: For cutting large pieces of wood, use a jigsaw or circular saw, and for intricate cuts, use a coping saw or handsaw.
3. Joinery tools: Assemble and join parts using a hammer, screwdriver, drills, and chisels.
4. Sanding tools: Smooth and shape wood surfaces using sandpaper or a power sander.
5. Clamping tools: Hold pieces together while working using clamps and a vise.
6. Safety equipment: Ensure your safety with gloves, safety glasses, and a dust mask.
In addition to these tools, you’ll need a well-ventilated workspace with a sturdy workbench. This is crucial for building a sailboat. It’s also advisable to have a set of plans or blueprints to guide you through the construction process.
True story:
I always dreamt of building my own sailboat, so I gathered the necessary tools and materials. With dedication and passion, I started constructing the hull, following the step-by-step process. It was challenging but rewarding. Installing the sails and rigging was exciting too. I could already envision the boat sailing on open water. After applying the finishing touches and conducting safety checks, it was time for the sailboat’s launch. With a mix of nerves and anticipation, I set the boat into the water. To my delight, it sailed smoothly, taking me on incredible adventures. Building a sailboat was a labor of love that fulfilled my lifelong dream of being a boat builder.
What Materials Are Required to Build a Sailboat?
Materials Required to Build a Sailboat:
– Marine plywood : Several sheets
– Fiberglass cloth : Sufficient length
– Epoxy resin : Recommended amount
– Hardwood lumber : Various sizes
– Stainless steel screws : Sufficient quantity
– Aluminum mast : Appropriate size
– Sails : Multiple types
– Rigging hardware : Various components
– Navigation lights : Required number
– Steering system : As per design
– Electrical wiring : According to needs
Pro-tip : When choosing materials for building a sailboat, select high-quality marine-grade materials suitable for the intended purpose and capable of withstanding the harsh marine environment.
Choosing the Right Sailboat Design
Choosing the perfect sailboat design sets the course for an unforgettable journey on the sea . Discover the key factors to consider in selecting the ideal sailboat design that suits your needs. Get ready to navigate through a sea of options and explore the world of sailboat aesthetics , performance , and practicality . So, prepare to steer your way into understanding the vital elements that influence the decision-making process when it comes to selecting the ultimate sailboat design .
Factors to Consider When Selecting a Sailboat Design
When selecting a sailboat design, there are several factors to consider. First and foremost is the intended use of the sailboat. You need to determine whether you plan to race , cruise , or day sail . It is important that the design aligns with your activities on the water.
Another crucial factor is the size of the sailboat. Consider your experience and crew when deciding on the sailboat size. Keep in mind that larger sailboats may require more crew members and expertise to handle.
It is essential to evaluate the stability of different sailboat designs. Factors such as keel type and hull shape can significantly impact the stability and seaworthiness of the sailboat.
Performance is another important consideration. Determine the level of performance you desire. Some designs prioritize speed and agility , while others focus on comfort and ease of handling .
Budget is also a significant factor to keep in mind. Take into account the price of owning and maintaining different sailboat designs, as well as ongoing expenses.
The construction material of the sailboat is yet another factor to consider. Options include fiberglass , wood , aluminum , and steel , each with its own advantages and considerations.
It is important to note that sailboats come in various designs, each with unique features catering to different sailing preferences and conditions.
Preparing the Building Site
When preparing the building site for a sailboat, follow these important steps:
1. Clear the area: Remove vegetation, debris, and obstructions to create a clean workspace.
2. Level the ground: Ensure the site is level and stable for a solid foundation.
3. Mark out the dimensions: Use measuring tools to accurately mark the sailboat’s length, width, and height on the ground.
4. Prepare the ground: Dig or fill the ground to create a smooth surface that meets the required dimensions.
5. Install boundary markers: Place stakes or markers around the perimeter of the building site to clearly define the boundaries and prevent encroachment.
6. Establish access points: Create pathways or access points to allow for easy movement of materials and equipment.
7. Ensure safety: Take necessary precautions such as putting up warning signs, setting up barriers, and having appropriate safety equipment on site.
By following these steps, you can effectively prepare the building site for constructing your sailboat.
What Are the Requirements for a Suitable Building Site?
The requirements for a suitable building site for constructing a sailboat include:
- Ample space: The site should have enough room to accommodate the sailboat’s size and allow for easy movement around the boat.
- Flat and level ground: The ground must be stable and even to prevent structural issues during construction.
- Protection from weather: The site should be sheltered from strong winds, rain, and direct sunlight to prevent material damage and ensure optimal working conditions.
- Access to utilities: Electricity and running water are necessary for powering tools, equipment, cleaning, and maintenance.
- Proper drainage: The site needs good drainage to prevent water accumulation, which can damage materials and hinder progress.
- Secure storage: A secure storage area is essential to protect tools, materials, and equipment from theft and damage.
- Accessibility: The site should be easily accessible for material delivery and transportation of the completed sailboat.
- Permits and regulations: Compliance with local building codes, permits, and regulations is necessary for safety and legal compliance throughout the construction process.
Building the Hull of the Sailboat
Building the hull of a sailboat is an exciting journey that requires meticulous attention to detail and precise craftsmanship. In this section, we will embark on a step-by-step process for constructing the sailboat hull, guiding you through the essential stages of this intricate endeavor. From selecting the right materials to shaping the structure, we’ll cover everything you need to know to create a sturdy and seaworthy foundation . So, grab your tools and let’s dive into the art of crafting the perfect sailboat hull.
Step-by-Step Process for Constructing the Sailboat Hull
The sailboat hull can be constructed in a step-by-step process. Here is how you can construct a strong and durable sailboat hull:
Step 1. Create the hull mold : Start by building a robust and long-lasting frame that accurately represents the shape and size of the hull.
Step 2. Prepare the mold surface: Apply a release agent to ensure that the hull does not stick to the mold.
Step 3. Lay fiberglass : Soak fiberglass cloth in epoxy resin and carefully place it on the mold, forming multiple layers to create a sturdy hull.
Step 4. Apply resin and cure: Distribute epoxy resin evenly across the entire surface in order to bond the layers together. Let it cure as per the instructions provided by the manufacturer.
Step 5. Sand and fair: Smooth out any imperfections on the hull, creating a sleek and flawless shape.
Step 6. Paint the hull: Enhance both appearance and protection by applying high-quality marine paint to the hull.
Step 7. Install hardware: Securely attach cleats, hatches, and fittings to prevent any leaks or damages.
By following these step-by-step instructions, you will be able to construct a sailboat hull that is strong, durable, and ready for the next stages of building your sailboat.
Installing the Sails and Rigging
Get ready to take your sailboat to the next level as we dive into the section on installing the sails and rigging! We’ll be revealing the secrets to properly attaching and rigging the sails for optimal performance. With expert insights and practical tips , you’ll soon be harnessing the wind like a pro. So, tighten your ropes and get ready to set sail on this exciting adventure of sailboat building!
How to Properly Attach and Rig the Sails for Optimal Performance
To properly attach and rig the sails for optimal performance on a sailboat, follow these steps:
- Ensure all necessary hardware is securely attached to the sailboat.
- Attach the halyard to the head of the sail and hoist it up the mast to the desired height.
- Secure the tack of the sail to the tack fitting at the bottom of the mast.
- Attach one end of the mainsheet to the boom and the other end to the traveler .
- Connect the jib sheets to the clew of the jib sail.
- Rig any additional sails according to manufacturer’s instructions.
- Check all lines and rigging for proper tension and alignment.
- Test the rigging and sails in different wind conditions for optimal performance.
- Regularly inspect and maintain the rigging and sails.
By following these steps, you can learn how to properly attach and rig the sails for optimal performance on your sailboat.
Essential Systems and Finishing Touches
Make your sailboat dreams a reality with this guide to essential systems and finishing touches. Discover the ins and outs of installing electrical and plumbing systems, ensuring your vessel is equipped with everything you need for a smooth sailing experience . Learn the art of applying finishes and sealants to protect your sailboat from the harsh marine environment. Get ready to set sail with confidence and style !
Installing Electrical and Plumbing Systems
When building a sailboat, it is essential to install electrical and plumbing systems. Here is a step-by-step process to guide you:
1. Plan the electrical and plumbing layout: Determine locations for electrical outlets, switches, and plumbing fixtures like sinks and toilets. Consider placement for batteries, freshwater tanks, and wastewater holding tanks.
2. Install electrical wiring: Start by installing the main electrical panel and run wires to various components and outlets. Use appropriate wiring sizes and ensure secure connections. Include safety features like circuit breakers and grounding.
3. Connect plumbing lines: Begin by installing freshwater supply lines and connecting them to the freshwater tank. Install plumbing fixtures like sinks and toilets, ensuring proper sealing and secure connections. Then, install the wastewater plumbing system, including drain lines and a holding tank.
4. Install electrical and plumbing components: This involves installing electrical outlets, switches, and lighting fixtures. Ensure proper wiring connections and test the electrical system for functionality. For plumbing, install faucets, showerheads, and toilets, ensuring proper water flow and drainage.
5. Test the systems: Once everything is installed, test the electrical and plumbing systems to ensure correct functioning. Check for leaks, proper water pressure, and operational lights and switches.
6. Make necessary adjustments: If any issues are found during testing, make the necessary adjustments and repairs to ensure optimal functioning of the systems.
7. Secure and protect the systems: Once everything is working correctly, secure and protect the electrical and plumbing systems by organizing wires and pipes, using appropriate insulation, and securing any loose components.
By following these steps, you can successfully install the electrical and plumbing systems in your sailboat, ensuring functionality and convenience on your sailing adventures.
Applying Finishes and Sealants for Protection
Applying finishes and sealants is important in building a sailboat to protect the hull and ensure its longevity.
Clean the hull: Make sure the hull is clean and free from debris or contaminants. Use a marine-friendly cleaner and rinse thoroughly.
Sand the hull: Lightly sand the hull using fine-grit sandpaper to create a smooth surface. This will help the finishes adhere better.
Choose the right finish: Select a high-quality marine-grade finish suitable for the hull material, such as varnish, paint, or gelcoat.
Apply the finish: Follow the manufacturer’s instructions. Apply thin, even coats using a brush or roller and allow proper drying time between coats.
Seal the hull: After applying finishes and sealants for protection, use a marine-grade sealant specifically designed for boat hulls to protect it from water penetration.
Apply multiple coats: Depending on the desired level of protection, it may be necessary to apply multiple coats of finish and sealant.
Inspect and maintain: Regularly inspect the finishes and sealants for signs of wear or damage. Touch up or reapply as needed to maintain optimal protection.
In history, boat builders recognized the importance of protecting the hulls from the sea’s harsh elements by applying finishes and sealants for protection. They used natural materials like tar, pitch, or wax to seal the wood and prevent waterlogging. Advancements in technology and materials have led to more durable finishes and sealants. Today, boat builders have access to marine-grade products designed to provide exceptional protection and enhance the longevity of sailboats. By applying finishes and sealants for protection with care and proper maintenance, sailors can ensure their sailboats remain in excellent condition for years of sailing adventures.
Testing and Launching the Sailboat
Before launching your sailboat, there are crucial steps you need to take to ensure a safe and successful voyage. In this section, we will dive into the necessary safety checks to conduct before setting sail. We will also provide valuable tips from seasoned sailors to ensure that your sailboat launch goes smoothly. So, buckle up and get ready to embark on your sailing adventure with confidence !
Conducting Safety Checks Before Launching
Conducting safety checks before launching your sailboat is crucial to ensure a safe voyage. To guarantee a smooth sailing experience, follow these steps:
1. Carefully inspect the hull of the sailboat for any damage or cracks. Be sure to check the seams and joints thoroughly.
2. Take the time to check the rigging , including the mast , shrouds , stays , and halyards , for signs of wear, fraying, or corrosion.
3. Hoist the sails and test them to ensure they are functioning properly. Make sure that all sail controls are in good condition and working as they should.
4. It is important to examine the electrical system of the sailboat. Check the battery and wiring for any signs of damage. Verify that all lights and instruments are functioning correctly.
5. Inspect the plumbing system , testing the freshwater system and searching for any leaks or clogs that may cause issues during your voyage.
6. Take the time to review all the necessary safety equipment . Ensure that everything is on board and in proper working order.
7. Confirm that all navigation aids , such as the compass , GPS , and any other navigation instruments, are functioning correctly.
8. It is crucial to verify the functioning of all communication devices . Take the time to test the radio or any other communication devices that you may have on board.
9. Inspect the fuel and engine carefully. Check the fuel level, oil levels, and overall engine condition. Test the engine to make sure it is running smoothly.
By conducting these necessary safety checks before launching your sailboat, you can minimize the risk of encountering any issues during your sailing experience.
Tips for a Successful Sailboat Launch
Perform a safety check: Before sailing, inspect the boat for damage, ensure rigging is secure, and test essential systems.
Check weather conditions: Choose a day with favorable weather for launching. Avoid high winds or rough seas.
Prepare a launch area: Clear a suitable pathway, remove obstacles, and ensure sufficient depth and space.
Use adequate support : Use sturdy boat trailers or launch ramps for stability during launch.
Properly position the boat: Center and balance the sailboat parallel to the water’s edge using dock lines or ropes.
Release the boat gradually: Release the boat steadily to prevent damage or injuries.
Monitor the boat’s movements: Check for leaks or instability and address issues immediately. Adjust sails and rigging if necessary.
Enjoy your sail: Follow boating safety guidelines and have a great time on the water.
A friend built a sailboat from scratch and successfully launched it by following these tips. The weather was perfect, and everything went smoothly. With the boat securely supported and positioned, they released it into the water, and it floated beautifully. They had a memorable experience sailing without any issues. By following these tips, they ensured a safe and enjoyable journey on their newly built sailboat.
Some Facts About How To Build A Sailboat:
- ✅ Building a sailboat can take approximately 100 hours over 3 months. (Source: Instructables)
- ✅ The cost of building a sailboat can amount to around $1,000. (Source: Instructables)
- ✅ The first step in building a sailboat involves cutting out the parts using boat building plans and plywood. (Source: Instructables)
- ✅ Assembling the hull of a sailboat involves stitching and gluing the panels together. (Source: Instructables)
- ✅ Fiberglassing the hull of a sailboat makes it waterproof and strong. (Source: Sailboat Cruising)
Frequently Asked Questions
Faq 1: what are the different options for building a sailboat.
There are three main options for building a sailboat. The first option is refurbishing an old boat, the second option is purchasing a hull with the deck moulding already fitted, and the third option is to build a boat from scratch.
FAQ 2: How long does it take to build a sailboat?
Building a sailboat takes approximately 100 hours over a span of 3 months.
FAQ 3: Can I learn the necessary skills for building a sailboat along the way?
Yes, you can learn the necessary skills for building a sailboat slowly and avoid making mistakes along the way.
FAQ 4: Should I hire a professional surveyor before refurbishing an old sailboat?
Yes, it is advisable to involve a professional surveyor before taking on the project of refurbishing an old sailboat.
FAQ 5: What materials are needed for building a sailboat?
The materials required for building a sailboat include oak plywood, epoxy resin, epoxy hardener, silica thickener, wood flour thickener, masking tape, Japanese pull-saw, table saw, router, sander, jigsaw, drill, wire cutter, C-clamps, mixing cups, fiberglass cloth, glue, screws, and fasteners.
FAQ 6: How much does it cost to build a sailboat?
The cost of building a sailboat is approximately $1,000, excluding any additional costs for customization or specific features.
About the author

Leave a Reply Cancel reply
Your email address will not be published. Required fields are marked *
Save my name, email, and website in this browser for the next time I comment.
Latest posts

The history of sailing – from ancient times to modern adventures
History of Sailing Sailing is a time-honored tradition that has evolved over millennia, from its humble beginnings as a means of transportation to a beloved modern-day recreational activity. The history of sailing is a fascinating journey that spans cultures and centuries, rich in innovation and adventure. In this article, we’ll explore the remarkable evolution of…

Sailing Solo: Adventures and Challenges of Single-Handed Sailing
Solo Sailing Sailing has always been a pursuit of freedom, adventure, and self-discovery. While sailing with a crew is a fantastic experience, there’s a unique allure to sailing solo – just you, the wind, and the open sea. Single-handed sailing, as it’s often called, is a journey of self-reliance, resilience, and the ultimate test of…

Sustainable Sailing: Eco-Friendly Practices on the boat
Eco Friendly Sailing Sailing is an exhilarating and timeless way to explore the beauty of the open water, but it’s important to remember that our oceans and environment need our protection. Sustainable sailing, which involves eco-friendly practices and mindful decision-making, allows sailors to enjoy their adventures while minimizing their impact on the environment. In this…
Boat Trailer Plans
O ur BOAT TRAILER PLANS feature the most modern, up-to-date, and technologically advanced features available to give you a boat trailer that’s equal or superior to those you can buy. Created by designer, Ken Hankinson, long associated with TRAILERBOATS Magazine as columnist and contributing editor, he knows boats and boat trailers inside out. Each plan includes a comprehensive ILLUSTRATED MANUAL detailing all aspects of the project for QUICK & EASY assembly by anyone who can weld steel.
Click HERE for sizing information and examples.

Printed Standard Trailer Plans

Canoe/Kayak Trailer Plans and Book

Super Huck Trailer Plans and Book

Huck Finn Trailer Plans and Book

Trailer 4000/6000 PC Plans-PDF

Trailer 2000/3800 PC Plans-PDF

Trailer 7000/10000 Plans - PDF

Trailer 5000/6000 Plans - PDF

Trailer 2900/3800 Plans - PDF

Trailer 2300/2800 Plans - PDF

Trailer 1200/1800 Plans - PDF

Trailer 750/1000 Plans - PDF

How to Build Boat Trailers

Login to my account
Enter your e-mail and password:
New customer? Create your account
Lost password? Recover password
Recover password
Enter your email:
Remembered your password? Back to login
Your cart is empty

How To Build Boat Trailers
Description.
Don't let the lack of a trailer stop you from a great deal on a boat. Build the perfect trailer instead. It's a great alternative to the high cost and scarcity of trailers. Learn to build, launch, retrieve and drive.
Table of Contents:
- Introduction
- Wheels, Hubs, and Tires
- Wheel Bearings
- Trailer Frames
- Jack Stands
- Boat Launching & Retrieving
- Trailer Handling
Customer Reviews
Photos are from 1965 or earlier. Some of the sketches are okay but for the most part this publication features items and parts that are long since superceded. Needs a major update.
Recently viewed
Our Store is in Brooklin, Maine
at 84 Great Cove Drive. We're open Mon-Fri 8am to 4:30 pm Call 1.800.273.7447. WE'RE RIGHT HERE .
Timely Shipping
We are 99-3/4% sure... that we will ship your order within 24 hours Granted, that does not include weekends and holidays.
Secure payments
Rest assured... not only is our site secure, we do not hold your credit card/payment info.
- Opens in a new window.
18 Homemade Boat Trailer Plans You Can DIY Easily

To watercraft enthusiasts, owning a boat trailer is non-negotiable. If you want to protect your invaluable crafts from harsh weather, you need to carry and store them in weather-protected facilities.
And the great news is that those handy with metalworking tools don’t find it difficult to DIY a boat trailer all by themselves. So, if you’re confident in your handyman skills, here are 18 DIY boat trailer ideas for you to replicate.
Let’s start with a tutorial from Cypher Outside when you can educate yourself on how to convert a trailer into a boat trailer !
Table of Contents
1. DIY Boat trailer
2. material list for a do-it-yourself pontoon trailer, 3. how to build at home a custom boat trailer, guide, 4. build small boat trailer, 5. boat trailer guides – easy cheap diy homemade guides, 6. how to build your own jon boat trailer, 7. boat trailer build and replace., 8. how to build a diy camper trailer – the deck, 9. drift boat trailer build, 10. building a boat trailer, 11. do-it-yourself: upgrading your boat’s trailer, 12. which aluminum boat trailer is best welded vs bolt together, 13. diy jon boat trailer build, with boat bunks, 14. boat trailer plans, 15. revenge- diy boat trailer build, 16. how to make a boat trailer guide post, 17. mangrove jack folding boat trailer, 18. how to convert harbor freight trailer to boat trailer.
Do you own a trailer that you’d like to upgrade into a boat trailer? The Youtuber from Cypher Outside upgrades an inexpensive trailer he bought from the Facebook marketplace to a fabulous boat trailer. He walks his viewers through the entire process of DIY.
Cypher Outside further features plenty of other interesting DIYs and vlogs; do check the channel out!

Figuring out DIYs can be stressful – what plan to follow, what materials to gather. Luckily, for those wanting to DIY a pontoon trailer , this blog post by GONE OUTDOORS has got you covered!
Learn all the supplies you need for each part of the trailer in this post and get a brief overview of the DIY process. We hope it helps!
Here’s a tutorial to build a 26 feet boat trailer with 96 inches of width. The Youtuber Sorin Chebac shares dimensions, and images were taken throughout the process in a slideshow format.
This is only the first part of the video, and it’s sad that the Youtuber hasn’t uploaded the second part of the DIY process yet.

If you want to build a trailer for Dinghy , tinny, Parkercraft, or children’s yachts, this small boat trailer tutorial is perfect for you.
This trailer supports runabout of the length of around 10 ft to 13 ft and a width of 5 ft. For your ease, every step of the DIY process is explained in detail in this written tutorial by THE SHED .
Are you planning to DIY boat trailer guides along with a boat trailer? If yes, the Youtuber from WAYNE THE BOAT GUY walks you through the entire DIY process of building boat trailer guides, along with the supply and tools he used for the process.
Everyone in the comment section is raving about how great the DIY is. Do check it out! What’s more, this channel features a wide range of boat-related DIYs for boat enthusiasts like you!

In 8 well-organized steps, the blogger from IT STILL RUNS , Pauline Gill , instructs you on how to build an amazing Jon boat trailer.
Considering how detailed this written tutorial is, it is great for beginners. For tips and warnings, make sure you check out the end of the blog post. Also, find the supplies you need for the DIY at the end.
Is your old boat trailer wrecked? If yes, you might still be able to salvage some invaluable parts from it. In this video, Craig Campbell from MC Engineering inc. uses his rusty old trailer to DIY a brand new one.
He cuts mild steel tubes as per the plan and welds them together. The Youtuber surely does complete the DIY quickly and easily. Check it out!
Many have mentioned in the comment section how this DIY trailer built by DIY ADVENTURE isn’t capable of handling the weight of a heavy camper. This trailer features only one axle, and many have pointed out how the design needs another axle for this trailer to work.
In this first part, the Youtuber covers how to build the deck . Unfortunately, no other videos on this DIY series haven’t been uploaded yet. You can definitely look for inspiration in this tutorial or find creative ways to upgrade the Youtuber’s DIY. Let us know what you think of it!

According to Jaredsund from Instructables , you can easily DIY a drift boat trailer for around $500-$700. In this written tutorial, he elaborates on how he DIYed one for his aluminum drift boat . The finished product looks fantastic – sleek and professionally built.
On the downside, this tutorial might require you to be quite handy with CAD for you to be able to manipulate the design as per your requirement. Therefore, consider asking tech-savvy helping hands for help if you aren’t confident in your skills.
The Youtuber from Don’s Life Adventure builds a boat trailer for his 23 ft fibreglass boat. This DIY boat uses steel and features a fully welded joint. Here are the second and third part s of this fantastic DIY series. Make sure you check them out!
The comment section is full of positive reviews and applause. And, if you’re equally impressed by the content, make sure you drop some kind words in the comments as well. It fuels the creator!

Now, if your boat trailer needs just a little updating for the next summer, Chuck Hawley from West Marine has offered you some tips in this post.
From updating your jack winch to trailer guides to trailer lights, this post has all the information you’ll need for the upgrade. Also, find all the tools and supplies required at the beginning of the blog. Overall, this post is definitely an informational read!
Welded or bolt together – which aluminum boat trailer is the best? If you’ve found yourself wondering this, well, the answer is right here on Barrowed Time’ s Youtube video. Watch the video to find out the pros and cons of these trailers and see which one of these two the Youtuber picked.
In this Youtube tutorial by Fishing The Odds , the Youtuber rebuilds a trailer for his Jon boat . He further adds carpeted bunks and metal structures to the trailer frame. He truly transforms his old trailer from wrecked to fab!
If you’re a boating and fishing enthusiast, you’ll definitely enjoy more content from Fishing The Odds. It features a range of interesting DIYs and fishing vlogs.

To be precise, this is not a boat trailer tutorial. Nevertheless, you’ll find plenty of fantastic boat trailer DIY plans and their respective prices on this site.
What’s more, you can find all the homemade trailer pictures and specifications in the post such that you can make the best decision for yourself.
Matty from Revenge takes inspiration and design ideas from his old trailer and builds a new, stronger, and nicer trailer to fit his new hull. No kit, all from scratch – how great is that?
The Youtuber displays a sequence of documented images throughout the DIY and gives an overview of the process and some tips and suggestions regarding it for those seeking to achieve the same fantastic result.

If you’re looking forward to building a boat trailer on your own, this boat trailer guide post DIY by Ride The Ducks of Seattle will definitely interest you.
Every step of the DIY process is detailed in this post in an organized manner. If you’ve never built a boat trailer guide post before, this post is definitely a must-read.
This Youtube video is for those who have by now given up on DIYing a boat trailer. No judgements here – the hassle, especially to beginners, is real!
Here’s a review on Mangrove Jack folding boat trailer by the Youtuber from Western Australia Now and Then. He claims it to be the best folding trailer he has ever owned.
Did you know you could easily transform your Harbor Freight trailer into a boat trailer? Don’t know how to?
Luckily, the Youtuber from Boat Motors walks you through the entire process! The comment section looks more like a Q and A section. Therefore, don’t sleep on useful information exchanged there!
We hope you were able to find out a suitable trailer tutorial for you. Do you have experience in working on projects like these before? Or, maybe some information to share with us? We’re all ears!
Also, a quick reminder – if you aren’t familiar with metal fabrication tools or aren’t confident in your skills, we’d recommend you take help from someone experienced.
If you replicate any of these ideas, share your successes and failures in the comment section with us. We’re excited!
Related posts:
- 27 Homemade Pontoon Boat Plans You Can DIY Easily
- 17 Homemade Fishing Rod Holder For Boat Plans
- 17 Homemade Boat Seats Plans You Can DIY Easily
- 18 Homemade Boat Trailer Guides Plans You Can DIY Easily
Leave a Comment Cancel reply
Save my name, email, and website in this browser for the next time I comment.
Build Small Boat Trailer
- 28 August 2017
TO BUILD A SIMPLE trailer for a small light, runabout of 10ft to 13 ft long by about 5ft wide (3-4 metres long by up to 1.5 metres wide) this design is ideal. It is suitable for a dinghy, tinny, Parkercraft or even your children’s yacht. You can adapt this economical design, but componentry is not cheap, so keep it simple if you want it to remain as affordable as possible.

Build this small boat trailer for summer
TO BUILD A SIMPLE trailer for a small light, runabout of 10ft to 13 ft long by about 5ft wide (3-4 metres long by up to 1.5 metres wide) this design is ideal. It is suitable for a dinghy, tinny, Parkercraft or even your children’s yacht. You can adapt this economical design, but componentry is not cheap, so keep it simple if you want it to remain as affordable as possible. Don’t go over the top. The boat sits on keel rollers on the main beam drawbar, and above the mudguards. It is supported by chine rollers at the back, and is very secure when strapped down. The frame which holds the chine rollers and supports the axle, springs and wheels, is secured to the main beam by U-bolts, and can be shifted between two keel rollers to adjust for the different sizes of boat. The winch post at the front is also fi xed to the beam by U-bolts and can be adjusted for the position of the boat bow. I imagine a boat having an overhang at the back of 200mm or 300mm – the exact distance doesn’t matter. The trailer will run easily from bach to beach. When you want to travel on the road, the rear lights number plate and Warrant of Fitness sticker can be placed on a light board strapped to the back of the boat. That’s the best way to keep the construction simple. Otherwise you have to fi x lights on metal arms on either side at the back, and that can limit the width of the boat you can get in. The material is all steel, although the construction is plain and, in total, not too heavy. The cross members are made of 50x50mm angle iron, and the side rails of the frame are 40x40mm RHS. The mudguards are welded directly onto the side rails. The axle is made of 40x40mm RHS. The main beam / drawbar is 50x50mm RHS of 5mm thick steel – you don’t want the bar bending because at 3.6 metres it is fairly long. Following normal practice, I tack-weld the parts fi rst, moving through the whole trailer to ensure that it is all square and all the measurements agree. When the trailer has been fi nished and assembled I do a full weld on everything I tack-welded. The components that I can dismantle, I take to the bench to weld

Check coupling plate

Pre – drilled saftey chain hole

Measure coupling plate
Wheels and hub seats
You could use standard hubs or other, different hubs, but I’ve used marinised hubs that include a rubber seal in the kit to stop water getting in. Rubber is better for boat trailers because of the contact with water. This arrangement is better than a lip seal, because the water pressure comes on the rubber seal and closes it effectively. You could go to wheelbarrow hubs and wheels if you want to – the boat the trailer will carry is fairly light. The smaller wheels would be good enough, and would be okay if you were going only from bach to beach, or not very far. If you want to travel on a public road you have to get it warranted, of course. The way I have built this design is up to warrant standard.
The springs come with three leaves, for a 750kg rating, but I have taken one leaf off because I feel that the springs are too heavy. As a twoleaf spring, it could be described as a 500kg rating, and that’s plenty for a boat where its fi xed weight is known. Ordinary domestic trailers need stronger springs as they can carry all sorts of different weights. If some people want to load the boat up with gear when towing it for the holidays, they might like to keep on all the leaves that come with the springs as standard kit.
Begin with the 3.6 metre beam which is the support for the whole trailer and the drawbar. Pre-drill a hole in the end of the 50x50mm RHS for the safety chain to be bolted into the drawbar, not welded. Mark the holes through the coupling onto a 220mm-long piece of 80x10mm flat steel and tack-weld this coupling plate onto one end of the drawbar. I have the coupling plate sticking about 80mm out from the front of the bar, but you could have as much as you like, provided there’s enough clearance for the nuts holding the coupling on. Square up the coupling plate which is tack-welded. Then put the main beam on two jacks or similar supports so that you can work on the frame. With the frame on the main drawbar or beam, I can get the measurements correct all round for frame, axle and springs.

Coupling plate tack welded
Mark the 1200mm-long angleiron cross-members at the centre. Square up the angle iron on the main bar. Mark and then drill holes on either side of the centre point to fi t the U-bolts which will clamp the front and back angle iron pieces on either side of the 50mm drawbar. The back angle iron then has four holes drilled on either side of the main drawbar for the chine rollers. The extra holes allow the chine roller assembly to be moved to suit different boat hulls. Measure 50mm in from each end of the angle iron, and then mark the holes using the fi xing plate which comes as a kit with the chine support roller assembly. This is a U-fi xture on a long bar that is clamped by the plates through the holes in the angle iron. The distance between the front and back cross-members in the frame is determined by the length of the springs. In this trailer, the measurement is 680mm length from front spring hanger to back slipper. It’s not important what measurement it is, but what is measured is whatever the springs are for the frame. The RHS is placed in-between the angle iron cross-members to hold the angle iron in place. I move the RHS out 20mm or so sideways away from the mounting brackets for the mudguard. It also takes the RHS away from the chine holes. Check the frame for square. Clamp it and tackweld the frame. I put the frame on the bench to tack weld the slippers and springs on. Put the frame back onto the main bar and prepare the axle.

Square up angle iron

Springs define frame width

View fullsize

RHS 20mm out from frame ends

Square up frame

Springs placed

Axle to frame space
I found it was 1195mm. I added 20mm each side for the clearance to the wheel. The total was 1235mm, so I cut the steel for the axle at that length. Get the centre at 617mm (half of 1235). Use this to measure back for the holes drilled in the RHS for the locator pins, which are in the centre of the springs. The distance between these locator pins is 1155mm. Half is 577mm, so the locator holes in the axle will be drilled in the axle at 577mm out from the centre at 617mm. Measure 577mm and check the chalk marks against the spring locator studs. Don’t do as I do, and measure incorrectly. Fortunately, the holes I drilled in the wrong place in the axle could be used for the weld which is melted into the stub axle. Drill 16mm holes in axle at the spot markedfor the spring locators. I used the holes I drilled incorrectly first, to fill with weld to hold the stub axle. Otherwise I would have filled those holes in. That’s the beauty of steel – – you can fill in if it goes wrong, but you can’t do that with timber. The axle is being put under the springs this time (rather than on top as with the previous trailer). That’s because there’s very little clearance between the axle and the main bar. When the weight goes on and the axle moves up with the springs, it would hit the towbar. With the axle underneath, there’s not that problem (the axle is bolted on with U bolts). Assemble the wheel and hubs temporarily according to the kit instructions, and check that the clearance between edge of the frame and tyre is correct—20mm. Also, check that the mudguard is in the correct place by holding it over the wheel at this point. You don’t want the wheel sticking out beyond the mudguard. Now I weld the stub axle into the RHS axle. Push the stub axle in and hold it square. Weld the plug in the axle hole to hold the stub axle in. I ordered the stub axles specifi cally for the 40x40mm RHS and Trail Com turned the stub diameter down so it fits easily and squarely into the RHS. Because I have taken one leaf off the spring, the bolt through the leaves is now too long. I cut off the extra thread on the top of the spring with a cutting wheel. I also have to drill down into the stub axle where the spring locator hole is to make it fit where the bolt is longer under the spring (that’s where I have taken off the leaf). This allows the axle to sit down properly on the spring locator. If you leave the three leaves in place for the 750kg spring weight, there’s no need for this adjustment. I place the axle on the spring locator studs under the springs and bolt it in place to the plate above the spring with 40mm U-bolts.

Stub axle welded in

Stub axle tack – welded in place

Mount tyre for clearance

axle fitting

Frame placed

Mudguard mounted

Keel rollers welded on

Measure winch post at 80°

Measure bow stalk
Put the wheel back on temporarily to position the mudguards. I place a block of wood with a 70mm clearance above the tyres to get the height of mudguard I want. That looks better than 50mm clearance which would also be possible. Simply weld the mudguard directly to the side rail of the frame.
Put the solid-rubber keel rollers along the main bar about a metre apart, with the fi rst roller welded to the very back of the drawbar. The trolley frame can move and should be towards the back. The weight of the boat is toward the back with something like an outboard motor. The distance that the frame can be adjusted is the distance between the rollers. With the boat overhang at the back by about 200mm or 300mm, the bow would probably reach over the third roller, and three should be enough.The chine rollers bolted to the back angle-iron cross-member of the frame help with pulling the boat on and off the trailer. A drawbar skid welded to the bottom of the drawbar at the front stops the coupling plate digging into the ground when the trailer is empty and dropped forward.

Handle and jockey wheel pipe welded

Boat tie-on loop welded
From your own boat, measure the height of the eyelet on the bow post. You need to position the hook on the winch wire at about this height so you will have a reasonably straight pull when winching the boat on to the trailer. The winch post is made of 35x35mm RHS welded to a plate which is U-bolted to the drawbar. This means the winch post can be adjusted back and forwards depending on the size of the boat. I calculate the height of the winch post from the total distance from the drawbar to the eye on the bow of the boat. In the case of the boat for which I’m making this trailer, the eye is at 480mm, so I want the wire from the winch to come out at about that point. With the winch 80mm high, I need a winch post of 400mm. I cut the 35x35mm RHS steel at 390mm to allow for the 10mm plate welded onto the top where the winch is bolted. I lean the post, cutting it to sit at an angle of 80 degrees, then weld it to a piece of 5mm or 10mm plate. This is U-bolted in position, so can be adjusted. For a heavier boat on a bigger boat trailer, I would normally weld a supportive backstay onto another plate U-bolted to the draw bar. This backstay would be welded to the winch post. But the winch post doesn’t need extra support on this smaller trailer. On top of the winch post, I need to weld a fl at plate 80x10mm thick and 100mm long. The winch is bolted to this plate. I could get away with a 5mm thick plate. Before welding the plate on, using the winch I mark the bolt holes for the winch itself. The winch can always then be unbolted if it breaks and needs to be repaired or replaced. I am using a small 1:1 ratio winch. This is about the right size for a small boat, but they come in different sizes and ratios for heavier boats (from 3:1 to 15:1). Onto the winch post, I now weld a 200mm RHS stalk at an angle of 70 degrees up. The solid rubber bow block is bolted to this, so the bow of the boat can be pulled into the bow stop. With your boat present, you can always measure where the bow will stop. The metal plate to which the bow block is bolted is welded to the end of the stalk.

trailer to be galvanized
Handle and tie-ons
To make a handle for lifting and pulling the trailer, I weld a 300mm length of 35mm-diameter pipe across the drawbar just behind the coupling plate. Onto the stalk, I weld a small loop for attaching the boat to. I made this by hacksawing out a link from a little piece of safety chain I had spare. Never throw anything away or discard scraps and spare bits of metal – they come in useful some time. The last thing is to weld tieons of bent 8mm rod to the front and back of the frame. I then dismantled the trailer to be sent for galvanizing. Be sure that you have drilled holes in the closed RHS sections – the winch post, winch stalk and axle – before the trailer parts go for galvanizing. The main beam / drawbar has been left open at the end, and the two RHS side rails on the frame are also open at the ends, so that the galvanizing can penetrate.

Chine roller pre-galvanized

Metal spinning lives
The exact origins of metal spinning are unknown but the craft can be dated back to ancient Egypt where examples of spun vessels have been found. Metal spinning today differs little from the past with the only real advance being that an electric motor is used to drive the chuck instead of manpower or water power. Before the advent of power presses, metal spinning was used to make almost all round sheet metal objects such as pots, pans, lampshades and wheel rims. The principle of metal spinning is simple: a disc of metal is clamped between the tailstock and a former or mandrel. The disc is spun and the operator then uses a lever to manually work the metal down onto the mandrel. The process helps maintain the structure of the material and does not stress it, resulting in a stronger and more stable product than if it was pressed. While metal spinning by hand does not generally alter the thickness of the material, hydraulic-powered tools can be used to flow-form products making sections thinner where required.

Hi-Q Components has it all tied up with their range of ties
If you’re looking for plastic cable ties and mounts, and cable management components, it’s hard to beat Hi-Q Components’ comprehensive range, which covers just about anything you’ll need for the job in hand. Its selection of plastic fixings and fastenings includes standard strap-type cable ties, from 75mm x 2.4mm to 1500mm x 9mm; as a bonus, many sizes are available in weather-resistant black nylon for outdoor use. Hi-Q also has specialist ties covered, with stock including HVAC duct straps, heavy duty for hydraulic hoses, releasable, screw mount, marker, push mount, double loop mounting, hanking, and beaded ties. As well as cable ties, Hi-Q offers a great selection of cable tie mounts, such as quick and easy self-adhesive tie mounts, and push and lock clip mounts for through-hole panel mounting.

Rolling stool build
My wife, Rosaleen, loves to cook, and will happily spend an afternoon in the kitchen cooking meals to be frozen and given to our daughters and their friends whenever the need arises or opportunity presents. However, arthritis makes standing in one position for long periods difficult for her. She wanted a stool for the kitchen, but ours is a galley-style layout and quite narrow. It’s wide enough for one person to walk past another working in the space, but the presence of a stool would present a major obstacle. “Why don’t you invent something?” she said. I love a challenge like that.
The Shed magazine is eclectic, informed, and always fascinating. Aimed at those with a few tools and perhaps a few clues: this is the magazine for real sheddies.
Packed with ideas, projects, advice, and peeks into other people’s sheds providing inspiration, ideas, and techniques, or just for the sheer enjoyment of the sheddie’s endless inventiveness, The Shed is the project enthusiast’s bible.
- Rusty Media
- PO Box 46194
- Herne Bay, Auckland 1147
- +64 9 200 4847
Advertise with us
Get in touch with The Shed’s commercial team here .
Sign up to The Shed newsletter
Sign up here to The Shed monthly email newsletter for exclusive reader offers. For signing up, we’ll send you a free copy of The Shed , just simply put your postal address in the form.
Copyright © 2024 Rusty Media Limited. All rights reserved.
Affordable Sailboats You Can Build at Home

Last Updated by
Daniel Wade
September 13, 2023
Key Takeaways
- There are many sailboats that anyone can build from home depending on tastes
- Budget will be the biggest deciding factor on a majority of the process
- Consider kits that come with most of what you need or choose ones that are all-inclusive
- Design complexities and new materials may make the building time process longer
- Plan the best you can ahead of time to save money and your working hours
Buying a sailboat can be expensive, but building your own can save you money. So what are sailboats you can build from home?
Sailboats that you can build from home will likely be a small boat under 20 feet. These could be from many different boat suppliers such as B&B Yachts, Brooks Boat Designs, and Chase Small Craft. Boat plans will vary based on your budget and how much time you have on your hands.
Based on my previous experience, building your own boat will take much longer than if a professional were to do it. You also have to be able to study plans, consider various sailboat designs, and have tons of supplies such as fiberglass tape or fiberglass cloth. On top of that, you will also have to be good with your hands.
Table of contents
Top 10 Affordable Sailboats Anyone Can Build at Home
Building your own pocket cruiser or other styles from boat plans is an impressive feat, as this will need dedicated time and money to assure your boat sails safely. Boat building takes a lot of patience as well, especially since this will not be completed in a fast manner.
Finding boat plans and materials that fit your budget will be key to being able to complete the project. The time it takes to complete these projects will vary on your overall experience and needs. Below are 10 of the most affordable sailboats that you can build in the comfort of your home.
B&B Yachts

B&B Yachts have 14 different boat plans you can choose from to find the boat of your desires. Their shop is located along the Bay River in North Carolina where they construct all of the kits and have a 100 foot dock to show off your project once you complete it.
One popular model to check out is their Core Sound 15, as it is the perfect size for those wanting to build a modest size boat for a handful of people on board. Their website features some videos of completed projects and the plans or kits for purchase.
- 14 different models to choose from plus some dinghies
- Various monohull and multihull options
- Friendly customer service with attractive prices
- Might be too many options for some that are indecisive
- Not ideal for those wanting to have a motor sailer
Brooks Boat Designs

Brooks Boat Designs has a handful of options to consider for your next sailboat building project. They are located in Brookline, Maine and give the option to buy the kits or have them build one from scratch for you. They have plenty of knowledge, so do not be shy to ask about modifications or custom features you are looking for.
Depending on your specifics, they can attempt to accommodate some of their plans to help fit your desired outcome. By checking out their site, you can see many examples of their construction in progress and what the boats will look like when completed.
- Offers a variety of kits
- Plans vary around $50 and up, while materials will obviously add more costs
- Some plans can be rowing boats that can convert to sailboats
- Might take a while to hear back from them, as their contact section is a little outdated
- Their plans may not accommodate a ton of extras for your taste
Chase Small Craft

Chase Small Craft offers a simple process for building boats. Their kits are equipped with everything you need and will help save you time than just buying the materials outright and other parts you could need. This is arguably one of the best bang for buck instances if you want to save time and money searching for pieces to your boat.
They are located in Saco, Maine and will ship everything to your home from there. All the necessary materials are included and all you need are the proper tools and working space.
- All-inclusive kits with what you need
- Tons of knowledge on their site for boat building
- Easy process to order and customize
- Complete kits can range over $20,000 for larger boats
- Kits may take up to eight weeks to ship out
Chesapeake Light Craft

You can expect high-quality boat kits from Chesapeake Light Craft . They feature 18 different sailboat kits that vary from eight to 20 feet in length. This should be more than enough to find one for you if you are newer to boat building.
They also have a wide variety of other kits in addition to the sailboat, in the event that you wanted to order a small kayak or paddleboard in addition to your sailboat. The prices vary considerably when considering a small or larger boat, so check the complete list of options to in order to potentially fit your needs.
- Plenty of sailboat offerings to choose from
- Different beautiful hull form options to consider
- Easy to build and perfect for sailing
- Only has basic materials needed for kit, so you may need to purchase other items
- Has epoxy shipping fee no matter if you pick up item
Dudley Dix Yacht Design
Dudley Dix Yacht Design has an extensive list of plywood and single skin sailing boat options. They have plenty of sail plans and kits to consider depending on your goals. These follow a classic look for sailboats, which are aesthetically pleasing.
If you are wanting one to accommodate a small family, they have more than plenty to look through. The cost is not as bad compared to others, but keep in mind that you may need to throw in your own supplies or specific tools to get the job done.
- Plans start at $30 and range up to $7,500 or more for kits
- More than enough of options to consider
- Affordable variety of sailboat offerings
- Might be too many options for those new to sailing
- Most are wood without the use of aluminum or steel
Farrier Marine

If you are in search of a multihull to build, then Farrier Marine is what you need. They offer a unique folding catamaran that is trailerable and give you the option to build it yourself. This not only makes it an appealing option, but anyone can take this multihull boat wherever they want with ease.
It features a thorough construction guide once you receive all of the materials. These also come with stainless steel fasteners and an aluminum mast for high-quality materials. Pricing will vary since you must request which model type you are considering.
- Ability to build a unique catamaran
- In-depth construction guide to help
- Easily handled and trailerable
- Price may be too high
- Limited offerings since only a few multihull options
Glen-L Marine Designs

Building a boat from Glen-L Marine Designs can save you time and money. They feature an easy system to order and receive the kits, as well as an in-depth guide to building them. This is an appealing option compared to most boat kit sellers.
The beauty about Glen-L is that anyone can build these from scratch, so you do not have to be the best boat builder in the world to get it done. They offer guides and helpful insights from their team to point you in the right direction. Plans vary around $15, while kits can range well over $1,000 depending on boat size.
- Nearly 50 designs to choose from
- Complete guide to help anyone build it
- Plenty of price points depending on size
- Might be overwhelming with the amount of options
- Could take a while to get parts since they are popular
John Welsford Boat Designs

John Welsford Boat Designs invites new and veteran boat builders that want a taste of quality small wooden boats. The boat plans are designed to meet your specifications and are catered to your desires.
There are seven sailboat designs to choose from so you do not feel overwhelmed in the process. However, they do not sell kits all the time, so you would need to have the materials or be on the lookout for the best prices when they are available.
- Seven sailboat plans with different sizes
- Quality boat builder and supporting community
- In-depth knowledge provided to you when you order
- Might be too small of boat size
- Kits are not always available
Iain Oughtred
There are plenty of options on the wooden boat store, but you should narrow down your search for Iain Oughtred’s line of sailboat kits and plans. There are 25 different plans to choose from, which should accommodate most everyone looking to build their own boat.
While they do offer some kits, they do not routinely offer sailboat kits. You would need to purchase all of the materials if you are considering one of their sail plans. Keep this in mind if you are considering, as you would need to hunt down the parts yourself.
- 25 different sailboat plans to look through
- Various sizes to contemplate for you sailing needs
- Prices will vary but are not bad compared to market
- No sailboat kits, only plans
- Newer boat builders might find too many options unappealing
Paul Gartside Boat Builder and Designer
Gartside Boats is a boat builder company based in Long Island, New York that showcases a variety of boats from traditional and newer methods of boat building. Within that variety, they have boat plans meant for six to 50 feet in length.
With an abundance of options, you will need to contact them regarding prices and any customizable options. Kits may vary as well, as they typically design in-house and build for you.
- Experienced boat designer that can accommodate with custom plans
- Many options are trailerable
- Can have plans for up to a 50 foot boat
- You will need to contact them for prices
- Customized options may make process more complicated for new boat builders
How Much Does it Cost to Build a Sailboat at Home?
As you have likely already done so, the math between building your own boat and buying one may be a huge difference. Likewise, you may even enjoy the challenge of taking an older boat that is gutted and restoring with parts from a kit to build one new again.
But how much does it cost exactly to build a boat from the comfort of your own garage or workshop? The prices are going to vary dramatically depending on your situation and material needed to get the job done. In addition, the time that it takes to complete this will also vary.
Sail plans are rather inexpensive if you are aiming to build a small boat. These plans allow you to see the workings of the boat design and what you need to build the boat.
Without these plans, you will not know the exact details of the design and it can cause major issues with the boat’s hull or other areas of the boat. Think of these as the backbone or instructions of the boat’s infancy before being built.
Price Per Square Foot
You should assume to pay anywhere between $300 to $600 per square foot if you are interested in building a boat. Buying a kit outright can be a good way to save time, but oftentimes these do not come with everything you need.
Instead, you should try to source as much of the materials at the best price as possible. Thinking ahead is part of the process and you might be able to score a deal at a lumber yard or hardware store for parts.
Boat Designs Matter
The design of the boat will be much different from one boat to the next, regardless if they are the same size in length. If you are pondering boats that range anywhere between 16 and 20 feet, you should factor in the shape of the hull, any rigging, and various appendages.
Prices tend to increase when there are more complexities within the designs. If you are considering a kit with more details than others, you will also have to pay more for the designs on that as well.
Kits Can Differ
It is important to understand that all kits are not going to be the same. As you gander at sailboat kits online to stitch together, you need to thoroughly look over to see if you have everything you need before buying.
It would also be at your advantage to ask the seller if any additional parts or supplies are needed. This may change your dynamic on the kit buying process and you may pass up one for another if it has everything you need. An all-inclusive kit may cost several hundred, if not thousands, of dollars more to have the convenience of everything in the bundle.
Construction Approaches
Some boat plans may require you to have certain tools to get the job done. This means special saws or planers, which the average person simply does not have.
Purchasing specialty tools might be expensive upfront and hard to find depending on what it is. Your best bet would be to check locally for others trying to sell their tools or consider a boat plan that does not require extensive tools to finish the job.
How Long Does it Take to Build a Sailboat?
An easy to build sailboat could take a while to build from scratch. Many different variances come into play that are difficult to pinpoint for everyone. But how long is that exactly and how will your experience play into this?
A fun project to sail in the wind could take you several months to well over a year depending on the boat plan and how big your boat is going to be. In addition, the materials all need to be accounted for prior to starting in the event a hardware store does not have them in stock.
Time Varies
The time that passes for simple boat designs on small sailing vessels can be done in a few weeks. This is assuming you have everything you need and work non-stop around the clock.
Certain complex situations may make the process long, such as the difficulty of working with some materials. If you are a skilled laborer, it may take you half the time compared to a novice. The amount of time it can take will vary on your availability and skill level.
Planning ahead will undoubtedly offer the most time-saving features. It also helps if you can tackle parts of the project at your own pace.
Complexity of Design
The design of the boat may make the construction process longer. For example, it may take you longer to build a catamaran compared to a similar lengthed monohull.
More complex designs might require more materials, therefore making the process a bit longer to complete. Furthermore, you will also need more experience working with difficult designs and that will affect you more as a newbie.
Be sure to manage your expectations well and do not allow yourself to become too stressed over this fun project. If you can, seek expert boat building advice from a local builder or the company you purchased sail plans through.
Quality Materials
The quality of the materials will matter significantly when building a boat and will greatly affect the time it takes to construct it. Handling fiberglass or carbon fiber might require specialty tools, while wood also demands a certain level of craftsmanship.
If you are not skilled at working with the material at hand, it might affect the quality of the build and you may have to go back to fix mistakes. This will definitely add more time to your project, because mistakes are bound to happen with your first project.
To save time, consider adding the tools and materials throughout the year or as often as your budget allows. You may want to try testing your skills on fiberglass or other materials to get a feel for how to work with it.
Related Articles
I've personally had thousands of questions about sailing and sailboats over the years. As I learn and experience sailing, and the community, I share the answers that work and make sense to me, here on Life of Sailing.
by this author
Best Sailboats
Learn About Sailboats
Most Recent

Best Small Sailboat Ornaments
September 12, 2023

Best Small Sailboats With Standing Headroom
December 28, 2023
Important Legal Info
Lifeofsailing.com is a participant in the Amazon Services LLC Associates Program, an affiliate advertising program designed to provide a means for sites to earn advertising fees by advertising and linking to Amazon. This site also participates in other affiliate programs and is compensated for referring traffic and business to these companies.
Similar Posts

Discover the Magic of Hydrofoil Sailboats
December 11, 2023

Best Bluewater Sailboats Under $50K

Hunter Sailboats: Are They Built for Bluewater Cruising?
August 29, 2023
Popular Posts

Best Liveaboard Catamaran Sailboats

Can a Novice Sail Around the World?
Elizabeth O'Malley
June 15, 2022

4 Best Electric Outboard Motors

How Long Did It Take The Vikings To Sail To England?

10 Best Sailboat Brands (And Why)
December 20, 2023

7 Best Places To Liveaboard A Sailboat
Get the best sailing content.
Top Rated Posts
Lifeofsailing.com is a participant in the Amazon Services LLC Associates Program, an affiliate advertising program designed to provide a means for sites to earn advertising fees by advertising and linking to Amazon. This site also participates in other affiliate programs and is compensated for referring traffic and business to these companies. (866) 342-SAIL
© 2024 Life of Sailing Email: [email protected] Address: 11816 Inwood Rd #3024 Dallas, TX 75244 Disclaimer Privacy Policy
How To Make Boat Trailer Guides
- BOAT TRAILER
You’re at the boat ramp, excited to launch your boat for a day out on the water. But as you begin to reverse down the ramp, visibility becomes a challenge, making it difficult to align your trailer properly.
Frustrating, right? That’s where boat trailer guides come to the rescue. These simple yet effective markers can make loading and unloading your boat a breeze. So, how can you make your own boat trailer guides?
To start, gather the necessary tools and materials for the project. Take precise measurements of your boat and trailer to determine the optimal guide height and position.
Next, cut the PVC pipes or steel angles to your desired size, ensuring they provide adequate guidance for your boat. Mark the points where you’ll insert bolts to secure the guides to the trailer. Proper alignment is crucial for stability and safety.
As we delve deeper, we’ll explore additional steps and tips to help you create custom boat trailer guides that perfectly suit your needs. So, let’s get started on this DIY project.
Note: Are You Looking For?
- Can You Rent A Boat Trailer?
- How To Center A Boat On A Trailer
How to Make Boat Trailer Guides:
There are multiple ways you can make your boat trailer guide. We will talk about at least two of them. The first one is PVC (DIY) made trailer guide. The second one is setting up an online brought guide, the way you should prepare the guides.
How to Make PVC Boat Trailer Guides ?
Making your own boat trailer guides using PVC is super easy and fun. It will take only around 30-40 minutes to complete. Here is how you do it-
Things You Will Need:
- 2 Pieces of PVC.
- Drill Machine.
- Washer Locks.
- Tape Measure.
- Marker Pen.
- Hand Saw Machine.
- Small Wood Pieces for Bunking.
- Post-Light Kit (Not Mandatory)
Take the Boat and Trailer Measurement:
The first thing you will need to do is taking the actual measurement on-how big will be your trailer guides. A usual middle type boat and trailer should be covered with around 5 feet or a little longer. However, it’ll vary depending on your boat and trailer height.
Cut the PVC as Your Required Size:
Then, use the hand saw to cut down the PVCs according to your requirement. For me, I always keep some extra length for safety. If I made any mistakes, then it is easy to cover with the extra distance. But it is not the best choice for all the time.
Mark the Bolt Insert Points:
Next, use the measuring tape to pinpoint the bolt insert points on the PVC. I also use the bolt itself to prevent from making any mistakes. Choose the point by leaving some PVC below the bolt joint. For me, I left around 5 inches for the first hole.
Also, your bolts can be either U-shape or middle V-shape. So, it’s better to use the bolt itself to identify the hole points. Then, use the marker pen to mark the hole points that needed to be drilled.
Use the Drill to Create Holes on PVC:

After that, it’s time for some drilling. I love to drill, LOL. Sorry for the unnecessary talk. Use the drill machine to create holes in your marking points. You have to be a little careful here.
The holes are two ended. So, make sure they are in the middle. Also, if you are planning to use trailer guide lights, make holes for their setup too.
Set The Light on PVCs (Not Mandatory):
If you drive with your boat during the night or load and unload during the night, you will need a post guide. Boat trailer guide lights will help you to avoid any mistakes or accidents during the night.
Personally, for me, I prefer light always because I happen to drive with my boat after sundown a lot.
Here’s our recommended light you can use. This one is submersible. So, it happens to be accidentally your trailer goes into the water, it won’t hurt your light. Also, it is very easy to setup.
Put the PVC Cap:
Use your PVC cap to cover the ends. Normally covering the upside should be enough. But having cover even below can prevent the inside of PVC from getting all muddy and dusty.
I recommend using them on both ends. It is straightforward to clean and wash-off with them on.After completing all the initial steps,your boat trailer should look like this.

Place the PVC on the Trailer:
Now, you have to set the PVCs on the trailer rod. After setting the PVC and bolt, use the washer and nuts to tighten up. Remember to keep them a little loose. Keep some extra length below the trailer rod.

Before going to the next step, check again everything is alright or needs some adjustment. If required, perform those.
Use the Wood Pieces as Bunk:
The small wood pieces put them in between the boat trailer rod. Why you need them? Whenever you are using the trailer to load-unload your boat, it may create pressure directly on the bolts and PVC.

At least a 4-5 inches gap is required between the boat and the trailer guide. These wood bunks will help you to create that gap and also will work as support
Online Bought Trailer Guides:
Setting up an online bought boat trailer guide is easy and simple. Follow their instructions, which come with the product. If you’re not up to making one for yourself by using PVC, you can always have one from the local store or online.
For your convenience, we have provided the products which we think are the best in the market.
This one is very sturdy and solid looking. And also one of the best in the market. However, it doesn’t have pre-installed light with it. So, if you want a light too, you have to purchase one. You can use our recommended light or can pick one by yourself. This one another good choice if you are looking for boat trailer guides with pre-installed light.
Frequently Asked Questions
Do boat trailer guides work.
Of course, they do. A boat trailer helps you to prevent from damaging your boat’s bottom. Having them makes it easy to load and unload during the day or night.
If you are driving with the boat trailer during the night, the trailer guide with lights can help you prevent any accident.So, it is a very useful and supportive kit for a boat owner.
How tall should boat trailer guides be?
It depends on your boat size and preference. According to the experts and for me, boat trailer guides should have enough length which can be easily visible from the driving seat.
And also, you can keep track during the loading and unloading process. Mine is 5.5 inches tall. So, just pick your size according to your requirement.
Final Thought:
After reading this article, now you should know- how to make boat trailer guides using PVC. You can setup trailer guide lights for further improvement. Both are helpful and become necessary sometimes.
Try to make yourself with PVC or wood pieces or anything you prefer to work with if you can’t complete the process. Then, you can go for online or offline purchases.
You can always use our well researched recommended products or choose one by yourself. Well, that’s all folk for today. Until the next time, stay healthy and safe and happy outing.

Jack K. Pride
Jack K. Pride is an accomplished author and a prominent figure in the boating community. With a passion for boats and a deep understanding of the maritime industry, he has been sharing his expertise through his compelling articles on OutedWeb.com.
Known for his insightful and informative writing style, Jack's articles provide valuable insights, tips, and knowledge to boat enthusiasts worldwide. His dedication to the subject matter and commitment to delivering high-quality content makes him a trusted voice in the boating world.
Leave a Reply Cancel Reply
Your email address will not be published. Required fields are marked *
Name *
Email *
Add Comment *
Save my name, email, and website in this browser for the next time I comment.
Post Comment

How to Load a Boat on a Trailer (Retrieving Your Boat)
Table of Contents
You and your crew had a day of fun and adventure on the water, you’re nearing the dock, and it’s time to load your boat back onto its trailer. Also known as “retrieving the boat” in nautical jargon, loading a boat on its trailer can be smooth and easy.
Here are 10 basic steps for loading a boat on a trailer:
- Drop the tow vehicle driver and passengers off at the dock.
- Ensure you’re out of the way of the launch area while you wait for your tow—if available, park at a nearby courtesy dock.
- The trailer should be backed down the launch ramp until its wheels or fenders are submerged to a similar water level as when you launched your boat .
- Be mindful of wind and current as you position your boat to load on the trailer.
- Use just enough power to control the boat. Slow is pro, and you’ll have more time to react.
- Aim the bow of the boat to the trailer winch stop.
- If the ramp is shallow, trim your outboard or sterndrive up so the prop (propeller) doesn’t hit the bottom.
- If your trailer is positioned at the correct depth, your boat should glide onto the trailer—use a little throttle to push the boat up further if needed.
- The tow vehicle driver should put the vehicle in park using the parking brake, and get out to secure the trailer winch and the safety chain.
- Once you pull out of the ramp, use a staging area off of the water to unload your gear, attach the transom straps and trailer lights, and prepare to hit the road.
Be sure to consult our other launching and towing guides to ensure you’re best equipped for your experience heading to and from the launch ramp:
- Launching a Boat: Step-by-Step Guide
- How to Back Up a Boat Trailer
- Choosing the Right Tow Vehicle
Now, let’s walk through some of these steps in a little more detail…
Want help paying off your boat? List it with us
Dropping off your driver and passengers
Approach the dock to drop the vehicle driver and passengers off. If there’s a courtesy dock or dock away from the launch area, it’s okay to tie up while you wait for the trailer. If not, move the boat away from the ramp area and wait for the trailer to be backed down.
Backing up the boat trailer down the ramp

The driver who gets the tow vehicle should get in line – if there is a line – to take a turn in backing down the ramp to retrieve the boat .
If you and your crew remembered to observe the water level relative to your trailer wheels or fenders when you launched, back the trailer in to that same depth.
The driver can now put the vehicle in park and set the parking brake, and get out to help load the boat.
Loading and positioning your boat back on its trailer
Simultaneously, the boat driver should pay attention and be in position to approach the ramp when the trailer is in the water.
Once you’re ready to load, you’ll want to be mindful of wind and current that could push you off course as you approach the trailer, and plan ahead by starting a little upwind, for example.
- Use just enough power to control the boat. A slower speed gives you more time to react and keep the boat on course.
- Aim the bow at the trailer winch stop. Most boat trailers will self-align as the boat glides onto the trailer.
- If the ramp is shallow you may need to trim your outboard motor or sterndrive up a bit so the prop doesn’t hit bottom.
- If you have your trailer at the correct depth, the boat should glide onto the trailer right to the winch stop, or close to it.
- Use a little throttle to push the boat up to the stop, or have your helper attach the winch strap to the bow eye and use the winch to pull the boat up the watercraft stop.
If the boat ends up a little crooked on the trailer, back down the ramp just a little to allow the boat to float and center itself.
Pro Tip: Do not “power load” your boat—using excessive engine thrust to drive the boat up onto the trailer will damage the ramp by washing away the lake bottom. Better to back your trailer in a little deeper in the water.

Preparing to hit the road
Once the boat is positioned properly on the trailer, secure the winch at the bow and secure the safety chain. The boat driver can stay in the boat while the vehicle driver pulls up the ramp.
Drive to the staging area, or away from traffic, to unload coolers and gear from the boat, secure transom straps and trailer lights, and get ready to hit the road.
Clean, drain, and dry to remove any aquatic invasive species

Before driving away, it’s important—and in most places, the law—to remove weeds from the boat and trailer and to drain the bilge , live wells, and bait wells before driving away from the ramp. This prevents the spread of invasive species like milfoil and zebra mussels. There may be signage at the ramp with guidance for this procedure or check with your state DNR for local regulations.
Boatsetter is a unique boat-sharing platform that gives everyone — whether you own a boat or you’re renting — the chance to experience life on the water. You can list a boat , book a boat , or make money as a captain .
Start offsetting the costs of boat ownership as soon as you list with Boatsetter!
Charles Plueddeman is a self-employed writer and photographer based in Wisconsin. A staff editor and contributor to Boating Magazine since 1986, he is the author of its “Off My Dock” column. In the marine realm he specializes in engine technology and trailerable boats. His editorial work has appeared in many national publications, including Popular Mechanics, Men’s Journal, Playboy, Popular Science, Cycle World, and Harley-Davidson Enthuisast .
Browse by experience

Explore articles

Lake Conroe Water Activities

Ultimate Packing List: Bareboat Charter Provisioning

8 Great Boating Destinations for Your Summer Road Trip

Miami Waterkeeper: Protecting the Water You Love | #MindYourWake Series
IMAGES
VIDEO
COMMENTS
In this Video i show you how i built my Sailboat Trailer for a 27ft Columbia. Follow my channel as i refit 2 sailboats and prepare one for life at sea as a ...
Boat trailer with inertial braking system build DIY guide.A step by step guide showing how to build a boat trailer 26' lenght , 98'' width for boat 5600 lb f...
How to build a Sailboat Trailer In 10 Days. I'm building a trailer for my 1980 Hunter H33 Sailboat in 10 days. The materials that I am using is scrap by most...
Building a Sailboat Trailer. Since Belle did not come with a trailer, much of why she was so inexpensive, we had to source a trailer to put under her to make her useful to us. Buying a custom trailer was going to be in the $3000 range, 10X what we paid for Belle. Adapting a used trailer was going to be the only affordable.
Sep 14, 2010. #6. Trailer building or modification. I have built trailers from scratch and have modified powerboat trailers to accommodate sailboat hulls. First, make sure the powerboat trailer you get has the capacity required to accommodate your boat, with water and fuel in the tanks, outboard and gear.
Let me introduce you to the Trailer Sailer. A trailerable sailboat is in many ways better than a keel boat or a dinghy. You can get a trailer down a boat ramp, it stores for free in your backyard, and it has many of the benefits of a keel boat or dinghy, with fewer drawbacks. Some might argue that the perfect sailboat is the trailer sailer.
Check the Tires and Brakes. The tires and brakes of a tow vehicle should be in a good condition for safe transportation. A valuable tip that you should always put into consideration, in respect to how to trailer a sailboat, is ensuring that the pressure of the tires is at the right levels. Ensure that the tires of the tow vehicle and the ...
Boat trailers can differ greatly in price, so set a spending plan and also adhere to it. Spending in a top-notch trailer will likely save you money in the lengthy run, as it will be less likely to need repairs as well as will certainly last longer. The benefits of possessing a sailboat trailer 6. Convenience and also flexibility:
How to Build Boat Trailers. Over 100 photos, drawings, diagrams and charts, 96 pages, 8 1/2" x 11", softcover, 1996. Building your own boat trailer is the best way to get an exact fit to suit your boat. Even if you can't weld, you can still use this book to plan your boat trailer for local assembly by your own welder, and still save money.
Plan A. First, off to the local metal shop, where I purchased 15 feet of galvanized steel, in the same dimension as the steel on the trailer's tongue (3″x5″). I think it's possible to go with something smaller, but not knowing how it would handle the load I decided to stay with the original dimensions. Next, I ordered a 2-5/8″ hitch ...
Step 3: Assemble the Boat Trailer Frame for Building Your Boat Trailer. The third step in building a boat trailer is to assemble the boat trailer frame. Assembling the boat trailer frame involves joining the wood, metal, or plastic parts together to form the structure of your boat trailer.
The sailboat hull can be constructed in a step-by-step process. Here is how you can construct a strong and durable sailboat hull: Step 1. Create the hull mold: Start by building a robust and long-lasting frame that accurately represents the shape and size of the hull. Step 2.
Items from AMAZON used on this trailer. https://www.amazon.com/shop/danielwoodell?listId=LPYRL2QL8BUP&ref=idea_share_inf DEWALT DWMT70782L Angle Die Grinder ...
Boat Trailer Plans. O ur BOAT TRAILER PLANS feature the most modern, up-to-date, and technologically advanced features available to give you a boat trailer that's equal or superior to those you can buy. Created by designer, Ken Hankinson, long associated with TRAILERBOATS Magazine as columnist and contributing editor, he knows boats and boat ...
Don't let the lack of a trailer stop you from a great deal on a boat. Build the perfect trailer instead. It's a great alternative to the high cost and scarcity of trailers. Learn to build, launch, retrieve and drive. Table of Contents: Photos are from 1965 or earlier. Some of the sketches are okay but for the most part this publication features ...
Here's a tutorial to build a 26 feet boat trailer with 96 inches of width. The Youtuber Sorin Chebac shares dimensions, and images were taken throughout the process in a slideshow format. This is only the first part of the video, and it's sad that the Youtuber hasn't uploaded the second part of the DIY process yet. 4.
Build this small boat trailer for summer. TO BUILD A SIMPLE trailer for a small light, runabout of 10ft to 13 ft long by about 5ft wide (3-4 metres long by up to 1.5 metres wide) this design is ideal. It is suitable for a dinghy, tinny, Parkercraft or even your children's yacht. You can adapt this economical design, but componentry is not ...
Sailboats that you can build from home will likely be a small boat under 20 feet. These could be from many different boat suppliers such as B&B Yachts, Brooks Boat Designs, and Chase Small Craft. Boat plans will vary based on your budget and how much time you have on your hands. Based on my previous experience, building your own boat will take ...
This is how I built an inexpensive boat trailer. I used 30 feet of "C" channel and 10 feet of square tubing. All of it was 1/8 inch thick walls. So not too h...
Take the Boat and Trailer Measurement: Cut the PVC as Your Required Size: Mark the Bolt Insert Points: Use the Drill to Create Holes on PVC: Set The Light on PVCs (Not Mandatory): Put the PVC Cap: Place the PVC on the Trailer: Use the Wood Pieces as Bunk: Online Bought Trailer Guides:
In this video, we'll show you how to set up a boat trailer with all the parts you need. We'll also provide a guide on how to build a boat trailer, so you'll ...
Step 3 - Add Support. Cut two 2 1/2-inch pieces of tubing for the support of the crossbeams. These should be attached parallel to and level with the center beam of the boat trailer. Fix the right and left galvanized tubing in place at both ends, and to the axle mounts in the middle. Use a drill to make the necessary holes to bolt these pieces ...
Here are 10 basic steps for loading a boat on a trailer: Drop the tow vehicle driver and passengers off at the dock. Ensure you're out of the way of the launch area while you wait for your tow—if available, park at a nearby courtesy dock. The trailer should be backed down the launch ramp until its wheels or fenders are submerged to a ...
Build your own sail boat with Hartley Boat Plans. Hartley sail boats are the benchmark in reliable and sea worthy trailer sailers, in fact the name trailer sailer was coined by these amazing craft. Many of these build plans also have a printed study pack available to help you through your project.