
Crafts by Theme
Crafts by occasion, crafts by season, crafts by age.
- Alphabet & Numbers
- Bags & Baskets
- Coloring Pages
- Crowns & Hats
- Flowers & Nature
- Greeting Cards
- Masks & Glasses
- Valentine's Day
- Craft Recipes
Paper Plate Sailboat
Craft an easy mini sailboat using some basic materials— a paper plate, a craft stick, a toilet paper roll and some paper. Paint and decorate it into an awesome-looking sailboat. Make some paper people to ride in it too!

Featured Crafts

Paper Bowl Jellyfish
Supplies needed.
- Paper plate
- Craft stick or wooden dowel
- Toilet paper roll
- Poster paint, tempera, or acrylic paint
- Paint brush
- Crayons or colored markers
- Stickers, buttons, etc. (optional)

1 Cut a paper plate in half.
Fold a paper plate in half. Cut along the crease.

2 Trim off the plate's curved bottom.
Stack the two halves together. While keeping them aligned, cut a straight line 2½ to 3 inches from the plate's straight edge.

3 Assemble the boat.
Position the two halves facing each other so that they form a boat-like shape. Make sure that the edges are aligned, then staple or glue all four corners together.

4 Paint the boat.
Paint the boat with a water-based paint like poster paint, tempera, or acrylic.

5 Make a sail.
To make a triangular sail, you can start off with a square or a rectangular piece of paper.
a.) Square - prepare a square sheet such as origami paper. Fold it diagonally in half to come up with a triangular sail.

b.) Rectangle - begin with a rectangular sheet like A4 or Letter-size paper. If you used a small paper plate to make your boat, you may need to cut the paper in half for a smaller sail.
Fold one top corner of the paper down to meet the opposite edge, forming a triangle. Cut and discard the excess paper below the triangle.

6 Decorate the sail.
Use crayons, colored pencils or markers to decorate both sides of the sail. You can also put stickers or glue some paper cut-outs.

7 Glue a craft stick.
Unfold the sail and apply glue on all four sides of the square. Position a large craft stick or a wooden dowel along one side.
Fold the square again along the diagonal crease. Press on the edges to glue them in place.

8 Cut a slit on a TP roll.
About ¾" to 1" from one end of a TP roll, cut a slit just wide enough for your craft stick.
If you used a wooden dowel instead of a craft stick, make a small hole on the TP roll using the tip of a pencil. Make the hole just wide enough for the dowel to get through.

9 Position the craft stick.
Insert the bottom end of the craft stick or dowel into the slit or hole. Push until it touches the bottom of the TP roll.
The stick should fit snugly inside the TP roll's slit. If the slit is too wide, put tape around the craft stick to keep the sail steady and upright.

10 Put the TP roll in the boat.
Place the TP roll inside the boat. The roll should fit snugly. If it does not, glue the sides of the TP roll to the inside of the paper plate boat.
11 Add more detail.
You can further decorate your boat, if you like. Glue some buttons or foam shapes. To get your sailing theme going, make paper cut-outs of anchors, life savers, or flags. You can also draw and cut out paper people to ride on your awesome sailboat.
Though your boat looks all set for sailing, it is not made to float on water. Take it for a fun pretend sailing adventure instead!

Create a fabric sail.
Instead of a paper sail, create one from fabric. Choose a plain piece of fabric or a colorful patterned one. Cut it into a triangle and glue it onto a craft stick or wooden dowel.
Check out these crafts for ideas on for fabric decorating ideas:
- Bubble Wrap Prints
- Fruit and Vegetable Prints
- Potato Stamps

Paint a wooden boat effect.
For a wooden-looking boat, first paint the boat a light brown or beige color.

Once the paint is almost dry, use a dry brush to paint horizontal stripes in a darker shade of brown. Add very little or no water to the dark brown paint. Spread the paint a bit below each stripe so that it blends lightly with the background.
- Beach & Ocean Crafts
- Summer Crafts
- Transportation Crafts
- Crafts for 1st & 2nd Graders
- Crafts for 3rd Graders & Up
You Might Also Like

Box Sailboat

Mayflower or Pirate Ship

Paper Plate Animals
Access our Full Library of Templates

Home » Craft » Interactive Paper Plate Sailboat
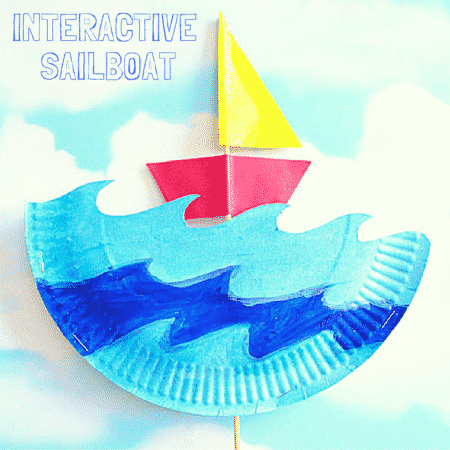
Interactive Paper Plate Sailboat
Sharing is caring!
My kids love interactive crafts and we’ve just added a super fun Summer themed Interactive Paper Plate Sailboat to our growing repertoire. Kids will be unable to resist the lure of singing ‘Row Row Row your Boat’ as their sailboats cross the paper plate sea and with a swift spin, their boats can turn around and start all over again for a seamless play.
I had the pleasure of creating this craft for my friend Rachel who blogs over at I Heart Crafty Things , so head over there to see the full tutorial and have a good look around her site, as there’s lots of gorgeous crafts and activities to see!

It’s that time of year where everyone seems to be looking for deep sea and summer crafts to try out with the kiddies, and we have a few right here for you to see!
Take a look at our Paper Plate Fish that’s inspired by the book ‘The Rainbow Fish’. Alternatively, you may like our Puffy Octopus that uses a really cool bubble wrap technique that almost brings the octopus to life and I can assure you, that you will not want to miss our amazingly popular Paper Plate Jellyfish – it’s even due to be featured on Buzzfeed!

Interactive crafts have become bit of thing here on Arty Crafty Kids and they usually involve a paper plate (as we love paper plate crafts!). We have pop-up chicks and bunnies that we designed for Easter, as well as a swimming goldfish within a paper plate bowl that forms part of a fun collective noun series. Did you know that a group of Goldfish is also referred to as a glint of Goldfish?
I hope you enjoy the paper plate sailboat and make sure you join us over on our facebook page to let us know what your kids think of their play and create craft!

Choose Your Plan!
- Unlimited Access & Prints
- Educational & Personal Use
- Access FULL Library & New Content
- NEW Content Added Weekly
- Cancel Anytime

Best Value - Save 35%!
- Access FULL Library & New Content

Creative and fun art & craft ideas for parents and educators of children 3-8 years old.
Art and Craft projects and printable templates, activities, how-to-draw guides, coloring pages and more in the Arty Crafty Kids Members Area !
Happy Crafting!
Free eBook & Templates
Sign-up for our weekly Arty Crafty Kids email and we’ll send you our popular Pet Pals eBook with Free Printable Templates!
Arty Crafty Kids © 2024 – Positive Flow Creates Ltd (Co Reg No. 10628790)
art-spiration activity book!
Sign-up and we'll email this art inspired activity book free.

Rocking Paper Plate Boat
Paper Plate crafts are the best for preschoolers and kindergarteners. There are SO many cute things you can make. We particularly love our series of paper plate rocking crafts. Today we have a rocking Paper Plate boat – a simple craft that is super fun to interact with.

Ahhhh I do love it, when YOU the reader tag me in Instagram or better still email me with photos. Where possible, I will add them to my blogposts or put them on my Pinterest Reader’s Gallery… or on occassion.. write a new Blog Post ALL about YOUR interpretation of my craft!
So yes, today, I have the lovely Nicola from Williamson Art Gallery & Museum , who was inspired by our Paper Plate Rocking Submarines and create their very own Rocking Paper Plate Boat or Yacht! Not just that she kindly ask the parents for permission to share these photos today! A big thank you!! This really is a lovely paper plate boat craft for preschoolers!

I love how to you can see that these little Preschoolers (or 2 and 3yrs olds) really got stuck in with their fine motor skills – from cutting out triangles to colouring in their Paper Plate Ships! A great craft for a group enviroment. And those little Star Hole Punches? Just too sweet.. take me away on a magical journey across the sea!!! Who doesn’t love a lovely Boat Craft for kids ?!
Other Rocking Paper Plate Crafts you may love:
I feel our paper plate boat craft is very much a SUMMER themed craft for preschoolers. Though we have a collection of designs for you, the two you may like most this time of o

Rocking Submarine Craft

Rocking Mermaid Craft (with free templates) – you can see these in the video tutorial on autoplay
Now.. onwards and let’s learn how to make a boat with paper plates, a sheet of paper for the sails and a mast from popsicle sticks.
Rocking Paper Plate Boat – Materials
- per rocking boat, you will need one paper plate
- paper for the sail (you may want to draw a triangle for the children ahead of time – use any paper – old art projects, construction paper or even origami paper)
- crafting sticks (you can use coffee stirrers or wooden skewers with the sharp bits cut off)
- star hole punch (optional)
- coloring pens
Get all your supplies ready on the crafting table and lets get making!
How to make Rocking Paper Plate Boat
The construction method relaly is super easy for these paper boats!

Fold your paper plates in half and decorate.. if the children wish, the “rim” of the paper plate can be the “sea” and the centre of the plate can be the “boat”… but it really doesn’t matter! It is totally up to them. The kids can also draw little fish “In the sea” or use “fish stickers” to add details (if they wish). You can really make this activity as simple or complicated as you wish.
Cut out your triangular Yacht Sail and again decorate – use pens, paint, tape and hole punches!!!! As much or as little as you like. You can also experiment with color paper, origami paper and construction paper. Just work with what you have!

Now tape your yacht craft sail to the wooden sticks… you may want to use two – one down the centre of the sail and another along the bottom of the sail to give it a little structure. You can also add a little wimple to your sail if you wish! Totally your call.
Next, you can either tape the “stem” of the sail to the back of your boat.. or you can make a small hole in the paper playe crease, feed the stick through and tape it to the inside of your board.
SNAGGING: If your boat doesn’t stay upright fully, you can add a little glue/ or rolled up tape to the inside of the paper plate halves to keep them together and really turn this into a fabulous rocking paper plate craft for kids!!!
Your Rocking Paper Plate Boat Craft is finished!

I want to make a boat craft that floats?
Unfortunately these paper boats/ paper plate yachts will not float (but they do ROCK!!). If you are lookng for some boart crafts that float, you can have a go at our Origami Boats (fantastic!) as well as these Magarine Tub Boats (complete with rubber band propellers!). Enjoy! Or maybe older kids will also enjoy this simple origami boat !

More great Boat Crafts for Kids :
More great Ocean Paper Plate Crafts for Kids :

Enjoy your paper plate boat craft for preschoolers!!!

Step-by-Step Guide: How to Make a Paper Sailboat for Endless Fun
Alex Morgan
Introduction to Paper Sailboats
Making a paper sailboat is a fun and creative craft activity that can be enjoyed by all ages. Whether you want to engage in a rainy day activity or simply have some leisurely fun, paper sailboats are a great option. In this article, we will explore the materials needed to make a paper sailboat, provide a step-by-step guide to creating one, and offer tips and tricks for making the perfect paper sailboat. We will explore different variations and designs for paper sailboats, as well as fun activities and games that can be enjoyed with them. Let’s dive into the world of paper sailboats and let our imaginations set sail!
Key takeaway:
- Making paper sailboats is a fun and creative activity: Paper sailboats provide an enjoyable way to explore the art of origami and enhance creativity.
- Using the right materials is crucial: Different types of paper can be used for making paper sailboats, and additional materials like adhesive might be required for certain designs.
- Step-by-step guide simplifies the process: Following a structured guide with clear steps helps in folding the hull, creating a sail, and attaching it to the hull, ensuring a successful paper sailboat creation.
Materials Needed to Make a Paper Sailboat
To create a paper sailboat, you will need the following materials:
- Paper: Ensure you have a square piece of paper. You can fold an 8.5×11-inch sheet into a square shape.
- Scissors: Cut the paper into a square.
- Pencil or pen: Use a pencil or pen to mark the paper for folding lines.
- Ruler: Make use of a ruler to create straight and accurate folds.
- Decorative materials (optional): If desired, you can decorate your sailboat using colored pens, stickers, or markers.
To make your paper sailboat, carefully follow these steps:
- Begin with a square piece of paper.
- Fold the square in half diagonally to form a triangle.
- Unfold the paper and fold it in half again diagonally in the opposite direction.
- Unfold the paper once more and fold each corner into the center, creating a diamond shape.
- Take the top point of the diamond shape and fold it down towards the bottom point, creating a triangle shape.
- Fold the two bottom corners of the triangle up towards the top, forming a smaller triangle with a flat bottom.
- Open the flaps at the bottom of the triangle and fold them outwards to shape the base of the sailboat.
- Use colored pens, stickers, or markers to decorate your sailboat as desired.
- If you used any wet materials for decoration, allow the sailboat to dry.
- Your paper sailboat is now ready to set sail!
By following these steps and gathering the necessary materials, you can easily create a paper sailboat for fun and imaginative play.
What Types of Paper Can be Used?
When making a paper sailboat, it is important to consider what types of paper can be used to ensure sturdiness and flexibility . There are several options to choose from.
One option is origami paper , which is lightweight and easy to fold. It holds its shape well, making it a good choice for creating the structure of the sailboat.
Another option is cardstock , which is thicker and more durable. It provides stability and strength to the sailboat, ensuring that it will hold up well during use.
Construction paper is also a versatile option, offering a wide range of colors. This type of paper can add color and creativity to the design of the sailboat, making it visually appealing.
For those looking for a thicker paper with a variety of designs, scrapbook paper is a great choice. It enhances the visual appeal of the sailboat and adds an extra layer of interest to the design.
Personally, I have made a paper sailboat using origami paper in the past. It was a vibrant and easy-to-fold option, allowing for intricate details on the sailboat. The lightweight nature of the paper also made it glide smoothly on the water. It brought joy to my nephew as he watched it float in a mini pool.
When making your own paper sailboat, it is important to consider the type of paper you choose. The right paper can make a huge difference in the overall experience. So, be sure to choose wisely and enjoy the process of creating your very own paper sailboat!
Additional Materials Required
The construction process of a paper sailboat requires additional materials such as scissors and glue . These materials are essential for improving the sturdiness of the sailboat. Scissors are utilized for precise cutting, resulting in clean edges. Glue plays a crucial role in securing all parts of the sailboat, guaranteeing its integrity during both playtime and display. Incorporating both scissors and glue into the process significantly enhances the quality and durability of the paper sailboat.
Step-by-Step Guide to Making a Paper Sailboat
Get ready to set sail with a step-by-step guide on making a paper sailboat ! We’ll take you through the process of folding the hull , creating the sail , and attaching it to the hull. From the first fold to the final touch, you’ll have all the know-how to create your own miniature vessel . So grab some paper and let’s navigate the seas of creativity together!
Step 1: Folding the Hull
To make the hull of a paper sailboat, follow these steps:
– Step 1: Start with a square piece of paper.
– Step 2: Place the paper in front of you in a diamond shape, with one corner pointing towards you.
– Step 3: Fold the bottom corner up to meet the top corner, creating a triangle.
– Step 4: Unfold the triangle, then fold the left corner to the center of the triangle.
– Step 5: Repeat with the right corner, folding it to the center of the triangle.
– Step 6: Flip the paper over to the other side.
– Step 7: Take the top layer of the left corner and fold it towards the center line.
– Step 8: Repeat with the right corner.
– Step 9: Unfold the left and right corners.
– Step 10: Take the bottom corner and fold it up towards the top point of the triangle.
– Step 11: Flip the paper over to the other side.
– Step 12: Fold the bottom corner up again, leaving a small gap between the fold and the top point.
– Step 13: Unfold the paper completely, and you now have the folded hull of your paper sailboat.
Following these steps will allow you to create a sturdy and functional hull for your paper sailboat. Be precise with your folds to ensure the best results.
Step 2: Creating the Sail
- Select an 8-inch by 8-inch square piece of paper.
- Fold the square in half diagonally to create a triangle.
- Unfold the paper and fold the top two corners down to the center crease to make a smaller triangle.
- Fold the bottom point of the triangle up towards the top point, leaving a small space at the top.
- Fold the two outer edges of the triangle inward to meet at the center crease and create a diamond.
- Flip the diamond over and fold the bottom point up towards the top point, leaving a small space at the top again.
- Fold the right and left corners of the top layer towards the center line of the diamond.
- While still folded, fold the entire diamond in half vertically.
- Unfold the top layer to reveal the sail of your paper sailboat.
- Optional: Use markers, stickers, or other decorations to personalize your paper sailboat.
Origami sailboats , originated in Japan , have a long-standing tradition dating back centuries. These miniature vessels , with their intricate folds and precise techniques, have been passed down through generations, bringing joy to both children and adults. Paper sailboats were commonly used in traditional Japanese celebrations and festivals, symbolizing good luck and prosperous journeys. Today, making paper sailboats remains a popular craft activity, providing a fun and creative way to explore origami .
Step 3: Attaching the Sail to the Hull
- Begin by folding and creating the sail.
- Next , position the sail on top of the hull, making sure to align the bottom edge of the sail with the top edge of the hull.
- To secure the sail in place, use a small amount of glue or adhesive tape.
- Make sure that the sail is straight and centered on the hull.
- Gently press down to create a strong bond between the sail and the hull.
- Before moving or playing with the paper sailboat, allow the glue to dry completely.
Paper sailboats have been a cherished tradition originating in ancient China. Just like origami boats, they were used in various festivities to symbolize good luck and prosperity. Nowadays, both children and adults enjoy making paper sailboats as crafts. These boats not only provide entertainment but also serve as a reminder of the beauty and simplicity of handmade objects. Attaching the sail to the hull is a crucial step in completing the paper sailboat and preparing it for exciting adventures in bathtubs, puddles, or miniature ponds.
Tips and Tricks for Making the Perfect Paper Sailboat
To create the perfect paper sailboat , follow these tips and tricks for making the perfect paper sailboat . Begin by starting with a square piece of paper , as this will ensure balanced proportions and make folding easier. Fold the paper in half diagonally to form a triangle , making sure to press firmly to create a sharp crease . Next, unfold the triangle and fold the bottom edge up to meet the top, creating a smaller triangle shape .
Then, take the right corner of the triangle and bring it towards the center , repeating this step with the left corner . After that, fold the bottom edge of the paper up to meet the top, resulting in a square shape . Fold the sides in towards the center . Flip the paper over and fold the bottom corners up to the top, forming a diamond shape .
Carefully unfold the two sides of the diamond to create the sail . Adjust the angle of the sail by making small folds along the bottom edge . To ensure proper flotation , fold the bottom edges inward to create a small base for balance in the water . Test your boat in a basin of water to ensure it floats correctly.
By following these tips and tricks , you will be able to create a perfect paper sailboat . Enjoy the process of crafting your own miniature boat and have fun sailing it in the water .
Different Variations and Designs for Paper Sailboats
If you’re ready to embark on a paper crafting adventure, you’ll be amazed at the plethora of different variations and designs available for making paper sailboats . From the simplicity of a basic origami sailboat to the intricate techniques of an advanced cut and fold sailboat , these sub-sections offer a range of possibilities to explore. So grab your paper, fold, cut, and let your creativity set sail !
Simple Origami Sailboat
To create a Simple Origami Sailboat , you just need to follow these steps:
- Start with a square piece of paper.
- Place the paper in front of you with one corner pointing towards you.
- Fold the paper in half diagonally, bringing the opposite corners together.
- Unfold and repeat step 3, folding it in half diagonally in the opposite direction.
- Rotate the paper so that one of the folded corners is facing towards you.
- Fold the two outer corners of the paper towards the center, forming a triangle shape .
- Flip the paper over and fold the bottom edge upwards to create the sailboat’s hull.
- Open up the bottom of the hull to make a flat base.
- Create the sail by folding a small rectangle of paper in half diagonally.
- Tuck one corner of the triangle sail into the opening at the top of the hull.
You can experiment with different sizes and colors of paper to make a fleet of simple origami sailboats .
Advanced Cut and Fold Sailboat
To create an Advanced Cut and Fold Sailboat , follow these steps:
1. Choose sturdy paper, like cardstock or construction paper , for support.
2. Start with a rectangular piece of paper, preferably 8.5 x 11 inches .
3. Fold the paper in half lengthwise to create a center crease .
4. Unfold the paper and fold the top edges towards the center crease , creating diagonal folds meeting at the top.
5. Flip the paper over and fold the bottom corners up towards the center crease , following the previous diagonal folds .
6. Fold the bottom edge of the paper up to meet the top edge , aligning the sides and creating a triangle shape at the bottom.
7. Flip the paper over, keeping the triangle shape at the bottom. Fold the bottom corners inwards towards the center crease , creating 45-degree angles .
8. Unfold the previous step and carefully cut along the creases , starting from the bottom and stopping before reaching the top.
9. Fold the paper back into its original shape, tucking the triangles created in step 7 into the slits made in step 8.
10. Create a sail by cutting a small rectangle from a different colored paper. Attach the sail to the back of the sailboat, near the top.
11. Your Advanced Cut and Fold Sailboat is now complete! It is ready to set sail in the imagination of your paper fleet.
Fun Activities and Games with Paper Sailboats
Looking for some fun activities and games with paper sailboats? Here are some ideas to get you started:
1. Racing: Set up a racecourse in a pool or a bathtub and have a friendly competition to see whose paper sailboat reaches the finish line first.
2. Obstacle Course: Create an obstacle course using household objects like pillows, books, or small toys. Test your skills by navigating your paper sailboat through the course without touching any obstacles.
3. Float and Sink: Test the stability of your paper sailboat by adding different objects one by one. See how many objects it can hold before sinking.
4. Design Challenge: Have a design contest with your friends or family. Each person creates their own unique paper sailboat design using colorful paper, markers, and craft materials. Then float them in water and see whose design performs the best.
5. Treasure Hunt: Hide small objects around the house or yard and use the paper sailboats as vessels for finding treasure. Sail them to discover hidden treasures and collect them along the way.
These activities and games with paper sailboats are not only fun but also great for enhancing creativity and problem-solving skills. So get ready to set sail and embark on some exciting adventures with your paper sailboats!
Some Facts About How To Make A Paper Sailboat:
- ✅ Making a paper sailboat is a fun and easy craft project that introduces the art of origami. (Source: One Little Project)
- ✅ All you need is a piece of printer paper to create a paper sailboat. (Source: One Little Project)
- ✅ The process involves folding the paper in half lengthwise and width-wise, and then folding the top corners downwards to align with the center fold. (Source: One Little Project)
- ✅ After folding the bottom flaps and creating a square shape, the paper sailboat is ready to be floated on water. (Source: WikiHow)
- ✅ Adding tape to the corners and bottom of the paper sailboat can help make it waterproof and prevent water from seeping in. (Source: WikiHow)
Frequently Asked Questions
How do i make a paper sailboat with printer paper.
Step 1: Start by folding a piece of letter-sized printer paper in half lengthwise and then width-wise.
Step 2: Rotate the paper and fold the top corners downwards to line up with the center fold.
Step 3: Fold one layer of the bottom flap upwards and flip the paper over to fold the little flaps behind the triangle shape.
Step 4: Fold the remaining bottom flap upwards.
Step 5: Pick up the folded paper and pull your thumbs apart to flatten it.
Step 6: Fold the bottom point up to meet the top point and flip the paper over to repeat the fold.
Step 7: Run your fingers along the folds to ensure they are flat and all edges are folded.
Step 8: Pull apart the sides of the folded paper at the top point to create a boat shape. Pinch along the bottom edges to make folds on each side and your paper boat is complete.
Can I make a paper sailboat with origami paper?
Yes, you can make a paper sailboat with origami paper. Follow the same steps mentioned earlier, but remember to use proper cutting techniques if needed.
How long will the paper sailboat float in water?
The paper sailboat will float in water for at least 10 minutes before becoming waterlogged. To make it last longer, you can add a layer of tape to the bottom for better waterproofing.
What kind of paper should I use to make a paper sailboat?
You can use regular printer paper or construction paper to make a paper sailboat. If you have origami paper, that can also be used with proper cutting techniques.
Can I put things in the paper sailboat?
Yes, you can put lightweight items in the paper sailboat. If you are placing the boat in water, make sure to only put lightweight items to prevent the boat from tipping over.
How long does it take to make a paper sailboat?
Making a paper sailboat with regular printer paper typically takes about five minutes. It is a quick and easy craft project that can be enjoyed by kids.
About the author

Leave a Reply Cancel reply
Your email address will not be published. Required fields are marked *
Save my name, email, and website in this browser for the next time I comment.
Latest posts

The history of sailing – from ancient times to modern adventures
History of Sailing Sailing is a time-honored tradition that has evolved over millennia, from its humble beginnings as a means of transportation to a beloved modern-day recreational activity. The history of sailing is a fascinating journey that spans cultures and centuries, rich in innovation and adventure. In this article, we’ll explore the remarkable evolution of…

Sailing Solo: Adventures and Challenges of Single-Handed Sailing
Solo Sailing Sailing has always been a pursuit of freedom, adventure, and self-discovery. While sailing with a crew is a fantastic experience, there’s a unique allure to sailing solo – just you, the wind, and the open sea. Single-handed sailing, as it’s often called, is a journey of self-reliance, resilience, and the ultimate test of…

Sustainable Sailing: Eco-Friendly Practices on the boat
Eco Friendly Sailing Sailing is an exhilarating and timeless way to explore the beauty of the open water, but it’s important to remember that our oceans and environment need our protection. Sustainable sailing, which involves eco-friendly practices and mindful decision-making, allows sailors to enjoy their adventures while minimizing their impact on the environment. In this…

Rocking paper plate ships

How cute are these little rocking paper plate ships? We made these yesterday ahead of our coastal walk that we went on today and both of my two kids are still totally fascinated by them. Every time they walk past they give them a tap and watch them rock for a bit before carrying on. I have to admit they’re probably my favourite craft that we have made recently too! They’re so sweet and easy to make and they only require basic resources too which makes them perfect for crafting at home or in groups. Unfortunately we didn’t get to see any pirate ships today or any boats with yellow and purple sails but we did see some pretty cool other ones!
Heres what we used
- Paper plate
- Coloured paper
- Lollipop stick
How to mAKE OUR ROCKING PAPER PLATE SHIP

First take your paper plate and fold it in half. Then, take your blue paper and cut it into wavy strips to create your ocean waves. Glue your paper strips across the front half of your paper plate and put it aside to dry.

Whilst your ocean is drying it’s time to make your ship! Cut out a trapezium shape for the base of your boat and then glue your lollipop to back of it to make the mast. Then cut out two curved triangles to make the ship’s sails and glue them onto the front of your stick.

Finish decorating your ship by adding any decoration such as circle portholes or patterns/designs on the sail. Pop your ship to one side.

Hopefully by now your paper plate ocean is nearly dry. Take it up again and trim off the loose ends of your paper strips to round off your plate again.
Glue your ship onto the back of your paper plate and leave to dry. Once it’s dry your awesome paper plate ship is finished! Don’t they look great?!
Leave a Reply Cancel reply
Recent posts.

Paper Plate turtle

Paper plate chicken

5 free ocean colouring pages!

Shredded paper birds nests

Paper cup flamingo puppet

EASY Paper tulips
Join the newsletter, discover more from this crafty family.
Subscribe now to keep reading and get access to the full archive.
Continue reading

Paper Plate Boat Craft for Preschool
Sharing is caring!
Simple crafts for kids are the best way to enjoy the summer months — whether you’re looking for art projects to make at home or fun crafts for the preschool classroom! That’s why you’re going to love this cute paper plate boat craft ! Just grab a few simple supplies to put this easy project together with your kids right now.
This posts contains affiliate links, which means I may earn a commission if you purchase something from my link (at no additional cost to you). Thanks for your support!

This simple paper plate boat craft is so quick and easy to put together! That means it’s a great summer art project for kids of any age to make!
The best part about this DIY project is that you only need a few simple craft supplies to put it together. In fact, you probably have everything you need at home right now! What better way to keep your kids entertained when you’re tired of hearing them say I’m bored?
Paper Plate Boat Craft
Since this adorable paper plate craft is so easy to make, it can be put together with just a few minutes of crafting time. Which means it’s perfect for a lazy summer afternoon! And since it’s so simple, all your kids can get in on the fun, no matter their ages!

You’re going to love the short list of supplies needed to put this easy art project together! And since it’s so easy to make, this beach craft is also easy to customize. Keep scrolling to the bottom of the post to get more ideas for making this project with your kids.
- Paper plates . We used small 6-inch plates because that’s what we had on hand, but full-sized plates would also work to make your own rocking sailboats!
- Paint . Have fun picking the colors for your boats! I suggest using acrylic craft paint to paint the paper plates because it has the best color and coverage.
- Popsicle sticks . You can use plain wooden sticks or colored sticks to create the sails for your boats.
- Cardstock or construction paper . To make the sails for your rocking boats, you can use any type of paper you want. I used polka dot scrapbook paper to add a fun pattern to our sales. But plain construction paper would also work.
How to Make a Paper Plate Boat
Now that you have all your supplies gathered up, it’s time to get crafty! Have some fun with your kids making your own sailboat craft at home this summer.

Before you can start putting your paper plate boats together, your kids will need to have some fun painting their paper plates. Make sure to cover your work area well, then let your kids paint their plates whatever color they want their boats to be. You may need to add a second coat to fully cover the plate with paint.
Once the paint on the plates is fully dry, fold each paper plate in half.

After giving the paint on your paper plate plenty of time to dry, set them aside for a minute while you make the sails. First, cut one triangle out of your cardstock or construction paper for each boat you plan to make.

Then, glue the triangle sail to one one end of a popsicle stick. Make sure to leave plenty of room at the bottom of the stick to attach it to your boat!

After that, flip the sale over and glue it to the paper plate. Make sure the round part of the plate is on the bottom of your boat so your sailboats will rock properly.
Once the glue is dry, stand the sailboats up on the round part of the plate and lightly tap one side. The boat will start rocking like it’s floating on the water!
Paper Plate Boat Craft Ideas
See how simple it is to make your own sailboats out of a paper plate? And while these boats might not float in the water, they are pretty fun to play with!

But my favorite part about making this cute summer art project is giving your kids a chance to customize their craft! Try these ideas as your kids are putting their own boats together to create some adorable art projects while they’re on summer break.
Decorate the boat . While you can make this a super simple craft by letting your kids paint the paper plates one solid color, there’s no reason they can’t get creative! Let them have some fun adding their own decorations by painting designs in the boat, or adding creative elements after the paint is dry. Try decorating your boats with:
- Markers or crayons
Add decorations to the sails . Another fun way to customize your boats is by adding decorations to your sails. Let your kids draw their own designs or add different craft decorations to the paper to make it their own.

Turn a plain paper plate into a cute rocking sailboat with this fun preschool-friendly craft idea.
- Paper plates
- Popsicle sticks
- Cardstock or construction paper
- Paint brush
Instructions
- Paint the paper plate and allow to dry completely.
- Fold the plate in half.
- Cut a triangle out of the cardstock and glue it to the top of the popsicle stick. Attach the other end of the stick to the back of the paper plate.
Did you make this project?
Please leave a comment on the blog or share a photo on Pinterest
More Easy Craft Ideas:
Popsicle Stick Fish Craft
Fish Bowl Craft
Coffee Filter Rainbow Craft
Rainbow Jellyfish Craft
If you like this post, you’ll probably like these:

Emily is a midwestern mom of two boys. She loves all things DIY — from home renovations to kids birthday party planning. Whether she’s making a new farmhouse craft for her home or helping her kids with a cool activity, you can bet she’s in the middle of some kind of DIY project (or three) right now!
Similar Posts

85 Amazing Mason Jar Christmas Gifts to Give This Year

Simple Flower Craft for Kids with Cupcake Wrappers

15 Patriotic 4th of July Mason Jar Ideas

How to Have a Fun Family Movie Night at Home

Dinosaur Egg Chocolate Nests for Your Dinosaur Party

Popsicle Stick Heart Garland Craft
Leave a reply cancel reply.
Your email address will not be published. Required fields are marked *
This site uses Akismet to reduce spam. Learn how your comment data is processed .

Easy Paper Plate Boat Craft for Kids
Categories Arts and Crafts , Summer
Do you have a boat lover at home? This Paper Plate Boat is a great craft for kids of all ages. Use it as part of a Summer or Transportation themed lesson plan in your toddler or preschool classroom.

Disclosure: Adult supervision is required for all activities at all times.
The Summer break can be tough on parents who aren’t used to having their kids home every day. If you’re trying to get ready for this Summer, then start with these Summer activities for kids . Or invest in the Summer Activity Pack , which is filled with educational ideas for young kids.
Table of Contents
- What you’ll need
Instructions
- More Summer arts and crafts to try
Materials Needed
- Small paper plate
- Blue construction paper, both light and dark blue
- Jumbo popsicle sticks
How to Make a Paper Plate Boat Craft
1. draw a line down the center of the paper plate..

Half of your paper plate will be the hull of the boat and the other half will be turned into the boats sail.
2. On one side of the plate draw a triangle
I made two sides of the triangle curved. I did this so that it looks like the wind is making the sail billow out. However, if you’re doing this simple craft with young children, like preschoolers or kindergarteners, then just let them make a simple triangle in whichever way works best for them.
3. Cut along the lines.
Use a pair of scissors to cut out the sail and the hull. Cutting is a great way to help young kids develop their fine motor skills (the small muscles in their hands and fingers).
4. Paint the boat.

I kept this step simple. But this is a great way to let your kids create without constraint. Let them pick their favorite colors and make patterns across the hull of their ships.
5. Tear your dark blue and white paper into strips.

I like to tear the paper strips because I like the way they mimic the waves. However you can also cut out the waves instead, if you want to work on fine motor skills with some scissor practice.
6. Glue down the paper strips in alternate colors, but set aside the last piece of blue paper.

Although I used white and blue strips for the waves. I did this because those were the colors I already had. Try using different shades of blue, or even a little bit of green for a different effect.
Alternatively, you can also experiment with different materials. For example, try using strips of newspaper, paper towels or strips from a tissue paper square instead. Scrunched up blue tissue paper would also add a nice textural element to your ocean.
7. Glue down the semi-circle with the flat side facing upwards.

8. Glue down the last strip of blue paper, overlapping with the bottom of the boat.
If you don’t want to do steps 6 and 7 in this order, you don’t have to. You can always glue the paper plate hull down last and then paint waves over the bottom with blue paint instead.
9. Glue the jumbo craft stick down the center of the page.

Make sure that one end of the wooden sticks is underneath the inside of the paper plate halves. This will act as the mast for your paper plate ships.
10. Glue the sail to the top of the popsicle stick.

I only made one sail for our boats. However, you can also use the same process make two or three smaller sails instead. Just like a schooner which has both back and front sails.
11. As an extra step, use a sharpie to draw on your boat.

Let your kids decorate their sailboat craft however they like. My little girl decided to draw her family inside, while my son had a great time when he turned his picture into a pirate ship.
You can also add a school of rainbow fish in the deep sea or seagulls flying through the sky. If you have fish stickers on hand, this would be a wonderful way to add some extra detail to your paper boat.

Summer Activity Pack
Educational printables for preschoolers and kindergarteners for this Summer.
Are you going to make this Paper Plate Boat Craft with your kids? Don’t forget to pin the idea for later.

More Summer Crafts for Kids
Do you love easy crafts? There are so many great ideas to try this Summer. Here are some of my most popular crafts to make with both younger and older kids during the school break.
- Paper Plate Turtle Craft
- Paper Plate Starfish Craft
- Paper Plate Fish Craft
- Rocking Paper Plate Crabs
- Summer Paper Plate Masks
For more easy craft ideas, visit 40 Paper Plate Crafts for Summer

Summer Crafts for Kids

Paper Plate Summer Crafts for Kids
Paper Plate Boat Craft

Learn how to make a boat craft out of paper plates. This is an easy craft for kids to try this Summer.
Make the Boat
- Draw a line down the center of the paper plate.
- One one side of the plate, draw a triangle.
- Cut along the lines.
- Paint the semi-circle in any color you like.
Make the Background
- Tear dark blue and white paper into strips.
- Glue the strips along the bottom third of the light-blue background paper. (Save the last strip till step 4)
Put them together
- Glue the semi-circle to the background
- Now glue the last strip so that it overlaps with the bottom of the boats hull.
- Glue the jumbo craft stick to the middle of the page.
- Glue the sail to the top of the popsicle stick.
- As an extra step, use a permanent marker to draw people of your ship or birds in the sky.
Share this:
- Click to share on Facebook (Opens in new window)
- Click to share on Pinterest (Opens in new window)
- Click to share on Twitter (Opens in new window)
Rocking Paper Plate Pirate Boat Craft
Sharing is caring!
Who knew that driving a boat could be so much fun?
We live in the 10,000 lake state but it wasn’t here that we felt the nudge to give boating a try.
Instead, it was miles away from home, on our vacation in Italy.
And what a great experience it was!
So great that our first craft after coming back home had to be about boats.
We started with a sail boat and ended up with this rocking paper plate pirate boat craft.
RELATED: Check out also our paper plate boat craft .

We love paper plate crafts and use paper plates for every season and holiday crafts. They are great for painting, cutting and turning into so many ideas.
You can easily turn this pirate boat into a regular boat, just replace the pirate sail with a regular sail.

MORE PAPER PLATE CRAFT FOR KIDS:
- Paper plate boat craft
- Paper plate jellyfish craft
- Paper plate bee craft
Paper plate pirate boat craft

This post contains affiliate links. I may receive commissions for purchases made through links in this post at no cost to you .
- pirate boat template – find it at the end of the article
- paper plate
- brown paint
- cardstock paper (black, yellow and white)
- craft stick

How to make a paper plate pirate boat
Step 1: Start by painting the outside of the paper plate brown.
Step 2: While the paper plate is drying, print out the pirate boat template and cut out 2 rectangle top parts out of yellow cardstock paper, 3 boat windows and one flag out of black cardstock paper. You can cut out the pirate skull yourself with the use of a craft knife or you can use a skull punch .
Step 3: Bend the paper plate in half with the painted side on the outside.
Step 4: Glue the three windows on one yellow rectangle.
Step 5: Glue one yellow rectangle at the top of the paper plate and glue the stick at the back of the yellow part. Glue the other yellow rectangle on the other side.
Step 6: The skull will go on the flag and then the flag on the craft stick.
Check out more easy crafts for kids .
Sign up for our Newsletter and get this Pirate Boat Template as a thank you!
17 Creative Paper Plate Crafts For Kids That Are Perfect For Summer
Sunday 29th of July 2018
[…] Idea from Non Toy Gifts. […]
Visit Our Recipe Site EAT YOUR BEETS!

20+ Sailboat Crafts for Summer
Sharing is caring!
Preschool Sailboat Crafts For Summer
Well today I wanted to share a fun an creative list of ideas in the form of Sailboat crafts .
Making new things with the kids can be really fun. Sylvia and I love to make little, new and interesting crafts and we have been visiting the internet for sail boat inspiration.
I really love the idea of making crafts from recycled materials. So the wine cork boats and the boats using twigs are a real winner in my eyes.
I also love the idea of juice box and egg carton crafts . It’s great to use what we have in the home and make use of them for fun.
Which idea do you like the most?
I’d love to hear?

Twig Boat Craft
Crafts inspired by nature are the perfect ones to try during the summer, and this easy twig boat craft is just that!
E asy Pirate Cork Boats
Time to put those corks to use! Get your toddler involved in this fun and interesting pirate themed cork boat activity!
Wine Cork Sailboat Craft For Kids
And here’s another cork craft to get your toddler busy with! All you’ll need is a few toothpicks, colored paper and some corks!
Juice Box Boats
Time to use up those empty juice boxes and turn them into something wow momma! Get your toddler involved in
Milk Carton Crafts Boat
And here’s another super adorable and easy to make sailboat craft you can get your toddler to try out! This one’s made using milk cartons.
Handmade Boats
A few twigs and sticks, a few strips of paper and some string- that’s all you need to get your kiddo to try making these handmade boats.
Sailing On The 7 Seas Treasure Ships
Filled with parts of a map leading upto a treasure, this fun sailboat themed activity is an interesting one you can get your toddler to try out!
Egg Carton Craft Ideas
Summer is here and it is the perfect time to try some fun crafts! This one makes use of that extra egg carton you have!
Pool Noodle Crafts And Activities
Time to put that extra old pool noodle to use! Here’s not just one or two but 18 super toddler friendly activities using just that.

Be A Sailor Make A Boat
Using a simple cardboard box and a few other essentials, get your kid into some pretend play and try creating this fun little boat.
Using just a few popsicle sticks, you can get your toddler to try making this awesome sailboat craft on a lazy summer afternoon.
Boat Crafts For Kids
On the hunt for some more fun boat crafts for your kiddo? This one has a list of some of the best picks.
Fun Sample Cardboard Boat
Approved by toddlers and lots of fun to make, this cardboard canoe craft project is an easy one to try!
Paper Crafts Make A Boat
Super simple and easy to make, this is one boat themed craft activity that’s fun and yet, needs minimal supervision from your end too.
Mayflower Craft And Science Activity
Turn egg cartons into mini pirate ships and get your toddler on board with this fun crafty and science themed activity!
Kids Craft Milk Carton Boats
Use up those old milk cartons and turn them into boats. This is another fun summer themed activity you would want your toddler to try!
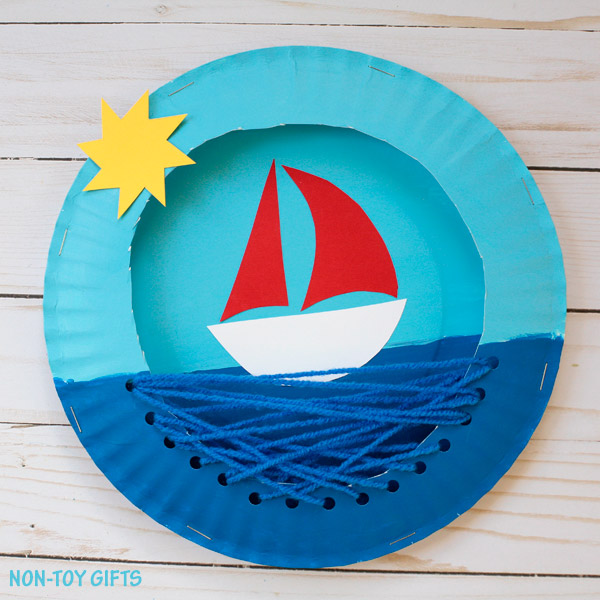
Paper Plate Sailboat
And of course, no craft activity list is complete without a paper plate craft! Yes, you can use up those extra paper plates and turn them into a sailboat.
Cork crafts Mini Beasts and Boat
And here’s one more fun cork craft you can get your toddler to engage in. And yes, it is super easy too.
Tub Boat Craft
Ready to take your toddler’s activity time up a notch! Give this super fun self propelling boat activity a shot!
Egg Carton Boat Craft
And last but not the least, here’s another inspired sailboat themed activity that needs you to use a few paints, egg cartons and some straws.
Have you seen our super fun Noah’s Ark Paper Plate Craft ? Check it out!

Angela Milnes is a Qualified Early Years Teacher who has specialised in Preschool and Kindergarten teaching. She has a wealth of experience teaching young children and is passionate about kids crafts and having fun as a family. Angela has also taught cooking skills and loves to share both family recipes and easy crafts here on The Inspiration Edit. Follow her on Pinterest !

Similar Posts

Batman Mask for Kids to Make

Ladybug Handprint Art for Preschool Kids

5 Things to Buy Before Your Disneyland Trip

Perfect Patriotic Pinwheel Cupcakes

Negligence vs Intentional Harm in Personal Injury Cases

Creating My Own Kawaii Animals
These are so sweet! I feel the need to go and make a sailboat now…! x
Oh thanks Rosie. They are cute!
Those cork pirate ships are so adorable. You’ve picked out some lovely ideas here.
I know. I love them and this would be a great way to recycle too.
oh wow what fun ideas! I can really see the cork ones floating well
thanks Kitty. I love the cork one’s they are super cute!
Leave a Reply Cancel reply
Your email address will not be published. Required fields are marked *
- Skip to primary navigation
- Skip to main content
- Skip to primary sidebar

Easy Paper Plate Pirate Ship Craft For Kids

Ahoy, crafty mateys! Sail into fun with our Pirate Ship Craft. Transform into a seafaring masterpiece. Perfect for kids of all ages!

This pirate ship paper plate craft is fun for Talk Like a Pirate Day in September or any day of the year.
Ahoy there! Hoist the anchor and get ready to set sail! Today we’re crafting our very own pirate ship on the high seas! This paper plate pirate ship that’s just perfect for all our little pirates out there.
Crafting isn't just about gluing pieces together and waiting for them to dry; it's about bringing imagination to life, learning through doing and having so much fun along the way. Our pirate ship craft is an absolute blast and a fantastic way to get the kids involved in a world of pirate adventures.

Want to save this project?
Enter your email below, and then we'll send it straight to your inbox. Plus get awesome new projects from us each week.
Pirate Theme Crafts
Shiver me timbers! Our craft project today is sailing straight out of the tales of pirates, swashbuckling adventures, and hidden treasures. In the spirit of the pirate theme, we're turning ordinary paper plates and craft sticks into magnificent pirate ships that are ready to sail the seven seas!
Creating this pirate ship is all about having fun! Your kids will love bringing it to life with just a few simple craft supplies. And you’ll love that it is easy and cheap! Phew!
Plus, it’s also a great opportunity to teach young pirates about the pirate code and their world of adventure. I don’t know any kids who don’t just love all things, pirates! Most parents do too!
Once completed, the kids can play with the boats or you can display them on the kids’ art wall. Anyway, if you choose to use them, I promise they’ll be simple to make and the kids will love them.
Check out these other Pirate Themed Crafts

Pirate Craft

Binocular Craft

Pirate Coloring Page

Easy Pirate Craft
Let’s get crafty! Can you just imagine me whipping out the glue guns while I say that? Because I feel like doing that on a regular.
This blog post is your treasure map to creating a fantastic pirate ship from simple materials. I’m all about simple materials! It’s also an easy craft perfect for a rainy day, a pirate-themed party, or whenever the kids are feeling adventurous. Or you are! Don’t leave yourself out of the crafting fun!
We’ll take everyday items like paper plates, popsicle sticks, and a little paint into a seaworthy vessel. All we need is your child’s imagination. So, gather your craft supplies, put on your pirate hats, and get ready to sail through this fun craft journey!

Simple Paper Plate Crafts
Sometimes I feel like I live in the world of paper plate crafts. It's amazing how a simple paper plate can turn into a cool pirate ship with creativity and a splash of paint. Our pirate ship is an easy, budget-friendly project that kids of all ages can enjoy, especially our younger children.
Using a paper plate as the ship's base, some popsicle sticks for the ship masts, and a little bit of crafty magic, we'll craft a ship worthy of the bravest pirate. We'll provide you with a printable template and step-by-step instructions to make the crafting process smooth sailing.
So, are you ready to sail away on a crafty adventure? Let's get started and make some pirate-themed magic together!
Pirate Ship Craft Supplies

- Paper Plate
- Colorful Craft Paper
- Acrylic Paints
- Paintbrushes
How to Make Easy Pirate Ship Craft

Start by downloading the free pirate ship template at the bottom of the post. Use scissors to cut out each of the pieces of the template.
Paper Plate Boat

Grab a paper plate. If it's similar to the pirate boat template, that would make it easier for young children to trace the template onto the paper plate.

Cut the paper plate in half.

Trace the ship template onto the paper plate and cut out the deck. Or simply cut a step out of the center of the ship.

Paint a stripe at the top of the ship with one color. We painted it a brown color.

Paint the rest of the ship. We painted it red and then added a few strokes of brown paint over it to give it a weathered look.
Pirate Ship Masts and Details

Cut each of the pirate ship templates out of white, brown, blue, and black paper.

Glue the skull bones diagonally onto the black flag. Then glue the pirate skull on top of the bones creating the pirate flag.

Next, glue the pirate flag to the top of the mast. The masts are the poles that come out of the ship and hold the sails.
*Note: You can also use a craft stick for the mast as well.

Glue a sail underneath the pirate flag on one mast and then two other sails on the other mast.

Next, glue the smaller circles onto each of the larger circles from the template. These will be the ship windows or portholes.

Glue the port holes to the side of the ship.

Next, glue the anchor to either the front of the ship or towards the back.

Lastly, glue the mast base to the back side of the center of the ship.

Viola, you have an awesome pirate ship!
Happy Crafting!
We highlighted this Halloween Craft along with some other fun kid's crafts in our September Crafts along with our 101+ Kids Crafts .
You also do not want to miss our 101+ Printable Coloring Pages For Kids and 101+ Printables For Kids full of Crafts and Coloring Pages.
Other Fun Boat Crafts
- Origami Boat
- Paper Plate Sail Boat
- How to Draw a Sailboat
- Juice Box Preschool Boat Craft

Download the Free Pirate Ship Craft Template
Enter your email address in the form below and you will be taken directly to the downloadable free printable pirate ship craft template.
*For personal use only
Pirate Ship Craft

- Pirate Ship Craft Template
Instructions
CONNECT WITH MADE WITH HAPPY!
Be sure to follow me on social media, so you never miss a post!
Facebook | Twitter | Youtube | Pinterest | Instagram
Looking for crafts to keep your child busy? Sign up for my 5 Ridiculous HAPPY Activities in under 30 minutes for your kids delivered directly to your inbox!
Find and shop my favorite products on my Amazon storefront here!
PIN IT TO YOUR DIY BOARD ON PINTEREST!
FOLLOW MADE WITH HAPPY ON PINTEREST FOR ALL THINGS HAPPY!

More Happy Halloween

Discover a world of creativity and joy with Alli Ward, the creative mind behind Made with Happy. From DIY crafts to delicious recipes, Alli brings happiness to every project!
Fun Family Crafts
A library of free craft ideas from toddler to teenager
Paper Plate Boat
July 17, 2019 By Stef
Sharing is caring!
This paper plate boat is a fun summer craft for kids. It’s easy to transform into a pirate ship, a cruise ship, or another vessel.
Get the instructions for ––> Paper Plate Boat
- Video Library
- Monthly Collection
- Craft Academy
- Paper Flowers
- Felt & Fiber
- Kid's Crafts
DIY Paper Sailboat Centerpiece for Treats

- Copy Link
Join our email list to learn about new projects, discounts, and membership perks!
Goodies You Can't Google
You've found a member-exclusive project. But for less than the price of a fancy coffee... You'll get instant access to this and over 2,000 other premium projects inside the Lia Griffith membership!

Set Sail With Snacks!
Need a nautical centerpiece for your next kid’s party? Never fear, the Lia Griffith sail crew is here! We’ve come up with an amazing, easy-breezy paper sailboat snack holder project. Anyone can make this DIY sailboat, giving you the perfect piece to weigh anchor in the middle of the kid’s table!
All you have to do is gather the materials and tools, then download the templates and instructions. Heave-ho on this impressive craft!
This content uses links from which we may earn a commission. Click here for more information.
- Cutting Machine (recommended)
- Low-Temp Hot Glue Gun
- Scissors
- Craft Knife
- Cutting Mat
- Glue Dot Roller
- “Twilight” My Colors Heavyweight Cardstock
- “Royal White” Recollections Linen
- Kraft Cardstock
- “Patriot Blue” Smooth Solid
- “Bluebell” Paper
- 14-ply Chipboard
- Kraft Packing Tape
- White Twine
- 12” Wooden Skewer
Instructions
- Gather tools and materials.
- Cut pieces according to the template. We cut the chipboard with the Cricut set to custom material – chipboard – more pressure, cut twice. You can also print out the template, trace onto chipboard, and cut with a craft knife.
- Cut packing tape into smaller strips (if needed). Tape one of the sides to base of boat, following the curve. Make sure that the side is matched up with the bow (front) and stern (back) correctly (see template PDF).
- Tape second side on. Match points of the bow together and tape edge.
Full tutorial available for members. Join here.
More Crafts Ashore!
We are here to help you explore your creativity with daily inspiration, downloadable cut files and printable templates that make your craft life easier. We believe in the power of creativity to nurture the soul and to empower us. Our designs are created with simplicity in mind and we always strive to provide you with the highest quality DIYs. Share what you’ve been up to with the LGM community by using #MadeWithLia — your creativity is our biggest inspiration!
Membership gains you access to our full library of DIY project tutorials complete with pattern downloads and instructions. Head over to our membership page to see a full list of benefits. And be sure to follow us on Instagram , Facebook , and YouTube . We look forward to making this the most creative year of your life! Happy crafting! ~ Lia and Team

All the Goodies You Can't Google 🎁
Tired of scrolling endlessly for the perfect project? Save time, money, and Google-induced headaches with us! Our membership makes it easy to create beautifully finished crafts without needing to look all over the internet for ideas and materials or spend lots of money on individual videos and templates.
Already a member? Click here to log in.
Ask Lia or the community!
Leave a comment cancel reply.
Your email address will not be published. Required fields are marked *
Save my name and email in this browser for the next time I comment.
14 Comments

After I download this I can’t go back and look at the tutorial? I hope I can

We suggest you download and save copies of all patterns, instructions and tutorials to your computer so you always have them to reference!

I do not see an SVG to cut with my machine. I only see to download and print and svg. How can I get the SVG for cutting electronically?
Yes there is an SVG available, it’s the first download titled “Large Paper Sailboat SVG”.

So beautiful!I like it!

Hi Can I separate the sails to cut separately? Thanks
Yes, they’re set up as different colors so they will automatically cut separately in Design Space.

Hi, Lia! I’m trying to download svg for the sailboat but it doesn’t let me. I’m using my iPhone. Can I do it on my iPhone or does it have to be a computer? Hopefully it doesn’t because my laptop is not working :((
Hi! As far as I know, you have to download our SVG files to a computer, then upload to Design Space. You may be able to find more info on Cricut’s site and perhaps there’s a workaround to use a smartphone or tablet!

C’est très joli ce vous faite es ce que je peux télécharger le modèle svp

Bonjour Lina, nous sommes ravis que le projet vous plaise! Nos modèles sont disponibles pour nos membres. Si vous envoyez un email à [email protected] , nous serons heureux de vous fournir plus d’informations sur nos options d’adhésion!

This is so neat, i love it. Just a great idea. Love your table setting also.
Thanks so much Yvonne!
Member Login
Email Address
Remember Me
Let your creativity bloom!

Join our email list to get a free flower crafting project bundle . Create four pretty peonies with the materials you already have on hand - in 60 minutes or less.
Your fresh picked peony projects are on the way to your inbox!
Continue Download?
This will use up one of your extra projects for the month.
Save posts to your craft room with the Lia Griffith membership.
Enjoy your freebie.
Join our email list to instantly download this freebie and get more DIY inspiration delivered to your inbox.
- Email Address *
- Hidden download_url
Already a member? Log in to get this freebie.
- Skip to primary navigation
- Skip to main content
- Skip to primary sidebar
- Play Recipes
- Gross Motor
- DIY Projects
- Learning Resources
- Product and Service Opinions
Paper Plate Boat Scene

The following post contains affiliate links, which means that at no extra cost to you I can make a tiny bit of money to help support this blog. Thank you!
Did you see my announcement about my new book? 50 Transportation Crafts is the SEVENTH in the successful “50 Crafts” series, and it includes airplanes, trucks, cars, boats, buses, trains and more!

It’s available in paperback, Kindle, and ebook formats. Please click HERE for more information!
To promote the book I’m giving you a sample of one of the new crafts! This paper plate boat uses just a few craft materials, and it is very cute! Keep reading to see our VIDEO!
To make this craft we used:
- White paper plate
- Blue paint in two tones
- Craft foam sheets
- Craft stick
- Craft knife and Cutting Mat
Invite your child to paint the paper plate – lighter blue for the sky and darker blue for the ocean.

Insert the craft stick through the cut and make the boat bob up and down on the waves!

Here’s our video!

More Crafts

Best Dishes for Sailboats: Galley Dinnerware Plates

Last Updated by
Elizabeth O'Malley
June 15, 2022
Wanna keep morale high on board? Choose the best dishes for your boat! Galley dinnerware can make (and hopefully not break!) meals underway and dockside.
Outfitting your galley -- whether you are dockside 90% of the time or a hard-core cruiser – means picking the proper dishes and glassware for safe, easy, enjoyable meals. From material to motif, consider the following when shopping for bowls, platters, mugs, and more!
Many sailors have amassed a mishmash of galley items over the years, and, while some are always going to be appropriate, newer options are making galley-stocking decisions more diverse from both functionality and aesthetic angles. Whether it’s the way a plate stays in place when heeled over 30 degrees or the way a wine glass feels in your hand, on your lips, and when it crashes to the deck, you’ll want to consider your personal dinnerware preferences and design taste as you outfit or upgrade your galley.
As a person who spends a lot of time on both sailboats (and, yes, power boats) and as a person who loves to entertain family and friends on board, I have come to appreciate the interplay of how dinnerware works, stows, and looks.
Table of contents
Best Dishes For Sailboats
Plates, dishes, and bowls can be made from the same materials as dinnerware in a landlubber’s kitchen, but boat life presents different considerations for the composition of galleyware. Here are various options for galleyware, presented in order of my least to most favorite:
Disposable and Paper Plates for Boats
While paper plates are easy and disposable, the mere thought of a true sailor opting for such an environmentally-antagonistic product makes me a bit seasick. Literally, the disposable nature of today’s society is making our seas sick and why any self-respecting sailor would opt for this, I simply can’t fathom.
Stainless Steel Plates and Bowls for Boats
Stainless steel – plates, bowls, mugs, and glasses – can certainly stand up to the rigors of boat life, much as they do for camping life, but dropping a stainless plate on pine-needled forest floor versus the deck of a boat has different outcomes. Yes, stainless steel, with regular use becomes pretty dented and we’ve had plates get bend-y and not flat after a while. Possibly more so than the denting, I just don’t like the taste of metal or the sound of metal while I’m eating. Clink, clink, clink. While I do like the clink, clink, clink of a halyard at night (yes, I know, many people hate that sound), I don’t like the sound of utensils clinking on a metal plate. And food really does taste differently when served on metal. It does, really! Having said that, if you feel compelled to go with stainless steel galleyware, here’s a complete stainless galleyware set folks seem to like. Candidly, I’m kind of a sucker for the “packaging” of these various pieces -- but practically it does seem like a good option for people who may step ashore for some hiking (or even beach camping which some pals of mine do because they “sail to surf” all over the world!).
Although it doesn’t necessarily fit in the “plate-dish-bowl” category I’m covering in this article, one stainless steel galley item that you may want to add to your wish list (especially if you do a lot of onboard cooking) is this set of nesting stainless steel cookware . It is 100% 18-10 marine-grade stainless steel and a real space saver. When nested, it stores in less than 1/2 ft³ of space. While I haven’t used it before, to me this stainless tiered, multi-step lid that can work for different sized pots and pans seems like it’d be helpful to have on hand.
Plastic Plates and Bowls for Boats
Plastic is a popular option and, admittedly, I’ve got plastic drink tumblers that get regular use. I sort of feel like plastic is just one step above paper relative to its environmental impact but I can’t argue that it stows well, is lightweight, takes a beating and (unless it’s a more brittle plastic) rarely breaks or shatters. Over the years, most of my food storage containers are plastic – and the only real negative with that is they’re prone to absorbing color and odors, which seems even more prevalent in damp boating conditions. I started with a version of this lightweight, unbreakable plastic dinnerware a while ago, and it may suit your needs if you’re comfortable with plastic and not too considered about attractiveness.
One of the clear advantages of plastic is that it can be microwaved -- and in some cases put in the oven (typically at no more than 300 degrees and for no longer than 45 minutes if you take it from freezer to oven). If you’re a big fan of the microwave, plastic definitely is a leading contender for galleyware.
I recently visited with a friend and her husband who were on the Intracoastal and docked in nearby Beaufort, North Carolina for several days. I fell head over(board) heels for the personalized plastic plates they had on their boat. It came as a big surprise to learn that she had purchased the plates from Amazon and, while $20 a plate is more than I think I want to spend, if you want to keep up(wind) from the Jones, you can check these fun, classic customized plates out for yourself right here .
Plastic is probably the most common material that I see folks using, and I definitely get the benefits of it. Like paper plates, though, for me, it has a pretty substantial drawback -- it’s just so not eco-friendly.
Wooden and Bamboo Plates and Bowls for Boats
Wooden galleyware has a nice warm feel to it, and aesthetically, at least for me, it often works well with a boat’s appearance. Wooden plates and bowls are great in terms of the breakage and the bounce-factor and they can hold up to regular use. When stored and not used on a regular basis, though, I have seen wooden galleyware deteriorate from the damp environment typically associated with boats; however, when I was in San Diego for a decade, the desert-like dry air (even dockside) never impacted the bamboo trays that we used on board.
I still have an earlier version of this wooden galleyware ,and every now and then still use it casually (but not for impressing guests). If wood is your thing, they do last well but will eventually begin to splinter here and there. These bamboo plates are nice because of their square shape – they seem to take up less space than round plates but maybe that’s just my imagination. My wooden beer mugs always elicit a variety of comments – mainly the surprise that there’s even such a thing as a “modern” wooden beer mug. And these coconut shell bowls are also a fun favorite due to both their depth and their material. They are not supposed to be used for very hot items but I’ve served soup in them before -- just not piping hot, burn-the-roof-of-your-mouth hot.
Melamine Plates and Bowls for Boats
My absolute preference for dishes and plates on the boat – and my ever-growing collection of it reflects my affinity for it – is melamine. Like plastic, it’s fairly lightweight and stacks well without sliding around too much (and options with non-skid material on the bottom alleviates this issue). Melamine galleyware comes in soooo many attractive designs – that rarely fade and hold up well to rough-and-tumble boat life. The biggest negative to melamine is that it is not microwavable. So, a quick reheat of last night’s leftovers can’t happen on those cute anchor or nautilus shell-themed plates. For me, that’s a tradeoff that I’m comfortable with but if you’re a leftover hound (and use the microwave a lot), keep that con in mind.
Melamine isn’t a whole lot better for the environment than plastic -- it’s actually just really hard plastic. Sigh. It just seems like the design options (both dimensions and graphics) are better and, dare I say, classier than plastic. In my mind, melamine is like the Nordstrom of plastic so if design and appearance really matters to you, I suspect you’ll find much better choices than with plastic. As an example, I love this setting for four for its minimalist in design -- it can be mixed and matched with various patterned napkins, charges, placemats, etc. A plastic version of this would look and feel, well, chintzy.
If your see-worthy taste tends toward nautical (and isn’t that way you’re here on this site?) this melamine set with a nautical flag design might just appeal to your sail flag fetish. There is a third melamine set that I have my eye on and it is from a small, woman-owned business (Relish in Atlanta). This style marries the look of pottery with the efficient ease of melamine.
Bowls on Board Sailboats
While not something one might think to consider when acquiring galleyware, you should definitely ponder the seemingly simple bowl before you buy. Bowls by nature are intended to corral foodstuffs that don’t cooperate with a flat surface, i.e. a plate or dish. When sitting still on land or even standing at a cocktail party, it’s fairly easy to eat off of a plate without too much risk of food falling or sliding off. But it goes to a different level of complexity on a boat -- which means that bowls become much more often used vessels for meals.
Bowls come in different sizes (as you can see with the three different melamine set options I have already linked) and size matters. It’s sometimes better to get a bigger bowl (20 oz versus 16 oz) so you can put the same amount in the bowl but the contents don’t come up as high on the sides of the bowl – just in case you’re eating while it’s a big rough on the water. No one likes to see their Rice Krispies sloshed onto the deck…
And because the contents of bowls tend to be more slippery than plated items (think cereal versus sandwich), anti-skid bowls are definitely something to look for. I recommend purchasing more than you think you’ll need -- all the same size because you want them to be nesting and stackable. The more variety you have the less likely that they’ll nicely cozy up with one another and then you’ve got a jumbled mess in your galley cabinets. I’d recommend this good looking and versatile stacking, nesting, anti-skid bowl , recognizing that it is melamine and not recommended for microwave use. For something of the microwave-friendly variety that apparently is eco-friendly, check into this set of eight deep and large (30 oz!) bowls . (Note: they do not have the non-skid feature.)
While i think it goes without saying, I’ll mention it just in case: anti-skid or non-skid/non-slip features are certainly helpful to have on plates too. It’s not just bowls that move around.
Using anti-skid placemats can be another way to address the slip-slide challenge. Some placemats are non-skid between the mat and the tabletop, and others are non-skid between the mat and the plate or bowl on top of the placemat. The latter are often made of silicone which grips both on the top and the bottom side. Regretfully, I have yet to see a really attractive silicone placemat but the light gray one linked here is neutral and at least not primary-color childish or amusement-park garish like most of the other silicone mats that I have seen out there.
There are plenty of dinnerware material options from which to choose when it comes to having a well-stocked galley, regardless of whether you’re a solo sailor or the hostess with the mostess. You may have learned some of your preferences through trial and error and hopefully I’ve covered (and linked) some unique plate, dish, and bowls considerations here. In a future article, I will provide an overview of some of the best beverage containers and family-style serving pieces for boats that have made for plenty of convenient, fun, and fine dining experiences on the water. When you’re on the water and the food is good and it stays where it is supposed to stay, you can be pretty sure that the crew’s morale (and the cook’s too) will be better than shipshape!
Related Articles
Elizabeth has sailed Sunfish, Catalinas, Knarrs, and countless other boats. Forty years later, she finds herself back on the waters of Bogue Sound, where she lives and sails with her daughter, Morgan, and chocolate lab, Choco.
by this author
Most Recent

What Does "Sailing By The Lee" Mean?
Daniel Wade
October 3, 2023

The Best Sailing Schools And Programs: Reviews & Ratings
September 26, 2023
Important Legal Info
Lifeofsailing.com is a participant in the Amazon Services LLC Associates Program, an affiliate advertising program designed to provide a means for sites to earn advertising fees by advertising and linking to Amazon. This site also participates in other affiliate programs and is compensated for referring traffic and business to these companies.
Similar Posts

How To Choose The Right Sailing Instructor
August 16, 2023

Cost To Sail Around The World
May 16, 2023

Small Sailboat Sizes: A Complete Guide
October 30, 2022
Popular Posts

Best Liveaboard Catamaran Sailboats
December 28, 2023

Can a Novice Sail Around the World?

4 Best Electric Outboard Motors

How Long Did It Take The Vikings To Sail To England?

10 Best Sailboat Brands (And Why)
December 20, 2023

7 Best Places To Liveaboard A Sailboat
Get the best sailing content.
Top Rated Posts
Lifeofsailing.com is a participant in the Amazon Services LLC Associates Program, an affiliate advertising program designed to provide a means for sites to earn advertising fees by advertising and linking to Amazon. This site also participates in other affiliate programs and is compensated for referring traffic and business to these companies. (866) 342-SAIL
© 2024 Life of Sailing Email: [email protected] Address: 11816 Inwood Rd #3024 Dallas, TX 75244 Disclaimer Privacy Policy
11 Best Items for Your Money at Sam’s Club in May 2024
1. sealy memory foam mattress: online only. quality sleep at a discount., 2. bounty paper towels: stock up for memorial day messes., 3. ball park hot dogs: perfect for summer cookouts., 4. lay's potato chips: essential bbq snack., 5. banana boat sunscreen: stay protected all summer., 6. hefty trash bags: cleanup made easy., 7. hefty disposable plates: convenient for gatherings., 8. lasko tower fan: beat the heat with style ., 9. kingsford charcoal: grill like a pro., 10. cuisinart grill tools: upgrade your grilling game., 11. kristen sectional: online only. stylish comfort for less., discover more stories.
COMMENTS
Rectangle - begin with a rectangular sheet like A4 or Letter-size paper. If you used a small paper plate to make your boat, you may need to cut the paper in half for a smaller sail. Fold one top corner of the paper down to meet the opposite edge, forming a triangle. Cut and discard the excess paper below the triangle.
Variations of the Paper Plate Boat. If you want to take the paper plate boat craft a step further, here are some variations for you: Use light cardboard instead of paper plates. Give the boat a 3D element with clay or pipe cleaners. Make the sailboat out of recycled materials. Making a paper plate boat is the perfect way to combine a simple ...
6480shares. My kids love interactive crafts and we've just added a super fun Summer themed Interactive Paper Plate Sailboat to our growing repertoire. Kids will be unable to resist the lure of singing 'Row Row Row your Boat' as their sailboats cross the paper plate sea and with a swift spin, their boats can turn around and start all over ...
A sailboat craft is a fun summer idea for kids. Take up a challenge and make one that's floating or use paper for a simple one for preschoolers. We made a paper plate boat craft that combines a yarn sewing project with a free printable template. If you don't want to add the yarn threading step, you can use just one paper plate that you ...
per rocking boat, you will need one paper plate. paper for the sail (you may want to draw a triangle for the children ahead of time - use any paper - old art projects, construction paper or even origami paper) crafting sticks (you can use coffee stirrers or wooden skewers with the sharp bits cut off) star hole punch (optional) coloring pens.
Step 1: Folding the Hull. To make the hull of a paper sailboat, follow these steps: - Step 1: Start with a square piece of paper. - Step 2: Place the paper in front of you in a diamond shape, with one corner pointing towards you. - Step 3: Fold the bottom corner up to meet the top corner, creating a triangle.
Ready to set sail on a vibrant paper boat?Make the best out of waste materials in this fun activity and teach your child the art of reusing!Parental Involvem...
First take your paper plate and fold it in half. Then, take your blue paper and cut it into wavy strips to create your ocean waves. Glue your paper strips across the front half of your paper plate and put it aside to dry. Whilst your ocean is drying it's time to make your ship! Cut out a trapezium shape for the base of your boat and then glue ...
Join Miss Laura for another craft at home. This week learn how to make a Paper Plate Sail Boat with these supplies:Paper PlateStaplerPopsicle Stick or Wooden...
After giving the paint on your paper plate plenty of time to dry, set them aside for a minute while you make the sails. First, cut one triangle out of your cardstock or construction paper for each boat you plan to make. Then, glue the triangle sail to one one end of a popsicle stick. Make sure to leave plenty of room at the bottom of the stick ...
How to Make a Paper Plate Boat Craft. Step 1. Draw a line down the center of the paper plate. 2. On one side of the plate draw a triangle. Then cut along the lines. I made two sides of the triangle curved. I did this so that it looks like the wind is making the sail billow out.
Step 1: Start by painting the outside of the paper plate brown. Step 2: While the paper plate is drying, print out the pirate boat template and cut out 2 rectangle top parts out of yellow cardstock paper, 3 boat windows and one flag out of black cardstock paper. You can cut out the pirate skull yourself with the use of a craft knife or you can ...
Paper Plate Sailboat. And of course, no craft activity list is complete without a paper plate craft! Yes, you can use up those extra paper plates and turn them into a sailboat. Cork crafts Mini Beasts and Boat. And here's one more fun cork craft you can get your toddler to engage in. And yes, it is super easy too. Tub Boat Craft
2D Paper Sailboat Making Out of Color Paper for makers. Its a DIY origami sailing boat making video tutorial where I've shown how to make a paper boat that h...
Paint half of the paper plate royal blue as the ocean and sky blue for the other half. Draw a sun on yellow construction paper, cut it out and glue it on the paper plate. Cut out our free printable summer sailboat drawing template then place it on the paper plate. This DIY sailboat craft will give children a variety of ways to play it.
Paper Plate Boat. Grab a paper plate. If it's similar to the pirate boat template, that would make it easier for young children to trace the template onto the paper plate. Cut the paper plate in half. Trace the ship template onto the paper plate and cut out the deck. Or simply cut a step out of the center of the ship.
Paper Plate Boat. July 17, 2019 By Stef. Sharing is caring! 326. This paper plate boat is a fun summer craft for kids. It's easy to transform into a pirate ship, a cruise ship, or another vessel.
PAPER PLATE SAILBOAT CRAFT -Kids will love making their sailboat sail across their paper plate ocean....
Instructions. Gather tools and materials. Cut pieces according to the template. We cut the chipboard with the Cricut set to custom material - chipboard - more pressure, cut twice. You can also print out the template, trace onto chipboard, and cut with a craft knife. Cut packing tape into smaller strips (if needed).
To make this craft we used: Invite your child to paint the paper plate - lighter blue for the sky and darker blue for the ocean. While the paint is drying, cut some sails and hull shapes from the craft foam. Attach the boat parts to the top of a craft stick. Use a craft knife to cut a wavy line into the lower part of the ocean (this is a job ...
A fun activity for a birthday party or classroom, this craft kit will change the way kids look at everyday items like paper plates. Glue is required to complete the craft. Includes self-adhesive foam pieces and yarn. 9" Makes 12. All craft kit pieces are pre-packaged for individual use.
Check out our sailboat paper plates selection for the very best in unique or custom, handmade pieces from our plates shops.
Plates, dishes, and bowls can be made from the same materials as dinnerware in a landlubber's kitchen, but boat life presents different considerations for the composition of galleyware. Here are various options for galleyware, presented in order of my least to most favorite: Disposable and Paper Plates for Boats
Bounty Paper Towels: Stock up for Memorial Day messes. 3. Ball Park Hot Dogs: Perfect for summer cookouts. 4. Lay's Potato Chips: essential BBQ snack. 5. Banana Boat Sunscreen: Stay protected all summer. 6. Hefty Trash Bags: Cleanup made easy. 7. Hefty Disposable Plates: Convenient for gatherings. ...