

The $tingy Sailor
Diy trailerable sailboat restoration and improvement without throwing your budget overboard.
Refinish Your Interior Teak to Better Than New
One of the things about older sailboats that I appreciate most is their abundance of teak woodwork. As a woodworker, I admire good craftsmanship, creative design, and a fine finish. It’s harder to find on today’s modern sailboats. Teak is in short supply so it’s more expensive than it once was and most modern sailors don’t want to spend time maintaining their brightwork. For the rest of us, beautiful teak appointments are an opportunity to set our sailboat apart from the rest and a sign of pride of ownership. Few improvements freshen up a sailboat’s interior like well maintained woodwork.
Before I continue, a bit of legal housekeeping. This post contains affiliate links. That means I receive a small commission if you make a purchase using those links. Those commissions help to pay the costs associated with running this site so that it stays free for everyone to enjoy. For a complete explanation of why I’m telling you this and how you can support this blog without paying more, please read my full disclosure .

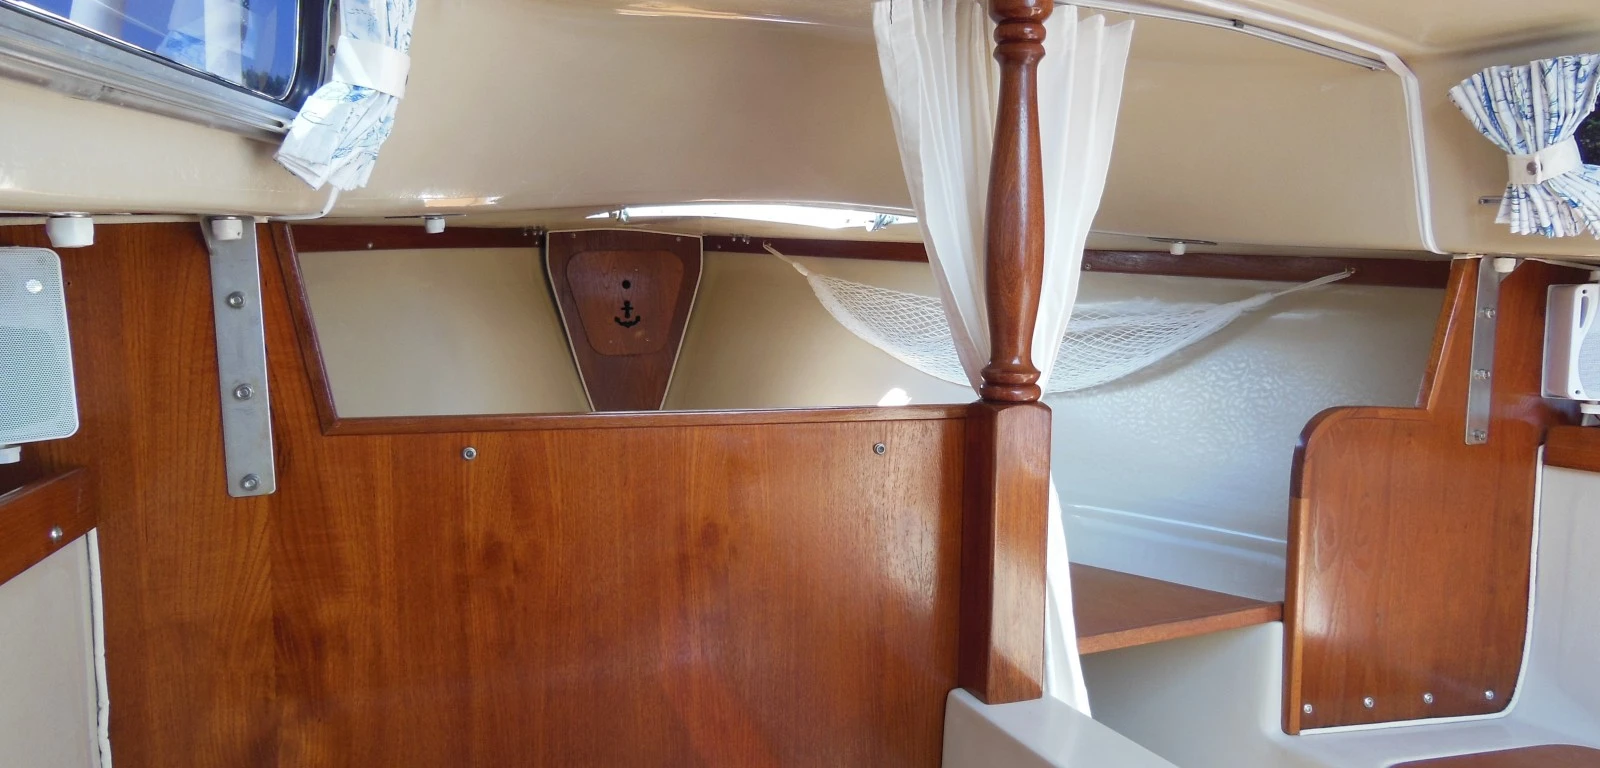
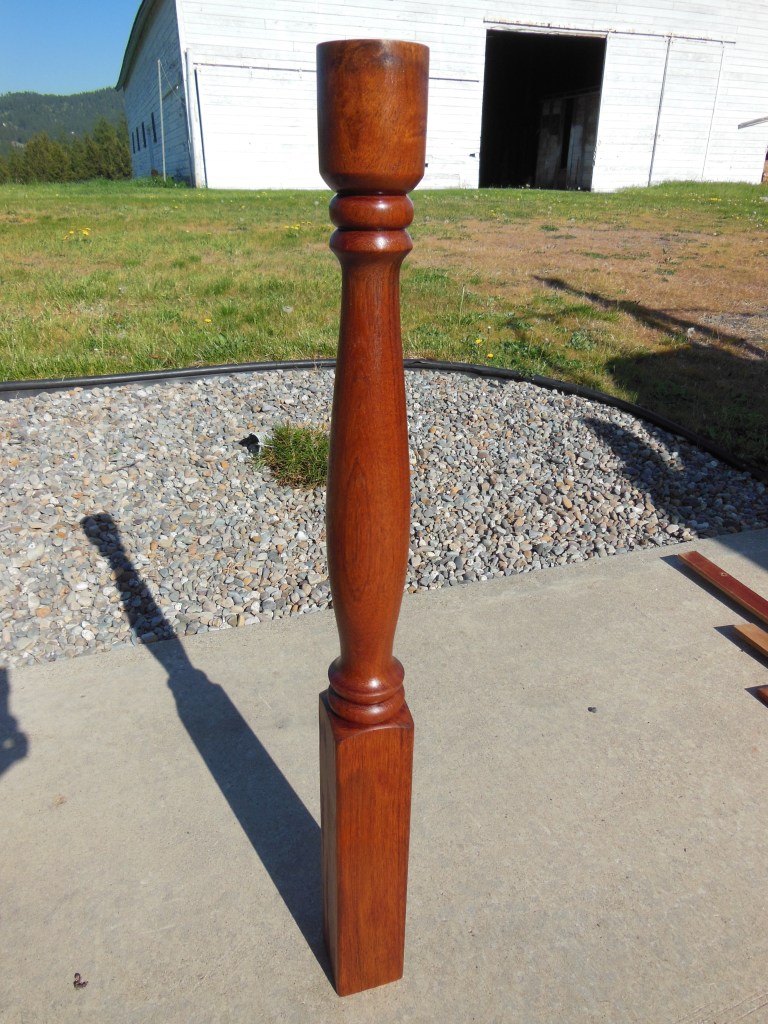
Catalina Yachts was generous with the teak woodwork in their first generation sailboats, less so in the “new design.” The forward bulkheads and removable panels except for the locker lids are marine grade teak veneer plywood. Solid wood was used where it made the most sense: handrails, trim, compression post, and moldings.
The down side of wood in a sailboat is, of course, water damage. Teak is very water resistant; it contains a lot of natural oil. But it’s not invincible and if neglected for too long it will begin to look more like firewood. Ultraviolet light can bleach the color, persistent deck leaks can delaminate plywood, and sustained humidity can foster mildew and add to that old boat smell. The best defense is a durable finish.
An inch of teak is a terrible thing to waste
You have a lot of options to choose from for a finish. They run the spectrum of cost, ease of application, performance, and appearance. Some finishes are better choices for some locations on a sailboat than others. Protection from the elements is most important for topside brightwork; UV resistant and waterproof. Below deck, the finish should also be water resistant but ease of application is also very important so that the finish can be repaired or reapplied without having to remove all of the woodwork from the sailboat as I show here.
Most experienced skippers have a favorite finish that they recommend and there is little consensus among them. Before you begin refinishing your own woodwork, it’s worth spending some time looking at other sailboats and talking to their owners to help you decide on a finish for your own sailboat. If your teak already has an aftermarket product on it like Cetol or a spar varnish, it might be best to stick with that product rather than try to strip it all off so that you can apply something else.
For woodwork that gets a lot of use and abuse, like the companionway step lid on a C-22, consider applying a more durable finish like polyurethane, epoxy, or non-skid material like I describe in Turn Carpet Remnants into Custom Floor Mats .
Get started on that finish
Here are the basic steps that I follow to refinish interior teak:
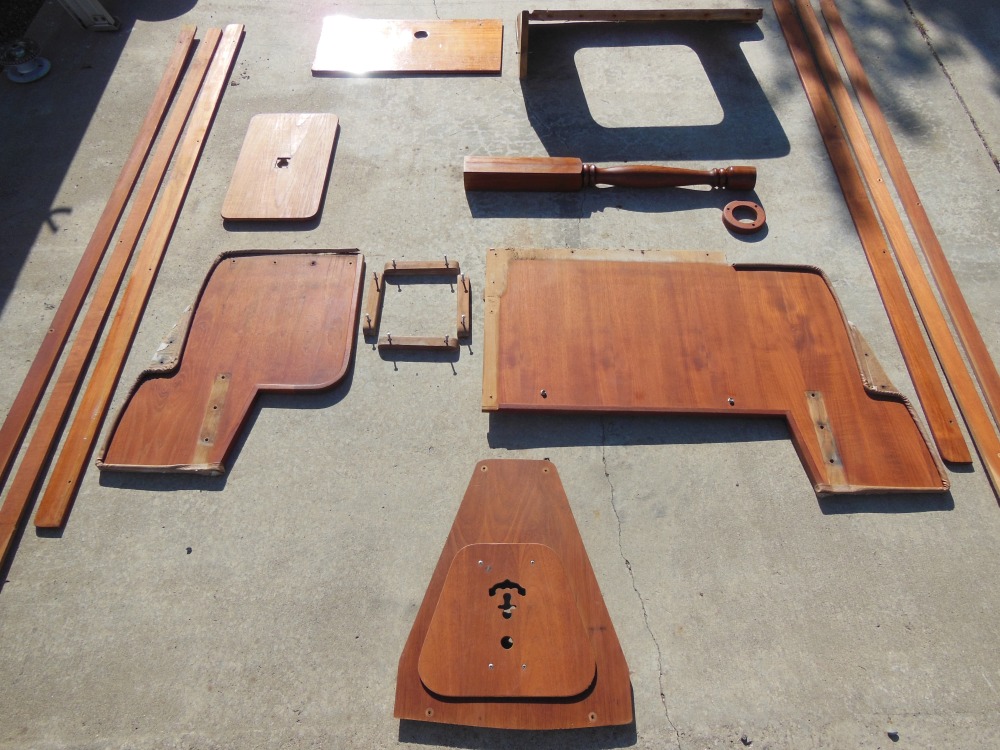
1. If the wood has never been refinished or if the existing finish is in poor condition, remove it all from the sailboat so that you can work on it easier and apply the finish to all the surfaces.
2. Remove all attached hardware (screws, snaps, etc.) and other non-wood materials like vinyl welting.
3. If there is any visible (black) mildew, apply a mild acid like white vinegar or diluted laundry bleach to remove it completely, especially in the grain and any recesses. Test first in an inconspicuous spot. You might have to bleach the entire part to get even coloring. For more about bleaching prior to applying a finish and using oxalic acid, see Restore Your Exterior Teak to Better Than New .

3. Use a sanding block with 220 and 320 grit open face paper to sand all the exposed surfaces smooth. Since the wood is so hard and oily, it takes such fine sandpaper to remove all the sanding marks and bring out the beautiful grain and coloring of the teak.
4. Wipe all the parts thoroughly with a tack rag to remove all sanding dust from the pores and grain.
5. Wipe all the parts thoroughly with a clean cloth wetted with acetone. This will remove surface oils that can prevent the finish from soaking into the wood.
6. Apply the first coat of finish. If you chose a spar varnish, thin it with the maximum amount of thinner recommended by the manufacturer. This will help the first coat to soak in more and provide an excellent base for the subsequent coats. With the first coat of teak oil, the color of the wood will really warm up and the grain will start to show some depth. It will get better with every coat.

7. When dry, if you chose a spar varnish, lightly sand with 220 or 320 grit open face sandpaper to remove any dust particles that may have settled on the surfaces.
8. Apply additional unthinned coats to achieve the desired thickness and appearance. If you chose a spar varnish, sand after each coat except for the last coat. If you chose teak oil, lightly polish after each coat with a clean cloth while it is still damp, then allow it to dry completely before applying the next coat.
9. If your sailboat has welting where the wood panels meet the fiberglass hull liner and they’re ugly or decaying, now is a good time to replace them. You can make new welting out of synthetic cord from a fabric store covered with vinyl or another material. For more on making welting, see How to Sew Cabin Cushion Covers .
10. Replace the parts in the sailboat but leave it open with good air circulation until all the fumes dissipate. If you chose teak oil, it is slow to harden and it can take a couple of weeks for the fumes to go away completely.
After you refinish your interior teak, it might make the exterior woodwork look worse. To read about my different process for refinishing topside brightwork, see Restore Your Exterior Teak to Better Than New .
I’ve worked with tropical woods before in various woodworking projects, but I’ve come to love teak for its golden, irregular coloring, interesting grain patterns, weather resistance, and durable hardness. After you work with it, you’ll understand why it’s been the go-to wood of boat builders for hundreds of years. I plan to use it in several future projects that I have in mind. For some easy and practical woodworking projects and how to use other hardwoods that look like teak but are more economical, see:
Make a Door to Storage Space Under the V Berth Make a Door for More Storage Under the Galley Make this Easy and Elegant Wine Glass Rack Add More Cockpit Seating With DIY Stern Perch Seats Make This Fold-Up Paper Towel Holder
Would you like to be notified when I publish more posts like this? Enter your email address below to subscribe to this blog and receive notifications of new posts by email. You will also receive occasional newsletters with exclusive info and deals only for subscribers and the password to the Downloads page. It’s free and you can unsubscribe at any time but almost nobody does!
Share this:
19 thoughts on “ refinish your interior teak to better than new ”.
Just this morning I removed all of the interior wood on my Precision 23 and plan to follow your good instructions. Just curious – did you treat the mildew the same as you explained for your outdoor teak restoration project?
My interior teak was in pretty good shape so I didn’t have to, but I would have done it the same.
Good luck with your project!
OK, the mildew in your “before” picture must have come off during sanding. I’ll hope for the same. By the way, the links to Daly’s Wood Finish in your exterior teak page are dead – you might want to update these especially if it helps pay for a few bills!
Exactly right, Tom. It was just on the surface and came right off with light sanding. The exterior mildew had penetrated deep into the wood so it had to be treated chemically.
Thanks for the heads-up about the links. They’re fixed now.
Love your site! I am a Navy Veteran in SoCal looking to buy a cheap Catalina 25 for my first boat. You have given me inspiration to not only go ahead searching but great ideas for getting a great discount for things that look like easy DIY.
Dear Stingy Sailor,
I bought a Catalina 22 ( 70-something) just a few weeks ago. I’m toatally in love with it.
The bed in the front is just to small for me, so I’m thinking about removing the ‘wall’ between the front and the bench on the stirn side. All catalina 22 but one that I’ve seen on the net have this metal bracket that seems to connect the mid stay to this wall.
Do you have a reccomendation: is it really neccesary the keep it there or not so much? . Hope I’ll here from you.
Kind regards, Robert Amsterdam, Holland
Yes, the forward wooden bulkheads between the V berth and the main cabin area are CRITICAL structural components. They transfer the force of the upper shrouds down to the hull. If you remove them, you could severely damage your sailboat.
Instead, I’d recommend you remove the galley from the starboard berth so you can stretch your feet out under the cockpit. It’s narrow, but it should be long enough for you. Another alternative is to lower the dinette table to make the port berth and use the portable toilet compartment cover boards and an ice chest to fill in the center aisle and make a large berth in the salon area. This is how my wife and I sleep when anchored out. It’s quite spacious. You can see how we do it toward the end of How to Sew Cabin Cushion Covers

Thanks for your question.
Met Vriendelijke Groeten, $tingy
Am I understanding you correctly? You oil outside teak and then varnish it???
That’s right, Jim. Especially if you bleach it first. That takes almost all the color out of it. The oil brings it back.
$tingy, earlier this week I started the task of conditioning the teak on my Cat 22 with teak oil. I started with the crib boards and now am planning to move interior. I am a little apprehensive to pull the interior teak out. More so, just not sure how to go about it. Any tips?
Hello, Shanna
It all comes out pretty easily without many tricks. All of the fasteners are relatively easy to access except the four small machine screws along the bottom of each forward bulkhead. The nuts are inside the adjacent lockers so you have to be a bit of a contortionist to hold them yourself or have a helper hold them while you remove the screws.
Label each piece so that you know where it came from and keep the fasteners together for each piece. Sandwich bags work well for this. Taking pictures as you go can help too. There are several different sizes and types of fasteners used and it’s important that you replace the same sizes in the same locations.
The trickiest part of the job is reattaching the pieces. The screw holes can be randomly spaced and difficult to realign, especially for the long, thin strips along the hull/deck joint. But once you get a couple screws started, the rest should go easier.
It’s also important that the bulkheads are firmly anchored at the top by the chain plates and the bottom by those four machine screws. The bulkheads transfer the force from the upper shrouds to the hull so you don’t want them to be loose or your rig won’t stay in tune. For that reason, be sure the bottoms of the bulkheads aren’t rotted and soft.
Best of luck with your refinish. Let us know how it turns out! $tingy
Hello $tingy, I have my exterior teak sanded, bleached and ready for finish. Have you heard anything about using Starbrite teak sealer for a couple coats, then varnishing with the same varnish you used for another 5+ coats? Also did you use varnish on your interior or just the teak oil? If just teak oil, did it have a bit of gloss? Thanks for ALL the helpful tips!
Hi, Christian
I haven’t heard of anybody using sealer only under varnish but someone may well have tried it. I don’t see much purpose to it, though. Seal coats are typically just thinned varnish so that it penetrates, which is the same process that Epifanes recommends when applying their varnish.
I use only teak oil on my interior teak and yes, you can build it up to a nice gloss if you want to but it will take 3-5 coats to get there, whereas you could just apply one or two coats of varnish over one coat of teak oil and achieve much the same result.
Hope that helps!
Thank you for sharing this informative article! All the information provided by you is really very helpful for all. I agreed that by using tack cloth you can keep your project dust-free and it is useful for cleaning fine dust off a surface. Everyone should follow the tips provided by you, it will make their work easier. Keep Posting! Keep Sharing!
This couldn’t have come at a better time for me, just about to do some interior teak work before we fit a new teak and holly sole
I really appreciate your article. I am in the process of stripping all of the think varnish from the teak handrails and fittings on my grand banks trawler and was thinking about going with just teak oil instead of using a urethane finish. Does the oil leak on to the gelcoat over time? Was also considering maybe using awlwood which is water base but requires 8 or more coats.
No, it dries hard like the linseed oil in oil based paints.
Hello, We tried to take unbolt the starboard bulkhead where the chainplate is located due to some rot at the bottom the bulkhead after a leak started from the plate of the middle shroud the top of the chainplate on deck. It was very difficult to reach in and get a hold on the bolts! We also found that the bolts were not flush with the teak plywood wall. But were hanging out a few inches. Can the bulkhead be taken out by itself without removing other pieces? How do you get a grip on the bolts inside the interior area? We are fixing the deck leak with cleaning, polyurethane sealant, new slightly longer screws, backed up by Butyl tape. Also, I am considering using Git Rot for the bottom of the bulkhead rot for this season and taking out this bulkhead in the fall. Do you think that is a good solution? Thank you, Doris
Hi, Doris Yes, they’re hard to reach but critical that they provide a strong connection between the bulkhead and hull liner since they transfer all of the load of the upper shrouds to the hull structure. You might need to have a helper hold the nuts while you turn the screws. The original screws aren’t extra long so it sounds like a previous owner installed whatever they had on hand. You can remove the bulkhead for repair or replacement after slackening the shroud and disconnecting the chain plate. I recommend that over any quick fix that might not be strong enough.
Leave a comment Cancel reply
This site uses Akismet to reduce spam. Learn how your comment data is processed .

- Already have a WordPress.com account? Log in now.
- Subscribe Subscribed
- Copy shortlink
- Report this content
- View post in Reader
- Manage subscriptions
- Collapse this bar

Home » Blog » Live on a boat » Give your boat interior a fresh look
Give your boat interior a fresh look
By Author Fiona McGlynn
Posted on Last updated: August 4, 2023
12 AFFORDABLE BOAT INTERIOR DESIGN IDEAS
When we first moved aboard, our sailboat interior was a mess and we didn’t have the money to update it . We wanted to go cruising and our priorities were things like new sails, rigging, fiberglass repair, and electronics.
As much as I wanted a beautiful boat interior it was impossible to justify hiring an interior designer or updating the upholstery when we didn’t even have a dependable bilge pump! Fortunately, I found some creative boat interior design ideas and was able to makeover our sailboat for next to nothing.
In addition to sharing our boat interior restoration ideas, I’ve included my favorite boat interior photos from Pinterest and Instagram to further stoke your inspiration!
A quick note that this post contains affiliate links (so if you purchase through a link we’ll earn a small commission). The opinions are our own.
1. START BY DEEP CLEANING
As un-fun as it might be, a deep clean is the cheapest way to radically brighten your interior. It’s especially affordable if you use homemade boat cleaners. Dirty boat upholstery, mildewed cabin liners, and salt-encrusted hatches made our boat feel damp, dark, and generally unpleasant.
Deep cleaning (after years of neglect) drastically improved the boat cabin’s appearance and gave me a better idea of where to focus our boat interior makeover.
- Professionally launder your upholstery
- Wipe down the cabin liners with vinegar to prevent mildew and mold
- Wash hatches to maximize natural light
- Clean under all the cabin soles and the edges of any rotting boards
- Wash the walls and treat any wood with the appropriate wax, oil, or varnish
- Scrub out the bilge to prevent that boaty smell.

2. INSTALL INTERIOR BOAT LIGHTS
One of the great challenges of sailboat interior design is lighting. I’ve always felt that living on our sailboat is like living in a basement apartment because it is totally lacking in natural light !
One of the quickest ways to brighten things up is to install marine LED lights. The key to making LED boat lights look great, is placement.
The 3 best places to places to put LED strip lights on a sailboat
1. Under counter lighting. They look especially nice under cupboards or overhangs because the light strip is hidden.
View this post on Instagram < New battery installed! Lights and radio work. There’s LED strip lights which are great, but in the future we may need to swap those out for the multi colored ones. Our house has party-mode, the boat should too! #catalina22 #sailing #boatlife A post shared by SV Buza Sasha (@sv_buza_sasha) on Jul 11, 2018 at 5:18am PDT
2. LED rope lights make great courtesy lights . Tuck strip lighting on either side of a walkway to help guests navigate in the dark.
Battery operated fairy lights look cute coiled in a jar of seashells and are another easy way to add decorative lighting because no wiring is required. For the same reason, Solar Luci lamps and Solar Luci strings are a great option for lighting the cockpit.
3. COZY-UP TO NEW BEDDING
Ditch those damp cotton sheets and invest in hydrophobic options like 100% polyester. If you have a vberth, quarter berth, or non-standard sized bed, you may want to spend a few extra bucks on custom fitted boat sheets.
I know many cruisers who swear by memory foam mattresses and the Hypervent mattress pad for preventing condensation. If you like duvets and comforters, consider a mulberry silk option because it’s mold and mildew resistant.
4. FRESHEN THE HEAD
Add a splash of color to a dark bathroom with cheerful microfiber towels , Or, if you don’t want to feel like you’re camping, try the more luxurious quick-drying Turkish towels .
Tie them in with a cute wall-mounted soap dispenser and a spill-proof whicking air freshener and you’re on your way
5. GO GALLEY GOURMET
- Replace a rusted or dull faucet with a sparkling new one with a pull-down sprayer.
- Splash-out with colorful dish towels
- Use biodegradable loofas and scrubbies instead of plastic
- Pick up non-breakable dishware and glassware in fun patterns and designs.
- Create extra space with chopping board stove and sink covers
- Add custom knife, wine, and spice racks
- Add a green bar to keep greens fresh without a fridge
View this post on Instagram Boat decor #sundance #sailboat #sailboatlife #sailboatlifestyle #1969 #tartansailboat #sailboatinteriordesign #sailboatinteriors #maltetaller A post shared by Sundance Sailboat (@sundancesailboat1969) on Aug 15, 2017 at 5:32pm PDT
6. BOAT INTERIOR UPHOLSTERY IDEAS
Reupholstering a boat is the single most expensive part of a sailboat interior refit but it makes a huge difference. It costs thousands of dollars if you hire someone to do it. Fortunately there are a few tricks we used to avoid a full upholstery overhaul.
- Fun throw cushions and blankets can give your interior new life (and cover stained or threadbare upholstery)
- Packed out seat cushions can be easily fixed by inserting a layer of high-density foam and batting on top of the existing foam.
- If your upholstery is in really bad shape you may want to sew elasticated cushion coverlets that go over the top side of the cushion (it’s also a good way to protect nice new upholstery from boat projects (see: dirt, grease, and sweat stains).
- You can reupholster your boat for a fraction of the cost if you do the sewing yourself. It’s possible to score good deals on durable materials and marine-grade fabrics online. Also, if you’re not a sewer but you’re going cruising, you may want to bring your boat interior fabric with you and have the cushions sewn up in a place like Mexico or Fiji. We eventually had all of our saloon cushions sewn up for $100 USD in Ensenada, Mexico.
If you choose to reupholster your boat, look for boat interior upholstery fabric . You don’t have to worry (as much) about finding a waterproof or UV-resistant fabric (because it will be inside). However, always choose a synthetic fabric , heavy-duty nylon thread, and plastic zippers. Cotton will eventually rot and metal zippers will rust. You can get away with not using marine upholstery but natural fibers are a big no-no!
7. CUT A RUG
8. LOVE YOUR WALLS
Securely fasten art, photos, and souvenirs to your walls. Mirrors are great for creating the illusion of space.
Privacy curtains are also a good way to add a splash of color and are straightforward to make
View this post on Instagram My husband’s an artist…the cat approves 🐙🤣 . . . . . #catvskraken #sailboat #chalk #artist #sailboatinteriors #chalkboardart #kraken #catsofinstagram #meow #liveaboard #fridayvibes #fridaymood #instamoment #talent #husbandskills #saltytails @sv_saltytails A post shared by Erin 🌊🌴⛵🐚👙☉ (@erin_svsaltytails) on Jul 27, 2018 at 2:42pm PDT
View this post on Instagram After all of the sanding, refinishing, painting, ripping out old floors and carpet, we’re really loving our space. There are more projects to do, but we’re enjoying the results so far! When we originally bought our boat back in December, we had enough time to take care of the “must do’s” so this summer we are spending the time to really make her ours! . . . . . . #lightandbright #sailboat #sailboatinteriors #woodwork #overhaul #huntersailboats #cherubini #interiordesign #laboroflove #tinyliving #liveaboard #boatlife #sailors #ourhome #takingabreak #fornow #summerprojects #traveler #travelblog #results #saltytails @sv_saltytails A post shared by Erin 🌊🌴⛵🐚👙☉ (@erin_svsaltytails) on Jul 22, 2018 at 11:27am PDT
9. WHITEN AND BRIGHTEN YOUR SAILBOAT INTERIOR
Painting panels in light colors can brighten and modernize a boat cabin and set off teak trim. We repainted our red and blue fiberglass bathroom white and it made the space feel much bigger. It also makes it easy to clean because you can see the dirt.
View this post on Instagram #beforeandafter #boatrestoration #vintagesailing #menorca #sailing #boat #sailboat #sailboatinteriors #boatinterior A post shared by Velero Vintage en Menorca (@vintagesailing) on May 1, 2018 at 5:02pm PDT
10. STOW SIMPLY WITH CUTE STORAGE SOLUTIONS
Boats are always short on storage space but a few decorative baskets and storage containers can really improve the look of the space while giving you more room to tuck things away.
11. FUN AND FUNCTIONAL WINDOW COVERINGS
12. CHOOSE A FUN FEATURE
Let your imagination run wild. A feature wall, table, or piece of artwork can really change the feel of a sailboat interior. Have fun with colors, patterns, and make your new floating home your own.
View this post on Instagram #sailboat #boatlife #boatlifestyle #sailboatinteriors #ceder #liveedge #boatlifestyle #vancouver #boatinterior #art #windspirit #homesweethome #liveaboard #westcoastliving A post shared by @ arana_arte on Nov 2, 2017 at 9:13am PDT
If you’re still feeling overwhelmed about revamping your sailboat interior you may want to consider hiring professional help . There are plenty of interior designers who would welcome the challenge of working on a boat! Look for someone who has experience designing for small spaces and tiny homes.
We hope you enjoyed this list of custom boat interior ideas…
Good luck with your sailboat makeover.

Fiona McGlynn is an award-winning boating writer who created Waterborne as a place to learn about living aboard and traveling the world by sailboat. She has written for boating magazines including BoatUS, SAIL, Cruising World, and Good Old Boat. She’s also a contributing editor at Good Old Boat and BoatUS Magazine. In 2017, Fiona and her husband completed a 3-year, 13,000-mile voyage from Vancouver to Mexico to Australia on their 35-foot sailboat.
Terms and Conditions - Privacy Policy
How to restore a classic sailboat
Restoring a classic sailboat can be a fulfilling and rewarding process, allowing you to create a personalized vessel for exploring the open sea with your family.
How to Restore a Classic Sailboat
Restoring a classic sailboat is a labor of love that can bring immense satisfaction and pride to those who embark on this journey. It’s a chance to breathe new life into a vessel that has seen better days, and to create a unique and personalized space for you and your family to enjoy the open sea. In this article, we’ll guide you through the process of restoring a classic sailboat, from finding the right boat to the final touches that make it truly your own.
Table of Contents
Finding the right sailboat, assessing the condition, creating a restoration plan, hull and deck repairs, interior restoration, rigging and sails, electrical and plumbing systems, engine and propulsion, final touches.
The first step in restoring a classic sailboat is finding the right boat. This can be a challenging process, as there are many factors to consider, such as the size, age, and condition of the boat, as well as your budget and personal preferences.
When searching for a sailboat, consider the following:
- Size : Think about how much space you and your family will need, both for living and storage. A larger boat may offer more comfort and amenities, but it will also require more work and expense to restore and maintain.
- Age : Older boats may have more character and history, but they may also require more extensive restoration work. Be prepared to invest more time and money into an older boat.
- Condition : Assess the overall condition of the boat, including the hull, deck, rigging, sails, and interior. A boat in poor condition may be a good candidate for restoration, but it will also require more work and expense.
- Budget : Determine your budget for both the purchase of the boat and the restoration process. Keep in mind that restoration costs can quickly add up, so it’s important to have a realistic understanding of what you can afford.
Once you’ve found a sailboat that meets your criteria, it’s time to assess its condition in more detail. This will help you determine the extent of the restoration work required and whether the project is feasible for your budget and skill level.
Consider hiring a marine surveyor to conduct a thorough inspection of the boat. They can provide valuable insights into the condition of the hull, deck, rigging, sails, and other components, as well as identify any potential safety issues or structural problems.
Take note of any areas that require immediate attention, such as leaks, cracks, or signs of rot. These issues should be addressed before any cosmetic work is done, as they can compromise the integrity of the boat and lead to more serious problems down the line.
With a clear understanding of the boat’s condition, you can now create a restoration plan. This should outline the work that needs to be done, the order in which it should be completed, and an estimated timeline and budget for the project.
Start by prioritizing the most critical repairs, such as fixing leaks or addressing structural issues. Then, move on to less urgent tasks, such as cosmetic improvements and upgrades.
Be realistic about your abilities and the amount of time you can dedicate to the project. Restoring a sailboat can be a time-consuming and labor-intensive process, so it’s important to have a clear understanding of what you’re getting into before you begin.
The hull and deck are the foundation of your sailboat, and any issues with these components should be addressed as soon as possible. Common problems include cracks, blisters, and signs of rot or corrosion.
To repair cracks or holes in the hull or deck, you’ll need to clean the area thoroughly, remove any damaged material, and fill the void with an appropriate filler or epoxy. Once the repair has cured, sand the area smooth and apply a protective coating, such as paint or gelcoat.
For more extensive repairs, such as replacing large sections of the hull or deck, it may be necessary to consult with a professional boatyard or shipwright. They can provide guidance on the best materials and techniques for your specific boat and ensure that the repairs are done correctly.
Restoring the interior of your sailboat can be a rewarding process, as it allows you to create a comfortable and personalized space for you and your family. Start by assessing the condition of the interior, including the cabinetry, upholstery, and flooring.
If the cabinetry is in good condition, you may be able to simply refinish or paint the surfaces to give them a fresh look. If the cabinets are damaged or outdated, consider replacing them with new, custom-built units that meet your needs and preferences.
Upholstery can be cleaned or replaced, depending on its condition and your personal taste. New cushions, curtains, and other soft furnishings can make a big difference in the overall appearance and comfort of the interior.
Flooring options for sailboats include marine-grade carpet, vinyl, or teak. Choose a material that is durable, easy to clean, and complements the overall aesthetic of the boat.
The rigging and sails are essential components of your sailboat, and their condition will have a significant impact on the boat’s performance and safety. Inspect the rigging for signs of wear or damage, such as frayed lines, corroded fittings, or bent or cracked hardware. Replace any components that are in poor condition or no longer meet safety standards.
Sails should be inspected for tears, fraying, or signs of UV damage. Small repairs can often be made with sail tape or by sewing, but larger issues may require professional repair or replacement. Consider upgrading to modern sail materials and designs for improved performance and durability.
The electrical and plumbing systems on a classic sailboat may require updating or replacement to meet modern standards and ensure safety and reliability. Inspect the wiring, switches, and electrical components for signs of wear or damage, and replace any outdated or faulty parts.
Plumbing systems should be checked for leaks, corrosion, or other issues. Replace any damaged hoses, fittings, or fixtures, and consider upgrading to modern materials and designs for improved performance and ease of maintenance.
The engine and propulsion system are critical to the performance and safety of your sailboat. Inspect the engine for signs of wear or damage, and perform any necessary maintenance or repairs. This may include changing the oil and filters, replacing belts or hoses, or overhauling the entire engine.
The propeller and shaft should also be inspected for signs of wear or damage, and any issues should be addressed promptly. Consider upgrading to a modern, efficient propulsion system for improved performance and fuel efficiency.
With the major restoration work complete, it’s time to add the final touches that make your sailboat truly your own. This may include installing new electronics and navigation equipment, adding custom artwork or graphics, or outfitting the boat with personalized accessories and gear.
Take the time to celebrate your hard work and enjoy the fruits of your labor. Your restored classic sailboat is now ready for new adventures and memories with your family.
Restoring a classic sailboat is a challenging but rewarding endeavor that can provide you and your family with a unique and personalized vessel for exploring the open sea. By carefully assessing the condition of the boat, creating a detailed restoration plan, and tackling the project one step at a time, you can breathe new life into a once-neglected boat and create a lasting legacy for future generations.
- Forums New posts Unanswered threads Register Top Posts Email
- What's new New posts New Posts (legacy) Latest activity New media
- Media New media New comments
- Boat Info Downloads Weekly Quiz Topic FAQ 10000boatnames.com
- Classifieds Sell Your Boat Used Gear for Sale
- Parts General Marine Parts Hunter Beneteau Catalina MacGregor Oday
- Help Terms of Use Monday Mail Subscribe Monday Mail Unsubscribe
Interior Wood Refinishing
- Thread starter npaulay
- Start date Apr 14, 2020
- Forums for All Owners
- Ask All Sailors

Hello, I'm working on restoring my fathers sailboat and one of the first projects is cleaning the inside up. It's in rough condition at the moment. The wood paneling has started to peel back (See attached photos). I'm hoping to be able to sand it down and clean it up with some type of wood oil. Does anyone have any experience doing a project like this? I'm hoping to not have to replace much wood if possible. The door to the head and a fold up table are already in need of being rebuilt. See attached google drive folder for photos. Sailboat Interior - Google Drive Thanks!

carefully remove the panels and use for patterns to make new there is no saving those panels they are saturated and are delaminating. The glassed in ones that hold the chain plates are sealed but I would drill a small test hole to see if the wood inside is wet. If it is you will need to cut it out, grind back the inside of the hull and glass new pieces in. In short it needs a complete gut and total rebuild and it is a lot of work.

Rich Stidger
You are correct- the interior is in very rough shape. I think it is beyond saving with sanding and refinishing. If this boat is very important to you, then I would consider gutting the interior and rebuilding with all the proper materials and techniques. I suspect that this is a 1960-70's vintage boat, and with the interior in this condition, I would expect that the exterior, sails, engine, and essentially all equipment will need extensive work or replacement. This project is nothing that I would attempt. Sorry I can't be more positive about your project. Good luck.

npaulay You should go to the You Tube video series called "Sail Life". It's produced by a Danish IT pro who decided to become a one man boat re-builder, on TWO boats. He speaks perfect English and has a wry sense of humor. He's in the middle of his second iteration of the interior rebuild on boat 2, so you should go back several episodes to the gutting/planning phase to start your education. He has done hull and deck rebuilds as well. He posts every Sunday evening EDT.

Timm R Oday25
I had a bulkhead on our boat that the chainplate had enlongated the holes .I dreaded replacing it . In the end it really wasn't nearly as bad as I had imagined. As was previously post use the old one as a template . Pay particular attention to whether or not the old one was tabbed into the hull .After I replaced the starboard one , I noticed how shabby the port one looked . Yep ,I'm replacing that one as well. Do yourself a favor and don't rush to get it done . Learn to enjoy the process and your end result will be much better . Along with redoing the wood work ,you now have the perfect opportunity to run new wires for new lights .you might as well do it now as you'll never have better access . Don't let it over whelm you . Just do a little something fairly often.
I'd try sanding....then marine varnish that sucker! Oh course it is for structural support so soggy wood needs to go. Varinsh and sanding was a quick fix for me and if and when it doesn't work, I replace it.
- This site uses cookies to help personalise content, tailor your experience and to keep you logged in if you register. By continuing to use this site, you are consenting to our use of cookies. Accept Learn more…
- New Sailboats
- Sailboats 21-30ft
- Sailboats 31-35ft
- Sailboats 36-40ft
- Sailboats Over 40ft
- Sailboats Under 21feet
- used_sailboats
- Apps and Computer Programs
- Communications
- Fishfinders
- Handheld Electronics
- Plotters MFDS Rradar
- Wind, Speed & Depth Instruments
- Anchoring Mooring
- Running Rigging
- Sails Canvas
- Standing Rigging
- Diesel Engines
- Off Grid Energy
- Cleaning Waxing
- DIY Projects
- Repair, Tools & Materials
- Spare Parts
- Tools & Gadgets
- Cabin Comfort
- Ventilation
- Footwear Apparel
- Foul Weather Gear
- Mailport & PS Advisor
- Inside Practical Sailor Blog
- Activate My Web Access
- Reset Password
- Customer Service

- Free Newsletter
Ericson 34-2 Finds Sweet Spot

How to Sell Your Boat

Cal 2-46: A Venerable Lapworth Design Brought Up to Date

Rhumb Lines: Show Highlights from Annapolis

Solar Panels: Go Rigid If You have the Space…

Leaping Into Lithium

The Importance of Sea State in Weather Planning

Do-it-yourself Electrical System Survey and Inspection

When Should We Retire Dyneema Stays and Running Rigging?

Rethinking MOB Prevention

Top-notch Wind Indicators

The Everlasting Multihull Trampoline

What Your Boat and the Baltimore Super Container Ship May Have…

Check Your Shorepower System for Hidden Dangers

DIY survey of boat solar and wind turbine systems

What’s Involved in Setting Up a Lithium Battery System?

The Scraper-only Approach to Bottom Paint Removal

Can You Recoat Dyneema?

How to Handle the Head

The Day Sailor’s First-Aid Kit

Choosing and Securing Seat Cushions

Cockpit Drains on Race Boats

Re-sealing the Seams on Waterproof Fabrics

Safer Sailing: Add Leg Loops to Your Harness

Waxing and Polishing Your Boat

Reducing Engine Room Noise

Tricks and Tips to Forming Do-it-yourself Rigging Terminals

Marine Toilet Maintenance Tips

Learning to Live with Plastic Boat Bits
- Boat Maintenance
Maintenance of Interior Teak
Nevertheless, the simplicity of finishing teak, the economy of a single variety of wood in inventory, and the ready acceptance by boat buyers, are all attractive reasons why boatbuilders use the wood for interior decor.
With resistance to weathering as its primary virtue, however, teak makes less sense for use as trim below. Nevertheless, the simplicity of finishing teak , the economy of a single variety of wood in inventory, and the ready acceptance by boat buyers, are all attractive reasons why boatbuilders use the wood for interior decor .
Typically, only the most expensive boats have interior teak that is varnished, usually with a satin-finish varnish for a “hand-rubbed” effect. Such a finish should last for years if it is not abused or allowed to get wet. Maintenance can be no more than an occasional wipe with furniture oil or polish and another coat of varnish every decade or so.
Many boatowners wonder if it would be worthwhile to varnish the oiled teak trim in a typical production boat in order to take advantage of the easiermaintenance. From the standpoint of reduced maintenance, the answer is, “probably not.” At least three coats of varnish would be required (a Hinckley, for example, has six to eight). The time required to prepare the surfaces, and to sand and varnish the trim in a 30-foot production boat, could amount to a full winter’s work. In fact, it is quite likely that the total amount of work would be more than the amount of effort required to maintain the oiled teak trim over the lifetime of the boat.
On the other hand, from the standpoint of aesthetics, a varnished interior has much to recommend it. After all, such an interior may be the best way to upgrade your boat’s interior to resemble a Hinckley or a Swan. Of course, if the wood is anything but teak, the question is moot; oak, mahogany, butternut, birch, and ash must be protected with varnish, preferably with an epoxy sealer underneath.
The quality of the interior finish varies widely among boatbuilders. Some builders leave teak rough and bare, others (curse them) rough and oiled, and still others (to their credit) make a real effort to sand the wood smooth and oil it carefully. Despite the variation, however, almost any production boat with teak below can benefit from a reasonable amount of time and energy devoted to improving the look and feel of the wood.
Preparation The key to finishing joinerwork is to start with a smooth surface, and that, of course, means sanding. Even some of the better boatbuilders sometimes deliver boats with trim that is only as smooth-or as rough-as it comes out of the planer. Others may simply have a helper give the interior trim a swipe or two withapieceof sandpaper thedaybefore theboat is delivered. Well-finished joinerwork apparently costs more in labor than can be added to the price of some boats.
Fortunately, the boatowner can often take up where the builder left off with a minimum of difficulty. Before applying oil or varnish, sand the wood in the direction of the grain with the finest sandpaper that smooths it with a reasonable amount of effort; 120-or 150-grit should be about right. Oiled wood that is rough will take coarser paper and more work, since the oil both darkens and hardens the surface of the wood.
Avoid the use of power sanders, except possibly a high-speed palm sander, in order to prevent scars and swirl marks. Finish sanding should always be done by hand with 220-or even 240-grit paper for a first-class job. Again, be careful to sand in the direction of the grain and to get into tight corners.
At this point, your investment may be such that you actually consider a varnish finish (but sleep on the notion). Preparation of the wood is more than half the work of applying an oiled finish, but this preparation is only just the first step for a varnished interior.
Varnishing Interior Trim If you do decide to varnish, give the wood a final sanding with fresh 240-grit paper (or whatever is specified on the varnish can> for an extra measure of satisfaction and smoothness. Then, give the wood at least three coats of varnish; five is better, especially in high-traffic areas.
Belowdecks, there is no need to use a marine varnish with an ultraviolet inhibitor. We suggest a good-quality polyurethane varnish such as ZipGard. We have found that polyurethane varnishes are durable, economical, easy to apply, and fast drying. A second coat can often be applied in two to three hours.
Varnish with a high gloss shows every surface irregularity, tends to hide the grain of the wood, and sometimes reflects light in an objectionable manner. For these reasons, we prefer a semi-glossor satin-finish varnish which simulates a hand-rubbed surface. The traditional method for producing a hand-rubbed finish is to first rub down the final coat with powdered pumice applied with rubbing felt and water. This is followed by rubbing with rottenstone and linseed oil applied with a soft cotton cloth. Some of the modem rubbing compounds available at your local hardware store are considerably easier to use, however. We have used Duffy’s Elbow Grease with good results. This is a Vaseline-like grease which is used with 0000 bronze wool. (The instructions call for steel wool, but tiny bits of steel wool inevitably end up rusting in a marine environment.)
Whether using pumice and rottenstone or one of the newer greases, the object of hand-rubbing is to rub out all the dust sediment, brush strokes, rough spots, and hairs. Hand rubbing produces a beautiful finish, but it is a lot of work. Try it on a small piece like a sextant box before deciding to hand-rub the entire interior. Better yet, use a satin-finish varnish.
If you choose to varnish interior wood, we suggest that you avoid the use of waxes and furniture polishes on the finish. Modern polyurethane varnishes are so hard they do not need the additional protection of wax. Moreover, wax complicates any future recoating with varnish, in that all traces must be sanded or washed off in preparation for revarnishing. With a thick enough varnish finish, only a damp cloth should be needed for routine maintenance and cleaning.
Oiling Interior Trim If inclination and inertia tell you not to varnish but rather to finish the wood with an oil or dressing, choose a top-quality furniture oil. These are usually linseed oil- or tung oil-based, both of which seal the grain of the wood and harden the surface over time. One major difference between linseed oil and tung oil is that linseed oil tends to darken more than tung oil as it oxidizes; otherwise they share essentially the same virtuous characteristics. Incidentally, we would not use any of the teak dressings (including Deks Olje) intended for on-deck use. Most are high in penetrating solvents and low in oils and are not intended to produce a smooth surface on the wood.
Wipe on the oil liberally and rub it into the wood thoroughly. Use a polyfoam brush to apply the oil and a soft terrycloth pad to rub. A small amount of turpentine added to the oil (for the first coat only) should increase penetration. All traces of excess oil should be rubbed off; rub well into corners and crevices. Let the first coat dry for a day or two and follow up with subsequent coats. No excess oil should remain on the wood surface after the rubbing is completed; it will remain sticky, collect dirt, and may stain clothes and upholstery. After a day or so, if you find that the surface feels oily, give the whole surface a final hard rub with a clean piece of terrycloth dampened with turpentine.
Treatments for exterior teak are usually only available from marine outlets, but most neighborhood hardware stores carry a number of oils that are suitable for interior trim. We have used both Min-wax “hand-rubbed” effect oil and Watco Danish Teak Oil in the “original” finish on belowdecks teak, and have found them both to produce a pleasing and long-lasting finish. Both can also be used on interior mahogany trim if it is unvarnished. Lighter oils such as Scott’s Liquid Gold produce a nice finish and are easier to apply, but do not last nearly as long. These oils are better for an occasional sprucing up, rather than an original finish. A light coat of Liquid Gold, incidentally, does wonders for the appearance of bulkheads covered with the “wood-grain” plastic laminates such as Formica.
If you want an absolutely smooth finish, let the first few coats of oil harden for a few weeks, then apply another coat of oil and rerub. This time, however, use 600-grit wet-or-dry sandpaper or fine bronze wool rather than a terrycloth pad. Use the oil instead of water with the sandpaper as a “wetting agent” and continuously wipe away the residue with a clean cloth as you work.
Since wax will not adversely affect future coats of oil the way it would with varnish, you may want to apply wax or furniture polish to an oiled surface. A good quality carnauba paste wax such as Butcher’s Wax gives the surface a glowing patina that rivals a hand-rubbed varnish finish, and protects the wood from grease and dirt.
A Few Words About Other Woods Some of the most impressive-looking modem yacht interiors use light-colored woods such as ash, butter nut, spruce, and white oak for bulkheads and cabinetry. These woods pose problems that teak does not. Specifically, they are more liable to damage and discoloration from water. As a result, they must be well finished to prevent moisture from soaking into the wood.
Ash and oak are especially sensitive to water, almost instantly turning gray where they are exposed to a combination of air and water. This gray may be bleached out, but bleaching is a frustrating job and not likely to restore the wood to its original light yellow color. From the outset, even with a brand new boat finished in one of these woods, we would add a couple of coats of varnish wherever there is a chance that the wood may get wet. These areas include the area around the companionway, the deck hatches, the galley countertop, and berth risers close to the cabin sole. Also, plan to revarnish every couple of years or whenever there are signs of moisture penetrating into the wood.
Smooth, well-finished wood is easier to keep up than wood treated with low-effort finishes. An annual wipe-down with furniture polish should be enough, but watch for worn spots and water stains that may need some special attention.
Care of a Teak And Holly Cabin Sole The combination of teak “planks” and strips of holly has become a favorite of boatbuilders for cabin soles. The combination is handsome and looks “traditional,” even if its place in traditional boatbuilding is questionable.
Most teak and holly soles are just a thin veneer on a sheet of plywood. Left unprotected, the sole won’t last long, nor can it be easily restored. The thinness of the veneer and its location inside the cabin usually precludes the use of either a liquid teak cleaner or a power sander.
Unfortunately, there is no simple way to both assure protection for the wood, and to give a secure footing when the cabin sole is wet. Varnish suitable for protection does not have good nonskid characteristics.
Faced with this dilemma, we would use a satin-finish polyurethane floor varnish with just a small amount of nonskid grit (usually pumice or finely ground sand) added in areas such as the base of the companionway and outside the head, where wetness is apt to be a problem. And then don’t ignore the wear on the sole during annual maintenance; it may need an annual touching up with varnish.
RELATED ARTICLES MORE FROM AUTHOR
What your boat and the baltimore super container ship may have in common, leave a reply cancel reply.
Log in to leave a comment
Latest Videos

40-Footer Boat Tours – With Some Big Surprises! | Boat Tour

Electrical Do’s and Don’ts

Bahamas Travel Advisory: Cause for Concern?

Island Packet 370: What You Should Know | Boat Review
- Privacy Policy
- Do Not Sell My Personal Information
- Online Account Activation
- Privacy Manager
- 2024 BOAT BUYERS GUIDE
- Email Newsletters
- Boat of the Year
- 2024 Freshwater Boat and Gear Buyers Guide
- 2024 Boat Buyers Guide
- 2024 Water Sports Boat Buyers Guide
- 2023 Pontoon Boat Buyers Guide
- Cruising Boats
- Pontoon Boats
- Fishing Boats
- Personal Watercraft
- Water Sports
- Boat Walkthroughs
- What To Look For
- Best Marine Electronics & Technology
- Watersports Favorites Spring 2022
- Boating Lab
- Boating Safety
Easy Tips for Boat Restoration
- By Heather Steinberger
- Updated: February 10, 2020

If you’ve got an aging or damaged boat that has sentimental value, you might be ready to tackle a restoration project. Here are 11 tips to keep in mind when restoring an older boat.
1. Take an inventory of your tools, and then roll up your sleeves and start. It’s that simple.
2. Clean the boat from stem to stern so you can see exactly what you have to work with.
3. Remove all the water, leaves and debris from the boat. Organic material is your enemy.
4. Identify what’s broken. Seat bases? Fiberglass components? The steering system? Will you need fiberglass boat restoration?
5. Remove the old fuel from the fuel tank, as well as the old oil from the engine and gear case.
6. Remove the old belts and hoses on the engine and replace them with new ones.
7. Check the through-hull fittings to make sure they are still properly sealed. Also check the seacocks to make sure they are in working order. Replace any broken ones.
8. Look for cracking and crazing in the fiberglass around fixtures and fittings, such as cleats. Make sure load-bearing fixtures have a proper backing plate.
9. Old boats may have lots of rotting wood. Check the deck floor, seat bases and especially the transom for sagging, rot or decay. Strip old wood out of the boat and replace it with marine-grade plywood or a modern cored composite.
10. Go to YouTube and find at least three step-by-step DIY videos that say the same thing. These guys might not be “experts,” but they at least have experience.
11. Have a specific job in mind? Check out all of our content dedicated to DIY projects.
Boat refurbishing and boat restoration can be much more complicated than the tips above, but the checklist will allow you to work on basic exterior and boat interior restoration.
- More: diy projects , How-To , Used Boats
More How To

Eight Tips for Waxing Your Boat

What to Do if Your Boat’s Engine Dies

I Learned About Boating From This: Capsize, Rescue and Lessons Learned

Should You Abandon Ship During a Boat Fire?

Boat Test: 2024 Bayliner Trophy T23 Pilothouse

Boat Test: 2024 Nuova Jolly Prince 33 CC

ProTournament Elite Gen 3 Chargers
- Digital Edition
- Customer Service
- Privacy Policy
- Cruising World
- Sailing World
- Salt Water Sportsman
- Sport Fishing
- Wakeboarding
Many products featured on this site were editorially chosen. Boating may receive financial compensation for products purchased through this site.
Copyright © 2024 Boating Firecrown . All rights reserved. Reproduction in whole or in part without permission is prohibited.

- Boat Accessories
- Where to Buy

Special until March 31st: 40% off Teak Deck Sealant for the month of March. Use Code MAR24 at checkout. *restrictions apply
Free ground shipping in the Continental US for any orders over $150!
Refinishing A Fiberglass Boat...
Refinishing a fiberglass boat.

Few things on your boat will give it that original luster quite like the quality of its fiberglass. Yet this material can be tricky to deal with. There’s paint to consider, and then there’s the gel coat. It’s more than just a material you need to clean every so often. That’s why we’ve put together a brief guide on what you’ll need to know when refinishing a fiberglass boat.
Repaint Or Refinish?
It might not sound like such an important distinction at first, but the question gets to the heart of just how much work you plan to do with your fiberglass. Refinishing a gel coat, for instance, can be relatively pain-free if you have experience and the right tools at your disposal. Going underneath the gel coat for a full repainting is a highly involved DIY project that can sometimes require the assistance of a professional.
To restore your boat’s luster, it may be possible to get away with a refinish. But keep in mind for older boats, a repainting might be in order as well.
Tips For Dealing With Fiberglass

Liquid LifeSeal® Sealant 5.2 fl. oz. Clear

Stainless Steel Cleaner 16 fl. oz.
Related blogs, thanksgiving trivia.
Thanksgiving is one of America’s oldest and most loved holidays. Even though the story is steeped in a dark history […]
Detailing Your Boat
There’s nothing better than hitting the water in a beautiful boat. A warm summer day with the sun shining, there’s […]
How To Properly Clean Your Boat Trailer
We all know that cleaning your boat is important to not only keep it looking great, but to also ensure […]
All products proudly made in the usa
Watch CBS News
Search resuming for 6 missing and presumed dead after Francis Scott Key Bridge collapse in Baltimore
By Brian Dakss , Kerry Breen , S. Dev
Updated on: March 27, 2024 / 5:42 AM EDT / CBS News
The search was to resume Wednesday morning for six people missing and presumed dead in the wake of the collapse of the Francis Scott Key Bridge in Baltimore. It crumbled early Tuesday after a support column was hit by a large container ship that had lost power, sending people and vehicles into the Patapsco River, authorities said.
Two people were rescued from the water Tuesday.
All eight people were part of a construction crew that was filling potholes on the bridge at the time, Rear Admiral Shannon Gilreath of the U.S. Coast Guard said at a news conference Tuesday evening. Jennifer Homendy, the chair of the National Transportation Security Board, said Tuesday afternoon that the workers were employed by a local company, Brawner Builders.
One of the rescued workers was unhurt. The other was treated at the University of Maryland Medical Center and has been discharged, CBS News Baltimore reported.
Search and rescue operations were suspended at 7:30 p.m. ET as officials transitioned to recovery efforts.
"Based on the length of time that we've gone in this search, the extensive search efforts that we've put into it, the water temperature — that at this point we do not believe that we're going to find any of these individuals still alive," Gilreath said.
Col. Roland Butler Jr., with Maryland State Police, said conditions in the water, including changing currents, low visibility and sharp metal objects, made it dangerous for divers and first responders.
Divers were to begin recovery operations at 6 a.m. ET Wednesday, Butler Jr. said, adding that officials didn't know where the victims are located.
The nonprofit organization CASA identified one of the missing workers as Miguel Luna, from El Salvador. "He is a husband, a father of three, and has called Maryland his home for over 19 years," CASA executive director Gustavo Torres said in a statement Tuesday night.
Guatemala's Ministry of Foreign Affairs said two of the missing workers were from that country. One was 26 years old and the other was 35 years old, according to the ministry. The state's consul general was on site assisting the affected families.
Honduras' Deputy Foreign Affairs Minister Antonio García told The Associated Press a Honduran citizen, Maynor Yassir Suazo Sandoval, was missing. García said he'd been in contact with Suazo's family.
The Mexican Embassy in Washington said there were Mexicans among the six as well.
Maryland Gov. Wes Moore said at an earlier news conference Tuesday afternoon, "There is not a single resource we will hold off on deploying ... to make sure that this search and rescue operation is carried out to its fullest intent."
"Our hearts are with the families and loved ones of the victims," Moore said in a Tuesday evening statement after the rescue efforts were called off. "We will continue to work in partnership with leaders at the local, state, and federal levels to ensure that we can provide all those affected with the closure they deserve."

Maryland Democratic Rep. David Trone told CBS News recovery efforts will likely be conducted with underwater drones. He said the drones will be able to locate the vehicles and that authorities have identified one in particular that likely has casualties.
Jeffrey Pritzker, executive vice president of Brawner Builders, told The Associated Press the construction crew was working in the middle of the bridge's span when the crash happened.
"This was so completely unforeseen," Pritzker said. "We don't know what else to say."
"We take such great pride in safety, and we have cones and signs and lights and barriers and flaggers," he added. "But we never foresaw that the bridge would collapse."
Moore declared a state of emergency shortly after the collapse, saying in a statement that "we are working with an interagency team to quickly deploy federal resources from the Biden Administration. We are thankful for the brave men and women who are carrying out efforts to rescue those involved and pray for everyone's safety."
The ship — the Singapore-flagged Dali — was operated by charter vessel company Synergy Marine Group and was chartered by Maersk, carrying Maersk customers' cargo, the companies said.
There were 22 crew members, including two pilots, aboard the ship, according to a statement from Synergy. All 22 are Indian nationals. Synergy said it had activated its incident response team and is cooperating with state and federal officials. Homendy said the NTSB is communicating with Singaporean officials as part of their investigation.
Wiedefeld said that FBI was on the scene "to see if there was any terrorism connection, which there is not."
William DelBagno, the special agent in charge of the FBI's Baltimore field office, said at a subsequent news conference that "there is no specific or credible information to suggest that there are ties to terrorism in this incident."
An FBI official told CBS News FBI dive teams had joined in the search for the missing and that the FBI underwater search and evidence response team was in the water. The FBI has also sent a victim specialist to assist families impacted by the incident.
The NTSB said Tuesday morning that it had dispatched a 24-person team to investigate the incident. At the time, the team was waiting to board the ship to enable search and rescue operations to continue, and it hoped to access recordings from the ship Tuesday night or Wednesday, Homendy said.
The U.S. Army Corps of Engineers, Baltimore District, said it would provide some 1,100 specialists to help in the recovery.
"In accordance with USACE's federal authorities, USACE will lead the effort to clear the Federal channel as part of the larger interagency recovery effort," the USACE said. "Together with local, state, and federal partners, they are working closely to determine the key actions required to remove the fallen bridge."
Ship had a "power issue" before the collision
Officials have confirmed that the ship lost power right before the collision. Moore said the crew notified authorities of a "power issue."
Two U.S. officials told CBS News multiple alarms rang out on the ship, alerting pilots and crew to an issue on board. The crew ran several system tests to attempt to remedy the loss of propulsion from the motor, but the tests proved unsuccessful. At that point, the pilot alerted the Maryland Department of Transportation and the Maryland Transit Authority.
Roughly two minutes elapsed between when the ship's pilot notified state authorities of an issue on board and when the bridge collapsed, Baltimore County Executive John Olszewski said.
Officials said in a news conference that the call allowed officials to order a mayday and stop traffic onto the bridge.
Moore said that the decision to stop traffic onto the bridge "saved lives last night." Baltimore Mayor Brandon Scott told CBS News the mayday call "saved many lives" and allowed emergency personnel to get to the scene quickly.
Officials did not clarify how many vehicles were on the bridge at the time of the collapse. Infrared video showed that vehicles did enter the water, but it's not clear if those vehicles had occupants. Multiple vehicles remained in the river as of mid-morning.
Homendy said it was too early in the investigation to clarify an exact timeline of events for the accident.
The ship's crew made an effort to deploy the anchor, though it remains unclear how much progress was made, multiple officials said.
"If it lost steering and power, then basically it's a dead ship just being carried by the current or its own momentum," James Mercante, the president of the New York Board of Pilot Commissioners, told CBS News.
He said video shows a "big, big puff of black, real dark black smoke" which might indicate that the vessel's power was "restored at the last minute" and that the pilot was "attempting to make an emergency maneuver" to prevent the collision. However, it would be difficult to stop the 900-foot-long vessel.
"It would take quite a while — probably the length of five [or] six football fields — to bring that ship to a stop, even after dropping the anchors, because of its power and momentum. This is a behemoth," Mercante said.
"An unthinkable tragedy"
The Baltimore mayor headed to the scene and told reporters at a morning briefing that the collapse was "an unthinkable tragedy."
"We have to first and foremost pray for all of those who are impacted, those families, pray for our first responders and thank them," Scott said.

A witness told CBS News Baltimore the sound of the collapse was massive, shaking his home.
"Earthquake — sounded like a big bash of thunder," the resident said. "And then just like I said it felt like an earthquake, the whole house vibrated. Like my house was falling down."
The man said he never thought in his "wildest dreams" he would see something like this happen.

Shipping in and out of the Port of Baltimore has been halted. Moore said that it was too early to estimate how long it would take to rebuild the bridge or for shipping to resume.
"Our exclusive focus is on saving lives. Our exclusive focus is on search and rescue," he said.
Location of the Key Bridge in Baltimore
The Francis Scott Key Bridge spans the Patapsco River, a key waterway that serves with the Port of Baltimore as a hub for East Coast shipping.

CBS News Baltimore reports that the 1.6-mile span was used by some 31,000 people per day and carried 11.5 million vehicles annually.
The Maryland Transportation Authority said all lanes were closed in both directions on I-695. Traffic was being detoured to I-95 and I-895.
All ship traffic at the port, the second-largest seaport in the mid-Atlantic region, has been halted. According to Census data, the Port of Baltimore handled more than $80 billion in imports and exports in 2023, marking a 20-year record.
The Baltimore Sun reports that the port is going to lose some $15 million per day in economic activity due to its closure. The newspaper cites Daraius Irani, chief economist at the Regional Economic Studies Institute at Towson University, as coming up with that estimate.
According to a CBS News report , the port directly supports 15,300 jobs, while another 140,000 in the area are related to port activities. The jobs provide a combined $3.3 billion in personal income.
The bridge, which opened in 1977, is named after the writer of "The Star-Spangled Banner."
U.S. Transportation Secretary Pete Buttigieg said on social media that he's "spoken with Gov. Moore and Mayor Scott to offer USDOT's support following the vessel strike and collapse of the Francis Scott Key bridge. Rescue efforts remain underway and drivers in the Baltimore area should follow local responder guidance on detours and response."
—Pat Milton, Nicole Sganga and other CBS News and CBS News Baltimore staff members contributed reporting.
More from CBS News

What caused ship to slam into Baltimore's Key Bridge? What we know

A timeline of the Francis Scott Key Bridge collapse

Maps and video show site of bridge collapse in Baltimore

What to know about the Key Bridge collapse in Baltimore
Here's who could be responsible for paying for the Baltimore bridge disaster
- The Francis Scott Key Bridge in Baltimore collapsed after a container ship collided with it.
- Several entities could be on the hook to foot the bill in the aftermath of the disaster.
- The maritime insurance industry will likely be saddled with the highest costs.
The Francis Scott Key Bridge in Baltimore collapsed on Tuesday after a large container ship ran into it, leading to six presumed deaths and millions of dollars in possible damage.
It's still too early to estimate the total economic impact of the disaster, but between the cost of rebuilding the decades-old bridge, compensating the victims' families , and paying out damages for disruptions to the supply chain, the eventual cost of the disaster is expected to be significant.
Who will pay to rebuild the bridge?
President Joe Biden said on Tuesday the federal government should be responsible for paying to reconstruct the damaged Francis Scott Key Bridge.
"It is my intention that the federal government will pay for the entire cost of reconstructing that bridge, and I expect Congress to support my effort," Biden said.
The bridge was built in the 1970s for about $60 million, but the cost of rebuilding it could be 10 times its original price tag, an engineering expert told Sky News.
Baltimore is among the busiest ports in the nation , with more than a million shipping containers passing through each year. The collapse — which closed the port to all maritime and most road traffic until further notice — is already beginning to wreak havoc on the supply chain.
The cost of building the bridge back fast enough to offset diversions as much as possible could saddle the government with a more than $600 million bill, David MacKenzie, the chair of the engineering and architecture consultancy COWIfonden, told Sky News.
Who will pay for damages to the ship and its cargo?
The container ship, the Dali , is owned by a Singapore-based firm. The ship's charterer, Maersk, confirmed to Business Insider that vessel company Synergy Group operates the ship.
However, the companies with cargo aboard the Dali could ultimately be responsible for some of the ship's damages and cargo costs, according to Ryan Petersen , the CEO of the supply-chain-logistics company Flexport, which had two containers on the ship.
Related stories
The Dali was carrying 330 containers that must now be rerouted, Petersen said in an X thread.
An ancient maritime law known as " general average " dictates that companies with even a single container aboard a ship split certain damages pro rata based on the number of containers they had on board, ensuring all the stakeholders benefiting from the voyage are splitting the risk, Petersen said.
General average situations can occur when a ship is stranded or when cargo is damaged or thrown overboard to save the vessel, according to Flexport . The concept helps ensure that all parties who have a vested interest in the vessel share the cost and concern of protecting it.
It's too soon to know whether damages incurred to free the Dali in the coming days will qualify as a case of general average.
Who will pay for everything else?
The majority of the financial fallout is likely to lay primarily with the insurance industry, according to media reports.
Industry experts told the Financial Times that insurers could pay out losses for bridge damage, port disruption, and any loss of life.
The collapse could drive "one of the largest claims ever to hit the marine (re)insurance market," John Miklus, the president of the American Institute of Marine Underwriters, told Insurance Business.
He told the outlet that the loss of revenue from tolls while the bridge is being rebuilt will be expensive, as will any liability claims from deaths or injuries.
The Dali is covered by the Britannia Steam Ship Insurance Association Ltd., known as Britannia P&I Club, according to S&P Global Market Intelligence.
In a statement to Business Insider, Britannia said it was "working closely with the ship manager and relevant authorities to establish the facts and to help ensure that this situation is dealt with quickly and professionally."
Britannia is one of 12 mutual insurers included in the International Group of P&I Clubs, which maintains more than $3 billion of reinsurance cover, sources familiar with the matter told Insurance Business.
Britannia itself is liable for the first $10 million in damages, both FT and Insurance Business reported. Whatever remains is dealt with by the wider mutual insurance group and Lloyd's of London, a reinsurance market in the UK, the FT reported.
Update: March 28, 2024 — This story has been updated to include additional information about general average and clarify that it is too soon to know whether general average will apply in the case of the Dali.
Watch: The container ship that destroyed the Francis Scott Key Bridge has crashed before
- Main content
Why the Baltimore bridge stood little chance against a fully loaded cargo ship
As questions surround the collapse of a Baltimore bridge after a containership crashed into it Tuesday, engineering experts say that while bridges have some built-in defenses against collisions, this one was most likely too extreme to withstand.
“Bridges are and should be designed to withstand ship impacts. That’s typical of the design process,” said Sanjay R. Arwade, a professor of civil engineering at the University of Massachusetts Amherst.
“But for all structures and all engineered systems, there is a possibility that an event will occur that is beyond what the structure was designed for. And this may be one of those situations,” he added.
The Francis Scott Key Bridge, a roughly 1.5-mile-long steel arch truss bridge, collapsed into the Patapsco River early Tuesday after a containership struck it. Several vehicles crashed into the water, and one of the country’s busiest ports shut down.
Follow live updates on the Baltimore bridge collapse
An unknown number of workers with Brawner Builders Inc. were repairing concrete ducts when the ship, called the Dali, hit a support pillar. Six employees are presumed dead .
Key Bridge was ‘fairly unprotected'
Arwade said design codes for modern bridges stipulate "what sort of loads it has to be able to resist.”
“Whenever a design code is written, decisions have to be made about what the most extreme conditions are,” he said.
Maryland Gov. Wes Moore said the bridge was "fully up to code."
But the Key Bridge was built in 1977, and bridge design and technology have improved since then.
"Since the 1970s, we have a lot of advancements," Sameh Badie, a professor of engineering at George Washington University, told NBC Washington. But he said, "I saw today a couple of videos before the collapse, and it seems to me, structurally wise, it was very safe."
Roberto Leon, a structural engineer at Virginia Tech, said that while engineers try to account for “extreme events” during the design and construction process, “when this bridge was built, there were no ships of this size.”
“This type of load was not really considered,” he said. “So the bridge was, I would say, fairly unprotected.”
Retrofitting older bridges could cost millions
Officials have not specified what type of protective infrastructure, if any, the Key Bridge had.
Leon said that on a newer bridge, large concrete structures called dolphins are often used to protect the base. Dolphins can form a kind of frame and are designed to take the impact of a vessel and “slow the ship down and redirect it away from the bridge,” he said.
“In some cases, they’re called sacrificial elements, because they might be damaged beyond repair if an event of this type occurs, but of course, they save the bridge,” he added.
John Pistorino, a structural engineer in Florida, said dolphins are in use to protect the Sunshine Skyway Bridge in Tampa, Florida, which was reopened in 1987 , seven years after it was hit by a freighter. Thirty-five people died after the bridge collapsed into Tampa Bay.
Pistorino, who was involved in the construction of the rebuilt Sunshine Skyway Bridge, described dolphins as walls or guardrails.
“They can be concrete or steel … and they go all the way down to the bottom of the river,” he said. “They’re supposed to protect the abutments.”
Jacksonville, Florida, Mayor Donna Deegan cited the dolphin infrastructure that's in place to protect the Dames Point Bridge — the only bridge in the city that cargo ships sail under — in a statement Tuesday. She noted that the bridge is also equipped with specialty sensors that provide real-time information about the distance between the water surface and the bottom of the bridge structure over the main channel.
Older and more vulnerable bridges can be retrofitted to add defensive infrastructure like dolphins, Leon said, but building them can cost hundreds of millions of dollars.
“I’m hoping that because of the infrastructure bill that passed, we are going to be able to do projects like this,” he said, referring to the $555 billion infrastructure bill that President Joe Biden signed in 2021. “Putting those into the budget and justifying them is very difficult when you have all kinds of other bridges that are in really sad shape. So it’s just a question of prioritization.”
However, Kevin Heaslip, director of the Center for Transportation Research and a professor of civil and environmental engineering at the University of Tennessee, Knoxville, said the cost of designing bridges to withstand fully loaded cargo ships like the Dali would “be so high that we wouldn’t be able to have any bridges.”

Government oversight of bridges could increase
Transportation Secretary Pete Buttigieg said he has been monitoring the situation in Baltimore. A team of investigators from the National Transportation Safety Board has been sent to the crash site.
Leon said he hopes what happened in Baltimore will cause port operations to change “quite a bit.” Pistorino said the event may lead legislators to take a closer look at vulnerable bridges in the country and the types of maritime traffic in ports.
“Just like the building collapse in South Florida created a lot of legislation that required a more intimate type of building scrutiny, I think that will happen on the bridges,” he said.
Minyvonne Burke is a senior breaking news reporter for NBC News.
- Popular Professionals
- Design & Planning
- Construction & Renovation
- Finishes & Fixtures
- Landscaping & Outdoor
- Systems & Appliances
- Interior Designers & Decorators
- Architects & Building Designers
- Design-Build Firms
- Kitchen & Bathroom Designers
- General Contractors
- Kitchen & Bathroom Remodelers
- Home Builders
- Roofing & Gutters
- Cabinets & Cabinetry
- Tile & Stone
- Hardwood Flooring Dealers
- Landscape Contractors
- Landscape Architects & Landscape Designers
- Home Stagers
- Swimming Pool Builders
- Lighting Designers and Suppliers
- 3D Rendering
- Sustainable Design
- Basement Design
- Architectural Design
- Universal Design
- Energy-Efficient Homes
- Multigenerational Homes
- House Plans
- Home Remodeling
- Home Additions
- Green Building
- Garage Building
- New Home Construction
- Basement Remodeling
- Stair & Railing Contractors
- Cabinetry & Cabinet Makers
- Roofing & Gutter Contractors
- Window Contractors
- Exterior & Siding Contractors
- Carpet Contractors
- Carpet Installation
- Flooring Contractors
- Wood Floor Refinishing
- Tile Installation
- Custom Countertops
- Quartz Countertops
- Cabinet Refinishing
- Custom Bathroom Vanities
- Finish Carpentry
- Cabinet Repair
- Custom Windows
- Window Treatment Services
- Window Repair
- Fireplace Contractors
- Paint & Wall Covering Dealers
- Door Contractors
- Glass & Shower Door Contractors
- Landscape Construction
- Land Clearing
- Garden & Landscape Supplies
- Deck & Patio Builders
- Deck Repair
- Patio Design
- Stone, Pavers, & Concrete
- Paver Installation
- Driveway & Paving Contractors
- Driveway Repair
- Asphalt Paving
- Garage Door Repair
- Fence Contractors
- Fence Installation
- Gate Repair
- Pergola Construction
- Spa & Pool Maintenance
- Swimming Pool Contractors
- Hot Tub Installation
- HVAC Contractors
- Electricians
- Appliance Services
- Solar Energy Contractors
- Outdoor Lighting Installation
- Landscape Lighting Installation
- Outdoor Lighting & Audio/Visual Specialists
- Home Theater & Home Automation Services
- Handyman Services
- Closet Designers
- Professional Organizers
- Furniture & Accessories Retailers
- Furniture Repair & Upholstery Services
- Specialty Contractors
- Color Consulting
- Wine Cellar Designers & Builders
- Home Inspection
- Custom Artists
- Columbus, OH Painters
- New York City, NY Landscapers
- San Diego, CA Bathroom Remodelers
- Minneapolis, MN Architects
- Portland, OR Tile Installers
- Kansas City, MO Flooring Contractors
- Denver, CO Countertop Installers
- San Francisco, CA New Home Builders
- Rugs & Decor
- Home Improvement
- Kitchen & Tabletop
- Bathroom Vanities
- Bathroom Vanity Lighting
- Bathroom Mirrors
- Bathroom Fixtures
- Nightstands & Bedside Tables
- Kitchen & Dining
- Bar Stools & Counter Stools
- Dining Chairs
- Dining Tables
- Buffets and Sideboards
- Kitchen Fixtures
- Wall Mirrors
- Living Room
- Armchairs & Accent Chairs
- Coffee & Accent Tables
- Sofas & Sectionals
- Media Storage
- Patio & Outdoor Furniture
- Outdoor Lighting
- Ceiling Lighting
- Chandeliers
- Pendant Lighting
- Wall Sconces
- Desks & Hutches
- Office Chairs
- View All Products
- Side & End Tables
- Console Tables
- Living Room Sets
- Chaise Lounges
- Ottomans & Poufs
- Bedroom Furniture
- Nightstands
- Bedroom Sets
- Dining Room Sets
- Sideboards & Buffets
- File Cabinets
- Room Dividers
- Furniture Sale
- Trending in Furniture
- View All Furniture
- Bath Vanities
- Single Vanities
- Double Vanities
- Small Vanities
- Transitional Vanities
- Modern Vanities
- Houzz Curated Vanities
- Best Selling Vanities
- Bathroom Vanity Mirrors
- Medicine Cabinets
- Bathroom Faucets
- Bathroom Sinks
- Shower Doors
- Showerheads & Body Sprays
- Bathroom Accessories
- Bathroom Storage
- Trending in Bath
- View All Bath
- Designer Picks
- Houzz x Jennifer Kizzee
- Houzz x Motivo Home
- How to Choose a Bathroom Vanity

- Patio Furniture
- Outdoor Dining Furniture
- Outdoor Lounge Furniture
- Outdoor Chairs
- Adirondack Chairs
- Outdoor Bar Furniture
- Outdoor Benches
- Wall Lights & Sconces
- Outdoor Flush-Mounts
- Landscape Lighting
- Outdoor Flood & Spot Lights
- Outdoor Decor
- Outdoor Rugs
- Outdoor Cushions & Pillows
- Patio Umbrellas
- Lawn & Garden
- Garden Statues & Yard Art
- Planters & Pots
- Outdoor Sale
- Trending in Outdoor
- View All Outdoor
- 8 x 10 Rugs
- 9 x 12 Rugs
- Hall & Stair Runners
- Home Decor & Accents
- Pillows & Throws
- Decorative Storage
- Faux Florals
- Wall Panels
- Window Treatments
- Curtain Rods
- Blackout Curtains
- Blinds & Shades
- Rugs & Decor Sale
- Trending in Rugs & Decor
- View All Rugs & Decor
- Pendant Lights
- Flush-Mounts
- Ceiling Fans
- Track Lighting
- Wall Lighting
- Swing Arm Wall Lights
- Display Lighting
- Table Lamps
- Floor Lamps
- Lamp Shades
- Lighting Sale
- Trending in Lighting
- View All Lighting
- Bathroom Remodel
- Kitchen Remodel
- Kitchen Faucets
- Kitchen Sinks
- Major Kitchen Appliances
- Cabinet Hardware
- Backsplash Tile
- Mosaic Tile
- Wall & Floor Tile
- Accent, Trim & Border Tile
- Whole House Remodel
- Heating & Cooling
- Building Materials
- Front Doors
- Interior Doors
- Home Improvement Sale
- Trending in Home Improvement
- View All Home Improvement
- Cups & Glassware
- Kitchen & Table Linens
- Kitchen Storage and Org
- Kitchen Islands & Carts
- Food Containers & Canisters
- Pantry & Cabinet Organizers
- Kitchen Appliances
- Gas & Electric Ranges
- Range Hoods & Vents
- Beer & Wine Refrigerators
- Small Kitchen Appliances
- Cookware & Bakeware
- Tools & Gadgets
- Kitchen & Tabletop Sale
- Trending in Kitchen & Tabletop
- View All Kitchen & Tabletop
- Storage & Organization
- Baby & Kids

- View all photos
- Dining Room
- Breakfast Nook
- Family Room
- Bed & Bath
- Powder Room
- Storage & Closet
- Outdoor Kitchen
- Bar & Wine
- Wine Cellar
- Home Office
- Popular Design Ideas
- Kitchen Backsplash
- Deck Railing
- Privacy Fence
- Small Closet
- Stories and Guides
- Popular Stories
- Renovation Cost Guides
- Fence Installation Cost Guide
- Window Installation Cost Guide
- Discussions
- Design Dilemmas
- Before & After
- Houzz Research
- View all pros
- View all services
- View all products
- View all sales
- Living Room Chairs
- Dining Room Furniture
- Coffee Tables
- Home Office Furniture
- Join as a Pro
- Interior Design Software
- Project Management
- Custom Website
- Lead Generation
- Invoicing & Billing
- Landscape Contractor Software
- General Contractor Software
- Remodeler Software
- Builder Software
- Roofer Software
- Architect Software
- Takeoff Software
- Lumber & Framing Takeoffs
- Steel Takeoffs
- Concrete Takeoffs
- Drywall Takeoffs
- Insulation Takeoffs
- Stories & Guides
- LATEST FROM HOUZZ
- HOUZZ DISCUSSIONS
- SHOP KITCHEN & DINING
- Kitchen & Dining Furniture
- Sinks & Faucets
- Kitchen Cabinets & Storage
- Knobs & Pulls
- Kitchen Knives
- KITCHEN PHOTOS
- FIND KITCHEN PROS
- Bath Accessories
- Bath Linens
- BATH PHOTOS
- FIND BATH PROS
- SHOP BEDROOM
- Beds & Headboards
- Bedroom Decor
- Closet Storage
- Bedroom Vanities
- BEDROOM PHOTOS
- Kids' Room
- FIND DESIGN PROS
- SHOP LIVING
- Fireplaces & Accessories
- LIVING PHOTOS
- SHOP OUTDOOR
- Pool & Spa
- Backyard Play
- OUTDOOR PHOTOS
- FIND LANDSCAPING PROS
- SHOP LIGHTING
- Bathroom & Vanity
- Flush Mounts
- Kitchen & Cabinet
- Outdoor Wall Lights
- Outdoor Hanging Lights
- Kids' Lighting
- Decorative Accents
- Artificial Flowers & Plants
- Decorative Objects
- Screens & Room Dividers
- Wall Shelves
- About Houzz
- Houzz Credit Cards
- Privacy & Notice
- Cookie Policy
- Your Privacy Choices
- Mobile Apps
- Copyright & Trademark
- For Professionals
- Houzz vs. Houzz Pro
- Houzz Pro vs. Ivy
- Houzz Pro Advertising Reviews
- Houzz Pro 3D Floor Planner Reviews
- Trade Program
- Buttons & Badges
- Your Orders
- Shipping & Delivery
- Return Policy
- Houzz Canada
- Review Professionals
- Suggested Professionals
- Accessibility
- Houzz Support
- COUNTRY COUNTRY
Custom Fireplace Contractors & Installers in Elektrostal'
Location (1).
- Use My Current Location
Popular Locations
- Albuquerque
- Cedar Rapids
- Grand Rapids
- Indianapolis
- Jacksonville
- Kansas City
- Little Rock
- Los Angeles
- Minneapolis
- New Orleans
- Oklahoma City
- Orange County
- Philadelphia
- Portland Maine
- Salt Lake City
- San Francisco
- San Luis Obispo
- Santa Barbara
- Washington D.C.
- Elektrostal', Moscow Oblast, Russia
Featured Reviews for Custom Fireplace Contractors & Installers in Elektrostal'
- Reach out to the pro(s) you want, then share your vision to get the ball rolling.
- Request and compare quotes, then hire the Fireplace professional that perfectly fits your project and budget limits.
- Electric Fireplace Installation
- Electric Fireplace Repair
- Fireplace Installation
- Fireplace Repair
- Gas Fireplace Installation
- Gas Fireplace Repair
- Outdoor Fireplace Construction
What should you know about buying a fireplace in Elektrostal'?
Here are some recommendations for when you’re shopping for a fireplace or fire pit:, business services, connect with us.

- Air Quality
- Aircraft Acquisition & Completions Management
- Aircraft Orders & Deliveries
- Cabin Equipment
- Certification
- Completion, Refurbishment & Maintenance
- Events & Awards
- Galleys & Catering
- Human Resources
- IFEC & CMS
- Interior Design
- Sustainability
- Dec 2023 / Jan2024
- Sept / Oct 2023
- March / April 2023
- Dec 2022 / Jan 2023
- Archive Issues
- Subscribe Free!
- Supplier Spotlight
- Browse Industry Jobs
- Post a Job – It’s FREE!
- Manage Jobs (Employers)

Jet Aviation Moscow Vnukovo gets EASA approval for Falcon 900EX EASy
Jet Aviation Moscow Vnukovo has received EASA Part-145 approval for Dassault Falcon 900EX EASy aircraft, authorizing it to provide line maintenance to the aircraft.
“Our ability to support long-range aircraft in this region is vital to our customers,” said Vitaly Aleksikov, general director at Jet Aviation Moscow Vnukovo.
May 29, 2015

Izzy has been part of the Business Jet Interiors International team since its second issue, and the editor since 2011. She also edits Auditoria and Railway Interiors International. Outside of work, Izzy is rediscovering her love of art by learning how to paint with watercolors.
Related Posts
Aloft aeroarchitects to equip private bbj with eutelsat oneweb leo connectivity, video: 7500-landing inspection at bombardier’s london biggin hill service centre, aero-dienst expands hangar space at vienna maintenance station.
Type above and press Enter to search. Press Esc to cancel.
What we know about Baltimore’s Francis Scott Key Bridge collapse
The Francis Scott Key Bridge in Baltimore collapsed early Tuesday after being hit by a cargo ship, with large parts of the bridge falling into the Patapsco River.
At least eight people fell into the water, members of a construction crew working on the bridge at the time, officials said. Two were rescued, one uninjured and one in serious condition, and two bodies were recovered on Wednesday. The remaining four are presumed dead. The workers are believed to be the only victims in the disaster.
Here’s what we know so far.
Baltimore bridge collapse
Baltimore’s Francis Scott Key Bridge collapsed after being hit by a cargo ship , sending at least eight people from a construction crew into the water. Follow live updates and see photos from the scene .
How it happened: The container ship lost power shortly before hitting the bridge, Maryland Gov. Wes Moore (D) said. Video shows the bridge collapse in under 40 seconds.
Victims: Divers recovered the bodies of two construction workers who died , while finding other vehicles trapped and probably containing the other victims, officials said. They were fathers, husbands and hard workers . The entire crew aboard the container ship Dali survived . First responders shut down most traffic on the four-lane bridge after the crew issued an urgent mayday call. It saved lives, Moore said.
Economic impact: The collapse of the bridge, which severed ocean links to the Port of Baltimore, adds a fresh headache to already struggling global supply chains . See how the collapse will disrupt the supply of cars, coal and other goods .
History: The Key Bridge was built in the 1970s and spanned the Patapsco River. Rebuilding the bridge will probably take years and cost hundreds of millions of dollars, experts said.
- Baltimore begins massive and dangerous cleanup after bridge collapse Earlier today Baltimore begins massive and dangerous cleanup after bridge collapse Earlier today
- Baltimore port workers are ‘living in a dream’ as harbor remains blocked March 28, 2024 Baltimore port workers are ‘living in a dream’ as harbor remains blocked March 28, 2024
- Rebuilding Baltimore’s Key Bridge will likely take years, experts say March 27, 2024 Rebuilding Baltimore’s Key Bridge will likely take years, experts say March 27, 2024

IMAGES
VIDEO
COMMENTS
Here are the basic steps that I follow to refinish interior teak: 1. If the wood has never been refinished or if the existing finish is in poor condition, remove it all from the sailboat so that you can work on it easier and apply the finish to all the surfaces. BEFORE - dull and dirty. 2.
CONS OF REFURBISHING OUR SAILBOAT'S INTERIOR. 1. It can be an expensive investment - The old adage of, "you get what you pay for," is especially true in the boating world! Just so you know, the full cost of refurbishing S/V Empress is going to be about twice the price we bought her for, but that's not at all unusual for a 46 year old boat ...
SEE our Project Sailboats Interior Makeover! Our Project Boat Refit and Restoration.We did many projects over the years and in this video we are going to sha...
solution deep into the wood for a restoration so strong that you can then. drill, screw, sand, and paint it. This is an essential step for anyone. refurbishing a boat interior that features wood afflicted with dry rot, which. is why we recommend it in any boat owner's refurbishing kit.
Are you good at refurbishing sailboat interior? If not, hire a company that refitting sailboat interior is their specialty. They can take that project boat and get it done right and in a timely manner. Maybe you already bought it before you priced everything out. You love it and you just had to have it.
Right up front, what most experts suggest is disarmingly simple—clean the interior wood you want to upgrade with cotton rags and a spray bottle (the 32-ounce size works well) filled with water and a couple of tablespoons of Murphy's Oil Soap. "Spray it on and then quickly wipe the surface off—you don't want water spots," says John ...
Here are a few products for you to consider if you're restoring the interior of your own boat: Boat Cleaner. Bilge Cleaner. Aluminum Cleaner. And there are more boat cleaners where that came from—just keep browsing BoatLIFE for more. Put all of these boat interior restoration tips together, and there's no reason you can't continue to ...
2. INSTALL INTERIOR BOAT LIGHTS. One of the great challenges of sailboat interior design is lighting. I've always felt that living on our sailboat is like living in a basement apartment because it is totally lacking in natural light!. One of the quickest ways to brighten things up is to install marine LED lights. The key to making LED boat lights look great, is placement.
What's on the list of interior projects? It's tempting to say "too many to list!" but - a lot of folks are asking. Here's the scoop. ... Heartbeat of the boat: we're looking forward to a lighter space. Lockers customzed to fit freediving fins! Easy grab spots for camera gear! It's great to think about making the most of the space.
The first step in restoring a classic sailboat is finding the right boat. This can be a challenging process, as there are many factors to consider, such as the size, age, and condition of the boat, as well as your budget and personal preferences. Size: Think about how much space you and your family will need, both for living and storage.
For guidance on how to proceed with replacing the upholstery, we turned to Sunbrella Horizon, which offers a broad line marine vinyl upholstery fabrics. Bill McDaniel, marine market manager for Sunbrella Horizon, offered these tips. The original upholstery in our 1977 project boat was worn and torn. In addition, the underlying plywood frame was ...
1. Wet the teak down; 2. Apply part one (the caustic), spreading and lightly scrubbing with a bristle brush; 3. When the surface is a uniform wet, muddy brown, apply the second part (the acid), spreading with a clean bristle brush; 4. Apply and spread enough of the acid to turn the teak a uniform tan; 5.
3,915. Hunter 40.5 Warwick, RI. Apr 14, 2020. #3. You are correct- the interior is in very rough shape. I think it is beyond saving with sanding and refinishing. If this boat is very important to you, then I would consider gutting the interior and rebuilding with all the proper materials and techniques.
1. Follow the instructions on the label. If you have gallon containers, it is easier and less wasteful to transfer the chemicals to quart spray bottles. 2. Starting at the highest point of your boat, thoroughly wet the surface with a hose. 3. Apply part one of the cleaner, spreading it evenly with a nylon pad.
Regular cleaning: Regular cleaning is crucial for preserving the condition of your boat's interior. Remove loose dirt and debris with a soft brush or vacuum cleaner. Use a mild soap or specialized marine cleaner and gently scrub the upholstery. Rinse thoroughly and allow it to dry completely before covering or storing.
With resistance to weathering as its primary virtue, however, teak makes less sense for use as trim below. Nevertheless, the simplicity of finishing teak, the economy of a single variety of wood in inventory, and the ready acceptance by boat buyers, are all attractive reasons why boatbuilders use the wood for interior decor.. Typically, only the most expensive boats have interior teak that is ...
Here are 11 tips to keep in mind when restoring an older boat. 1. Take an inventory of your tools, and then roll up your sleeves and start. It's that simple. 2. Clean the boat from stem to stern so you can see exactly what you have to work with. 3. Remove all the water, leaves and debris from the boat.
Contact us for a free estimate. We can consult with you about the damages and recommended solutions for restoration. Call (800) 933-2656 to schedule marine vinyl & leather repair services with us and receive a free estimate! Creative Colors International is dedicated to ensuring that your marine watercraft is well-kept and preserved!
Generally, refinishing a fiberglass boat involves replacing this gel coat to ensure that the coat looks smooth and continues to protect your fiberglass. When you clean in between refinishing sessions, it's important to use products that will not harm the gel coat. Repainting a boat is a great way to get it to look like new, but as mentioned ...
The six construction workers who were on the Key Bridge in Baltimore when it collapsed are presumed dead, authorities said Tuesday evening, ending a day-long rescue mission in cold and murky ...
The search was to resume Wednesday morning for six people missing and presumed dead in the wake of the collapse of the Francis Scott Key Bridge in Baltimore. It crumbled early Tuesday after a ...
After the Francis Scott Key Bridge's collapse, authorities now aim to recover remains of missing people presumed dead. NTSB investigators boarded the ship overnight.
The Dali was carrying 330 containers that must now be rerouted, Petersen said in an X thread. An ancient maritime law known as "general average" dictates that companies with even a single ...
Interior Designer VS Interior Decorator: Interior designers: Create functional and appealing spaces, collaborating with professionals. Manage projects from start to finish, ensuring a smooth process. Formal education in interior design, including color schemes, materials, and CAD. Handle design and decoration, offering a comprehensive approach.
Although bridges are designed to withstand impacts from ships, experts said, some events go beyond what a structure can handle.
Search 1,121 Elektrostal' new & custom home builders to find the best custom home builder for your project. See the top reviewed local custom home builders in Elektrostal', Moscow Oblast, Russia on Houzz.
Interior fireplaces and mantel designs are as varied as home interiors. From custom fireplace mantels made to conceal a flat-screen TV to custom hearth designs with elaborate Renaissance-style stone mantels, the latest designs can be found by visiting Elektrostal', Moscow Oblast, Russia fireplace showrooms.
Read The Latest Issue. 31st March 2023. In This Issue - March/April 2023
The bodies of two victims have been recovered from the waters of the Patapsco River. The bridge collapsed after being hit by a cargo ship.
When a container ship slammed into Baltimore's Francis Scott Key Bridge on Tuesday, it led to the disastrous collapse that left six people presumed dead and took out one of the region's key ...